
 Web Front-end
JS Tutorial
Detailed explanation of the steps to implement multi-form verification of vue dynamically bound components, child and parent components
Web Front-end
JS Tutorial
Detailed explanation of the steps to implement multi-form verification of vue dynamically bound components, child and parent components
Detailed explanation of the steps to implement multi-form verification of vue dynamically bound components, child and parent components
This time I will bring you the vue dynamic binding component with multiple child and parent componentsForm verificationDetailed implementation steps, the implementation of vue dynamic binding component with multiple child and parent componentsNotesWhat are they? Here are actual cases. Let’s take a look.
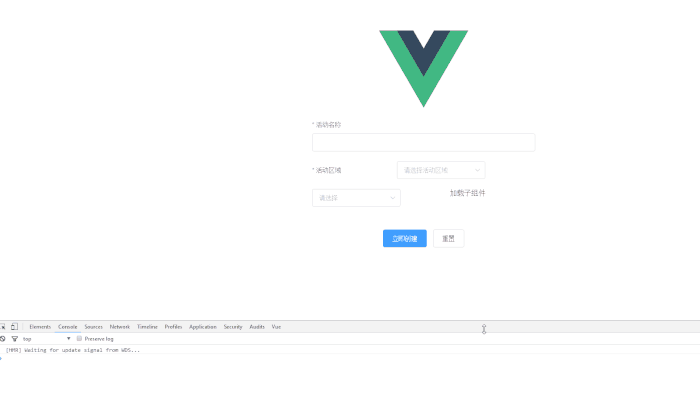
There are often drop-downs or tabs in front-end projects. If you use if, else or switch to judge the loading, a lot of redundant code and variable definitions will be generated, and they are all written in At the same time, it is difficult for future generations to maintain.
The core of Vue lies in components. If there is content that can be switched through tabs or drop-down boxes, it is best to dynamically load sub-components.
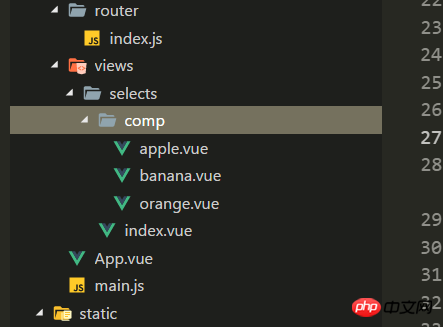
As shown in the figure: In the selects folder, index is only responsible for public data (of course public data can also be written in other files, leaving only one entry file ), while several components in the comp folder are loaded dynamically.
Dynamic loading of sub-components: component
// 给下拉框绑定下拉列表的索引
<el-select v-model="value" placeholder="请选择" style="float:left" @change="selectNum(value)">
     <el-option
         v-for="item in options"
         :key="item.value"
         :label="item.label"
         :value="item.value">
     </el-option>
</el-select>Introduce the component and place it in an array, and control the corresponding index to achieve the purpose of loading the component
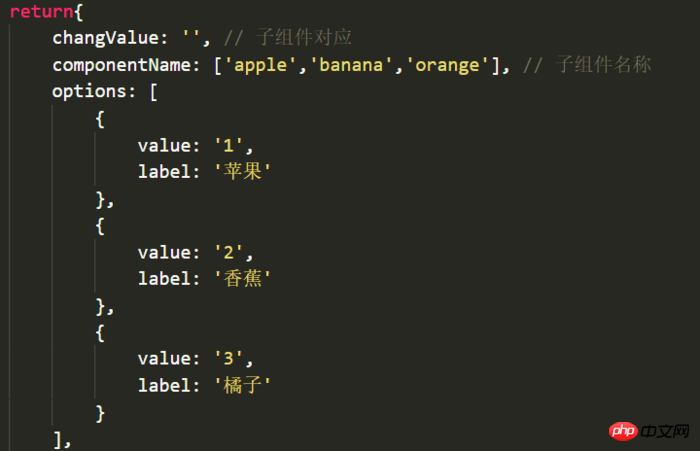
// 加载组件:每次下拉框监听则给changValue新赋值,如果下拉options的value从0开始则绑定组件时不用-1
<component :is="componentName[changValue - 1]" ref="subjectChild" @isSubmit="getSubmit"></component>
Verify the child and parent component forms together:
Button is placed in the parent component:
Sub component: CustomizedValidation rules
data(){
  const num = (rule, value, callback) => {
    let num = /^\d+$/
    if(!value){
      return callback(new Error('数量不能为空'))
    }else if(!num.test(value)){
      return callback(new Error('数量必须为数字'))
    }else{
      callback()
    }
  }
  const price = (rule, value, callback) => {
    let num2 = /^\d+$/
    if(!value){
      return callback(new Error('单价不能为空'))
    }else if(!num2.test(value)){
      return callback(new Error('单价必须为数字'))
    }else{
      callback()
    }
  }
  return{
    // 验证
    apple:{
      num: '',
      price: '',
    },
    reg:{
      num: [
        { validator: num, trigger: 'blur' }
      ],
      price: [
        { validator: price, trigger: 'blur' }
      ]
    }
  }
// 验证
  submitForm(){
    this.$refs.apple.validate((valid) => {
      if(valid){
        this.$emit('isSubmit',["subject",true])
      }else{
        this.$emit('isSubmit',["subject",false])
        return false
      }
    })
}Parent component:
 // 获取子组件状态
  getSubmit(type){
    this.isRule = type[1]
  },
// 公共数据验证
  submitForm2(){
    // 如果选中了子组件
    if(this.changValue){
      this.$refs.subjectChild.submitForm()
    }
    let _this = this
    let p1 = new Promise((resolve, reject) => {
      _this.$refs.ruleForm.validate((valid) => {
        if(valid){
          resolve()
        }
      })
    })
    if(_this.isRule){
      Promise.all([p1]).then(() => {
        console.log('正确')
      })
      .catch(() => {
        console.log('错误')
      })
    }else{
      console.log('错误')
    }
},I believe you have mastered the method after reading the case in this article. For more exciting information, please pay attention to other related articles on the PHP Chinese website!
Recommended reading:
Summary of common JS DOM node operation methods
Summary of commonly used JS built-in functions
The above is the detailed content of Detailed explanation of the steps to implement multi-form verification of vue dynamically bound components, child and parent components. For more information, please follow other related articles on the PHP Chinese website!

Hot AI Tools

Undresser.AI Undress
AI-powered app for creating realistic nude photos

AI Clothes Remover
Online AI tool for removing clothes from photos.

Undress AI Tool
Undress images for free

Clothoff.io
AI clothes remover

Video Face Swap
Swap faces in any video effortlessly with our completely free AI face swap tool!

Hot Article
Hot Tools

Notepad++7.3.1
Easy-to-use and free code editor

SublimeText3 Chinese version
Chinese version, very easy to use

Zend Studio 13.0.1
Powerful PHP integrated development environment

Dreamweaver CS6
Visual web development tools

SublimeText3 Mac version
God-level code editing software (SublimeText3)
Hot Topics


 Can two WeChat accounts be bound to the same bank card?
Aug 25, 2023 pm 03:13 PM
Can two WeChat accounts be bound to the same bank card?
Aug 25, 2023 pm 03:13 PM
Two WeChat accounts cannot be bound to the same bank card. Bind a bank card to a WeChat account: 1. Open the WeChat application, click the "Me" option, and then select the "Pay" option; 2. Select the "Add Bank Card" option and enter the bank card information as prompted; 3. Once the bank card is successfully bound, users can use the bank card to make payments and transfers in WeChat.
 How to implement page jump after PHP form submission
Aug 12, 2023 am 11:30 AM
How to implement page jump after PHP form submission
Aug 12, 2023 am 11:30 AM
How to implement page jump after PHP form submission [Introduction] In web development, form submission is a common functional requirement. After the user fills out the form and clicks the submit button, the form data usually needs to be sent to the server for processing, and the user is redirected to another page after processing. This article will introduce how to use PHP to implement page jump after form submission. [Step 1: HTML Form] First, we need to write a page containing a form in an HTML page so that users can fill in the data that needs to be submitted.
 How to implement editable tables in Vue
Nov 08, 2023 pm 12:51 PM
How to implement editable tables in Vue
Nov 08, 2023 pm 12:51 PM
Tables are an essential component in many web applications. Tables usually have large amounts of data, so tables require some specific features to improve user experience. One of the important features is editability. In this article, we will explore how to implement editable tables using Vue.js and provide specific code examples. Step 1: Prepare the data First, we need to prepare the data for the table. We can use a JSON object to store the table's data and store it in the data property of the Vue instance. In this case
 How to install the Windows 10 old version component DirectPlay
Dec 28, 2023 pm 03:43 PM
How to install the Windows 10 old version component DirectPlay
Dec 28, 2023 pm 03:43 PM
Many users always encounter some problems when playing some games on win10, such as screen freezes and blurred screens. At this time, we can solve the problem by turning on the directplay function, and the operation method of the function is also Very simple. How to install directplay, the old component of win10 1. Enter "Control Panel" in the search box and open it 2. Select large icons as the viewing method 3. Find "Programs and Features" 4. Click on the left to enable or turn off win functions 5. Select the old version here Just check the box
 BTCC tutorial: How to bind and use MetaMask wallet on BTCC exchange?
Apr 26, 2024 am 09:40 AM
BTCC tutorial: How to bind and use MetaMask wallet on BTCC exchange?
Apr 26, 2024 am 09:40 AM
MetaMask (also called Little Fox Wallet in Chinese) is a free and well-received encryption wallet software. Currently, BTCC supports binding to the MetaMask wallet. After binding, you can use the MetaMask wallet to quickly log in, store value, buy coins, etc., and you can also get 20 USDT trial bonus for the first time binding. In the BTCCMetaMask wallet tutorial, we will introduce in detail how to register and use MetaMask, and how to bind and use the Little Fox wallet in BTCC. What is MetaMask wallet? With over 30 million users, MetaMask Little Fox Wallet is one of the most popular cryptocurrency wallets today. It is free to use and can be installed on the network as an extension
 How to bind a sub-account on Xiaohongshu? How does it check whether the account is normal?
Mar 21, 2024 pm 10:11 PM
How to bind a sub-account on Xiaohongshu? How does it check whether the account is normal?
Mar 21, 2024 pm 10:11 PM
In today's era of information explosion, the construction of personal brand and corporate image has become increasingly important. As the leading fashion life sharing platform in China, Xiaohongshu has attracted a large number of user attention and participation. For those users who want to expand their influence and improve the efficiency of content dissemination, binding sub-accounts has become an effective means. So, how does Xiaohongshu bind a sub-account? How to check whether the account is normal? This article will answer these questions for you in detail. 1. How to bind a sub-account on Xiaohongshu? 1. Log in to your main account: First, you need to log in to your Xiaohongshu main account. 2. Open the settings menu: click "Me" in the upper right corner, and then select "Settings". 3. Enter account management: In the settings menu, find the "Account Management" or "Account Assistant" option and click
 Steps and methods to bind Douyin in Toutiao
Mar 22, 2024 pm 05:56 PM
Steps and methods to bind Douyin in Toutiao
Mar 22, 2024 pm 05:56 PM
1. Open Toutiao. 2. Click My in the lower right corner. 3. Click [System Settings]. 4. Click [Account and Privacy Settings]. 5. Click the button on the right side of [Douyin] to bind Douyin.
 How to use JavaScript to realize the automatic prompt function of the input box content of the form?
Oct 20, 2023 pm 04:01 PM
How to use JavaScript to realize the automatic prompt function of the input box content of the form?
Oct 20, 2023 pm 04:01 PM
How to use JavaScript to realize the automatic prompt function of the input box content of the form? Introduction: The automatic prompt function of the form input box content is very common in web applications. It can help users quickly enter the correct content. This article will introduce how to use JavaScript to achieve this function and provide specific code examples. Create the HTML structure First, we need to create an HTML structure that contains the input box and the auto-suggestion list. You can use the following code: <!DOCTYP
