
 Web Front-end
JS Tutorial
Detailed explanation of React Native's prop-types for attribute confirmation
Web Front-end
JS Tutorial
Detailed explanation of React Native's prop-types for attribute confirmation
Detailed explanation of React Native's prop-types for attribute confirmation

This article mainly introduces the detailed explanation of property confirmation using prop-types in React Native. The editor thinks it is quite good, so I will share it with you now and give it as a reference. Let’s follow the editor to take a look, I hope it can help everyone.
The role of attribute confirmation
Components created using React Native can be reused, so the components we develop may be used by other colleagues in the project team . But others may not be familiar with this component and often forget to use certain attributes, or the data types passed by some attributes are incorrect.
So when we develop a React Native custom component, we can declare which properties the component requires through property confirmation. In this way, if the corresponding attributes are not provided when calling this custom component, a warning message will pop up on the mobile phone and debugging tools to inform the developer what attributes the component requires.
React Native has been upgraded to 0.51.0. The version upgrade is very fast, but there are also some problems with old projects. The most common problem is that attributes cannot be found. For example:
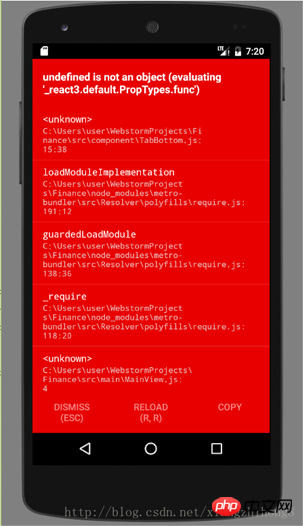
The main reason is that with the upgrade of React Native, the system has abandoned a lot of things. In the past, we could directly use React.PropTypes to confirm properties, but this automatically React v15.5 has been removed and replaced with the prop-types library
Attribute confirmation
The role of attribute confirmation
Components created using React Native can be reused, so the components we develop may be used by other colleagues in the project team. But others may not be familiar with this component and often forget to use certain attributes, or the data types passed by some attributes are wrong. Therefore, when we develop a React Native custom component, we can use property confirmation to declare which properties the component requires.
Note: In order to ensure that React Native code runs efficiently, attribute confirmation is only valid in the development environment and will not be checked when the officially released App is run.
prop-types library usage
is similar to other third-party libraries. To install prop-types, first enter the project root directory and execute the following code to install prop-types. Library:
npm install --save prop-types
Then introduce it where you need to use the PropTypes attribute:
import PropTypes from 'prop-types';
Example
For example, we write an example of a navigation bar, the effect is as follows:

import React, {
 Component
} from 'react'
import {
 StyleSheet,
 View,
 Animated,
 Image,
 TouchableOpacity,
 TouchableNativeFeedback,
 Platform
} from 'react-native'
import px2dp from '../utils/Utils'
import Icon from 'react-native-vector-icons/Ionicons'
import PropTypes from 'prop-types';

export default class NavBar extends Component{

 static propTypes = {
  title: PropTypes.string,
  leftIcon: PropTypes.string,
  rightIcon: PropTypes.string,
  leftPress: PropTypes.func,
  rightPress: PropTypes.func,
  style: PropTypes.object
 }
 static topbarHeight = (Platform.OS === 'ios' ? 64 : 44)
 renderBtn(pos){
  let render = (obj) => {
  const { name, onPress } = obj
  if(Platform.OS === 'android'){
   return (


   )
  }else{
   return (


   )
  }
  }
  if(pos == "left"){
  if(this.props.leftIcon){
   return render({
   name: this.props.leftIcon,
   onPress: this.props.leftPress
   })
  }else{
   // return ()
   return ()
  }
  }else if(pos == "right"){
  if(this.props.rightIcon){
   return render({
   name: this.props.rightIcon,
   onPress: this.props.rightPress
   })
  }else{
   return ()
  }
  }
 }
 render(){
  return(

    {this.renderBtn("left")}
    {this.props.title}
    {this.renderBtn("right")}

  )
 }
}
const styles = StyleSheet.create({
 topbar: {
  height: NavBar.topbarHeight,
  backgroundColor: "#06C1AE",
  flexDirection: 'row',
  justifyContent: 'space-between',
  alignItems: 'center',
  paddingTop: (Platform.OS === 'ios') ? 20 : 0,
  paddingHorizontal: px2dp(10)
 },
 btn: {
  width: 22,
  height: 22,
  justifyContent: 'center',
  alignItems: 'center'
 },
 title:{
  color: "#fff",
  fontWeight: "bold",
  fontSize: px2dp(16),
  marginLeft: px2dp(5),
 }
}); Syntax
1, requires the attribute to be the specified JavaScript basic type. For example:
Properties: PropTypes.array,
Properties: PropTypes.bool,
Properties: PropTypes.func,
Properties: PropTypes.number,
Properties: PropTypes.object,
Attribute: PropTypes.string,
2, requires the attribute to be a renderable node. For example:
Attribute: PropTypes.node,
3, requires the attribute to be a certain React element. For example:
Attribute: PropTypes.element,
4, requires the attribute to be an instance of a specified class. For example:
Attribute: PropTypes.instanceOf(NameOfAClass),
5, requires the attribute value to be certain values. For example:
Attribute: PropTypes.oneOf(['value1', 'value2']),
6, the required attribute can be any one of the specified types. For example:
Attribute: PropTypes.oneOfType([
PropTypes.bool,
PropTypes.number,
PropTypes.instanceOf(NameOfAClass),
])
7, requires the attribute to be an array of the specified type. For example:
Property: PropTypes.arrayOf(PropTypes.number),
8, the required property is an object with specific member variables. For example:
Attributes: PropTypes.objectOf(PropTypes.number),
9, the required attribute is an object with a specified composition method. For example:
Attribute: PropTypes.shape({
color: PropTypes.string,
fontSize: PropTypes.number,
}),
10, Properties can be of any type. For example:
Properties: PropTypes.any
Declare a property as required
Use the keyword isRequired to declare that it is required.
Properties: PropTypes.array.isRequired,
Properties: PropTypes.any.isRequired,
Properties: PropTypes.instanceOf(NameOfAClass).isRequired,
Related recommendations :
Detailed explanation of the communication instance between react native and webview
Detailed explanation of the React Native open source time and date selector component
Introduction to the ref attribute in the View component in react native
The above is the detailed content of Detailed explanation of React Native's prop-types for attribute confirmation. For more information, please follow other related articles on the PHP Chinese website!

Hot AI Tools

Undresser.AI Undress
AI-powered app for creating realistic nude photos

AI Clothes Remover
Online AI tool for removing clothes from photos.

Undress AI Tool
Undress images for free

Clothoff.io
AI clothes remover

Video Face Swap
Swap faces in any video effortlessly with our completely free AI face swap tool!

Hot Article
Hot Tools

Notepad++7.3.1
Easy-to-use and free code editor

SublimeText3 Chinese version
Chinese version, very easy to use

Zend Studio 13.0.1
Powerful PHP integrated development environment

Dreamweaver CS6
Visual web development tools

SublimeText3 Mac version
God-level code editing software (SublimeText3)
Hot Topics


 How to build a real-time chat app with React and WebSocket
Sep 26, 2023 pm 07:46 PM
How to build a real-time chat app with React and WebSocket
Sep 26, 2023 pm 07:46 PM
How to build a real-time chat application using React and WebSocket Introduction: With the rapid development of the Internet, real-time communication has attracted more and more attention. Live chat apps have become an integral part of modern social and work life. This article will introduce how to build a simple real-time chat application using React and WebSocket, and provide specific code examples. 1. Technical preparation Before starting to build a real-time chat application, we need to prepare the following technologies and tools: React: one for building
 Guide to React front-end and back-end separation: How to achieve decoupling and independent deployment of front-end and back-end
Sep 28, 2023 am 10:48 AM
Guide to React front-end and back-end separation: How to achieve decoupling and independent deployment of front-end and back-end
Sep 28, 2023 am 10:48 AM
React front-end and back-end separation guide: How to achieve front-end and back-end decoupling and independent deployment, specific code examples are required In today's web development environment, front-end and back-end separation has become a trend. By separating front-end and back-end code, development work can be made more flexible, efficient, and facilitate team collaboration. This article will introduce how to use React to achieve front-end and back-end separation, thereby achieving the goals of decoupling and independent deployment. First, we need to understand what front-end and back-end separation is. In the traditional web development model, the front-end and back-end are coupled
 How to build simple and easy-to-use web applications with React and Flask
Sep 27, 2023 am 11:09 AM
How to build simple and easy-to-use web applications with React and Flask
Sep 27, 2023 am 11:09 AM
How to use React and Flask to build simple and easy-to-use web applications Introduction: With the development of the Internet, the needs of web applications are becoming more and more diverse and complex. In order to meet user requirements for ease of use and performance, it is becoming increasingly important to use modern technology stacks to build network applications. React and Flask are two very popular frameworks for front-end and back-end development, and they work well together to build simple and easy-to-use web applications. This article will detail how to leverage React and Flask
 How to build a reliable messaging app with React and RabbitMQ
Sep 28, 2023 pm 08:24 PM
How to build a reliable messaging app with React and RabbitMQ
Sep 28, 2023 pm 08:24 PM
How to build a reliable messaging application with React and RabbitMQ Introduction: Modern applications need to support reliable messaging to achieve features such as real-time updates and data synchronization. React is a popular JavaScript library for building user interfaces, while RabbitMQ is a reliable messaging middleware. This article will introduce how to combine React and RabbitMQ to build a reliable messaging application, and provide specific code examples. RabbitMQ overview:
 React Router User Guide: How to implement front-end routing control
Sep 29, 2023 pm 05:45 PM
React Router User Guide: How to implement front-end routing control
Sep 29, 2023 pm 05:45 PM
ReactRouter User Guide: How to Implement Front-End Routing Control With the popularity of single-page applications, front-end routing has become an important part that cannot be ignored. As the most popular routing library in the React ecosystem, ReactRouter provides rich functions and easy-to-use APIs, making the implementation of front-end routing very simple and flexible. This article will introduce how to use ReactRouter and provide some specific code examples. To install ReactRouter first, we need
 How to build a fast data analysis application using React and Google BigQuery
Sep 26, 2023 pm 06:12 PM
How to build a fast data analysis application using React and Google BigQuery
Sep 26, 2023 pm 06:12 PM
How to use React and Google BigQuery to build fast data analysis applications Introduction: In today's era of information explosion, data analysis has become an indispensable link in various industries. Among them, building fast and efficient data analysis applications has become the goal pursued by many companies and individuals. This article will introduce how to use React and Google BigQuery to build a fast data analysis application, and provide detailed code examples. 1. Overview React is a tool for building
 How to build real-time data processing applications using React and Apache Kafka
Sep 27, 2023 pm 02:25 PM
How to build real-time data processing applications using React and Apache Kafka
Sep 27, 2023 pm 02:25 PM
How to use React and Apache Kafka to build real-time data processing applications Introduction: With the rise of big data and real-time data processing, building real-time data processing applications has become the pursuit of many developers. The combination of React, a popular front-end framework, and Apache Kafka, a high-performance distributed messaging system, can help us build real-time data processing applications. This article will introduce how to use React and Apache Kafka to build real-time data processing applications, and
 PHP, Vue and React: How to choose the most suitable front-end framework?
Mar 15, 2024 pm 05:48 PM
PHP, Vue and React: How to choose the most suitable front-end framework?
Mar 15, 2024 pm 05:48 PM
PHP, Vue and React: How to choose the most suitable front-end framework? With the continuous development of Internet technology, front-end frameworks play a vital role in Web development. PHP, Vue and React are three representative front-end frameworks, each with its own unique characteristics and advantages. When choosing which front-end framework to use, developers need to make an informed decision based on project needs, team skills, and personal preferences. This article will compare the characteristics and uses of the three front-end frameworks PHP, Vue and React.
