
 Web Front-end
JS Tutorial
Detailed explanation of React Native open source time and date picker component
Web Front-end
JS Tutorial
Detailed explanation of React Native open source time and date picker component
Detailed explanation of React Native open source time and date picker component
This article mainly introduces the detailed explanation of the React Native open source time and date picker component (react-native-datetime), which has certain reference value. Those who are interested can learn more about
Project Introduction
This component encapsulates a time and date picker and is adapted to both Android and iOS platforms. This component is developed based on @remobile/react-native-datetime-picker
Configuration and installation
npm install react-native-datetime --save
1.1. iOS environment configuration
After completing the above steps, directly Just write js code in the frontend
1.2. Android environment configuration
Configure as follows in the android/setting.gradle file
...
include ':react-native-datetime'
project(':react-native-datetime').projectDir = new File(rootProject.projectDir, '../node_modules/react-native-datetime/android')
Configure the following in the android/app/build.gradle file
...
dependencies {
  ...
  compile project(':react-native-datetime')
}Register the module in MainActivity.java
①.React Native>=0.18 starts
##
import com.keyee.datetime.*; // <--- import

public class MainActivity extends ReactActivity {
 ......

 /**
  * A list of packages used by the app. If the app uses additional views
  * or modules besides the default ones, add more packages here.
  */
  @Override
  protected List<ReactPackage> getPackages() {
   return Arrays.<ReactPackage>asList(
    new RCTDateTimePickerPackage(this), // <------ add here
    new MainReactPackage());
  }
}import com.keyee.datetime.*; // <--- import
public class MainActivity extends Activity implements DefaultHardwareBackBtnHandler {
......
@Override
protected void onCreate(Bundle savedInstanceState) {
super.onCreate(savedInstanceState);
mReactRootView = new ReactRootView(this);
mReactInstanceManager = ReactInstanceManager.builder()
.setApplication(getApplication())
.setBundleAssetName("index.android.bundle")
.setJSMainModuleName("index.android")
.addPackage(new MainReactPackage())
.addPackage(new RCTDateTimePickerPackage(this)) // <------ add here
.setUseDeveloperSupport(BuildConfig.DEBUG)
.setInitialLifecycleState(LifecycleState.RESUMED)
.build();
mReactRootView.startReactApplication(mReactInstanceManager, "ExampleRN", null);
setContentView(mReactRootView);
}
......
}
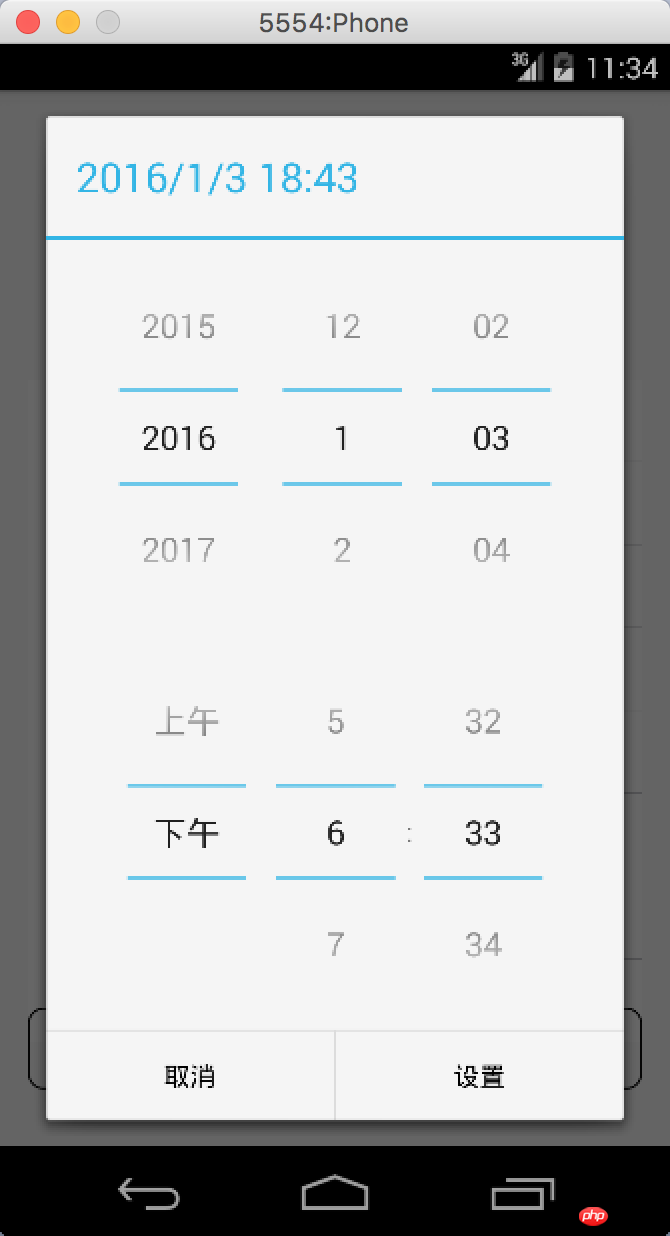
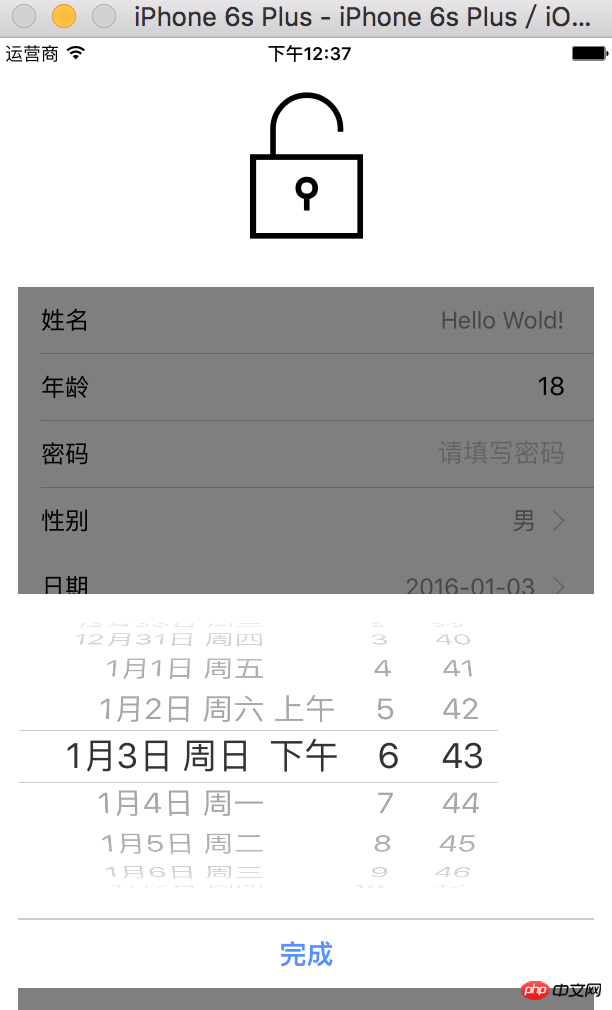 ##android running effect
 Usage method
<DateTimePicker ref={(picker)=>{this.picker=picker}}/>
...
this.picker.showDatePicker(...)
this.picker.showTimePicker(...)
this.picker.showDateTimePicker(...)When used on the ios platform, you need to ensure that the current DataTimePicker view is at the top
Usage example
'use strict';
var React = require('react-native');
var {
StyleSheet,
TouchableOpacity,
View,
Text,
} = React;
var DateTimePicker = require('react-native-datetime');
var Button = require('@remobile/react-native-simple-button');
module.exports = React.createClass({
getInitialState() {
return {
date: new Date(),
}
},
showDatePicker() {
var date = this.state.date;
this.picker.showDatePicker(date, (d)=>{
this.setState({date:d});
});
},
showTimePicker() {
var date = this.state.date;
this.picker.showTimePicker(date, (d)=>{
this.setState({date:d});
});
},
showDateTimePicker() {
var date = this.state.date;
this.picker.showDateTimePicker(date, (d)=>{
this.setState({date:d});
});
},
render() {
return (
<View style={styles.container}>
<Text style={{textAlign: 'center'}}>
{this.state.date.toString()}
</Text>
<View style={{height:40}} />
<Button onPress={this.showDatePicker}>showDatePicker</Button>
<View style={{height:40}} />
<Button onPress={this.showTimePicker}>showTimePicker</Button>
<View style={{height:40}} />
<Button onPress={this.showDateTimePicker}>showDateTimePicker</Button>
<DateTimePicker ref={(picker)=>{this.picker=picker}}/>
</View>
);
},
});
var styles = StyleSheet.create({
container: {
flex: 1,
justifyContent: 'center',
paddingTop:20,
},
});Method introduction
- showDatePicker(date, callback(date))
- ##showTimePicker(date, callback(date))
-
showDateTimePicker(date, callback(date)) - Property introduction
- okText (default: Ok)
The above is the detailed content of Detailed explanation of React Native open source time and date picker component. For more information, please follow other related articles on the PHP Chinese website!

Hot AI Tools

Undresser.AI Undress
AI-powered app for creating realistic nude photos

AI Clothes Remover
Online AI tool for removing clothes from photos.

Undress AI Tool
Undress images for free

Clothoff.io
AI clothes remover

Video Face Swap
Swap faces in any video effortlessly with our completely free AI face swap tool!

Hot Article
Hot Tools

Notepad++7.3.1
Easy-to-use and free code editor

SublimeText3 Chinese version
Chinese version, very easy to use

Zend Studio 13.0.1
Powerful PHP integrated development environment

Dreamweaver CS6
Visual web development tools

SublimeText3 Mac version
God-level code editing software (SublimeText3)
Hot Topics


 How to search previous Weibo by date on Weibo_How to search previous Weibo by date on Weibo
Mar 30, 2024 pm 07:26 PM
How to search previous Weibo by date on Weibo_How to search previous Weibo by date on Weibo
Mar 30, 2024 pm 07:26 PM
1. First open the mobile web browser, search for the Weibo web version, and click the avatar button in the upper left corner after entering. 2. Then click Settings in the upper right corner. 3. Click the version switching option in settings. 4. Then select the color version option in the version switch. 5. Click Search to enter the search page. 6. After entering the keywords, click Find People. 7. When the search completion interface appears, click Filter. 8. Finally, enter the specific date in the release time column and click Filter.
 How to remove the date that appears automatically when printing from PPT handouts
Mar 26, 2024 pm 08:16 PM
How to remove the date that appears automatically when printing from PPT handouts
Mar 26, 2024 pm 08:16 PM
1. Let me first talk about the method I used at the beginning, maybe everyone is using it too. First, open [View]——]Remarks Template[. 2. A place where you can actually see the date after opening it. 3. Select it first and delete it. 4. After deleting, click [Close Master View]. 5. Open the print preview again and find that the date is still there. 6. In fact, this date was not deleted here. It should be in the [Handout Master]. Look at the picture below. 7. Delete the date after you find it. 8. Now when you open the preview and take a look, the date is no longer there. Note: In fact, this method is also very easy to remember, because the printed handouts are handouts, so you should look for the [Handout Master].
 How to build a reliable messaging app with React and RabbitMQ
Sep 28, 2023 pm 08:24 PM
How to build a reliable messaging app with React and RabbitMQ
Sep 28, 2023 pm 08:24 PM
How to build a reliable messaging application with React and RabbitMQ Introduction: Modern applications need to support reliable messaging to achieve features such as real-time updates and data synchronization. React is a popular JavaScript library for building user interfaces, while RabbitMQ is a reliable messaging middleware. This article will introduce how to combine React and RabbitMQ to build a reliable messaging application, and provide specific code examples. RabbitMQ overview:
 React Router User Guide: How to implement front-end routing control
Sep 29, 2023 pm 05:45 PM
React Router User Guide: How to implement front-end routing control
Sep 29, 2023 pm 05:45 PM
ReactRouter User Guide: How to Implement Front-End Routing Control With the popularity of single-page applications, front-end routing has become an important part that cannot be ignored. As the most popular routing library in the React ecosystem, ReactRouter provides rich functions and easy-to-use APIs, making the implementation of front-end routing very simple and flexible. This article will introduce how to use ReactRouter and provide some specific code examples. To install ReactRouter first, we need
 How to display date and seconds in the top bar of Ubuntu 17.10?
Jan 08, 2024 am 10:41 AM
How to display date and seconds in the top bar of Ubuntu 17.10?
Jan 08, 2024 am 10:41 AM
By default, the top bar of Ubuntu 17.10 only has the current time and no date. What should I do if I want to display the date? Let’s take a look at the detailed tutorial below. 1. Open the terminal in the launcher, or press [Ctrl+Alt+T] 2. Enter in the terminal: sudoaptinstallgnome-tweak-tool 3. After the installation is completed, open the tweak tool 4. Click TopBar 5. Date is the date and seconds is the number of seconds 6. After setting it up, the date and seconds will be displayed on the time in the top bar.
 PHP, Vue and React: How to choose the most suitable front-end framework?
Mar 15, 2024 pm 05:48 PM
PHP, Vue and React: How to choose the most suitable front-end framework?
Mar 15, 2024 pm 05:48 PM
PHP, Vue and React: How to choose the most suitable front-end framework? With the continuous development of Internet technology, front-end frameworks play a vital role in Web development. PHP, Vue and React are three representative front-end frameworks, each with its own unique characteristics and advantages. When choosing which front-end framework to use, developers need to make an informed decision based on project needs, team skills, and personal preferences. This article will compare the characteristics and uses of the three front-end frameworks PHP, Vue and React.
 How to change the date into a pound sign in Excel
Mar 20, 2024 am 11:46 AM
How to change the date into a pound sign in Excel
Mar 20, 2024 am 11:46 AM
Excel software has very powerful data processing functions. We often use excel software to process various data. Sometimes when we enter a date in an excel cell, the date in excel changes to a pound sign. How can we display the data normally? Let’s take a look at the solution below. 1. First, we put the mouse on the column width line between columns AB, double-click and adjust the column width, as shown in the figure below. 2. After the column is widened, we find that numbers are displayed in the cells instead of dates. This is definitely incorrect. Then we should check the format of the cells, as shown in the figure below. 3. Click the "Number" option in the "Home" tab, and click "Other Number Format" in the drop-down menu, as shown in the figure below.
 How to use the time and date modules in Python
Oct 16, 2023 am 08:11 AM
How to use the time and date modules in Python
Oct 16, 2023 am 08:11 AM
How to use the time and date modules in Python Introduction: In programming, dealing with time and dates are very common tasks. Python provides powerful time and date modules, making time and date operations easier and more convenient. This article will introduce the time and date modules in Python and provide specific code examples to help readers better understand and apply them. 1. Introducing the time and date module Python’s built-in time and date module is the datetime module. We need to introduce this module first.
