

A brief introduction to the webpack packager

Concept
Webpack is a module packager for modern javascript applications.
When webpack processes your application, it recursively builds a dependency graph (containing every module your application needs), and then packages these modules into a handful of Budle files (usually There is only one, which will be loaded by the browser, depending on the project situation).
This is an incredible configuration, but before you get started, you only need to understand four core concepts: entry, output, loaders, and plugins.
Configuration Object Options
webpack.config.js
const path = require('path');

module.exports = {
  // click on the name of the option to get to the detailed documentation
  // click on the items with arrows to show more examples / advanced options

  entry: "./app/entry", // string | object | array
  // Here the application starts executing
  // and webpack starts bundling

  output: {
    // options related to how webpack emits results

    path: path.resolve(__dirname, "dist"), // string
    // the target directory for all output files
    // must be an absolute path (use the Node.js path module)

    filename: "bundle.js?1.1.11", // string
    // the filename template for entry chunks

    publicPath: "/assets/", // string
    // the url to the output directory resolved relative to the HTML page

    library: "MyLibrary", // string,
    // the name of the exported library

    libraryTarget: "umd", // universal module definition
    // the type of the exported library

    /* Advanced output configuration (click to show) */
  },

  module: {
    // configuration regarding modules

    rules: [
      // rules for modules (configure loaders, parser options, etc.)

      {
        test: /\.jsx?$/,
        include: [
          path.resolve(__dirname, "app")
        ],
        exclude: [
          path.resolve(__dirname, "app/demo-files")
        ],
        // these are matching conditions, each accepting a regular expression or string
        // test and include have the same behavior, both must be matched
        // exclude must not be matched (takes preferrence over test and include)
        // Best practices:
        // - Use RegExp only in test and for filename matching
        // - Use arrays of absolute paths in include and exclude
        // - Try to avoid exclude and prefer include

        issuer: { test, include, exclude },
        // conditions for the issuer (the origin of the import)

        enforce: "pre",
        enforce: "post",
        // flags to apply these rules, even if they are overridden (advanced option)

        loader: "babel-loader",
        // the loader which should be applied, it'll be resolved relative to the context
        // -loader suffix is no longer optional in webpack2 for clarity reasons
        // see webpack 1 upgrade guide

        options: {
          presets: ["es2015"]
        },
        // options for the loader
      },

      {
        test: "\.html$",

        use: [
          // apply multiple loaders and options
          "htmllint-loader",
          {
            loader: "html-loader",
            options: {
              /* ... */
            }
          }
        ]
      },

      { oneOf: [ /* rules */ ] },
      // only use one of these nested rules

      { rules: [ /* rules */ ] },
      // use all of these nested rules (combine with conditions to be useful)

      { resource: { and: [ /* conditions */ ] } },
      // matches only if all conditions are matched

      { resource: { or: [ /* conditions */ ] } },
      { resource: [ /* conditions */ ] },
      // matches if any condition is matched (default for arrays)

      { resource: { not: /* condition */ } }
      // matches if the condition is not matched
    ],

    /* Advanced module configuration (click to show) */
  },

  resolve: {
    // options for resolving module requests
    // (does not apply to resolving to loaders)

    modules: [
      "node_modules",
      path.resolve(__dirname, "app")
    ],
    // directories where to look for modules

    extensions: [".js?1.1.11", ".json", ".jsx", ".css?1.1.11"],
    // extensions that are used

    alias: {
      // a list of module name aliases

      "module": "new-module",
      // alias "module" -> "new-module" and "module/path/file" -> "new-module/path/file"

      "only-module$": "new-module",
      // alias "only-module" -> "new-module", but not "module/path/file" -> "new-module/path/file"

      "module": path.resolve(__dirname, "app/third/module.js?1.1.11"),
      // alias "module" -> "./app/third/module.js?1.1.11" and "module/file" results in error
      // modules aliases are imported relative to the current context
    },
    /* alternative alias syntax (click to show) */

    /* Advanced resolve configuration (click to show) */
  },

  performance: {
    hints: "warning", // enum
    maxAssetSize: 200000, // int (in bytes),
    maxEntrypointSize: 400000, // int (in bytes)
    assetFilter: function(assetFilename) {
      // Function predicate that provides asset filenames
      return assetFilename.endsWith('.css') || assetFilename.endsWith('.js');
    }
  },

  devtool: "source-map", // enum
  // enhance debugging by adding meta info for the browser devtools
  // source-map most detailed at the expense of build speed.

  context: __dirname, // string (absolute path!)
  // the home directory for webpack
  // the entry and module.rules.loader option
  //   is resolved relative to this directory

  target: "web", // enum
  // the environment in which the bundle should run
  // changes chunk loading behavior and available modules

  externals: ["react", /^@angular\//],
  // Don't follow/bundle these modules, but request them at runtime from the environment

  stats: "errors-only",
  // lets you precisely control what bundle information gets displayed

  devServer: {
    proxy: { // proxy URLs to backend development server
      '/api': 'http://localhost:3000'
    },
    contentBase: path.join(__dirname, 'public'), // boolean | string | array, static file location
    compress: true, // enable gzip compression
    historyApiFallback: true, // true for index.html upon 404, object for multiple paths
    hot: true, // hot module replacement. Depends on HotModuleReplacementPlugin
    https: false, // true for self-signed, object for cert authority
    noInfo: true, // only errors & warns on hot reload
    // ...
  },

  plugins: [
    // ...
  ],
  // list of additional plugins


  /* Advanced configuration (click to show) */
}The purpose of this document is to provide a high-level outline of these concepts , while providing links to specified use cases for detailed concepts.
Entry
webpack creates a dependency graph of all your applications. The starting point of this dependency graph is the known entry point. This entry point tells webpack where to start and package it based on a known dependency graph. You can think of your application's entry point as the context root or the first file that starts your application.
Define the entry point in the entry attribute of the webpack configuration object. A simple example is as follows:
module.exports = {
  entry: './path/to/my/entry/file.js'
};There are several ways to declare the entry attribute:
1. Single entry syntax
const config = {
  entry: './path/to/my/entry/file.js'
};

module.exports = config;2. Object syntax
const config = {
  entry: {
    app: './src/app.js',
    vendors: './src/vendors.js'
  }
};3. Multi-page application
const config = {
  entry: {
    pageOne: './src/pageOne/index.js',
    pageTwo: './src/pageTwo/index.js',
    pageThree: './src/pageThree/index.js'
  }
};Output
Once you package all the code, you still need to tell webpack where to package it. The output attribute tells webpack how to treat your code.
const path = require('path');

module.exports = {
  entry: './path/to/my/entry/file.js',
  output: {
    path: path.resolve(__dirname, 'dist'),
    filename: 'my-first-webpack.bundle.js'
  }
};In the above example, we use the output.filename and output.path properties to tell webpack the packaged file name and path
More configuration items
Loaders
The purpose of this configuration item is to let webpack focus on all the code of your project instead of the browser (this does not mean that they will be packaged together). webpack treats each file (.css, .html, .scss, .jpg, etc.) as a module. However, webpack only knows javascript.
Loaders in webpack will convert these files into modules and add them to your dependency graph.
At a high level, there are two purposes in your webpack configuration:
1. Identify what files should be converted with a certain loader.
2. The converted files can be added to your dependency graph.
const path = require('path');

const config = {
  entry: './path/to/my/entry/file.js',
  output: {
    path: path.resolve(__dirname, 'dist'),
    filename: 'my-first-webpack.bundle.js'
  },
  module: {
    rules: [
      {test: /\.(js|jsx)$/, use: 'babel-loader'}
    ]
  }
};

module.exports = config;The above configuration defines a rulues attribute for a separate module. This module has two attributes: test and use. This tells webpack to compile the following things:
When using require() or import statements, files with a .js or .jsx suffix in the path are converted and packaged using babel-loader.
More configuration items
Plugins
Because the loader only performs conversions on a per-file basis, plug-ins are the most commonly used (but not limited to) optimization behavior, and you Custom functions can be defined in editors or blocks of your packaged modules (etc.).
The webpack plug-in system is extremely powerful and customizable.
To use a plugin, you just require() and add it to the plugins array. More plugins can be customized with options. Since you can use a plugin multiple times in a configuration for different purposes, you will need to create a new instance.
const HtmlWebpackPlugin = require('html-webpack-plugin'); //installed via npm
const webpack = require('webpack'); //to access built-in plugins
const path = require('path');

const config = {
  entry: './path/to/my/entry/file.js',
  output: {
    path: path.resolve(__dirname, 'dist'),
    filename: 'my-first-webpack.bundle.js'
  },
  module: {
    rules: [
      {test: /\.txt$/, use: 'raw-loader'}
    ]
  },
  plugins: [
    new webpack.optimize.UglifyJsPlugin(),
    new HtmlWebpackPlugin({template: './src/index.html'})
  ]
};

module.exports = config;webpack provides many out-of-the-box plugins! More information can be obtained from our plugin list.
Using plugins in a webpack configuration is simple, however there are many usages worth exploring further.
More configuration items
Simple example
var path = require('path');
var webpack = require('webpack');

var env = process.env.NODE_DEV;

var config = {
    entry: {
        consumer: './consumer/index.js',
        admin: './admin/index.js',
        // jquery: ['jquery']
    },
    output: {
        path: path.resolve(__dirname, 'dist'),
        publicPath: '/dist/',
        filename: '[name].bundle.js'
    },
    module: {
        loaders: [
            { test: /\.css$/, loader: 'style-loader!css-loader' },
            { test: /\.less$/, loader: 'less-loader!style-loader!css-loader' },
            { test: /\.sass$/, loader: 'sass-loader!style-loader!css-loader' },
            { test: /\.(woff|woff2|eot|ttf|otf)$/i, loader: 'url-loader?limit=8192&name=[name].[ext]' },
            { test: /\.(jpe?g|png|gif|svg)$/i, loader: 'url-loader?limit=8192&name=[name].[ext]' },
            {
                test: /\.jsx?$/,
                loader: 'babel-loader',
                exclude: /node_modules/,
                include: __dirname,
                options: {
                    presets: ['es2015', 'react']
                },
            },
            {
                test: /\.tsx?$/,
                loader: 'ts-loader',
                exclude: /node_modules/,
                include: __dirname
            },
            {
                test: /\.coffee$/,
                loader: 'coffee-loader',
                exclude: /node_modules/,
                include: __dirname
            }
        ]
    },
    //devtool: 'source-map',
    //指定根路径
    context: __dirname,
    //这里枚举的后缀名,在require时可以省略
    resolve: {
        extensions: ['.js', '.jsx', '.json', '.ts', '.tsx', '.css']
    },
    plugins: [
        // 这里声明的变量是全局的,可以在所有的js中使用,可以避免写一堆的require
        new webpack.ProvidePlugin({
            $: 'jquery',
            jQuery: 'jquery',
            'window.jQuery': 'jquery',
            'window.$': 'jquery',
            'React': 'react',
            'ReactDOM': 'react-dom'
        }),
        // new webpack.optimize.CommonsChunkPlugin({
        //     // 与 entry 中的 jquery 对应
        //     name: 'jquery',
        //     // 输出的公共资源名称
        //     filename: 'jquery.min.js',
        //     // 对所有entry实行这个规则
        //     minChunks: Infinity
        // }),
        // new webpack.NoEmitOnErrorsPlugin()
    ],
    //在html页面中使用script标签引入库,而不是打包到*.bundle.js文件中
    externals: {
        jquery: 'jQuery',
        react: 'React',
        'react-dom' : 'ReactDOM'
    }
};

//如果是生产环境,要最小化压缩js文件
if (env === 'production') {
    //打包时对js文件进行最小化压缩
    config.plugins.push(new webpack.optimize.UglifyJsPlugin({
        mangle: {
            except: ['$super', '$', 'exports', 'require']
            //以上变量‘$super’, ‘$’, ‘exports’ or ‘require’,不会被混淆
        },
        compress: {
            warnings: false
        }
    }));
    //消除压缩后的文件在界面引用时发出的警告
    config.plugins.push(new webpack.DefinePlugin({
        'process.env': {
            NODE_ENV: JSON.stringify('production')
        }
    }));
}

module.exports = config;The above is the detailed content of A brief introduction to the webpack packager. For more information, please follow other related articles on the PHP Chinese website!

Hot AI Tools

Undresser.AI Undress
AI-powered app for creating realistic nude photos

AI Clothes Remover
Online AI tool for removing clothes from photos.

Undress AI Tool
Undress images for free

Clothoff.io
AI clothes remover

Video Face Swap
Swap faces in any video effortlessly with our completely free AI face swap tool!

Hot Article
Hot Tools

Notepad++7.3.1
Easy-to-use and free code editor

SublimeText3 Chinese version
Chinese version, very easy to use

Zend Studio 13.0.1
Powerful PHP integrated development environment

Dreamweaver CS6
Visual web development tools

SublimeText3 Mac version
God-level code editing software (SublimeText3)
Hot Topics


 The easiest way to query the hard drive serial number
Feb 26, 2024 pm 02:24 PM
The easiest way to query the hard drive serial number
Feb 26, 2024 pm 02:24 PM
The hard disk serial number is an important identifier of the hard disk and is usually used to uniquely identify the hard disk and identify the hardware. In some cases, we may need to query the hard drive serial number, such as when installing an operating system, finding the correct device driver, or performing hard drive repairs. This article will introduce some simple methods to help you check the hard drive serial number. Method 1: Use Windows Command Prompt to open the command prompt. In Windows system, press Win+R keys, enter "cmd" and press Enter key to open the command
 A Diffusion Model Tutorial Worth Your Time, from Purdue University
Apr 07, 2024 am 09:01 AM
A Diffusion Model Tutorial Worth Your Time, from Purdue University
Apr 07, 2024 am 09:01 AM
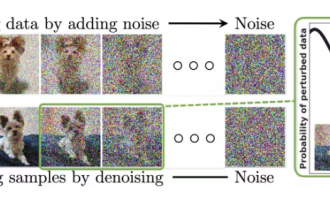
Diffusion can not only imitate better, but also "create". The diffusion model (DiffusionModel) is an image generation model. Compared with the well-known algorithms such as GAN and VAE in the field of AI, the diffusion model takes a different approach. Its main idea is a process of first adding noise to the image and then gradually denoising it. How to denoise and restore the original image is the core part of the algorithm. The final algorithm is able to generate an image from a random noisy image. In recent years, the phenomenal growth of generative AI has enabled many exciting applications in text-to-image generation, video generation, and more. The basic principle behind these generative tools is the concept of diffusion, a special sampling mechanism that overcomes the limitations of previous methods.
 Generate PPT with one click! Kimi: Let the 'PPT migrant workers' become popular first
Aug 01, 2024 pm 03:28 PM
Generate PPT with one click! Kimi: Let the 'PPT migrant workers' become popular first
Aug 01, 2024 pm 03:28 PM
Kimi: In just one sentence, in just ten seconds, a PPT will be ready. PPT is so annoying! To hold a meeting, you need to have a PPT; to write a weekly report, you need to have a PPT; to make an investment, you need to show a PPT; even when you accuse someone of cheating, you have to send a PPT. College is more like studying a PPT major. You watch PPT in class and do PPT after class. Perhaps, when Dennis Austin invented PPT 37 years ago, he did not expect that one day PPT would become so widespread. Talking about our hard experience of making PPT brings tears to our eyes. "It took three months to make a PPT of more than 20 pages, and I revised it dozens of times. I felt like vomiting when I saw the PPT." "At my peak, I did five PPTs a day, and even my breathing was PPT." If you have an impromptu meeting, you should do it
 All CVPR 2024 awards announced! Nearly 10,000 people attended the conference offline, and a Chinese researcher from Google won the best paper award
Jun 20, 2024 pm 05:43 PM
All CVPR 2024 awards announced! Nearly 10,000 people attended the conference offline, and a Chinese researcher from Google won the best paper award
Jun 20, 2024 pm 05:43 PM
In the early morning of June 20th, Beijing time, CVPR2024, the top international computer vision conference held in Seattle, officially announced the best paper and other awards. This year, a total of 10 papers won awards, including 2 best papers and 2 best student papers. In addition, there were 2 best paper nominations and 4 best student paper nominations. The top conference in the field of computer vision (CV) is CVPR, which attracts a large number of research institutions and universities every year. According to statistics, a total of 11,532 papers were submitted this year, and 2,719 were accepted, with an acceptance rate of 23.6%. According to Georgia Institute of Technology’s statistical analysis of CVPR2024 data, from the perspective of research topics, the largest number of papers is image and video synthesis and generation (Imageandvideosyn
 From bare metal to a large model with 70 billion parameters, here is a tutorial and ready-to-use scripts
Jul 24, 2024 pm 08:13 PM
From bare metal to a large model with 70 billion parameters, here is a tutorial and ready-to-use scripts
Jul 24, 2024 pm 08:13 PM
We know that LLM is trained on large-scale computer clusters using massive data. This site has introduced many methods and technologies used to assist and improve the LLM training process. Today, what we want to share is an article that goes deep into the underlying technology and introduces how to turn a bunch of "bare metals" without even an operating system into a computer cluster for training LLM. This article comes from Imbue, an AI startup that strives to achieve general intelligence by understanding how machines think. Of course, turning a bunch of "bare metal" without an operating system into a computer cluster for training LLM is not an easy process, full of exploration and trial and error, but Imbue finally successfully trained an LLM with 70 billion parameters. and in the process accumulate
 AI in use | AI created a life vlog of a girl living alone, which received tens of thousands of likes in 3 days
Aug 07, 2024 pm 10:53 PM
AI in use | AI created a life vlog of a girl living alone, which received tens of thousands of likes in 3 days
Aug 07, 2024 pm 10:53 PM
Editor of the Machine Power Report: Yang Wen The wave of artificial intelligence represented by large models and AIGC has been quietly changing the way we live and work, but most people still don’t know how to use it. Therefore, we have launched the "AI in Use" column to introduce in detail how to use AI through intuitive, interesting and concise artificial intelligence use cases and stimulate everyone's thinking. We also welcome readers to submit innovative, hands-on use cases. Video link: https://mp.weixin.qq.com/s/2hX_i7li3RqdE4u016yGhQ Recently, the life vlog of a girl living alone became popular on Xiaohongshu. An illustration-style animation, coupled with a few healing words, can be easily picked up in just a few days.
 A must-read for technical beginners: Analysis of the difficulty levels of C language and Python
Mar 22, 2024 am 10:21 AM
A must-read for technical beginners: Analysis of the difficulty levels of C language and Python
Mar 22, 2024 am 10:21 AM
Title: A must-read for technical beginners: Difficulty analysis of C language and Python, requiring specific code examples In today's digital age, programming technology has become an increasingly important ability. Whether you want to work in fields such as software development, data analysis, artificial intelligence, or just learn programming out of interest, choosing a suitable programming language is the first step. Among many programming languages, C language and Python are two widely used programming languages, each with its own characteristics. This article will analyze the difficulty levels of C language and Python
 Counting down the 12 pain points of RAG, NVIDIA senior architect teaches solutions
Jul 11, 2024 pm 01:53 PM
Counting down the 12 pain points of RAG, NVIDIA senior architect teaches solutions
Jul 11, 2024 pm 01:53 PM
Retrieval-augmented generation (RAG) is a technique that uses retrieval to boost language models. Specifically, before a language model generates an answer, it retrieves relevant information from an extensive document database and then uses this information to guide the generation process. This technology can greatly improve the accuracy and relevance of content, effectively alleviate the problem of hallucinations, increase the speed of knowledge update, and enhance the traceability of content generation. RAG is undoubtedly one of the most exciting areas of artificial intelligence research. For more details about RAG, please refer to the column article on this site "What are the new developments in RAG, which specializes in making up for the shortcomings of large models?" This review explains it clearly." But RAG is not perfect, and users often encounter some "pain points" when using it. Recently, NVIDIA’s advanced generative AI solution
