

How to use Koa2 to develop WeChat QR code scanning payment
This time I will show you how to use Koa2 to develop WeChat QR code scanning payment, and what are the precautions of using Koa2 to develop WeChat QR code scanning payment. The following is a practical case, let's come together take a look.
I was developing a function some time ago, and the requirement is to pay by scanning the WeChat QR code. This scenario is not uncommon for us. Various electronic shopping malls, offline vending machines, etc. all have this function. Usually I am just a user, but now I am a developer, which is not a small pitfall. So hereby write a blog to record it. Note: To develop WeChat QR code payment, you must have the permission of the corresponding merchant account, otherwise you will not be able to develop it. If you do not have the corresponding permissions, this article is not recommended to be read.Two modes
Open the WeChat payment document, we can see two payment modes: mode one and mode two. The flow charts of both are given in the WeChat documentation (but to be honest, the drawings are really ugly). The document points out the difference between the two: Before the development of Mode 1, merchants must set a payment callback URL in the backend of the public platform. Function implemented by URL: Receive the productid and openid called back by the WeChat payment system after the user scans the QR code. Compared with Mode 1, Mode 2 has a simpler process and does not rely on the set callback payment URL. The merchant's backend system first calls the unified ordering interface of WeChat payment. The WeChat backend system returns the link parameter code_url. The merchant's backend system generates a QR code image from the code_url value. The user uses the WeChat client to scan the code and initiate payment. Note: code_url is valid for 2 hours. After expiration, scanning the code cannot initiate payment. Mode 1 is more common when we shop online. A special page will pop up for scanning the QR code to pay. Then after the payment is successful, this page will jump back to the callback page again to notify you that the payment was successful. The second one is less likely to be correct, but the second one is relatively simple to develop.This article mainly introduces the development of mode two.
Build a simple development environment for Koa2
I recommend using koa-generator to quickly build a development environment for Koa2. Scaffolding can help us save some basic middleware writing steps at the beginning of the Koa project. (If you want to learn Koa, it’s best to build one yourself. If you already know Koa, you can use some quick scaffolding.) First install it globallykoa-generator:
npm install -g koa-generator
#or
yarn global add koa-generator
koa-wechatpay, and then enter koa2 koa-wechatpay. Then the scaffolding will automatically create the corresponding folder koa-wechatpay and generate the basic skeleton. Go into this folder and install the corresponding plug-in. Enter:
npm install
#or
yarn
npm start or yarn start to run the project (the default listening port is 3000).
routes/index.js.
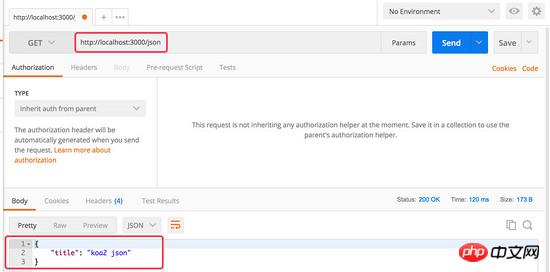
{
 "title": "koa2 json"
}wechatpay.js in the routes folder Used to write our processes.
Signature
#The key to communicating with the WeChat server is that the signature must be correct. If the signature is incorrect, then everything is in vain. First we need to go to the backend of the official account to obtain the following corresponding id or key information we need. Among them,notify_url and server_ip are used for when our payment is successful, WeChat will actively send the payment success information to this url post.
https://pay.weixin.qq.com/wiki/doc/api/native.php?chapter=4_3
In order for the signature to be correct , we need to installmd5.
npm install md5 --save
#or
yarn add md5
const md5 = require('md5')
const appid = 'xxx'
const mch_id = 'yyy'
const mch_api_key = 'zzz'
const notify_url = 'http://xxx/api/notify' // 服务端可访问的域名和接口
const server_ip = 'xx.xx.xx.xx' // 服务端的ip地址
const trade_type = 'NATIVE' // NATIVE对应的是二维码扫码支付
let body = 'XXX的充值支付' // 用于显示在支付界面的提示词const signString = (fee, ip, nonce) => {
let tempString = `appid=${appid}&body=${body}&mch_id=${mch_id}&nonce_str=${nonce}¬ify_url=${notify_url}&out_trade_no=${nonce}&spbill_create_ip=${ip}&total_fee=${fee}&trade_type=${trade_type}&key=${mch_api_key}`
return md5(tempString).toUpperCase()
}其中 fee 是要充值的费用,以分为单位。比如要充值1块钱, fee 就是100。ip是个比较随意的选项,只要符合规则的ip经过测试都是可以的,下文里我用的是 server_ip 。 nonce 就是微信要求的不重复的32位以内的字符串,通常可以使用订单号等唯一标识的字符串。
由于跟微信的服务器交流都是用xml来交流,所以现在我们要手动组装一下post请求的 xml :
const xmlBody = (fee, nonce_str) => {
 const xml = `
 <xml>
 <appid>${appid}</appid>
 <body>${body}</body>
 <mch_id>${mch_id}</mch_id>
 <nonce_str>${nonce_str}</nonce_str>
 <notify_url>${notify_url}</notify_url>
 <out_trade_no>${nonce_str}</out_trade_no>
 <total_fee>${fee}</total_fee>
 <spbill_create_ip>${server_ip}</spbill_create_ip>
 <trade_type>NATIVE</trade_type>
 <sign>${signString(fee, server_ip, nonce_str)}</sign>
 </xml>
 `
 return {
 xml,
 out_trade_no: nonce_str
 }
}如果你怕自己的签名的 xml 串有问题,可以提前在微信提供的签名校验工具里先校验一遍,看看是否能通过。
发送请求
因为需要跟微信服务端发请求,所以我选择了 axios 这个在浏览器端和node端都能发起ajax请求的库。
安装过程不再赘述。继续在 wechatpay.js 写发请求的逻辑。
由于微信给我们返回的也将是一个xml格式的字符串。所以我们需要预先写好解析函数,将xml解析成js对象。为此你可以安装一个 xml2js 。安装过程跟上面的类似,不再赘述。
微信会给我们返回一个诸如下面格式的 xml 字符串:
<xml><return_code><![CDATA[SUCCESS]]></return_code>
<return_msg><![CDATA[OK]]></return_msg>
<appid><![CDATA[wx742xxxxxxxxxxxxx]]></appid>
<mch_id><![CDATA[14899xxxxx]]></mch_id>
<nonce_str><![CDATA[R69QXXXXXXXX6O]]></nonce_str>
<sign><![CDATA[79F0891XXXXXX189507A184XXXXXXXXX]]></sign>
<result_code><![CDATA[SUCCESS]]></result_code>
<prepay_id><![CDATA[wx152316xxxxxxxxxxxxxxxxxxxxxxxxxxx]]></prepay_id>
<trade_type><![CDATA[NATIVE]]></trade_type>
<code_url><![CDATA[weixin://wxpay/xxxurl?pr=dQNakHH]]></code_url>
</xml>
我们的目标是转为如下的js对象,好让我们用js来操作数据:
{
 return_code: 'SUCCESS', // SUCCESS 或者 FAIL
 return_msg: 'OK',
 appid: 'wx742xxxxxxxxxxxxx',
 mch_id: '14899xxxxx',
 nonce_str: 'R69QXXXXXXXX6O',
 sign: '79F0891XXXXXX189507A184XXXXXXXXX',
 result_code: 'SUCCESS',
 prepay_id: 'wx152316xxxxxxxxxxxxxxxxxxxxxxxxxxx',
 trade_type: 'NATIVE',
 code_url: 'weixin://wxpay/xxxurl?pr=dQNakHH' // 用于生成支付二维码的链接
}于是我们写一个函数,调用 xml2js 来解析xml:
// 将XML转为JS对象
const parseXML = (xml) => {
 return new Promise((res, rej) => {
 xml2js.parseString(xml, {trim: true, explicitArray: false}, (err, json) => {
 if (err) {
 rej(err)
 } else {
 res(json.xml)
 }
 })
 })
}上面的代码返回了一个 Promise 对象,因为 xml2js 的操作是在回调函数里返回的结果,所以为了配合Koa2的 async 、 await ,我们可以将其封装成一个 Promise 对象,将解析完的结果通过 resolve 返回回去。这样就能用 await 来取数据了:
const axios = require('axios')
const url = 'https://api.mch.weixin.qq.com/pay/unifiedorder' // 微信服务端地址
const pay = async (ctx) => {
 const form = ctx.request.body // 通过前端传来的数据
 const orderNo = 'XXXXXXXXXXXXXXXX' // 不重复的订单号
 const fee = form.fee // 通过前端传来的费用值
 const data = xmlBody(fee, orderNo) // fee是费用,orderNo是订单号(唯一)
 const res = await axios.post(url, {
 data: data.xml
 }).then(async res => {
 const resJson = await parseXML(res.data)
 return resJson // 拿到返回的数据
 }).catch(err => {
 console.log(err)
 })
 if (res.return_code === 'SUCCESS') { // 如果返回的
 return ctx.body = {
 success: true,
 message: '请求成功',
 code_url: res.code_url, // code_url就是用于生成支付二维码的链接
 order_no: orderNo // 订单号
 }
 }
 ctx.body = {
 success: false,
 message: '请求失败'
 }
}
router.post('/api/pay', pay)
module.exports = router然后我们要将这个router挂载到根目录的 app.js 里去。
找到之前默认的两个路由,一个 index ,一个 user :
const index = require('./routes/index')
const users = require('./routes/users')
const wechatpay = require('./routes/wechatpay') // 加在这里然后到页面底下挂载这个路由:
// routes
app.use(index.routes(), index.allowedMethods())
app.use(users.routes(), users.allowedMethods())
app.use(wechatpay.routes(), users.allowedMethods()) // 加在这里
于是你就可以通过发送 /api/pay 来请求二维码数据啦。(如果有跨域需要自己考虑解决跨域方案,可以跟Koa放在同域里,也可以开一层proxy来转发,也可以开CORS头等等)
注意, 本例里是用前端来生成二维码,其实也可以通过后端生成二维码,然后再返回给前端。不过为了简易演示,本例采用前端通过获取 code_url 后,在前端生成二维码。
展示支付二维码
前端我用的是 Vue ,当然你可以选择你喜欢的前端框架。这里关注点在于通过拿到刚才后端传过来的 code_url 来生成二维码。
在前端,我使用的是 @xkeshi/vue-qrcode 这个库来生成二维码。它调用特别简单:
import VueQrcode from '@xkeshi/vue-qrcode'
export default {
 components: {
 VueQrcode
 },
 // ...其他代码
}然后就可以在前端里用 <vue-qrcode> 的组件来生成二维码了:
<vue-qrcode :value="codeUrl" :options="{ size: 200 }">放到Dialog里就是这样的效果:
文本是我自己添加的

付款成功自动刷新页面
有两种将支付成功写入数据库的办法。
一种是在打开了扫码对话框后,不停向微信服务端轮询支付结果,如果支付成功,那么就向后端发起请求,告诉后端支付成功,让后端写入数据库。
一种是后端一直开着接口,等微信主动给后端的 notify_url 发起post请求,告诉后端支付结果,让后端写入数据库。然后此时前端向后端轮询的时候应该是去数据库取轮询该订单的支付结果,如果支付成功就关闭Dialog。
第一种比较简单但是不安全:试想万一用户支付成功的同时关闭了页面,或者用户支付成功了,但是网络有问题导致前端没法往后端发支付成功的结果,那么后端就一直没办法写入支付成功的数据。
第二种虽然麻烦,但是保证了安全。所有的支付结果都必须等微信主动向后端通知,后端存完数据库后再返回给前端消息。这样哪怕用户支付成功的同时关闭了页面,下次再打开的时候,由于数据库已经写入了,所以拿到的也是支付成功的结果。
所以 付款成功自动刷新页面 这个部分我们分为两个部分来说:
前端部分
Vue的data部分
data: {
 payStatus: false, // 未支付成功
 retryCount: 0, // 轮询次数,从0-200
 orderNo: 'xxx', // 从后端传来的order_no
 codeUrl: 'xxx' // 从后端传来的code_url
}在methods里写一个查询订单信息的方法:
// ...
handleCheckBill () {
return setTimeout(() => {
if (!this.payStatus && this.retryCount < 120) {
this.retryCount += 1
axios.post('/api/check-bill', { // 向后端请求订单支付信息
orderNo: this.orderNo
})
.then(res => {
if (res.data.success) {
this.payStatus = true
location.reload() // 偷懒就用reload重新刷新页面
} else {
this.handleCheckBill()
}
}).catch(err => {
console.log(err)
})
} else {
location.reload()
}
}, 1000)
}在打开二维码Dialog的时候,这个方法就启用了。然后就开始轮询。我订了一个时间,200s后如果还是没有付款信息也自动刷新页面。实际上你可以自己根据项目的需要来定义这个时间。
后端部分
前端到后端只有一个接口,但是后端有两个接口。一个是用来接收微信的推送,一个是用来接收前端的查询请求。
先来写最关键的微信的推送请求处理。由于我们接收微信的请求是在Koa的路由里,并且是以流的形式传输的。需要让Koa支持解析xml格式的body,所以需要安装一个rawbody 来获取xml格式的body。
// 处理微信支付回传notify
// 如果收到消息要跟微信回传是否接收到
const handleNotify = async (ctx) => {
 const xml = await rawbody(ctx.req, {
 length: ctx.request.length,
 limit: '1mb',
 encoding: ctx.request.charset || 'utf-8'
 })
 const res = await parseXML(xml) // 解析xml
 if (res.return_code === 'SUCCESS') {
 if (res.result_code === 'SUCCESS') { // 如果都为SUCCESS代表支付成功
 // ... 这里是写入数据库的相关操作
 // 开始回传微信
 ctx.type = 'application/xml' // 指定发送的请求类型是xml
 // 回传微信,告诉已经收到
 return ctx.body = `<xml>
 <return_code><![CDATA[SUCCESS]]></return_code>
 <return_msg><![CDATA[OK]]></return_msg>
 </xml>
 `
 }
 }
 // 如果支付失败,也回传微信
 ctx.status = 400
 ctx.type = 'application/xml'
 ctx.body = `<xml>
 <return_code><![CDATA[FAIL]]></return_code>
 <return_msg><![CDATA[OK]]></return_msg>
 </xml>
 `
}
router.post('/api/notify', handleNotify)这里的坑就是Koa处理微信回传的xml。如果不知道是以 raw-body 的形式回传的,会调试半天。。
接下来这个就是比较简单的给前端回传的了。
const checkBill = async (ctx) => {
 const form = ctx.request.body
 const orderNo = form.orderNo
 const result = await 数据库操作
 if (result) { // 如果订单支付成功
 return ctx.body = {
 success: true
 }
 }
 ctx.status = 400
 ctx.body = {
 success: false
 }
}
router.post('/api/check-bill', checkBill)相信看了本文案例你已经掌握了方法,更多精彩请关注php中文网其它相关文章!
推荐阅读:
The above is the detailed content of How to use Koa2 to develop WeChat QR code scanning payment. For more information, please follow other related articles on the PHP Chinese website!

Hot AI Tools

Undresser.AI Undress
AI-powered app for creating realistic nude photos

AI Clothes Remover
Online AI tool for removing clothes from photos.

Undress AI Tool
Undress images for free

Clothoff.io
AI clothes remover

Video Face Swap
Swap faces in any video effortlessly with our completely free AI face swap tool!

Hot Article
Hot Tools

Notepad++7.3.1
Easy-to-use and free code editor

SublimeText3 Chinese version
Chinese version, very easy to use

Zend Studio 13.0.1
Powerful PHP integrated development environment

Dreamweaver CS6
Visual web development tools

SublimeText3 Mac version
God-level code editing software (SublimeText3)
Hot Topics


 Four recommended AI-assisted programming tools
Apr 22, 2024 pm 05:34 PM
Four recommended AI-assisted programming tools
Apr 22, 2024 pm 05:34 PM
This AI-assisted programming tool has unearthed a large number of useful AI-assisted programming tools in this stage of rapid AI development. AI-assisted programming tools can improve development efficiency, improve code quality, and reduce bug rates. They are important assistants in the modern software development process. Today Dayao will share with you 4 AI-assisted programming tools (and all support C# language). I hope it will be helpful to everyone. https://github.com/YSGStudyHards/DotNetGuide1.GitHubCopilotGitHubCopilot is an AI coding assistant that helps you write code faster and with less effort, so you can focus more on problem solving and collaboration. Git
 Which AI programmer is the best? Explore the potential of Devin, Tongyi Lingma and SWE-agent
Apr 07, 2024 am 09:10 AM
Which AI programmer is the best? Explore the potential of Devin, Tongyi Lingma and SWE-agent
Apr 07, 2024 am 09:10 AM
On March 3, 2022, less than a month after the birth of the world's first AI programmer Devin, the NLP team of Princeton University developed an open source AI programmer SWE-agent. It leverages the GPT-4 model to automatically resolve issues in GitHub repositories. SWE-agent's performance on the SWE-bench test set is similar to Devin, taking an average of 93 seconds and solving 12.29% of the problems. By interacting with a dedicated terminal, SWE-agent can open and search file contents, use automatic syntax checking, edit specific lines, and write and execute tests. (Note: The above content is a slight adjustment of the original content, but the key information in the original text is retained and does not exceed the specified word limit.) SWE-A
 Learn how to develop mobile applications using Go language
Mar 28, 2024 pm 10:00 PM
Learn how to develop mobile applications using Go language
Mar 28, 2024 pm 10:00 PM
Go language development mobile application tutorial As the mobile application market continues to boom, more and more developers are beginning to explore how to use Go language to develop mobile applications. As a simple and efficient programming language, Go language has also shown strong potential in mobile application development. This article will introduce in detail how to use Go language to develop mobile applications, and attach specific code examples to help readers get started quickly and start developing their own mobile applications. 1. Preparation Before starting, we need to prepare the development environment and tools. head
 Summary of the five most popular Go language libraries: essential tools for development
Feb 22, 2024 pm 02:33 PM
Summary of the five most popular Go language libraries: essential tools for development
Feb 22, 2024 pm 02:33 PM
Summary of the five most popular Go language libraries: essential tools for development, requiring specific code examples. Since its birth, the Go language has received widespread attention and application. As an emerging efficient and concise programming language, Go's rapid development is inseparable from the support of rich open source libraries. This article will introduce the five most popular Go language libraries. These libraries play a vital role in Go development and provide developers with powerful functions and a convenient development experience. At the same time, in order to better understand the uses and functions of these libraries, we will explain them with specific code examples.
 Which Linux distribution is best for Android development?
Mar 14, 2024 pm 12:30 PM
Which Linux distribution is best for Android development?
Mar 14, 2024 pm 12:30 PM
Android development is a busy and exciting job, and choosing a suitable Linux distribution for development is particularly important. Among the many Linux distributions, which one is most suitable for Android development? This article will explore this issue from several aspects and give specific code examples. First, let’s take a look at several currently popular Linux distributions: Ubuntu, Fedora, Debian, CentOS, etc. They all have their own advantages and characteristics.
 Exploring Go language front-end technology: a new vision for front-end development
Mar 28, 2024 pm 01:06 PM
Exploring Go language front-end technology: a new vision for front-end development
Mar 28, 2024 pm 01:06 PM
As a fast and efficient programming language, Go language is widely popular in the field of back-end development. However, few people associate Go language with front-end development. In fact, using Go language for front-end development can not only improve efficiency, but also bring new horizons to developers. This article will explore the possibility of using the Go language for front-end development and provide specific code examples to help readers better understand this area. In traditional front-end development, JavaScript, HTML, and CSS are often used to build user interfaces
 Understanding VSCode: What is this tool used for?
Mar 25, 2024 pm 03:06 PM
Understanding VSCode: What is this tool used for?
Mar 25, 2024 pm 03:06 PM
"Understanding VSCode: What is this tool used for?" 》As a programmer, whether you are a beginner or an experienced developer, you cannot do without the use of code editing tools. Among many editing tools, Visual Studio Code (VSCode for short) is very popular among developers as an open source, lightweight, and powerful code editor. So, what exactly is VSCode used for? This article will delve into the functions and uses of VSCode and provide specific code examples to help readers
 Comprehensive Guide: Detailed Java Virtual Machine Installation Process
Jan 24, 2024 am 09:02 AM
Comprehensive Guide: Detailed Java Virtual Machine Installation Process
Jan 24, 2024 am 09:02 AM
Essentials for Java development: Detailed explanation of Java virtual machine installation steps, specific code examples required. With the development of computer science and technology, the Java language has become one of the most widely used programming languages. It has the advantages of cross-platform and object-oriented, and has gradually become the preferred language for developers. Before using Java for development, you first need to install the Java Virtual Machine (JavaVirtualMachine, JVM). This article will explain in detail the installation steps of the Java virtual machine and provide specific code examples.
