
 Backend Development
Python Tutorial
How to implement nonlinear support vector machine in TensorFlow
Backend Development
Python Tutorial
How to implement nonlinear support vector machine in TensorFlow
How to implement nonlinear support vector machine in TensorFlow

This article mainly introduces the implementation method of nonlinear support vector machine in TensorFlow. Now I will share it with you and give you a reference. Let’s take a look together
Here we will load the iris data set and create a classifier for mountain iris (I.setosa).
# Nonlinear SVM Example
#----------------------------------
#
# This function wll illustrate how to
# implement the gaussian kernel on
# the iris dataset.
#
# Gaussian Kernel:
# K(x1, x2) = exp(-gamma * abs(x1 - x2)^2)

import matplotlib.pyplot as plt
import numpy as np
import tensorflow as tf
from sklearn import datasets
from tensorflow.python.framework import ops
ops.reset_default_graph()

# Create graph
sess = tf.Session()

# Load the data
# iris.data = [(Sepal Length, Sepal Width, Petal Length, Petal Width)]
# 加载iris数据集,抽取花萼长度和花瓣宽度,分割每类的x_vals值和y_vals值
iris = datasets.load_iris()
x_vals = np.array([[x[0], x[3]] for x in iris.data])
y_vals = np.array([1 if y==0 else -1 for y in iris.target])
class1_x = [x[0] for i,x in enumerate(x_vals) if y_vals[i]==1]
class1_y = [x[1] for i,x in enumerate(x_vals) if y_vals[i]==1]
class2_x = [x[0] for i,x in enumerate(x_vals) if y_vals[i]==-1]
class2_y = [x[1] for i,x in enumerate(x_vals) if y_vals[i]==-1]

# Declare batch size
# 声明批量大小(偏向于更大批量大小)
batch_size = 150

# Initialize placeholders
x_data = tf.placeholder(shape=[None, 2], dtype=tf.float32)
y_target = tf.placeholder(shape=[None, 1], dtype=tf.float32)
prediction_grid = tf.placeholder(shape=[None, 2], dtype=tf.float32)

# Create variables for svm
b = tf.Variable(tf.random_normal(shape=[1,batch_size]))

# Gaussian (RBF) kernel
# 声明批量大小(偏向于更大批量大小)
gamma = tf.constant(-25.0)
sq_dists = tf.multiply(2., tf.matmul(x_data, tf.transpose(x_data)))
my_kernel = tf.exp(tf.multiply(gamma, tf.abs(sq_dists)))

# Compute SVM Model
first_term = tf.reduce_sum(b)
b_vec_cross = tf.matmul(tf.transpose(b), b)
y_target_cross = tf.matmul(y_target, tf.transpose(y_target))
second_term = tf.reduce_sum(tf.multiply(my_kernel, tf.multiply(b_vec_cross, y_target_cross)))
loss = tf.negative(tf.subtract(first_term, second_term))

# Gaussian (RBF) prediction kernel
# 创建一个预测核函数
rA = tf.reshape(tf.reduce_sum(tf.square(x_data), 1),[-1,1])
rB = tf.reshape(tf.reduce_sum(tf.square(prediction_grid), 1),[-1,1])
pred_sq_dist = tf.add(tf.subtract(rA, tf.multiply(2., tf.matmul(x_data, tf.transpose(prediction_grid)))), tf.transpose(rB))
pred_kernel = tf.exp(tf.multiply(gamma, tf.abs(pred_sq_dist)))

# 声明一个准确度函数,其为正确分类的数据点的百分比
prediction_output = tf.matmul(tf.multiply(tf.transpose(y_target),b), pred_kernel)
prediction = tf.sign(prediction_output-tf.reduce_mean(prediction_output))
accuracy = tf.reduce_mean(tf.cast(tf.equal(tf.squeeze(prediction), tf.squeeze(y_target)), tf.float32))

# Declare optimizer
my_opt = tf.train.GradientDescentOptimizer(0.01)
train_step = my_opt.minimize(loss)

# Initialize variables
init = tf.global_variables_initializer()
sess.run(init)

# Training loop
loss_vec = []
batch_accuracy = []
for i in range(300):
  rand_index = np.random.choice(len(x_vals), size=batch_size)
  rand_x = x_vals[rand_index]
  rand_y = np.transpose([y_vals[rand_index]])
  sess.run(train_step, feed_dict={x_data: rand_x, y_target: rand_y})

  temp_loss = sess.run(loss, feed_dict={x_data: rand_x, y_target: rand_y})
  loss_vec.append(temp_loss)

  acc_temp = sess.run(accuracy, feed_dict={x_data: rand_x,
                       y_target: rand_y,
                       prediction_grid:rand_x})
  batch_accuracy.append(acc_temp)

  if (i+1)%75==0:
    print('Step #' + str(i+1))
    print('Loss = ' + str(temp_loss))

# Create a mesh to plot points in
# 为了绘制决策边界(Decision Boundary),我们创建一个数据点(x,y)的网格,评估预测函数
x_min, x_max = x_vals[:, 0].min() - 1, x_vals[:, 0].max() + 1
y_min, y_max = x_vals[:, 1].min() - 1, x_vals[:, 1].max() + 1
xx, yy = np.meshgrid(np.arange(x_min, x_max, 0.02),
           np.arange(y_min, y_max, 0.02))
grid_points = np.c_[xx.ravel(), yy.ravel()]
[grid_predictions] = sess.run(prediction, feed_dict={x_data: rand_x,
                          y_target: rand_y,
                          prediction_grid: grid_points})
grid_predictions = grid_predictions.reshape(xx.shape)

# Plot points and grid
plt.contourf(xx, yy, grid_predictions, cmap=plt.cm.Paired, alpha=0.8)
plt.plot(class1_x, class1_y, 'ro', label='I. setosa')
plt.plot(class2_x, class2_y, 'kx', label='Non setosa')
plt.title('Gaussian SVM Results on Iris Data')
plt.xlabel('Pedal Length')
plt.ylabel('Sepal Width')
plt.legend(loc='lower right')
plt.ylim([-0.5, 3.0])
plt.xlim([3.5, 8.5])
plt.show()

# Plot batch accuracy
plt.plot(batch_accuracy, 'k-', label='Accuracy')
plt.title('Batch Accuracy')
plt.xlabel('Generation')
plt.ylabel('Accuracy')
plt.legend(loc='lower right')
plt.show()

# Plot loss over time
plt.plot(loss_vec, 'k-')
plt.title('Loss per Generation')
plt.xlabel('Generation')
plt.ylabel('Loss')
plt.show()Output:
Step #75
Loss = -110.332
Step #150
Loss = -222.832
Step #225
Loss = -335.332
Step #300
Loss = -447.832
Four different gamma values (1, 10, 25 , 100):

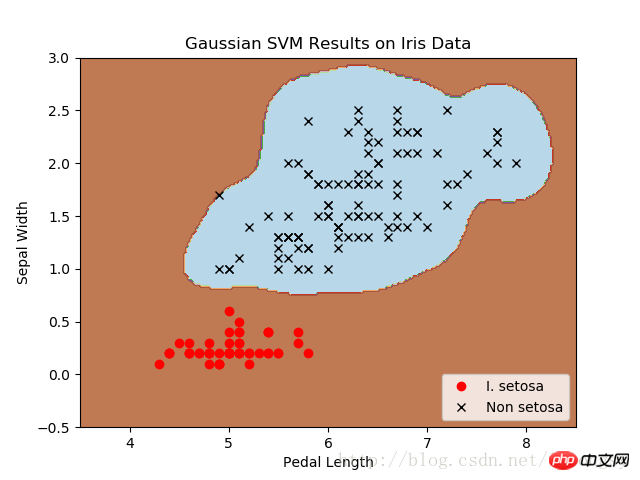


Classifier result diagram of I. setosa with different gamma values, using SVM with Gaussian kernel function.
The larger the gamma value, the greater the impact of each data point on the classification boundary.
Related recommendations:
TensorFlow’s method of implementing random training and batch training
##
The above is the detailed content of How to implement nonlinear support vector machine in TensorFlow. For more information, please follow other related articles on the PHP Chinese website!

Hot AI Tools

Undresser.AI Undress
AI-powered app for creating realistic nude photos

AI Clothes Remover
Online AI tool for removing clothes from photos.

Undress AI Tool
Undress images for free

Clothoff.io
AI clothes remover

Video Face Swap
Swap faces in any video effortlessly with our completely free AI face swap tool!

Hot Article
Hot Tools

Notepad++7.3.1
Easy-to-use and free code editor

SublimeText3 Chinese version
Chinese version, very easy to use

Zend Studio 13.0.1
Powerful PHP integrated development environment

Dreamweaver CS6
Visual web development tools

SublimeText3 Mac version
God-level code editing software (SublimeText3)
Hot Topics


 How to install tensorflow in conda
Dec 05, 2023 am 11:26 AM
How to install tensorflow in conda
Dec 05, 2023 am 11:26 AM
Installation steps: 1. Download and install Miniconda, select the appropriate Miniconda version according to the operating system, and install according to the official guide; 2. Use the "conda create -n tensorflow_env python=3.7" command to create a new Conda environment; 3. Activate Conda environment; 4. Use the "conda install tensorflow" command to install the latest version of TensorFlow; 5. Verify the installation.
 Create a deep learning classifier for cat and dog pictures using TensorFlow and Keras
May 16, 2023 am 09:34 AM
Create a deep learning classifier for cat and dog pictures using TensorFlow and Keras
May 16, 2023 am 09:34 AM
In this article, we will use TensorFlow and Keras to create an image classifier that can distinguish between images of cats and dogs. To do this, we will use the cats_vs_dogs dataset from the TensorFlow dataset. The dataset consists of 25,000 labeled images of cats and dogs, of which 80% are used for training, 10% for validation, and 10% for testing. Loading data We start by loading the dataset using TensorFlowDatasets. Split the data set into training set, validation set and test set, accounting for 80%, 10% and 10% of the data respectively, and define a function to display some sample images in the data set. importtenso
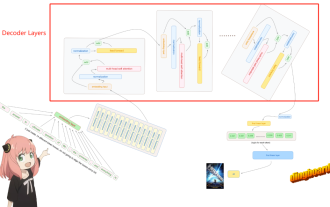 Hand-tearing Llama3 layer 1: Implementing llama3 from scratch
Jun 01, 2024 pm 05:45 PM
Hand-tearing Llama3 layer 1: Implementing llama3 from scratch
Jun 01, 2024 pm 05:45 PM
1. Architecture of Llama3 In this series of articles, we implement llama3 from scratch. The overall architecture of Llama3: Picture the model parameters of Llama3: Let's take a look at the actual values of these parameters in the Llama3 model. Picture [1] Context window (context-window) When instantiating the LlaMa class, the variable max_seq_len defines context-window. There are other parameters in the class, but this parameter is most directly related to the transformer model. The max_seq_len here is 8K. Picture [2] Vocabulary-size and AttentionL
 pip installation tensorflow tutorial
Dec 07, 2023 pm 03:50 PM
pip installation tensorflow tutorial
Dec 07, 2023 pm 03:50 PM
Installation steps: 1. Make sure that Python and pip have been installed; 2. Open the command prompt or terminal window and enter the "pip install tensorflow" command to install TensorFlow; 3. If you want to install the CPU version of TensorFlow, you can use "pip install tensorflow- cpu" command; 4. After the installation is complete, you can use TensorFlow in Python.
 TensorFlow.js can handle machine learning on the browser!
Apr 13, 2023 pm 03:46 PM
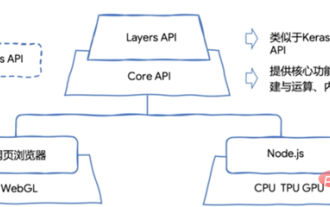
TensorFlow.js can handle machine learning on the browser!
Apr 13, 2023 pm 03:46 PM
Today, with the rapid development of machine learning, various machine learning platforms emerge in endlessly. In order to meet the needs of different business scenarios, machine learning models can be deployed to Android, iOS, and Web browsers respectively, so that the models can be deduced on the terminal side, thus Realize the potential of your model. TensorFlow.js is the JavaScript version of TensorFlow, supports GPU hardware acceleration, and can run in Node.js or browser environments. It not only supports developing, training and deploying models from scratch based entirely on JavaScript, but can also be used to run existing Python versions of TensorFlow models, or based on existing
 How to install tensorflow in pycharm
Dec 20, 2023 pm 04:32 PM
How to install tensorflow in pycharm
Dec 20, 2023 pm 04:32 PM
Installation steps: 1. Open PyCharm and open your project; 2. Go to "File"_"Settings"; 3. Select "Project"_"Python Interpreter"; 4. In the settings window in the upper right corner, click "+ " symbol to add a new library; 5. Enter "tensorflow" in the search box and select the latest version of TensorFlow; 6. Click the "Install Package" button and wait for the installation to complete.
 Create machine learning models and neural network applications using PHP and TensorFlow.
May 11, 2023 am 08:22 AM
Create machine learning models and neural network applications using PHP and TensorFlow.
May 11, 2023 am 08:22 AM
With the increasing development of artificial intelligence and machine learning, more and more developers are exploring the use of different technologies to build machine learning algorithms and applications. As a general-purpose language, PHP is gradually being used in the field of artificial intelligence. This article will introduce how to use PHP and TensorFlow to create machine learning models and neural network applications, helping developers better master this technology. Introduction to PHP and TensorFlow PHP is a scripting language suitable for web development and can be used for server-side scripts and also
 TensorFlow, PyTorch, and JAX: Which deep learning framework is better for you?
Apr 09, 2023 pm 10:01 PM
TensorFlow, PyTorch, and JAX: Which deep learning framework is better for you?
Apr 09, 2023 pm 10:01 PM
Translator | Reviewed by Zhu Xianzhong | Ink Deep learning affects our lives in various forms every day. Whether it’s Siri, Alexa, real-time translation apps on your phone based on user voice commands, or computer vision technology that powers smart tractors, warehouse robots, and self-driving cars, every month seems to bring new advancements. Almost all of these deep learning applications are written in these three frameworks: TensorFlow, PyTorch, or JAX. So, which deep learning frameworks should you use? In this article, we will perform a high-level comparison of TensorFlow, PyTorch, and JAX. Our goal is to educate you on the types of applications that play to their strengths,
