

PyQt implements interface flip switching effect

This article mainly introduces PyQt to realize the interface flip switching effect in detail, which has certain reference value. Interested friends can refer to it
PyQt uses qt to realize the interface flip switching effect. The scene function is implemented using QGraphicsView, QGraphicsLinearLayout, QGraphicsWidget and other qt scene libraries. It can be regarded as a small attempt at the Qt scenario. The content involved is not deep, and the program effect is not as arbitrary as you want. It needs to be further improved and improved. For the time being, I will post the code here for everyone to learn and correct.
The project includes four classes:
Interface A, TestMainWindow, which is used to act as side A of the flip effect.
Interface B, TestMainWindowTwo, is used as the B side of the flip effect.
Drawing interface: TestGraphicWidget, used to draw interfaces A and B.
Main interface: MainWindow is a full-screen transparent window, which is the general stage for displaying the entire effect. It contains a QGraphicsScene and a QGraphicsView, which are used to display interface flipping and interface replacement in the effect.
The principle of the entire effect is summarized in a few points:
First, add all the interfaces required for the entire effect to TestGraphicWidget, and then add TestGraphicWidget Put it into QGraphicsScene, and then add it to the main interface via QGraphicsScene.
Then, interface switching is implemented, two functions, very simple. To display A, remove and hide B; to display B, remove and hide A.
def setOne(self):
  self.twoWidget.hide()
  self.oneWidget.show()
  self.layout.removeItem(self.twoTestWidget)
  self.layout.addItem(self.oneTestWidget)
  self.view.update()

def setTwo(self):
  self.oneWidget.hide()
  self.twoWidget.show()
  self.layout.removeItem(self.oneTestWidget)
  self.layout.addItem(self.twoTestWidget)
  self.view.update()
Then the most important thing, the realization of the flip effect uses the unique flip method of TestGraphicWidget, and the parameters can be adjusted according to the actual situation.
def transeformR(self,count):
  r = self.form.boundingRect()
  for i in range(1,count):
    self.form.setTransform(QTransform()
                .translate(r.width() / 2, r.height() / 2)
                .rotate(91.00/count*i - 360 * 1, Qt.YAxis)
                .translate(-r.width() / 2, -r.height() / 2))
    self.waitMethod()
    self.view.update()

  self.form.setTransform(QTransform()
                .translate(r.width() / 2, r.height() / 2)
                .rotate(270 - 360 * 1, Qt.YAxis)
                .translate(-r.width() / 2, -r.height() / 2))
  self.view.update()
  if self.formflag %2 == 0:
    self.setOne()
  else:
    self.setTwo()

  for i in range(1,count):
    self.form.setTransform(QTransform()
                  .translate(r.width() / 2, r.height() / 2)
                  .rotate(270 + 93.00/count*i - 360 * 1, Qt.YAxis)
                  .translate(-r.width() / 2, -r.height() / 2))
    self.waitMethod()
self.view.update()And provides two methods to make the program wait without the interface getting stuck:
def sleep(self,msec):

  dieTime = QTime.currentTime().addMSecs(msec)

  print dieTime,QTime.currentTime()
  #a = 0
  while( QTime.currentTime() < dieTime ):
    #print "000000000000"
    QCoreApplication.processEvents(QEventLoop.AllEvents, 100)


def waitMethod(self):
  tt = QElapsedTimer()
  tt.start()

  q = QEventLoop()
  t = QTimer()
  t.setSingleShot(True)
  self.connect(t, SIGNAL("timeout()"), q.quit)
  t.start(1)  # 5s timeout
  q.exec_()
  if(t.isActive()):
    t.stop()
  else:
    pass

print tt.elapsed()The source code is pasted below for reference. This source code can be run directly, and the internal debugging information can be Ignore:
#coding:utf-8
'''''
Created on 2015 7 15
@author: guowu
'''
from PyQt4.QtGui import QWidget, QTextEdit, QPushButton, QGraphicsScene,\
QGraphicsWidget, QGraphicsLinearLayout, QGraphicsView, QApplication,\
QTransform, QHBoxLayout, QPainter, QLabel, QGraphicsLayoutItem, QFont,\
QPixmap, QBrush
from PyQt4.QtCore import Qt, QTime, QCoreApplication, QEventLoop, QObject,\
SIGNAL, QPoint, QTimer, QBasicTimer, QElapsedTimer, QPointF
import sys
import time
class TestGraphicWidget(QGraphicsWidget):
def __init__(self,parent=None):
super(TestGraphicWidget,self).__init__(parent)
self.setWindowFlags(Qt.Window)
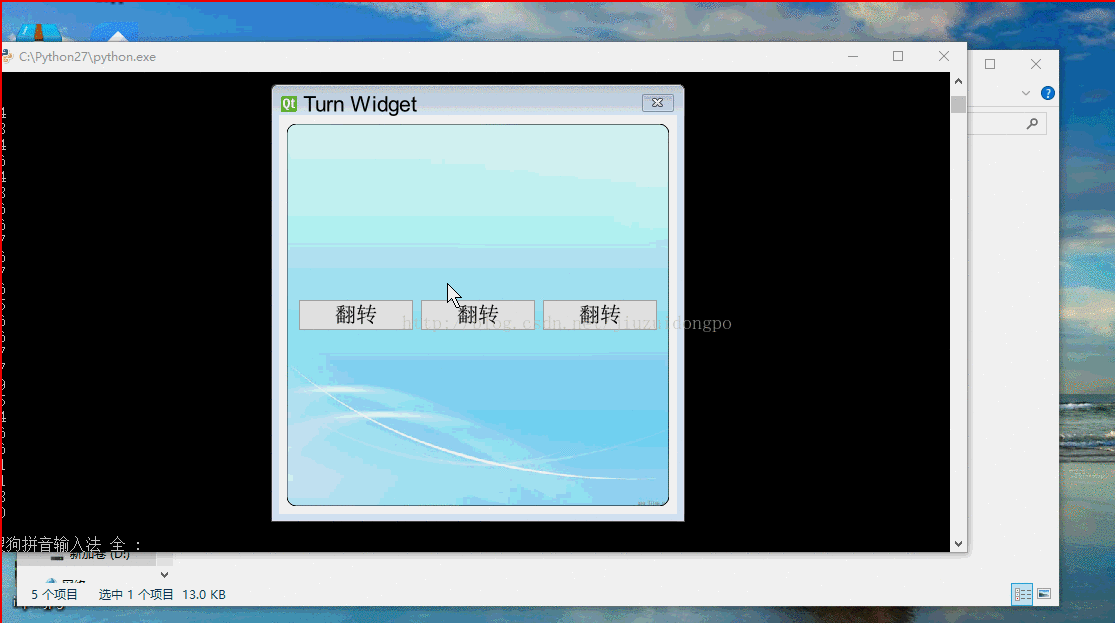
self.setWindowTitle("Turn Widget")
self.resize(400,400)
#self.setPos(QPoint(0,0))
self.mousePressed = False
def closeEvent(self,event):
print "closeclosetest"
self.emit(SIGNAL("startTurn"))
def mouseMoveEvent(self, event):
print "move move"
if self.mousePressed:
#self.move(self.pos() + event.pos() - self.currentPos)
self.setPos(self.pos() + event.pos() - self.currentPos)
def mousePressEvent(self, event):
if event.buttons() == Qt.LeftButton:
self.currentPos = event.pos()
self.mousePressed = True
class TestMainWindow(QWidget):
def __init__(self,parent=None):
super(TestMainWindow,self).__init__(parent)
#self.setStyleSheet("background: transparent;border:0px;")
self.setAttribute(Qt.WA_TranslucentBackground,True)
self.firstButton = QPushButton(u"翻转")
self.secondButton = QPushButton(u"翻转")
self.thirdButton = QPushButton(u"翻转")
self.mainLayout = QHBoxLayout(self)
self.mainLayout.addWidget(self.firstButton)
self.mainLayout.addWidget(self.secondButton)
self.mainLayout.addWidget(self.thirdButton)
self.connect(self.firstButton, SIGNAL("clicked()"), self.startTurn)
self.connect(self.secondButton, SIGNAL("clicked()"), self.startTurn)
self.connect(self.thirdButton, SIGNAL("clicked()"), self.startTurn)
def startTurn(self):
self.emit(SIGNAL("buttonclicked"))
def closeEvent(self,event):
print "closeclosetest"
self.emit(SIGNAL("startTurn"))
def paintEvent(self,event):
#print "paintevent"
painter = QPainter(self)
painter.setRenderHint(QPainter.SmoothPixmapTransform, True)#像素光滑
painter.setRenderHint(QPainter.Antialiasing, True)#反锯齿
pix = QPixmap("cloud-bak.jpg").scaled(self.width(),self.height())
painter.setBrush(QBrush(pix))
painter.drawRoundRect(self.rect(),5,5)
class TestMainWindowTwo(QWidget):
def __init__(self,parent=None):
super(TestMainWindowTwo,self).__init__(parent)
#self.setStyleSheet("QWidget{background: transparent;border:0px;}")
self.setAttribute(Qt.WA_TranslucentBackground,True)
self.firstButton = QPushButton(u"p翻转")
self.secondButton = QPushButton(u"p翻转")
self.thirdButton = QPushButton(u"p翻转")
self.mainLayout = QHBoxLayout(self)
self.mainLayout.addWidget(self.firstButton)
self.mainLayout.addWidget(self.secondButton)
self.mainLayout.addWidget(self.thirdButton)
self.connect(self.firstButton, SIGNAL("clicked()"), self.startTurn)
self.connect(self.secondButton, SIGNAL("clicked()"), self.startTurn)
self.connect(self.thirdButton, SIGNAL("clicked()"), self.startTurn)
def startTurn(self):
self.emit(SIGNAL("buttonclicked"))
def paintEvent(self,event):
#print "paintevent"
painter = QPainter(self)
painter.setRenderHint(QPainter.SmoothPixmapTransform, True)#像素光滑
painter.setRenderHint(QPainter.Antialiasing, True)#反锯齿
pix = QPixmap("login.jpg").scaled(self.width(),self.height())
painter.setBrush(QBrush(pix))
painter.drawRoundRect(self.rect(),5,5)
class MainWindow(QWidget):
def __init__(self,parent=None):
super(MainWindow,self).__init__(parent)
#self.setStyleSheet("QGraphicsView{background:rgb(0,0,0,0);border:0px;}")
self.formflag = 0
self.scene = QGraphicsScene()
self.setWindowFlags(Qt.FramelessWindowHint|Qt.WindowStaysOnTopHint)
self.setAttribute(Qt.WA_TranslucentBackground,True)
#创建部件,并关联它们的信号和槽
self.oneWidget = TestMainWindow()
self.connect(self.oneWidget, SIGNAL("buttonclicked"),self.startTurn)
self.twoWidget = TestMainWindowTwo()
self.connect(self.twoWidget, SIGNAL("buttonclicked"),self.startTurn)
#self.textEdit = QGraphicsLayoutItem(self.edit)
self.oneTestWidget = self.scene.addWidget(self.oneWidget)
self.twoTestWidget = self.scene.addWidget(self.twoWidget)
self.form = TestGraphicWidget()
self.connect(self.form, SIGNAL("startTurn"),self.close)
#将部件添加到布局管理器中
self.layout = QGraphicsLinearLayout(self.form)
self.layout.setSpacing(0)
self.layout.addItem(self.oneTestWidget)
self.layout.addItem(self.twoTestWidget)
self.layout.removeItem(self.twoTestWidget)
self.twoWidget.hide()
#创建图形部件,设置其为一个顶层窗口,然后在其上应用布局
#self.form.setWindowFlags(Qt.Window|Qt.FramelessWindowHint)
#self.form.setWindowTitle("Widget Item")
#self.form.setLayout(layout)
self.scene.addItem(self.form)
#self.form.setPos(QPointF(0,0))
#self.form.hide()
self.view = QGraphicsView(self.scene,self)
#self.view.setScene(self.scene)
self.view.setRenderHint(QPainter.Antialiasing)
self.view.setViewportUpdateMode(QGraphicsView.BoundingRectViewportUpdate)
self.view.resize(QApplication.desktop().width(),QApplication.desktop().height())
self.view.setStyleSheet("background: transparent;border:0px;")
self.view.setWindowFlags(Qt.FramelessWindowHint)
self.view.setHorizontalScrollBarPolicy(Qt.ScrollBarAlwaysOff)
self.view.setVerticalScrollBarPolicy(Qt.ScrollBarAlwaysOff)
self.view.move(QPoint(0,0))
#self.view.setAttribute(Qt.WA_TranslucentBackground,True)
#self.form.resize(500,500)
#self.form.setWindowFlags(Qt.FramelessWindowHint)
#for(int i=1;i<=360;i++)
def setOne(self):
self.twoWidget.hide()
self.oneWidget.show()
self.layout.removeItem(self.twoTestWidget)
self.layout.addItem(self.oneTestWidget)
self.view.update()
def setTwo(self):
self.oneWidget.hide()
self.twoWidget.show()
self.layout.removeItem(self.oneTestWidget)
self.layout.addItem(self.twoTestWidget)
self.view.update()
def transeformT(self,count):
r = self.form.boundingRect()
for i in range(1,count):
print "............."
self.form.setTransform(QTransform()
.translate(r.width() / 2, r.height() / 2)
.rotate(364.00/count*i - 360 * 1, Qt.YAxis)
.translate(-r.width() / 2, -r.height() / 2))
self.waitMethod()
#self.sleep(1)
#time.sleep(1)
self.view.update()
#
def transeformS(self,count):
r = self.form.boundingRect()
for i in range(1,count):
print "............."
self.form.setTransform(QTransform()
.translate(r.width() / 2, r.height() / 2)
.rotate(182.00/count*i - 360 * 1, Qt.YAxis)
.translate(-r.width() / 2, -r.height() / 2))
self.waitMethod()
self.view.update()
def transeformR(self,count):
r = self.form.boundingRect()
for i in range(1,count):
print "............."
self.form.setTransform(QTransform()
.translate(r.width() / 2, r.height() / 2)
.rotate(91.00/count*i - 360 * 1, Qt.YAxis)
.translate(-r.width() / 2, -r.height() / 2))
self.waitMethod()
self.view.update()
self.form.setTransform(QTransform()
.translate(r.width() / 2, r.height() / 2)
.rotate(270 - 360 * 1, Qt.YAxis)
.translate(-r.width() / 2, -r.height() / 2))
self.view.update()
if self.formflag %2 == 0:
self.setOne()
else:
self.setTwo()
for i in range(1,count):
self.form.setTransform(QTransform()
.translate(r.width() / 2, r.height() / 2)
.rotate(270 + 93.00/count*i - 360 * 1, Qt.YAxis)
.translate(-r.width() / 2, -r.height() / 2))
self.waitMethod()
self.view.update()
def transeformB(self,count):
r = self.form.boundingRect()
for i in range(1,count):
print "............."
self.form.setTransform(QTransform()
.translate(r.width(), r.height())
.rotate(91.00/count*i - 360 * 1, Qt.YAxis)
.translate(-r.width(), -r.height()))
self.waitMethod()
self.view.update()
self.form.setTransform(QTransform()
.translate(r.width(), r.height())
.rotate(270 - 360 * 1, Qt.YAxis)
.translate(-r.width(), -r.height()))
self.view.update()
for i in range(1,count):
self.form.setTransform(QTransform()
.translate(r.width(), r.height())
.rotate(270 + 93.00/count*i - 360 * 1, Qt.YAxis)
.translate(-r.width(), -r.height()))
self.waitMethod()
self.view.update()
def transeform(self):
print self.form.pos()
#self.scene.itemAt(QPointF)
rxx = self.scene.itemsBoundingRect()
rx = self.form.boundingRect()
r = self.form.geometry()
print r,rx,rxx
for i in range(1,361):
print self.form.pos()
print "............."
#print r.width(),r.height()
transform = QTransform()
transform.translate(r.width() / 2, r.height()/2)#中心点,原点
transform.rotate(i - 360 * 1, Qt.YAxis)#绕X轴旋转角度
self.form.setTransform(transform)
# self.form.setTransform(QTransform()
# .translate(r.width() / 2, r.height() / 2)
# .rotate(i - 360 * 1, Qt.YAxis)
# .translate(-r.width() / 2, -r.height() / 2))
# self.form.setTransform(QTransform()
# .translate(250, 250)
# .rotate(i - 360 * 1, Qt.YAxis)
# .translate(-250, -250))
self.waitMethod()
self.view.update()
#
def startTurn(self):
self.formflag += 1
self.transeformR(30)
#self.transeform()
#self.form.close()
#self.view.close()
def closeEvent(self,event):
print "close"
self.form.close()
self.view.close()
self.close()
def sleep(self,msec):
dieTime = QTime.currentTime().addMSecs(msec)
print dieTime,QTime.currentTime()
#a = 0
while( QTime.currentTime() < dieTime ):
#print "000000000000"
QCoreApplication.processEvents(QEventLoop.AllEvents, 100)
def waitMethod(self):
tt = QElapsedTimer()
tt.start()
q = QEventLoop()
t = QTimer()
t.setSingleShot(True)
self.connect(t, SIGNAL("timeout()"), q.quit)
t.start(1) # 5s timeout
q.exec_()
if(t.isActive()):
t.stop()
else:
pass
print tt.elapsed()
if __name__ == "__main__":
app = QApplication(sys.argv)
font = QFont()
font.setPointSize(16)
font.setFamily(("Roman Times"))
app.setFont(font)
c = MainWindow()
c.show()
c.move(QPoint(0,0))
app.exec_()Related recommendations:
PyQt5 must learn layout management every day
Python PyQt4 implements QQ drawer effect
The above is the detailed content of PyQt implements interface flip switching effect. For more information, please follow other related articles on the PHP Chinese website!

Hot AI Tools

Undresser.AI Undress
AI-powered app for creating realistic nude photos

AI Clothes Remover
Online AI tool for removing clothes from photos.

Undress AI Tool
Undress images for free

Clothoff.io
AI clothes remover

Video Face Swap
Swap faces in any video effortlessly with our completely free AI face swap tool!

Hot Article
Hot Tools

Notepad++7.3.1
Easy-to-use and free code editor

SublimeText3 Chinese version
Chinese version, very easy to use

Zend Studio 13.0.1
Powerful PHP integrated development environment

Dreamweaver CS6
Visual web development tools

SublimeText3 Mac version
God-level code editing software (SublimeText3)
Hot Topics


 How to switch between 4g and 5g on Xiaomi Mi 14Ultra?
Feb 23, 2024 am 11:49 AM
How to switch between 4g and 5g on Xiaomi Mi 14Ultra?
Feb 23, 2024 am 11:49 AM
Xiaomi 14Ultra is one of the most popular Xiaomi models this year. Xiaomi 14Ultra not only upgrades the processor and various configurations, but also brings many new functional applications to users. This can be seen from the sales of Xiaomi 14Ultra mobile phones. It is very popular, but there are some commonly used functions that you may not know yet. So how does Xiaomi 14Ultra switch between 4g and 5g? Let me introduce the specific content to you below! How to switch between 4g and 5g on Xiaomi 14Ultra? 1. Open the settings menu of your phone. 2. Find and select the "Network" and "Mobile Network" options in the settings menu. 3. In the mobile network settings, you will see the "Preferred network type" option. 4. Click or select this option and you will see
 The best way to solve Pyqt5 installation error is revealed!
Jan 04, 2024 am 10:26 AM
The best way to solve Pyqt5 installation error is revealed!
Jan 04, 2024 am 10:26 AM
Pyqt5 installation error? Quick solution revealed! PyQt5 is a popular Python GUI development toolkit that many developers like to use to create beautiful graphical user interfaces. However, when installing PyQt5, you sometimes encounter some errors. This article will introduce some common PyQt5 installation errors and provide solutions to help you install PyQt5 smoothly. Error: "Nomodulenamed'PyQt5'" This error is usually caused by the PyQt5 module
 Operation tutorial for switching from win11 home version to professional version_Operation tutorial for switching from win11 home version to professional version
Mar 20, 2024 pm 01:58 PM
Operation tutorial for switching from win11 home version to professional version_Operation tutorial for switching from win11 home version to professional version
Mar 20, 2024 pm 01:58 PM
How to convert Win11 Home Edition to Win11 Professional Edition? In Win11 system, it is divided into Home Edition, Professional Edition, Enterprise Edition, etc., and most Win11 notebooks are pre-installed with Win11 Home Edition system. Today, the editor will show you the steps to switch from win11 home version to professional version! 1. First, right-click on this computer on the win11 desktop and properties. 2. Click Change Product Key or Upgrade Windows. 3. Then click Change Product Key after entering. 4. Enter the activation key: 8G7XN-V7YWC-W8RPC-V73KB-YWRDB and select Next. 5. Then it will prompt success, so you can upgrade win11 home version to win11 professional version.
 Common problems and solutions to pyqt5 installation errors
Jan 19, 2024 am 10:00 AM
Common problems and solutions to pyqt5 installation errors
Jan 19, 2024 am 10:00 AM
With the popularity of Python, PyQt5 has become one of the first choice tools for many people for rapid GUI development. However, installation problems are inevitable. The following are several common problems with PyQt5 installation and their solutions. The error message when installing PyQt5 is that the sip module cannot be found. This problem usually occurs when using pip to install PyQt5. The reason for this error is the lack of dependencies on the sip module, so you need to install the sip module manually first. Enter the following code on the command line: pipinsta
 How to implement dual system switching in Win10 system
Jan 03, 2024 pm 05:41 PM
How to implement dual system switching in Win10 system
Jan 03, 2024 pm 05:41 PM
Many friends may not be used to the win system when they first come into contact with it. There are dual systems in the computer. At this time, you can actually switch between the two systems. Let's take a look at the detailed steps for switching between the two systems. How to switch between two systems in win10 system 1. Shortcut key switching 1. Press the "win" + "R" keys to open Run 2. Enter "msconfig" in the run box and click "OK" 3. In the open "System Configuration" In the interface, select the system you need and click "Set as Default". After completion, "Restart" can complete the switch. Method 2. Select switch when booting 1. When you have dual systems, a selection operation interface will appear when booting. You can use the keyboard " Up and down keys to select the system
 Step-by-step guide to quickly solve pyqt5 installation errors
Jan 19, 2024 am 09:32 AM
Step-by-step guide to quickly solve pyqt5 installation errors
Jan 19, 2024 am 09:32 AM
If you are learning Python and want to develop GUI applications, PyQt5 is a very good choice. It is a bound version of the PyQt library under Python, which makes it very convenient to call and develop the Qt graphics library. However, sometimes you may encounter some problems when installing PyQt5. This guide will provide you with some steps to quickly solve installation error problems, and also attach specific code examples. Make sure the Python version is correct PyQt5 is a Python-based library, so first
 Detailed explanation of the solution to pyqt5 installation error
Jan 19, 2024 am 09:37 AM
Detailed explanation of the solution to pyqt5 installation error
Jan 19, 2024 am 09:37 AM
Detailed solution to pyqt5 installation error, with specific code examples. Introduction: PyQt5 is a powerful and popular Python GUI graphical interface development tool. When installing PyQt5, you often encounter some errors, which brings a lot of trouble to developers. This article will introduce in detail several common PyQt5 installation errors and corresponding solutions, and attach code examples for reference. 1. Installation error: Command "pythonsetup.pyegg_info"faile
 Switch the dual system boot mode of Apple computer
Feb 19, 2024 pm 06:50 PM
Switch the dual system boot mode of Apple computer
Feb 19, 2024 pm 06:50 PM
How to switch between Apple dual systems when starting up Apple computers are powerful devices. In addition to their own macOS operating system, you can also choose to install other operating systems, such as Windows, to achieve dual system switching. So how do we switch between the two systems when booting? This article will introduce to you how to switch between dual systems on Apple computers. First of all, before installing dual systems, we need to confirm whether our Apple computer supports dual system switching. Generally speaking, Apple computers are based on
