

Writing APP interface (API) in laravel

This article mainly introduces the relevant information about making APP interface (API) based on laravel. Friends in need can refer to it. I hope to be helpful.
Preliminary preparation
Foreword, why and what to do
My surname is Bai, and I am a novice in programming. However, since I came into contact with the wonderful thing of programming in my freshman year, I have been completely immersed in the world of programming.
No, I have started to mess with APPs recently. It is said that it is really easy to develop an APP now. It can be completed with only JavaScript and a little HTML+css technology. But the backend of the APP is different. After developing an APP and want to read some data into it, we have to develop a backend.
The laravel framework is my favorite PHP framework, bar none. Last year I used laravel to write my personal website, but the roughness made me blush. Okay, let’s not go into details, let’s go directly to the topic - install laravel first!
Basic environment configuration
For specific steps, please refer to the document directly. Laravel5.2 installation
My own environment is win10 Wampsrver2.5 is installed above, but it is worth paying attention to. If you use wampsrver2.5, these places need to be changed. Regarding this, please read my notes and click to preview
Tools: sublime
Browser: chrome (plug-in postman to be used)
About API
API (Application Programming Interface, Application Programming Interface) are predefined functions that provide applications and developers with the ability to access a set of routines based on certain software or hardware without accessing the source code, or Understand the details of the inner workings.
It should be noted that API has its specific purpose, and we should know what it does. What should be entered when accessing the API. What should you get after accessing the API.
When we start designing the API, we should pay attention to these 8 points
The content here is excerpted from the master's blog
The subsequent development plan will revolve around this. (Really great summary)
1.Restful design principles
2.API naming
3.API security
4.API return data
5.Pictures Processing
6. Returned prompt information
7. Online API test document
8. When the app starts, call an initialization API to obtain the necessary information
Use laravel development API
Just when I was worried about whether to start learning from scratch, I found this plug-in dingo/api, so let’s install it now!
First of all, it must be downloaded correctly
Add the following content to the newly installed laravel composer.json
Then open cmd and execute
composer update
In config/app.php Add
App\Providers\OAuthServiceProvider::class,
Dingo\Api\Provider\LaravelServiceProvider::class,
LucaDegasperi\OAuth2Server\Storage\FluentStorageServiceProvider::class,
LucaDegasperi\OAuth2Server\OAuth2ServerServiceProvider::class,
to the providers and add
'Authorizer' => LucaDegasperi\OAuth2Server\Facades\Authorizer::class,
to the aliases. Modify the content in the app/Http/Kernel.php file
protected $middleware = [\LucaDegasperi\OAuth2Server\Middleware\OAuthExceptionHandlerMiddleware::class,
];
protected $routeMiddleware = [
  'oauth' => \LucaDegasperi\OAuth2Server\Middleware\OAuthMiddleware::class,
  'oauth-user' => \LucaDegasperi\OAuth2Server\Middleware\OAuthUserOwnerMiddleware::class,
  'oauth-client' => \LucaDegasperi\OAuth2Server\Middleware\OAuthClientOwnerMiddleware::class,
  'check-authorization-params' => \LucaDegasperi\OAuth2Server\Middleware\CheckAuthCodeRequestMiddleware::class,
  'csrf' => \App\Http\Middleware\VerifyCsrfToken::class,
];
Then execute
php artisan vendor:publish
php artisan migrate
to add these configurations in the .env file
API_STANDARDS_TREE=x
API_SUBTYPE=rest
API_NAME=REST
API_PREFIX =api
API_VERSION=v1
API_CONDITIONAL_REQUEST=true
API_STRICT=false
API_DEBUG=true
API_DEFAULT_FORMAT=json
Modify the app\config\oauth2.php file
'grant_types' => [
  'password' => [
    'class' => 'League\OAuth2\Server\Grant\PasswordGrant',
    'access_token_ttl' => 604800,
    'callback' => '\App\Http\Controllers\Auth\PasswordGrantVerifier@verify',
  ],
],Create a new service provider, create a new OAuthServiceProvider.php file under app/Providers with the following contents
namespace App\Providers;

use Dingo\Api\Auth\Auth;
use Dingo\Api\Auth\Provider\OAuth2;
use Illuminate\Support\ServiceProvider;

class OAuthServiceProvider extends ServiceProvider
{
  public function boot()
  {
    $this->app[Auth::class]->extend('oauth', function ($app) {
      $provider = new OAuth2($app['oauth2-server.authorizer']->getChecker());

      $provider->setUserResolver(function ($id) {
        // Logic to return a user by their ID.
      });

      $provider->setClientResolver(function ($id) {
        // Logic to return a client by their ID.
      });

      return $provider;
    });
  }

  public function register()
  {
    //
  }
}Then open routes.php and add relevant routes
//Get access_token
Route::post('oauth/access_token', function() {
   return Response::json(Authorizer::issueAccessToken());
});

//Create a test user, you don't need this if you already have.
Route::get('/register',function(){
  $user = new App\User();
   $user->name="tester";
   $user->email="test@test.com";
   $user->password = \Illuminate\Support\Facades\Hash::make("password");
   $user->save();
});
$api = app('Dingo\Api\Routing\Router');

//Show user info via restful service.
$api->version('v1', ['namespace' => 'App\Http\Controllers'], function ($api) {
  $api->get('users', 'UsersController@index');
  $api->get('users/{id}', 'UsersController@show');
});

//Just a test with auth check.
$api->version('v1', ['middleware' => 'api.auth'] , function ($api) {
  $api->get('time', function () {
    return ['now' => microtime(), 'date' => date('Y-M-D',time())];
  });
});Create BaseController respectively The contents of .php and UsersController.php are as follows
//BaseController
namespace App\Http\Controllers;

use Dingo\Api\Routing\Helpers;
use Illuminate\Routing\Controller;

class BaseController extends Controller
{
  use Helpers;
}

//UsersController
namespace App\Http\Controllers;

use App\User;
use App\Http\Controllers\Controller;

class UsersController extends BaseController
{

  public function index()
  {
    return User::all();
  }

  public function show($id)
  {
    $user = User::findOrFail($id);
    // 数组形式
    return $this->response->array($user->toArray());
  }
}Then create PasswordGrantVerifier.php under app/Http/Controllers/Auth/ and the contents are as follows
namespace App\Http\Controllers\Auth;
use Illuminate\Support\Facades\Auth;

class PasswordGrantVerifier
{
  public function verify($username, $password)
  {
     $credentials = [
      'email'  => $username,
      'password' => $password,
     ];

     if (Auth::once($credentials)) {
       return Auth::user()->id;
     }

     return false;
  }
}Open the oauth_client table of the database and add a new client data
INSERT INTO 'oauth_clients' ('id', 'secret', 'name', 'created_at', 'updated_at') VALUES ('1', '2', 'Main website', '2016–03–13 23:00:00', '0000–00–00 00:00:00');
The next step is to have fun testing. The APIs to be tested here are
Add a new user
http://localhost/register
Read all user information
http://localhost/api/users
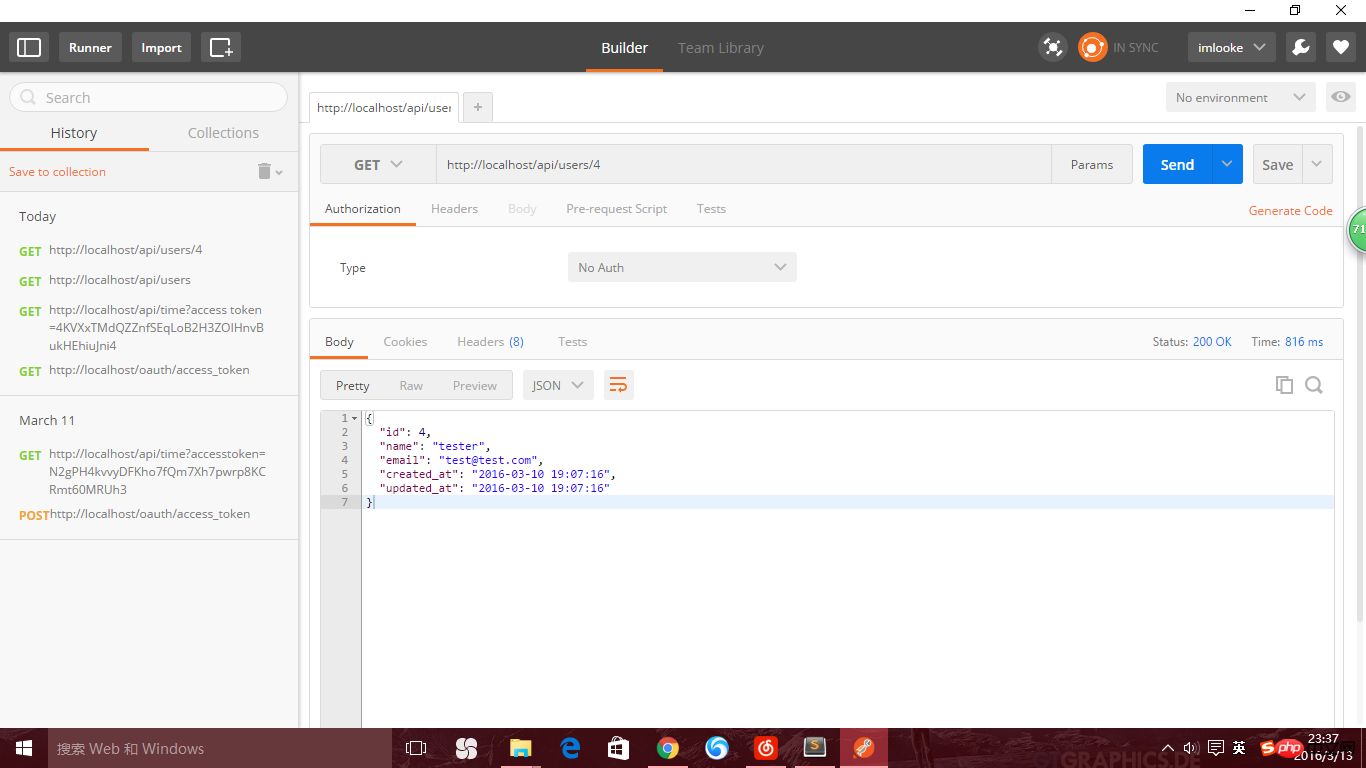
Only return information with user id 4
http ://localhost/api/users/4
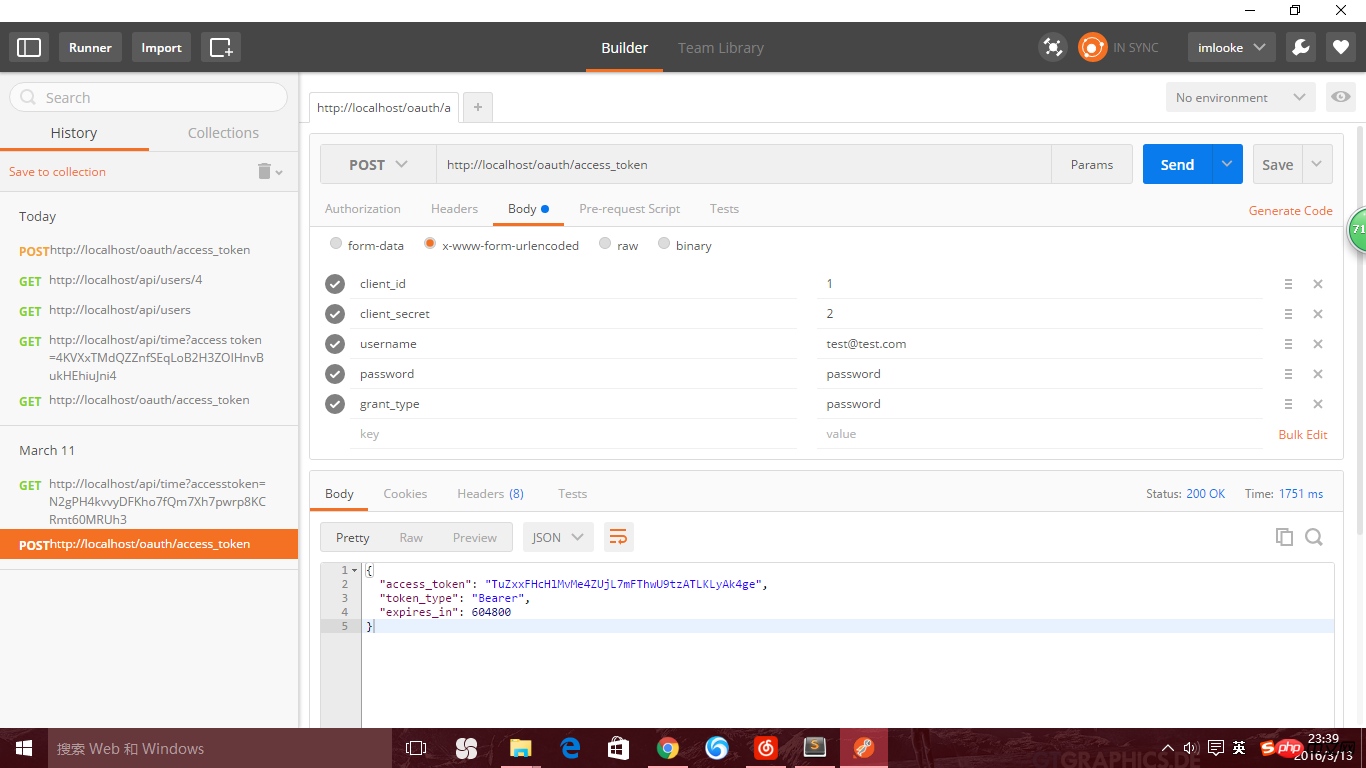
Get access_token
http://localhost/oauth/access_token
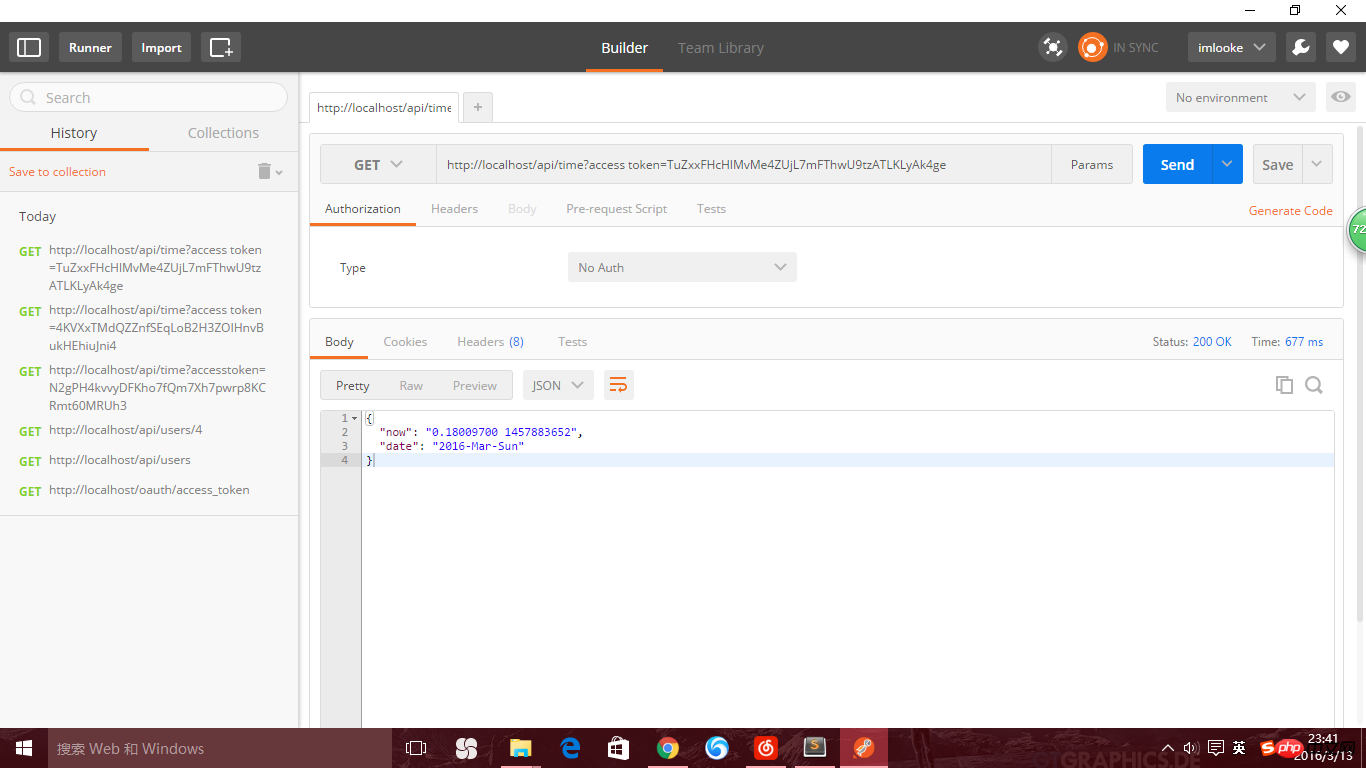
Use the token value to get the time , the correct value can be returned only if the token value is correct
http://localhost/api/time
Open PostMan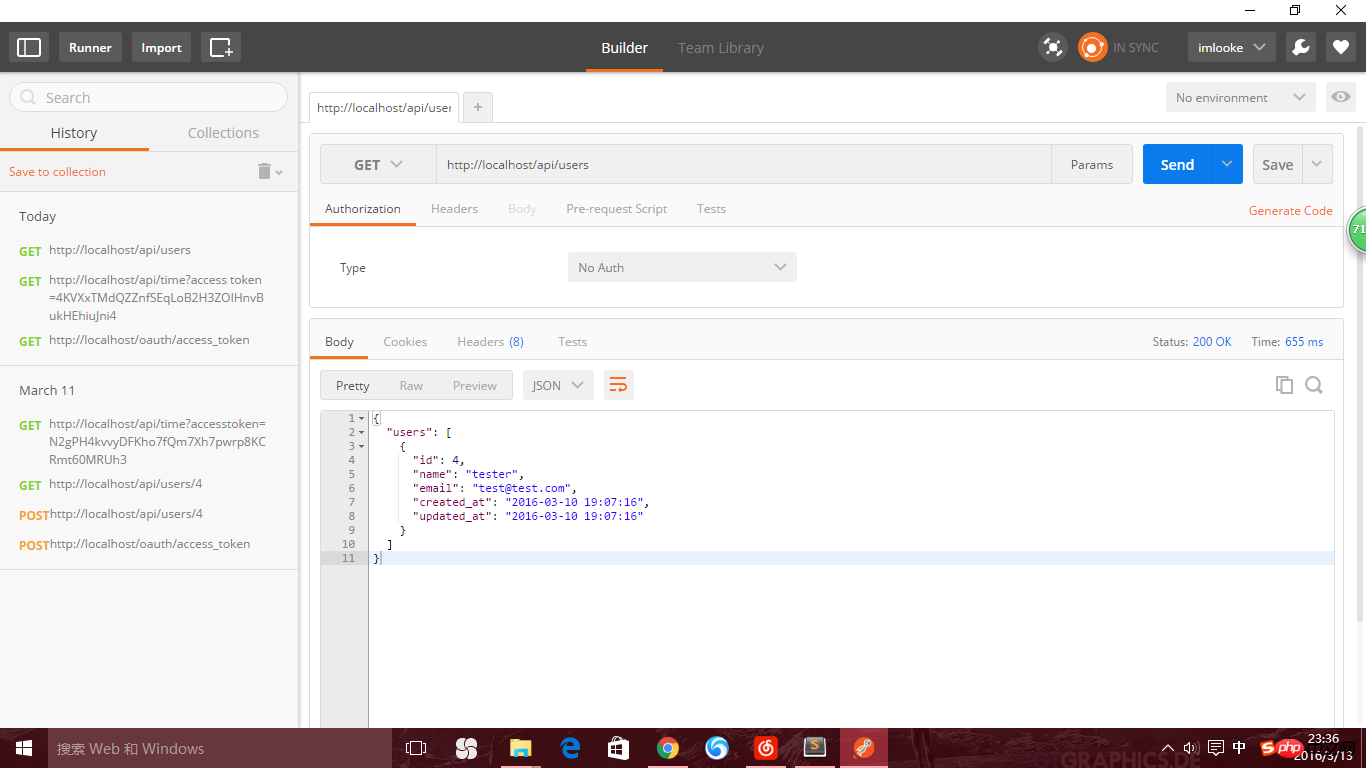
Related recommendations:
How to access paypal payment in larvel5
Learn Laravel5’s Eloquent relationship
The above is the detailed content of Writing APP interface (API) in laravel. For more information, please follow other related articles on the PHP Chinese website!

Hot AI Tools

Undresser.AI Undress
AI-powered app for creating realistic nude photos

AI Clothes Remover
Online AI tool for removing clothes from photos.

Undress AI Tool
Undress images for free

Clothoff.io
AI clothes remover

Video Face Swap
Swap faces in any video effortlessly with our completely free AI face swap tool!

Hot Article
Hot Tools

Notepad++7.3.1
Easy-to-use and free code editor

SublimeText3 Chinese version
Chinese version, very easy to use

Zend Studio 13.0.1
Powerful PHP integrated development environment

Dreamweaver CS6
Visual web development tools

SublimeText3 Mac version
God-level code editing software (SublimeText3)
Hot Topics


 How to get the return code when email sending fails in Laravel?
Apr 01, 2025 pm 02:45 PM
How to get the return code when email sending fails in Laravel?
Apr 01, 2025 pm 02:45 PM
Method for obtaining the return code when Laravel email sending fails. When using Laravel to develop applications, you often encounter situations where you need to send verification codes. And in reality...
 Laravel schedule task is not executed: What should I do if the task is not running after schedule: run command?
Mar 31, 2025 pm 11:24 PM
Laravel schedule task is not executed: What should I do if the task is not running after schedule: run command?
Mar 31, 2025 pm 11:24 PM
Laravel schedule task run unresponsive troubleshooting When using Laravel's schedule task scheduling, many developers will encounter this problem: schedule:run...
 In Laravel, how to deal with the situation where verification codes are failed to be sent by email?
Mar 31, 2025 pm 11:48 PM
In Laravel, how to deal with the situation where verification codes are failed to be sent by email?
Mar 31, 2025 pm 11:48 PM
The method of handling Laravel's email failure to send verification code is to use Laravel...
 How to implement the custom table function of clicking to add data in dcat admin?
Apr 01, 2025 am 07:09 AM
How to implement the custom table function of clicking to add data in dcat admin?
Apr 01, 2025 am 07:09 AM
How to implement the table function of custom click to add data in dcatadmin (laravel-admin) When using dcat...
 Laravel Redis connection sharing: Why does the select method affect other connections?
Apr 01, 2025 am 07:45 AM
Laravel Redis connection sharing: Why does the select method affect other connections?
Apr 01, 2025 am 07:45 AM
The impact of sharing of Redis connections in Laravel framework and select methods When using Laravel framework and Redis, developers may encounter a problem: through configuration...
 Laravel Eloquent ORM in Bangla partial model search)
Apr 08, 2025 pm 02:06 PM
Laravel Eloquent ORM in Bangla partial model search)
Apr 08, 2025 pm 02:06 PM
LaravelEloquent Model Retrieval: Easily obtaining database data EloquentORM provides a concise and easy-to-understand way to operate the database. This article will introduce various Eloquent model search techniques in detail to help you obtain data from the database efficiently. 1. Get all records. Use the all() method to get all records in the database table: useApp\Models\Post;$posts=Post::all(); This will return a collection. You can access data using foreach loop or other collection methods: foreach($postsas$post){echo$post->
 Laravel multi-tenant extension stancl/tenancy: How to customize the host address of a tenant database connection?
Apr 01, 2025 am 09:09 AM
Laravel multi-tenant extension stancl/tenancy: How to customize the host address of a tenant database connection?
Apr 01, 2025 am 09:09 AM
Custom tenant database connection in Laravel multi-tenant extension package stancl/tenancy When building multi-tenant applications using Laravel multi-tenant extension package stancl/tenancy,...
 Laravel's geospatial: Optimization of interactive maps and large amounts of data
Apr 08, 2025 pm 12:24 PM
Laravel's geospatial: Optimization of interactive maps and large amounts of data
Apr 08, 2025 pm 12:24 PM
Efficiently process 7 million records and create interactive maps with geospatial technology. This article explores how to efficiently process over 7 million records using Laravel and MySQL and convert them into interactive map visualizations. Initial challenge project requirements: Extract valuable insights using 7 million records in MySQL database. Many people first consider programming languages, but ignore the database itself: Can it meet the needs? Is data migration or structural adjustment required? Can MySQL withstand such a large data load? Preliminary analysis: Key filters and properties need to be identified. After analysis, it was found that only a few attributes were related to the solution. We verified the feasibility of the filter and set some restrictions to optimize the search. Map search based on city
