

How to implement Ajax upload image and preview function

最近有几个小项目用到了easyUI,一开始决定使用easyUI就注定了项目整体上前后端分离,基本上所有的请求都采用Ajax来完成。在文件上传的时候用到了Ajax上传文件,以及图片在上传之前的预览效果,解决了这两个小问题,和小伙伴们分享下,希望能帮助到大家。
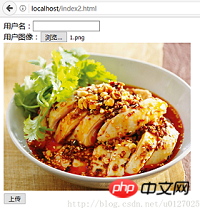
上传之前的预览
方式一
先来说说图片上传之前的预览问题。这里主要采用了HTML5中的FileReader对象来实现,关于FileReader对象,如果小伙伴们不了解,可以查看这篇文章HTML5学习之FileReader接口。我们来看看实现方式:
nbsp;html>
<meta>
<title>Ajax上传文件</title>
<script></script>
用户名:<input><br>
用户图像:<input><br>
<p></p>
<input>
<script>
$("#btnClick").click(function () {
var formData = new FormData();
formData.append("username", $("#username").val());
formData.append("file", $("#userface")[0].files[0]);
$.ajax({
url: '/fileupload',
type: 'post',
data: formData,
processData: false,
contentType: false,
success: function (msg) {
alert(msg);
}
});
});
function preview(file) {
var prevp = document.getElementById('preview');
if (file.files && file.files[0]) {
var reader = new FileReader();
reader.onload = function (evt) {
prevp.innerHTML = '<img src="/static/imghw/default1.png" data-src="' + evt.target.result + '" class="lazy" / alt="How to implement Ajax upload image and preview function" >';
}
reader.readAsDataURL(file.files[0]);
} else {
prevp.innerHTML = '<p class="img" style="filter:progid:DXImageTransform.Microsoft.AlphaImageLoader(sizingMethod=scale,src=\'' + file.value + '\'">';
}
}
</script>
这里对于支持FileReader的浏览器直接使用FileReader来实现,不支持FileReader的浏览器则采用微软的滤镜来实现(注意给图片上传的input标签设置onchange函数)。
实现效果如下:
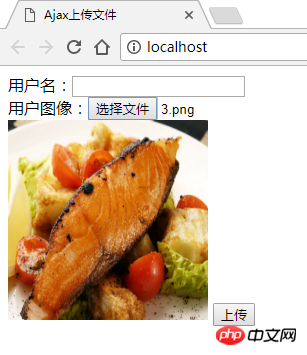
方式二
除了这种方式之外我们也可以采用网上现成的一个jQuery实现的方式。这里主要参考了这里。
不过由于原文年代久远,里边使用的$.browser.msie从jQuery1.9就被移除掉了,所以如果我们想使用这个得做一点额外的处理,我修改后的uploadPreview.js文件内容如下:
jQuery.browser={};(function(){jQuery.browser.msie=false; jQuery.browser.version=0;if(navigator.userAgent.match(/MSIE ([0-9]+)./)){ jQuery.browser.msie=true;jQuery.browser.version=RegExp.$1;}})();
jQuery.fn.extend({
 uploadPreview: function (opts) {
  var _self = this,
   _this = $(this);
  opts = jQuery.extend({
   Img: "ImgPr",
   Width: 100,
   Height: 100,
   ImgType: ["gif", "jpeg", "jpg", "bmp", "png"],
   Callback: function () {}
  }, opts || {});
  _self.getObjectURL = function (file) {
   var url = null;
   if (window.createObjectURL != undefined) {
    url = window.createObjectURL(file)
   } else if (window.URL != undefined) {
    url = window.URL.createObjectURL(file)
   } else if (window.webkitURL != undefined) {
    url = window.webkitURL.createObjectURL(file)
   }
   return url
  };
  _this.change(function () {
   if (this.value) {
    if (!RegExp("\.(" + opts.ImgType.join("|") + ")$", "i").test(this.value.toLowerCase())) {
     alert("选择文件错误,图片类型必须是" + opts.ImgType.join(",") + "中的一种");
     this.value = "";
     return false
    }
    if ($.browser.msie) {
     try {
      $("#" + opts.Img).attr('src', _self.getObjectURL(this.files[0]))
     } catch (e) {
      var src = "";
      var obj = $("#" + opts.Img);
      var p = obj.parent("p")[0];
      _self.select();
      if (top != self) {
       window.parent.document.body.focus()
      } else {
       _self.blur()
      }
      src = document.selection.createRange().text;
      document.selection.empty();
      obj.hide();
      obj.parent("p").css({
       'filter': 'progid:DXImageTransform.Microsoft.AlphaImageLoader(sizingMethod=scale)',
       'width': opts.Width + 'px',
       'height': opts.Height + 'px'
      });
      p.filters.item("DXImageTransform.Microsoft.AlphaImageLoader").src = src
     }
    } else {
     $("#" + opts.Img).attr('src', _self.getObjectURL(this.files[0]))
    }
    opts.Callback()
   }
  })
 }
});然后在我们的html文件中引入这个js文件即可:
nbsp;html>
<meta>
<title>Ajax上传文件</title>
<script></script>
<script></script>
用户名:<input><br>
用户图像:<input><br>
<p><img src="/static/imghw/default1.png" data-src="https://img.php.cn/upload/article/000/054/025/3a26f601966dfd207ad79c0227defade-1.png" class="lazy" alt="How to implement Ajax upload image and preview function" ></p>
<input>
<script>
$("#btnClick").click(function () {
 var formData = new FormData();
  formData.append("username", $("#username").val());
  formData.append("file", $("#userface")[0].files[0]);
  $.ajax({
   url: '/fileupload',
   type: 'post',
   data: formData,
   processData: false,
   contentType: false,
   success: function (msg) {
    alert(msg);
   }
  });
});
$("#userface").uploadPreview({Img: "ImgPr", Width: 120, Height: 120});
</script>
这里有如下几点需要注意:
1.HTML页面中要引入我们自定义的uploadPreview.js文件
2.预先定义好要显示预览图片的img标签,该标签要有id。
3.查找到img标签然后调用uploadPreview函数
执行效果如下:
Ajax上传图片文件
Ajax上传图片文件就简单了,没有那么多方案,核心代码如下:
var formData = new FormData();
formData.append("username", $("#username").val());
formData.append("file", $("#userface")[0].files[0]);
$.ajax({
url: '/fileupload',
type: 'post',
data: formData,
processData: false,
contentType: false,
success: function (msg) {
alert(msg);
}
});核心就是定义一个FormData对象,将要上传的数据包装到这个对象中去。然后在ajax上传数据的时候设置data属性就为formdata,processData属性设置为false,表示jquery不要去处理发送的数据,然后设置contentType属性的值为false,表示不要设置请求头的contentType属性。OK,主要就是设置这三个,设置成功之后,其他的处理就和常规的ajax用法一致了。
后台的处理代码大家可以在文末的案例中下载,这里我就不展示不出来了。
相关推荐:
The above is the detailed content of How to implement Ajax upload image and preview function. For more information, please follow other related articles on the PHP Chinese website!

Hot AI Tools

Undresser.AI Undress
AI-powered app for creating realistic nude photos

AI Clothes Remover
Online AI tool for removing clothes from photos.

Undress AI Tool
Undress images for free

Clothoff.io
AI clothes remover

Video Face Swap
Swap faces in any video effortlessly with our completely free AI face swap tool!

Hot Article
Hot Tools

Notepad++7.3.1
Easy-to-use and free code editor

SublimeText3 Chinese version
Chinese version, very easy to use

Zend Studio 13.0.1
Powerful PHP integrated development environment

Dreamweaver CS6
Visual web development tools

SublimeText3 Mac version
God-level code editing software (SublimeText3)
Hot Topics


 What functions does Doubao app have?
Mar 01, 2024 pm 10:04 PM
What functions does Doubao app have?
Mar 01, 2024 pm 10:04 PM
There will be many AI creation functions in the Doubao app, so what functions does the Doubao app have? Users can use this software to create paintings, chat with AI, generate articles for users, help everyone search for songs, etc. This function introduction of the Doubao app can tell you the specific operation method. The specific content is below, so take a look! What functions does the Doubao app have? Answer: You can draw, chat, write articles, and find songs. Function introduction: 1. Question query: You can use AI to find answers to questions faster, and you can ask any kind of questions. 2. Picture generation: AI can be used to create different pictures for everyone. You only need to tell everyone the general requirements. 3. AI chat: can create an AI that can chat for users,
 The difference between vivox100s and x100: performance comparison and function analysis
Mar 23, 2024 pm 10:27 PM
The difference between vivox100s and x100: performance comparison and function analysis
Mar 23, 2024 pm 10:27 PM
Both vivox100s and x100 mobile phones are representative models in vivo's mobile phone product line. They respectively represent vivo's high-end technology level in different time periods. Therefore, the two mobile phones have certain differences in design, performance and functions. This article will conduct a detailed comparison between these two mobile phones in terms of performance comparison and function analysis to help consumers better choose the mobile phone that suits them. First, let’s look at the performance comparison between vivox100s and x100. vivox100s is equipped with the latest
 What exactly is self-media? What are its main features and functions?
Mar 21, 2024 pm 08:21 PM
What exactly is self-media? What are its main features and functions?
Mar 21, 2024 pm 08:21 PM
With the rapid development of the Internet, the concept of self-media has become deeply rooted in people's hearts. So, what exactly is self-media? What are its main features and functions? Next, we will explore these issues one by one. 1. What exactly is self-media? We-media, as the name suggests, means you are the media. It refers to an information carrier through which individuals or teams can independently create, edit, publish and disseminate content through the Internet platform. Different from traditional media, such as newspapers, television, radio, etc., self-media is more interactive and personalized, allowing everyone to become a producer and disseminator of information. 2. What are the main features and functions of self-media? 1. Low threshold: The rise of self-media has lowered the threshold for entering the media industry. Cumbersome equipment and professional teams are no longer needed.
 What are the functions of Xiaohongshu account management software? How to operate a Xiaohongshu account?
Mar 21, 2024 pm 04:16 PM
What are the functions of Xiaohongshu account management software? How to operate a Xiaohongshu account?
Mar 21, 2024 pm 04:16 PM
As Xiaohongshu becomes popular among young people, more and more people are beginning to use this platform to share various aspects of their experiences and life insights. How to effectively manage multiple Xiaohongshu accounts has become a key issue. In this article, we will discuss some of the features of Xiaohongshu account management software and explore how to better manage your Xiaohongshu account. As social media grows, many people find themselves needing to manage multiple social accounts. This is also a challenge for Xiaohongshu users. Some Xiaohongshu account management software can help users manage multiple accounts more easily, including automatic content publishing, scheduled publishing, data analysis and other functions. Through these tools, users can manage their accounts more efficiently and increase their account exposure and attention. In addition, Xiaohongshu account management software has
 PHP Tips: Quickly Implement Return to Previous Page Function
Mar 09, 2024 am 08:21 AM
PHP Tips: Quickly Implement Return to Previous Page Function
Mar 09, 2024 am 08:21 AM
PHP Tips: Quickly implement the function of returning to the previous page. In web development, we often encounter the need to implement the function of returning to the previous page. Such operations can improve the user experience and make it easier for users to navigate between web pages. In PHP, we can achieve this function through some simple code. This article will introduce how to quickly implement the function of returning to the previous page and provide specific PHP code examples. In PHP, we can use $_SERVER['HTTP_REFERER'] to get the URL of the previous page
 PHP and Ajax: Building an autocomplete suggestion engine
Jun 02, 2024 pm 08:39 PM
PHP and Ajax: Building an autocomplete suggestion engine
Jun 02, 2024 pm 08:39 PM
Build an autocomplete suggestion engine using PHP and Ajax: Server-side script: handles Ajax requests and returns suggestions (autocomplete.php). Client script: Send Ajax request and display suggestions (autocomplete.js). Practical case: Include script in HTML page and specify search-input element identifier.
 What is Discuz? Definition and function introduction of Discuz
Mar 03, 2024 am 10:33 AM
What is Discuz? Definition and function introduction of Discuz
Mar 03, 2024 am 10:33 AM
"Exploring Discuz: Definition, Functions and Code Examples" With the rapid development of the Internet, community forums have become an important platform for people to obtain information and exchange opinions. Among the many community forum systems, Discuz, as a well-known open source forum software in China, is favored by the majority of website developers and administrators. So, what is Discuz? What functions does it have, and how can it help our website? This article will introduce Discuz in detail and attach specific code examples to help readers learn more about it.
 Detailed explanation of the functions and functions of GDM under Linux
Mar 01, 2024 pm 04:18 PM
Detailed explanation of the functions and functions of GDM under Linux
Mar 01, 2024 pm 04:18 PM
Detailed explanation of the functions and functions of GDM under Linux In the Linux operating system, GDM (GNOMEDisplayManager) is a graphical login manager that provides an interface for users to log in and log out of the system. GDM is usually part of the GNOME desktop environment, but can be used by other desktop environments as well. The role of GDM is not only to provide a login interface, but also includes user session management, screen saver, automatic login and other functions. The functions of GDM mainly include the following aspects:
