 Database
 Mysql Tutorial
 Detailed graphic and text explanation of database addition, deletion and modification operations (phpMyAdmin usage tutorial 1)
Detailed graphic and text explanation of database addition, deletion and modification operations (phpMyAdmin usage tutorial 1)
Detailed graphic and text explanation of database addition, deletion and modification operations (phpMyAdmin usage tutorial 1)
Whether it is a Windows operating system or a Linux operating system, phpMyAdmin is graphical The management tools are all used in the same way.
In the previous article "Introduction to phpMyAdmin" we mainly introduced the installation and use of phpMyAdmin, so our article mainly explains the visual interface of the phpMyAdmin graphical management tool Operating database~!
Operation database
Enter: localhost/phpMyAdmin/ in the address bar of the browser, press Enter, you can enter the main interface of phpMyAdmin . Next, you can operate the MySQL database.
1. Create a database
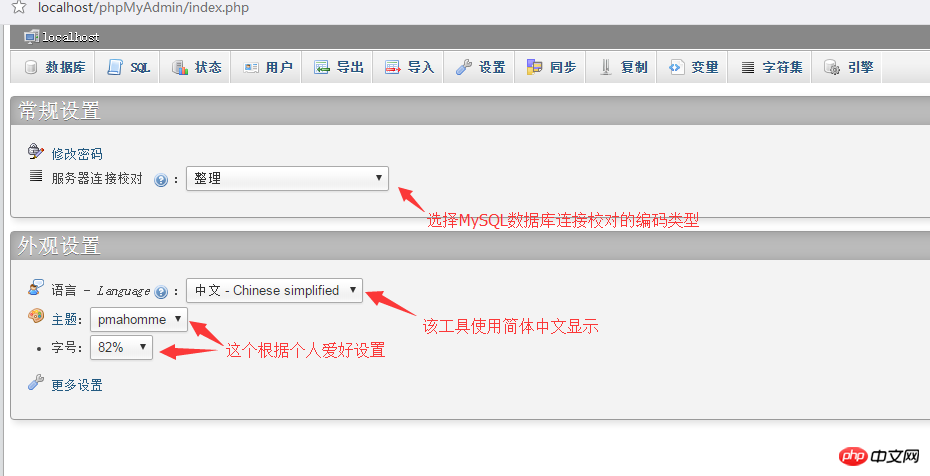
In the main interface of phpMyAdmin, you can see the drop-down box of "Language-languange", we can Select the "Chinese - Chinese simplified" option in the drop-down box, and then there is a "Server connection proofreading". We usually choose the utf8_general_ci simplified Chinese encoding format to prevent garbled characters.
After the above settings are completed, I will start to create the database. Click on the database in the upper left corner and the following interface will appear:
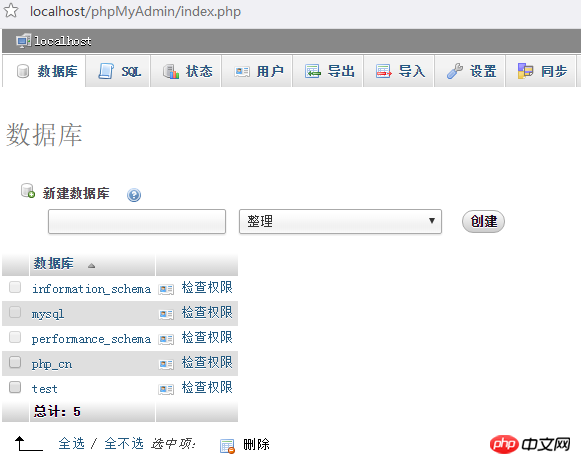
Then enter your own database name in the text box, ours here is "php.cn", although we have set this encoding format at the beginning, but just in case, we can choose it again here "utf8_general_ci", then click the create button and then you can see the database you created in the left column, as shown below:
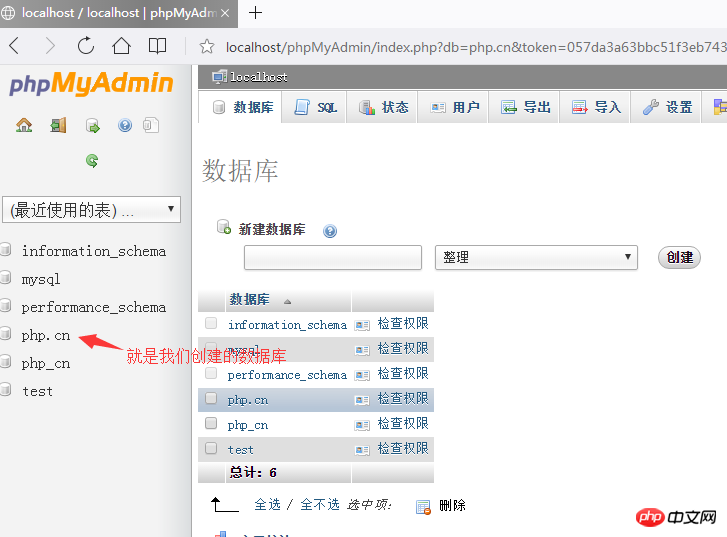
We can click on the database we created, and The database can be managed:
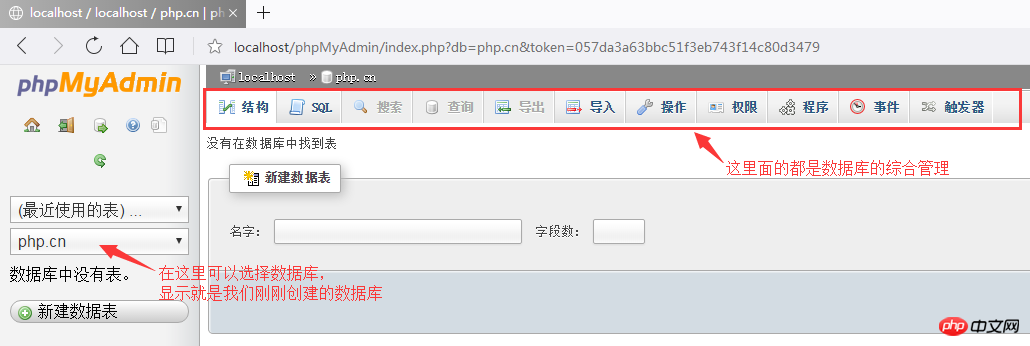
The above is the success of creating the database!
2. Modify the database
In the database management interface (picture above), there is an "Operation" button, click to enter the modification operation database page.
1. Enter the upper left corner of the modification page to create a data table for the current database. Enter the name of the data table to be created and the total number of fields in the two text boxes under the create data table prompt, and click Click the "Execute" button to enter the page for creating a data table structure, which we will introduce in detail in a later article.
2. You can rename the database in the upper right corner of the modification page. Enter the database name in the text box of "Rename the database to:" and click "Execute" to successfully modify the database name.

3. Delete the database
Also click the "Action" button to enter the modification page, and click on " Just below "New Data Table" is Delete Database. Click to delete the database.
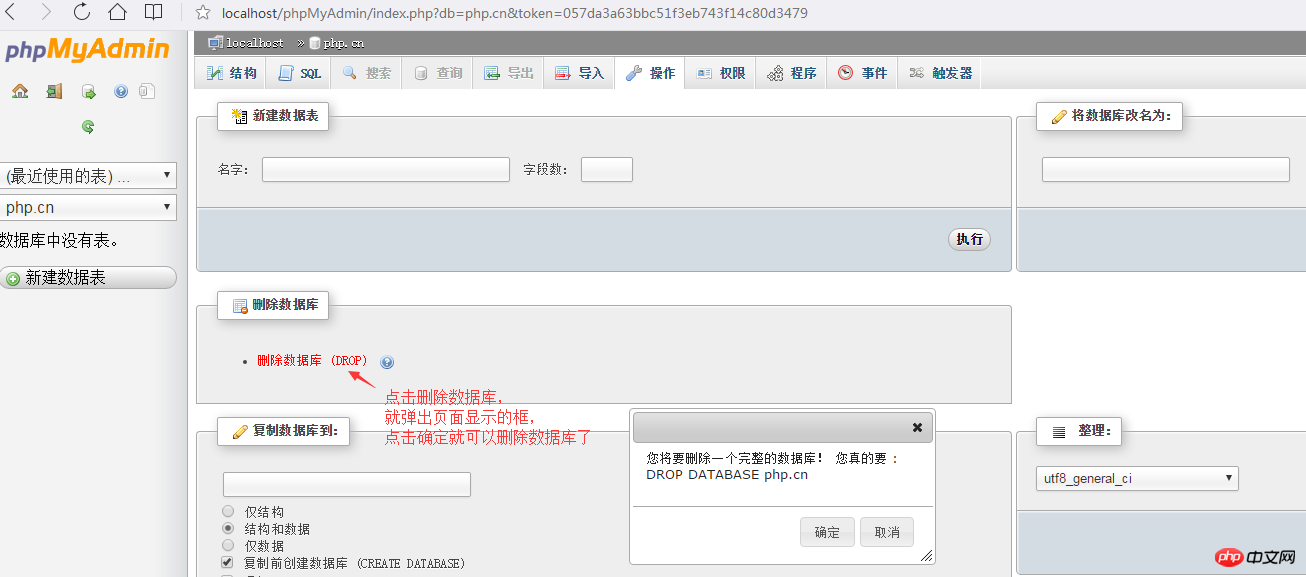
Note:
The database is very important in our daily development. There is a lot of data in it. If you want to delete it, you must be careful. Once deleted, it cannot be restored. It is recommended to back up the database before deleting it!
Have you learned how to create and modify databases? In the next article, we introduce the data table. For details, please read " Detailed graphic explanation of data table addition, deletion and modification operations (phpMyAdmin usage tutorial 2)"!
【Related recommendations】
1. Relevant topic recommendations: "phpMyAdmin usage tutorial"
2. Related video courses Recommended: "MySQL Free Online Tutorial"
3. Online download of related tools: "phpMyAdmin Tool Download"
The above is the detailed content of Detailed graphic and text explanation of database addition, deletion and modification operations (phpMyAdmin usage tutorial 1). For more information, please follow other related articles on the PHP Chinese website!

Hot AI Tools

Undresser.AI Undress
AI-powered app for creating realistic nude photos

AI Clothes Remover
Online AI tool for removing clothes from photos.

Undress AI Tool
Undress images for free

Clothoff.io
AI clothes remover

Video Face Swap
Swap faces in any video effortlessly with our completely free AI face swap tool!

Hot Article

Hot Tools

Notepad++7.3.1
Easy-to-use and free code editor

SublimeText3 Chinese version
Chinese version, very easy to use

Zend Studio 13.0.1
Powerful PHP integrated development environment

Dreamweaver CS6
Visual web development tools

SublimeText3 Mac version
God-level code editing software (SublimeText3)

Hot Topics
 What should I do if navicat cannot connect?
Apr 23, 2024 am 10:00 AM
When Navicat cannot connect, you can try the following solutions in order: Check whether the connection information is correct, such as database name, host name, port number, user name and password. Make sure the database is up and running. Check the firewall rules to confirm that Navicat and related services are not blocked. Try using the ping command to test your network connection. Update Navicat client software to the latest version. Check the server logs for error messages related to failed connections. Try connecting using other database tools to troubleshoot Navicat-specific issues.
 How to check if navicat forgets root password
Apr 24, 2024 am 12:06 AM
Answer: You can view and recover a forgotten Navicat root password by modifying the MySQL configuration file. Stop the Navicat MySQL service. Modify the MySQL configuration file, remove the "#" symbol before the password line and enter the root password. Save and restart the MySQL service.
 iOS 18 adds a new 'Recovered' album function to retrieve lost or damaged photos
Jul 18, 2024 am 05:48 AM
Apple's latest releases of iOS18, iPadOS18 and macOS Sequoia systems have added an important feature to the Photos application, designed to help users easily recover photos and videos lost or damaged due to various reasons. The new feature introduces an album called "Recovered" in the Tools section of the Photos app that will automatically appear when a user has pictures or videos on their device that are not part of their photo library. The emergence of the "Recovered" album provides a solution for photos and videos lost due to database corruption, the camera application not saving to the photo library correctly, or a third-party application managing the photo library. Users only need a few simple steps
 Detailed tutorial on establishing a database connection using MySQLi in PHP
Jun 04, 2024 pm 01:42 PM
How to use MySQLi to establish a database connection in PHP: Include MySQLi extension (require_once) Create connection function (functionconnect_to_db) Call connection function ($conn=connect_to_db()) Execute query ($result=$conn->query()) Close connection ( $conn->close())
 How to handle database connection errors in PHP
Jun 05, 2024 pm 02:16 PM
To handle database connection errors in PHP, you can use the following steps: Use mysqli_connect_errno() to obtain the error code. Use mysqli_connect_error() to get the error message. By capturing and logging these error messages, database connection issues can be easily identified and resolved, ensuring the smooth running of your application.
 How to connect to remote database using Golang?
Jun 01, 2024 pm 08:31 PM
Through the Go standard library database/sql package, you can connect to remote databases such as MySQL, PostgreSQL or SQLite: create a connection string containing database connection information. Use the sql.Open() function to open a database connection. Perform database operations such as SQL queries and insert operations. Use defer to close the database connection to release resources.
 How to use database callback functions in Golang?
Jun 03, 2024 pm 02:20 PM
Using the database callback function in Golang can achieve: executing custom code after the specified database operation is completed. Add custom behavior through separate functions without writing additional code. Callback functions are available for insert, update, delete, and query operations. You must use the sql.Exec, sql.QueryRow, or sql.Query function to use the callback function.
 How to save JSON data to database in Golang?
Jun 06, 2024 am 11:24 AM
JSON data can be saved into a MySQL database by using the gjson library or the json.Unmarshal function. The gjson library provides convenience methods to parse JSON fields, and the json.Unmarshal function requires a target type pointer to unmarshal JSON data. Both methods require preparing SQL statements and performing insert operations to persist the data into the database.


