 Backend Development
 PHP Tutorial
 Use AdminLTE template in PHP's Laravel framework to write website backend interface_php skills
Use AdminLTE template in PHP's Laravel framework to write website backend interface_php skills
AdminLTE is a free advanced admin control panel theme based on Bootstrap 3.x, fully responsive management, suitable for many screen resolutions from small mobile devices to large desktop computers.
Features of AdminLTE:
Fully responsive
Sortable dashboard
18 plugins and 3 custom plugins
Lightweight and fast
Compatible with most Compatible with major browsers
Fully supports Glyphicons, Fontawesome and icons
Tools we use
Laravel
AdminLTE 2.3.2
Bower
Composer
Download a brand new Laravel
If you are not sure, you can go to the official website to check Document link
at We can use the command line directly
composer create-project laravel/laravel myapp --prefer-dist
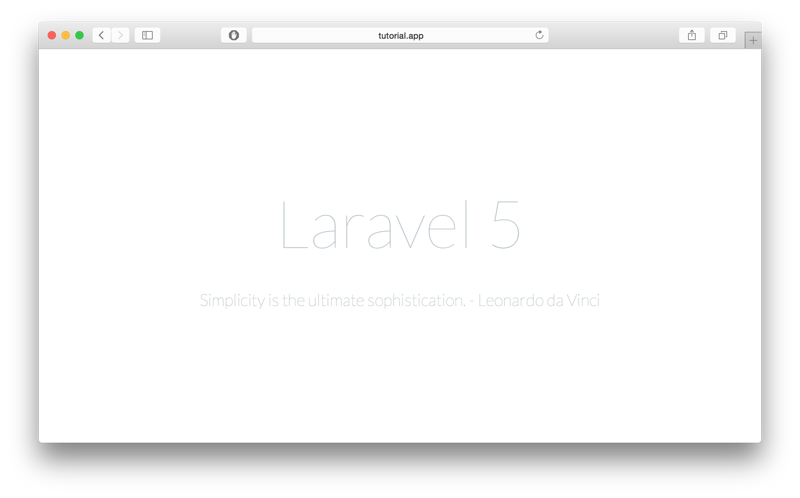
With this command we create a new name myapp Laravel project, if you succeed you can see the picture below

Download AdminLTE through Bower
Enter myapp/ public folder
cd myapp/public
Execute the following command in this folder
bower install admin-lte
Once completed, you will find an additional bower_componets folder, and in this folder you will see AdminLTE
Convert AdminLTE starter.html into Blade template
Laravel uses a good template engine Blade here. In order to make full use of Blade, we need to convert some common common HTML starters. To apply the start page to the Blade template, first create a view in the resources/views folder and name it admin_template.blade.php, and then we create a corresponding route for this page. As below I created
 Route::get('admin', function () {
  return view('admin_template');
});Then, change bower_components/admin-lte Copy the content in /starter.html to our view template, and point the relevant links to the corresponding directory of our AdminLTE. The following is my preliminary setting:
<script src="{{ asset("/bower_components/AdminLTE/plugins/jQuery/jQuery-2.1.4.min.js")}}"></script>
<!-- Bootstrap 3.3.5 -->
<script src="{{ asset("/bower_components/AdminLTE/bootstrap/js/bootstrap.min.js")}}"></script>
<!-- AdminLTE App -->
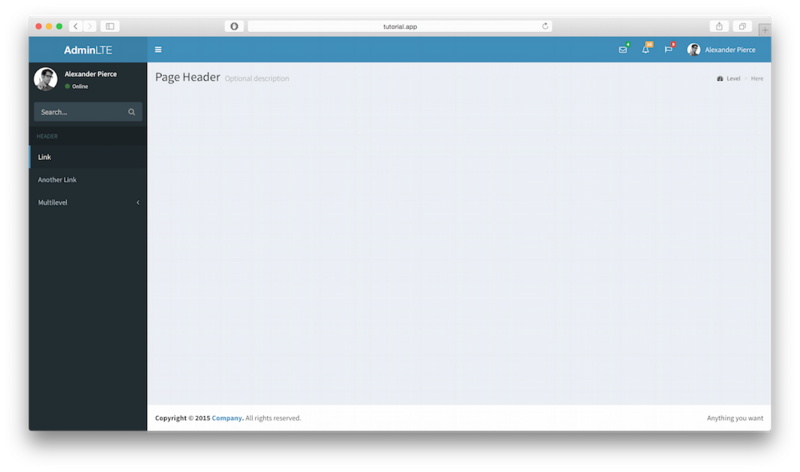
<script src="{{ asset("/bower_components/AdminLTE/dist/js/app.min.js")}}"></script>Similarly like this, change the css The links related to js point to the corresponding directory, and then we check the page changes through localhost:8000/admin. At this time, the page becomes as shown below:

Now Now that we have all the resources to use AdminLTE, let's add the final touches to our main view. I'll separate this template into three files, sidebar.blade.php, header.blade.php, and footer. blade.php
The contents of these three files are admin_template.blade.php header part, aside part and footer part respectively. Cut out these three parts and put them into three files in sequence.
Final Touches
Now that we have personalized our templates apart, we need to set up our initial admin_template.blade.php
template In order to facilitate the dynamic loading of content, as shown below:
<!DOCTYPE html>
<html>
head>
<meta charset="UTF-8">
<title>{{ $page_title or "AdminLTE Dashboard" }}</title>
<meta content='width=device-width, initial-scale=1, maximum-scale=1, user-scalable=no' name='viewport'>
<!-- Bootstrap 3.3.2 -->
<link href="{{ asset("/bower_components/AdminLTE/bootstrap/css/bootstrap.min.css") }}" rel="stylesheet"
type="text/css" />
<!-- Font Awesome Icons -->
<link href="https://maxcdn.bootstrapcdn.com/font-awesome/4.3.0/css/font-awesome.min.css" rel="stylesheet"
type="text/css" />
<!-- Ionicons -->
<link href="http://code.ionicframework.com/ionicons/2.0.0/css/ionicons.min.css" rel="stylesheet"
type="text/css" />
<!-- Theme style -->
<link href="{{ asset("/bower_components/AdminLTE/dist/css/AdminLTE.min.css")}}" rel="stylesheet"
type="text/css" />
<!-- AdminLTE Skins. We have chosen the skin-blue for this starter
page. However, you can choose any other skin. Make sure you
apply the skin class to the body tag so the changes take effect.
-->
<link href="{{ asset("/bower_components/AdminLTE/dist/css/skins/skin-blue.min.css")}}" rel="stylesheet"
type="text/css" />
<!-- HTML5 Shim and Respond.js IE8 support of HTML5 elements and media queries -->
<!-- WARNING: Respond.js doesn't work if you view the page via file:// -->
<!--[if lt IE 9]>
<script src="https://oss.maxcdn.com/libs/html5shiv/3.7.0/html5shiv.js"></script>
<script src="https://oss.maxcdn.com/libs/respond.js/1.3.0/respond.min.js"></script>
<![endif]-->
</head>
<body class="hold-transition skin-blue sidebar-mini">
<div class="wrapper">
<!-- Header -->
@include('header')
<!-- Sidebar -->
@include('sidebar')
<!-- Content Wrapper. Contains page content -->
<div class="content-wrapper">
<!-- Content Header (Page header) -->
<section class="content-header">
<h1>
{{ $page_title or "Page Title" }}
<small>{{ $page_description or null }}</small>
</h1>
<!-- You can dynamically generate breadcrumbs here -->
<ol class="breadcrumb">
<li><a href="#"><i class="fa fa-dashboard"></i> Level</a></li>
<li class="active">Here</li>
</ol>
</section>
<!-- Main content -->
<section class="content">
<!-- Your Page Content Here -->
@yield('content')
</section><!-- /.content -->
</div><!-- /.content-wrapper -->
<!-- Footer -->
@include('footer')
<aside class="control-sidebar control-sidebar-dark">
<!-- Create the tabs -->
<ul class="nav nav-tabs nav-justified control-sidebar-tabs">
<li class="active"><a href="#control-sidebar-home-tab" data-toggle="tab"><i class="fa fa-home"></i></a></li>
<li><a href="#control-sidebar-settings-tab" data-toggle="tab"><i class="fa fa-gears"></i></a></li>
</ul>
<!-- Tab panes -->
<div class="tab-content">
<!-- Home tab content -->
<div class="tab-pane active" id="control-sidebar-home-tab">
<h3 id="Recent-nbsp-Activity">Recent Activity</h3>
<ul class="control-sidebar-menu">
<li>
<a href="javascript::;">
<i class="menu-icon fa fa-birthday-cake bg-red"></i>
<div class="menu-info">
<h4 id="Langdon-s-nbsp-Birthday">Langdon's Birthday</h4>
<p>Will be 23 on April 24th</p>
</div>
</a>
</li>
</ul>
<!-- /.control-sidebar-menu -->
<h3 id="Tasks-nbsp-Progress">Tasks Progress</h3>
<ul class="control-sidebar-menu">
<li>
<a href="javascript::;">
<h4 class="control-sidebar-subheading">
Custom Template Design
<span class="label label-danger pull-right">70%</span>
</h4>
<div class="progress progress-xxs">
<div class="progress-bar progress-bar-danger" style="width: 70%"></div>
</div>
</a>
</li>
</ul>
<!-- /.control-sidebar-menu -->
</div>
<!-- /.tab-pane -->
<!-- Stats tab content -->
<div class="tab-pane" id="control-sidebar-stats-tab">Stats Tab Content</div>
<!-- /.tab-pane -->
<!-- Settings tab content -->
<div class="tab-pane" id="control-sidebar-settings-tab">
<form method="post">
<h3 id="General-nbsp-Settings">General Settings</h3>
<div class="form-group">
<label class="control-sidebar-subheading">
Report panel usage
<input type="checkbox" class="pull-right" checked>
</label>
<p>
Some information about this general settings option
</p>
</div>
<!-- /.form-group -->
</form>
</div>
<!-- /.tab-pane -->
</div>
</aside>
<!-- /.control-sidebar -->
<!-- Add the sidebar's background. This div must be placed
immediately after the control sidebar -->
<div class="control-sidebar-bg"></div>
</div><!-- ./wrapper -->
<!-- REQUIRED JS SCRIPTS -->
<!-- jQuery 2.1.3 -->
<script src="{{ asset ("/bower_components/AdminLTE/plugins/jQuery/jQuery-2.1.3.min.js") }}"></script>
<!-- Bootstrap 3.3.2 JS -->
<script src="{{ asset ("/bower_components/AdminLTE/bootstrap/js/bootstrap.min.js") }}"
type="text/javascript"></script>
<!-- AdminLTE App -->
<script src="{{ asset ("/bower_components/AdminLTE/dist/js/app.min.js") }}" type="text/javascript">
</script>
<!-- Optionally, you can add Slimscroll and FastClick plugins.
Both of these plugins are recommended to enhance the
user experience -->
</body>
</html>In the above code, we added contentn, which contains our main content and added pages Title for a different page, rename it to dashboard.blade.php Now the template is ready to use.
Test page
To verify what we have done before, I will create a simple page
1. Create test.blade.php
@extends('dashboard')
@section('content')
<div class='row'>
<div class='col-md-6'>
<!-- Box -->
<div class="box box-primary">
<div class="box-header with-border">
<h3 id="Randomly-nbsp-Generated-nbsp-Tasks">Randomly Generated Tasks</h3>
<div class="box-tools pull-right">
<button class="btn btn-box-tool" data-widget="collapse" data-toggle="tooltip" title="Collapse">
<i class="fa fa-minus"></i></button>
<button class="btn btn-box-tool" data-widget="remove" data-toggle="tooltip" title="Remove">
<i class="fa fa-times"></i></button>
</div>
</div>
<div class="box-body">
@foreach($tasks as $task)
<h5>
{{ $task['name'] }}
<small class="label label-{{$task['color']}} pull-right">{{$task['progress']}}%</small>
</h5>
<div class="progress progress-xxs">
<div class="progress-bar progress-bar-{{$task['color']}}" style="width: {{$task['progress']}}%">
</div>
</div>
@endforeach
</div><!-- /.box-body -->
<div class="box-footer">
<form action='#'>
<input type='text' placeholder='New task' class='form-control input-sm' />
</form>
</div><!-- /.box-footer-->
</div><!-- /.box -->
</div><!-- /.col -->
<div class='col-md-6'>
<!-- Box -->
<div class="box box-primary">
<div class="box-header with-border">
<h3 id="Second-nbsp-Box">Second Box</h3>
<div class="box-tools pull-right">
<button class="btn btn-box-tool" data-widget="collapse" data-toggle="tooltip" title="Collapse">
<i class="fa fa-minus"></i></button>
<button class="btn btn-box-tool" data-widget="remove" data-toggle="tooltip" title="Remove">
<i class="fa fa-times"></i></button>
</div>
</div>
<div class="box-body">
A separate section to add any kind of widget. Feel free
to explore all of AdminLTE widgets by visiting the demo page
on <a href="https://almsaeedstudio.com">Almsaeed Studio</a>.
</div><!-- /.box-body -->
</div><!-- /.box -->
</div><!-- /.col -->
</div><!-- /.row -->
@endsection2. Create TestController.php
php artisan make:controller TestController --plain
The following is the code part of this controller:
<?php
namespace App\Http\Controllers;
use Illuminate\Http\Request;
use App\Http\Requests;
use App\Http\Controllers\Controller;
class TestController extends Controller
{
public function index() {
$data['tasks'] = [
[
'name' => 'Design New Dashboard',
'progress' => '87',
'color' => 'danger'
],
[
'name' => 'Create Home Page',
'progress' => '76',
'color' => 'warning'
],
[
'name' => 'Some Other Task',
'progress' => '32',
'color' => 'success'
],
[
'name' => 'Start Building Website',
'progress' => '56',
'color' => 'info'
],
[
'name' => 'Develop an Awesome Algorithm',
'progress' => '10',
'color' => 'success'
]
];
return view('test')->with($data);
}
}3. Create the corresponding route
Route::get('test', 'TestController@index');
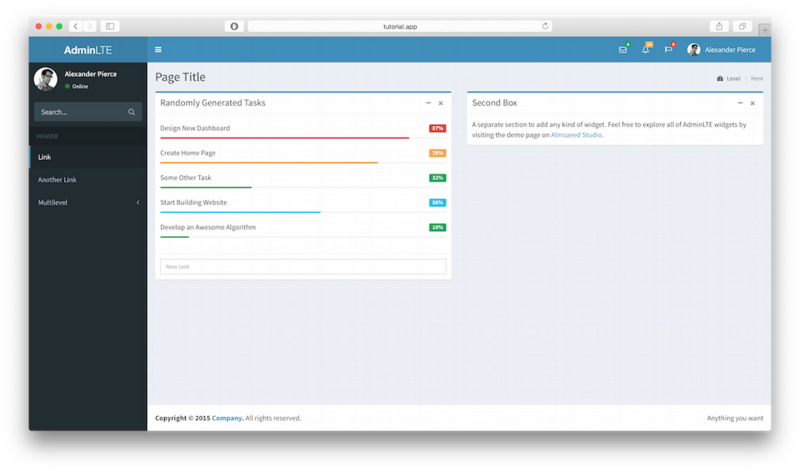
4. Open the corresponding page. If you made no mistakes, it should be as shown below

The above is the content of using AdminLTE template to write website backend interface _php skills in PHP's Laravel framework. For more related content, please pay attention to the PHP Chinese website (www.php.cn)!

Hot AI Tools

Undresser.AI Undress
AI-powered app for creating realistic nude photos

AI Clothes Remover
Online AI tool for removing clothes from photos.

Undress AI Tool
Undress images for free

Clothoff.io
AI clothes remover

Video Face Swap
Swap faces in any video effortlessly with our completely free AI face swap tool!

Hot Article

Hot Tools

Notepad++7.3.1
Easy-to-use and free code editor

SublimeText3 Chinese version
Chinese version, very easy to use

Zend Studio 13.0.1
Powerful PHP integrated development environment

Dreamweaver CS6
Visual web development tools

SublimeText3 Mac version
God-level code editing software (SublimeText3)

Hot Topics
 PHP and Python: Comparing Two Popular Programming Languages
Apr 14, 2025 am 12:13 AM
PHP and Python each have their own advantages, and choose according to project requirements. 1.PHP is suitable for web development, especially for rapid development and maintenance of websites. 2. Python is suitable for data science, machine learning and artificial intelligence, with concise syntax and suitable for beginners.
 PHP's Current Status: A Look at Web Development Trends
Apr 13, 2025 am 12:20 AM
PHP remains important in modern web development, especially in content management and e-commerce platforms. 1) PHP has a rich ecosystem and strong framework support, such as Laravel and Symfony. 2) Performance optimization can be achieved through OPcache and Nginx. 3) PHP8.0 introduces JIT compiler to improve performance. 4) Cloud-native applications are deployed through Docker and Kubernetes to improve flexibility and scalability.
 PHP's Purpose: Building Dynamic Websites
Apr 15, 2025 am 12:18 AM
PHP is used to build dynamic websites, and its core functions include: 1. Generate dynamic content and generate web pages in real time by connecting with the database; 2. Process user interaction and form submissions, verify inputs and respond to operations; 3. Manage sessions and user authentication to provide a personalized experience; 4. Optimize performance and follow best practices to improve website efficiency and security.
 The Enduring Relevance of PHP: Is It Still Alive?
Apr 14, 2025 am 12:12 AM
PHP is still dynamic and still occupies an important position in the field of modern programming. 1) PHP's simplicity and powerful community support make it widely used in web development; 2) Its flexibility and stability make it outstanding in handling web forms, database operations and file processing; 3) PHP is constantly evolving and optimizing, suitable for beginners and experienced developers.
 PHP in Action: Real-World Examples and Applications
Apr 14, 2025 am 12:19 AM
PHP is widely used in e-commerce, content management systems and API development. 1) E-commerce: used for shopping cart function and payment processing. 2) Content management system: used for dynamic content generation and user management. 3) API development: used for RESTful API development and API security. Through performance optimization and best practices, the efficiency and maintainability of PHP applications are improved.
 PHP and Python: Different Paradigms Explained
Apr 18, 2025 am 12:26 AM
PHP is mainly procedural programming, but also supports object-oriented programming (OOP); Python supports a variety of paradigms, including OOP, functional and procedural programming. PHP is suitable for web development, and Python is suitable for a variety of applications such as data analysis and machine learning.
 PHP and Python: Code Examples and Comparison
Apr 15, 2025 am 12:07 AM
PHP and Python have their own advantages and disadvantages, and the choice depends on project needs and personal preferences. 1.PHP is suitable for rapid development and maintenance of large-scale web applications. 2. Python dominates the field of data science and machine learning.
 Why Use PHP? Advantages and Benefits Explained
Apr 16, 2025 am 12:16 AM
The core benefits of PHP include ease of learning, strong web development support, rich libraries and frameworks, high performance and scalability, cross-platform compatibility, and cost-effectiveness. 1) Easy to learn and use, suitable for beginners; 2) Good integration with web servers and supports multiple databases; 3) Have powerful frameworks such as Laravel; 4) High performance can be achieved through optimization; 5) Support multiple operating systems; 6) Open source to reduce development costs.


