
 Database
Mysql Tutorial
Detailed graphic explanation of encoding settings for MySQL installation
Database
Mysql Tutorial
Detailed graphic explanation of encoding settings for MySQL installation
Detailed graphic explanation of encoding settings for MySQL installation

1. MySQL installation
Download Mac OS Follow the prompts to install. After the installation is complete, you can start and shut down the MySQL server under the control panel,
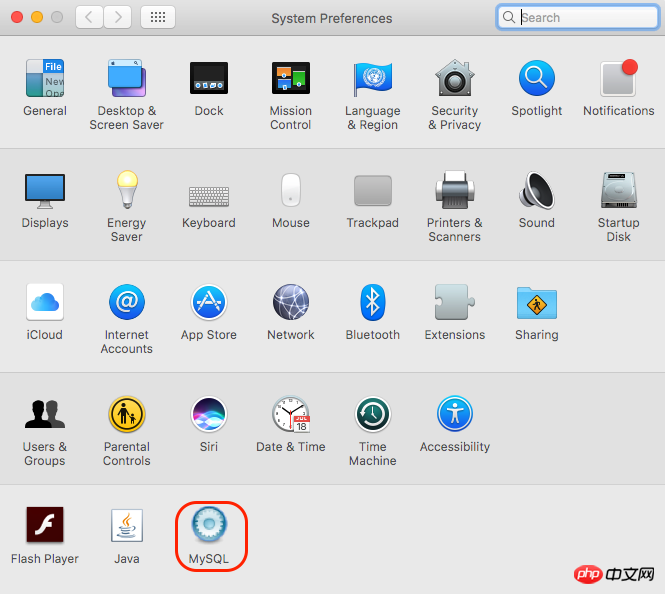
. At the same time, install the client: MySQL Workbench.app,
Start the MySQL server, open MySQL Workbench, enter the initial password, and then be prompted to change the initial password.
2. Set the login path under Terminal:
Create a new file in /Users/**/: .bash_profile
Enter the file:
export PATH=${PATH}:/usr/local/mysql/binSave That’s it. Under Terminal, you can use "mysql -u root -p" to log in.
3. Database encoding issue
Log in to the MySQL client in Terminal (mysql -u root -p) to view the database encoding. The command is as follows:
mysql> SHOW VARIABLES LIKE 'char%';
Found
character_set_database | latin1
character_set_server | latin1
It is necessary to set the encoding, but there is no my.cnf file in the installation file. Many solutions on the Internet are useless, and you can only create your own my.cnf file.
Close the MySQL server, use MacVim to create my.cnf, enter the following content:
# Example MySQL config file for medium systems.
#
# This is for a system with little memory (32M - 64M) where MySQL plays
# an important part, or systems up to 128M where MySQL is used together with
# other programs (such as a web server)
#
# MySQL programs look for option files in a set of
# locations which depend on the deployment platform.
# You can copy this option file to one of those
# locations. For information about these locations, see:
# http://dev.mysql.com/doc/mysql/en/option-files.html #
# In this file, you can use all long options that a program supports.
# If you want to know which options a program supports, run the program
# with the "--help" option.
# The following options will be passed to all MySQL clients
[client] default-character-set=utf8
#password = your_password
port = 3306
socket = /tmp/mysql.sock
# Here follows entries for some specific programs
# The MySQL server
[mysqld]
character-set-server=utf8
init_connect='SET NAMES utf8
port = 3306
socket = /tmp/mysql.sock
skip-external-locking
key_buffer_size = 16M
max_allowed_packet = 1M
table_open_cache = 64
sort_buffer_size = 512K
net_buffer_length = 8K
read_buffer_size = 256K
read_rnd_buffer_size = 512K
myisam_sort_buffer_size = 8M
character-set-server=utf8
init_connect='SET NAMES utf8' # Don't listen on a TCP/IP port at all. This can be a security enhancement, # if all processes that need to connect to mysqld run on the same host.
# All interaction with mysqld must be made via Unix sockets or named pipes.
# Note that using this option without enabling named pipes on Windows
# (via the "enable-named-pipe" option) will render mysqld useless! #
#skip-networking
# Replication Master Server (default)
# binary logging is required for replication
log-bin=mysql-bin
# binary logging format - mixed recommended
binlog_format=mixed
# required unique id between 1 and 2^32 - 1
# defaults to 1 if master-host is not set
# but will not function as a master if omitted
server-id = 1
# Replication Slave (comment out master section to use this)
#
# To configure this host as a replication slave, you can choose between
# two methods :
#
# 1) Use the CHANGE MASTER TO command (fully described in our manual) -
# the syntax is:
#
# CHANGE MASTER TO MASTER_HOST=<host>, MASTER_PORT=<port>,
# MASTER_USER=<user>, MASTER_PASSWORD=<password> ;
#
# where you replace <host>, <user>, <password> by quoted strings and
# <port> by the master's port number (3306 by default). #
# Example:
#
# CHANGE MASTER TO MASTER_HOST='125.564.12.1', MASTER_PORT=3306,
# MASTER_USER='joe', MASTER_PASSWORD='secret';
#
# OR
#
# 2) Set the variables below. However, in case you choose this method, then
# start replication for the first time (even unsuccessfully, for example
# if you mistyped the password in master-password and the slave fails to
# connect), the slave will create a master.info file, and any later
# change in this file to the variables' values below will be ignored and # overridden by the content of the master.info file, unless you shutdown
# the slave server, delete master.info and restart the slaver server.
# For that reason, you may want to leave the lines below untouched
# (commented) and instead use CHANGE MASTER TO (see above)
#
# required unique id between 2 and 2^32 - 1
# (and different from the master)
# defaults to 2 if master-host is set
# but will not function as a slave if omitted
#server-id = 2
#
# The replication master for this slave - required
#master-host = <hostname>
#
# The username the slave will use for authentication when connecting
# to the master - required
#master-user = <username>
#
# The password the slave will authenticate with when connecting to
# the master - required
#master-password = <password>
#
# The port the master is listening on.
# optional - defaults to 3306
#master-port = <port>
#
# binary logging - not required for slaves, but recommended
#log-bin=mysql-bin
# Uncomment the following if you are using InnoDB tables
#innodb_data_home_dir = /usr/local/mysql/data
#innodb_data_file_path = ibdata1:10M:autoextend
#innodb_log_group_home_dir = /usr/local/mysql/data
# You can set .._buffer_pool_size up to 50 - 80 %
# of RAM but beware of setting memory usage too high
#innodb_buffer_pool_size = 16M
#innodb_additional_mem_pool_size = 2M
# Set .._log_file_size to 25 % of buffer pool size
#innodb_log_file_size = 5M
#innodb_log_buffer_size = 8M
#innodb_flush_log_at_trx_commit = 1
#innodb_lock_wait_timeout = 50
[mysqldump]
quick
max_allowed_packet = 16M
[mysql]
no-auto-rehash
# Remove the next comment character if you are not familiar with SQL
#safe-updates
default-character-set=utf8
[myisamchk]
key_buffer_size = 20M
sort_buffer_size = 20M
read_buffer = 2M
write_buffer = 2M
[mysqlhotcopy]
interactive-timeoutSave and save the file to the /etc/ directory, restart the mysql server, that is, the modification is successful,
If you still cannot insert Chinese characters, please recreate the database and table.
The above is the detailed content of Detailed graphic explanation of encoding settings for MySQL installation. For more information, please follow other related articles on the PHP Chinese website!

Hot AI Tools

Undresser.AI Undress
AI-powered app for creating realistic nude photos

AI Clothes Remover
Online AI tool for removing clothes from photos.

Undress AI Tool
Undress images for free

Clothoff.io
AI clothes remover

Video Face Swap
Swap faces in any video effortlessly with our completely free AI face swap tool!

Hot Article
Hot Tools

Notepad++7.3.1
Easy-to-use and free code editor

SublimeText3 Chinese version
Chinese version, very easy to use

Zend Studio 13.0.1
Powerful PHP integrated development environment

Dreamweaver CS6
Visual web development tools

SublimeText3 Mac version
God-level code editing software (SublimeText3)
Hot Topics


 MySQL: An Introduction to the World's Most Popular Database
Apr 12, 2025 am 12:18 AM
MySQL: An Introduction to the World's Most Popular Database
Apr 12, 2025 am 12:18 AM
MySQL is an open source relational database management system, mainly used to store and retrieve data quickly and reliably. Its working principle includes client requests, query resolution, execution of queries and return results. Examples of usage include creating tables, inserting and querying data, and advanced features such as JOIN operations. Common errors involve SQL syntax, data types, and permissions, and optimization suggestions include the use of indexes, optimized queries, and partitioning of tables.
 How to open phpmyadmin
Apr 10, 2025 pm 10:51 PM
How to open phpmyadmin
Apr 10, 2025 pm 10:51 PM
You can open phpMyAdmin through the following steps: 1. Log in to the website control panel; 2. Find and click the phpMyAdmin icon; 3. Enter MySQL credentials; 4. Click "Login".
 Why Use MySQL? Benefits and Advantages
Apr 12, 2025 am 12:17 AM
Why Use MySQL? Benefits and Advantages
Apr 12, 2025 am 12:17 AM
MySQL is chosen for its performance, reliability, ease of use, and community support. 1.MySQL provides efficient data storage and retrieval functions, supporting multiple data types and advanced query operations. 2. Adopt client-server architecture and multiple storage engines to support transaction and query optimization. 3. Easy to use, supports a variety of operating systems and programming languages. 4. Have strong community support and provide rich resources and solutions.
 MySQL's Place: Databases and Programming
Apr 13, 2025 am 12:18 AM
MySQL's Place: Databases and Programming
Apr 13, 2025 am 12:18 AM
MySQL's position in databases and programming is very important. It is an open source relational database management system that is widely used in various application scenarios. 1) MySQL provides efficient data storage, organization and retrieval functions, supporting Web, mobile and enterprise-level systems. 2) It uses a client-server architecture, supports multiple storage engines and index optimization. 3) Basic usages include creating tables and inserting data, and advanced usages involve multi-table JOINs and complex queries. 4) Frequently asked questions such as SQL syntax errors and performance issues can be debugged through the EXPLAIN command and slow query log. 5) Performance optimization methods include rational use of indexes, optimized query and use of caches. Best practices include using transactions and PreparedStatemen
 How to connect to the database of apache
Apr 13, 2025 pm 01:03 PM
How to connect to the database of apache
Apr 13, 2025 pm 01:03 PM
Apache connects to a database requires the following steps: Install the database driver. Configure the web.xml file to create a connection pool. Create a JDBC data source and specify the connection settings. Use the JDBC API to access the database from Java code, including getting connections, creating statements, binding parameters, executing queries or updates, and processing results.
 How to start mysql by docker
Apr 15, 2025 pm 12:09 PM
How to start mysql by docker
Apr 15, 2025 pm 12:09 PM
The process of starting MySQL in Docker consists of the following steps: Pull the MySQL image to create and start the container, set the root user password, and map the port verification connection Create the database and the user grants all permissions to the database
 MySQL's Role: Databases in Web Applications
Apr 17, 2025 am 12:23 AM
MySQL's Role: Databases in Web Applications
Apr 17, 2025 am 12:23 AM
The main role of MySQL in web applications is to store and manage data. 1.MySQL efficiently processes user information, product catalogs, transaction records and other data. 2. Through SQL query, developers can extract information from the database to generate dynamic content. 3.MySQL works based on the client-server model to ensure acceptable query speed.
 How to install mysql in centos7
Apr 14, 2025 pm 08:30 PM
How to install mysql in centos7
Apr 14, 2025 pm 08:30 PM
The key to installing MySQL elegantly is to add the official MySQL repository. The specific steps are as follows: Download the MySQL official GPG key to prevent phishing attacks. Add MySQL repository file: rpm -Uvh https://dev.mysql.com/get/mysql80-community-release-el7-3.noarch.rpm Update yum repository cache: yum update installation MySQL: yum install mysql-server startup MySQL service: systemctl start mysqld set up booting
