

cocos2dx A*算法

头文件和源文件复制到项目中就能用了! have fun 使用cocos2dx 3.2 原理都一样 淡蓝色的点是地图 深蓝色的点是障碍物 绿色的点是路径 暗绿色的点是搜寻过的点 红色的点是按路径行走的点 dijkstra算法 会发现路径最短,但寻找过的路径比较多(计算速度慢) 最佳优
头文件和源文件复制到项目中就能用了! have fun
使用cocos2dx 3.2 原理都一样
淡蓝色的点是地图
深蓝色的点是障碍物
绿色的点是路径
暗绿色的点是搜寻过的点
红色的点是按路径行走的点
dijkstra算法 会发现路径最短,但寻找过的路径比较多(计算速度慢)

最佳优先搜索算法会发现寻找过的路径少了(计算速度提高了),但走了许多弯路
A星算法 结合了上面2种算法 即寻找到了最短路径, 搜寻过的路径也比较少
#ifndef __HELLOWORLD_SCENE_H__
#define __HELLOWORLD_SCENE_H__

#include "cocos2d.h"
#include "vector"
using namespace std;
USING_NS_CC;


class PathSprite : public cocos2d::Sprite//继承Sprite类, 因为要在里面加些其他变量
{
    PathSprite():Sprite()
    {
        m_parent = NULL;
        m_child = NULL;
        m_costToSource = 0;
        m_FValue = 0;
    };
public:
    static PathSprite* create(const char* ch)
    {
        PathSprite *pRet = new PathSprite();
        if (pRet )
        {
            pRet->initWithFile(ch);
            pRet->autorelease();
            return pRet;
        }
        else
        {
            delete pRet;
            pRet = NULL;
            return NULL;
        }
    }
    PathSprite* m_parent;//父节点
    PathSprite* m_child;//子节点
    float m_costToSource;//到起始点的距离
    int m_x;//地图坐标
    int m_y;
    float m_FValue;
};

class PathSearchInfo//寻路类(主要负责寻路的参数和逻辑)
{
public:

    static int m_startX;//开始点
    static int m_startY;
    static int m_endX;//结束点
    static int m_endY;

    static vector<pathsprite> m_openList;//开放列表(里面存放相邻节点)
    static vector<pathsprite> m_inspectList;//检测列表(里面存放除了障碍物的节点)
    static vector<pathsprite> m_pathList;//路径列表
    static void  barrierTest( vector<pathsprite> &pathList,int x, int y)//模拟障碍物
    {
        PathSprite* _z = getObjByPointOfMapCoord(pathList, x, y);
        if (_z)
        {
            _z->setColor(ccColor3B::MAGENTA);
            removeObjFromList(pathList, _z);
        }
    }
    static float calculateTwoObjDistance(PathSprite* obj1, PathSprite* obj2)//计算两个物体间的距离
    {
//        float _offsetX = obj1->m_x - obj2->m_x;
//        float _offsetY = obj1->m_y - obj2->m_y;
//        return sqrt( _offsetX * _offsetX + _offsetY * _offsetY);

        float _x = abs(obj2->m_x - obj1->m_x);
        float _y = abs(obj2->m_y - obj1->m_y);

        return _x + _y;
    }
    static void inspectTheAdjacentNodes(PathSprite* node, PathSprite* adjacent, PathSprite* endNode)//把相邻的节点放入开放节点中
    {
        if (adjacent)
        {
            float _x = abs(endNode->m_x - adjacent->m_x);
            float _y = abs(endNode->m_y - adjacent->m_y);

            float F , G, H1, H2, H3;
            adjacent->m_costToSource = node->m_costToSource + calculateTwoObjDistance(node, adjacent);//获得累计的路程
            G = adjacent->m_costToSource;

            //三种算法, 感觉H2不错
            H1 = _x + _y;
            H2 = hypot(_x, _y);
            H3 = max(_x, _y);

#if 1 //A*算法 = Dijkstra算法 + 最佳优先搜索
            F = G + H2;
#endif
#if 0//Dijkstra算法
            F = G;
#endif
#if 0//最佳优先搜索
            F = H2;
#endif
            adjacent->m_FValue = F;

            adjacent->m_parent = node;//设置父节点
            adjacent->setColor(Color3B::ORANGE);//搜寻过的节点设为橘色
            node->m_child = adjacent;//设置子节点
            PathSearchInfo::removeObjFromList(PathSearchInfo::m_inspectList, adjacent);//把检测过的点从检测列表中删除
            PathSearchInfo::m_openList.push_back(adjacent);//加入开放列表
        }
    }
    static PathSprite* getMinPathFormOpenList()//从开放节点中获取路径最小值
    {
        if (m_openList.size()>0) {
            PathSprite* _sp =* m_openList.begin();
            for (vector<pathsprite>::iterator iter = m_openList.begin(); iter !=  m_openList.end(); iter++)
            {
                if ((*iter)->m_FValue m_FValue)
                {
                    _sp = *iter;
                }
            }
            return _sp;
        }
        else
        {
            return NULL;
        }

    }
    static PathSprite* getObjByPointOfMapCoord( vector<pathsprite> &spriteVector,  int x, int y)//根据点获取对象
    {
        for (int i = 0; i m_x == x && spriteVector[i]->m_y == y)
            {
                return spriteVector[i];
            }
        }
        return NULL;
    }
    static bool removeObjFromList(vector<pathsprite> &spriteVector, PathSprite* sprite)//从容器中移除对象
    {
        for (vector<pathsprite>::iterator iter = spriteVector.begin(); iter !=  spriteVector.end(); iter++)
        {
            if (*iter == sprite)
            {
                spriteVector.erase(iter);
                return true;
            }
        }
        return false;

    }
};

class HelloWorld : public cocos2d::Layer
{
public:
    // there's no 'id' in cpp, so we recommend returning the class instance pointer
    static cocos2d::Scene* createScene();

    // Here's a difference. Method 'init' in cocos2d-x returns bool, instead of returning 'id' in cocos2d-iphone
    virtual bool init();

    // a selector callback
    void menuCloseCallback(cocos2d::Ref* pSender);

    // implement the "static create()" method manually
    CREATE_FUNC(HelloWorld);

    bool onTouchBegan(Touch* touch, Event* event);
    void onTouchMoved(Touch* touch, Event* event);
    void onTouchEnded(Touch* touch, Event* event);

    void calculatePath();//计算路径
    void drawPath();//绘制路径
    vector<pathsprite> m_mapList;//地图

    void clearPath();//清理路径

    PathSprite* m_player;//人物 用于演示行走
    int m_playerMoveStep;//人物当前的行程
    void playerMove();//人物走动
};

#endif // __HELLOWORLD_SCENE_H__
</pathsprite></pathsprite></pathsprite></pathsprite></pathsprite></pathsprite></pathsprite></pathsprite></pathsprite>#include "HelloWorldScene.h"
vector<pathsprite> PathSearchInfo::m_openList;
vector<pathsprite> PathSearchInfo::m_inspectList;
vector<pathsprite> PathSearchInfo::m_pathList;
int PathSearchInfo::m_startX;
int PathSearchInfo::m_startY;
int PathSearchInfo::m_endX;
int PathSearchInfo::m_endY;
Scene* HelloWorld::createScene()
{
// 'scene' is an autorelease object
auto scene = Scene::create();
// 'layer' is an autorelease object
auto layer = HelloWorld::create();
// add layer as a child to scene
scene->addChild(layer);
// return the scene
return scene;
}
// on "init" you need to initialize your instance
bool HelloWorld::init()
{
//////////////////////////////
// 1. super init first
if ( !Layer::init() )
{
return false;
}
Size visibleSize = Director::getInstance()->getVisibleSize();
Vec2 origin = Director::getInstance()->getVisibleOrigin();
Size winSize = Director::getInstance()->getWinSize();
/////////////////////////////
// 2. add a menu item with "X" image, which is clicked to quit the program
// you may modify it.
// add a "close" icon to exit the progress. it's an autorelease object
auto listener = EventListenerTouchOneByOne::create();
listener->setSwallowTouches(true);
listener->onTouchBegan = CC_CALLBACK_2(HelloWorld::onTouchBegan, this);
listener->onTouchMoved = CC_CALLBACK_2(HelloWorld::onTouchMoved, this);
listener->onTouchEnded = CC_CALLBACK_2(HelloWorld::onTouchEnded, this);
_eventDispatcher->addEventListenerWithSceneGraphPriority(listener, this);
//模拟一张地图 左上角 为(0,0) 主要是模拟tiledmap 每块的宽度为1
int _width = 25;
int _heigth = 15;
for (int i = 0; i m_x = j;
_sp->m_y = i;
Size _size = _sp->getContentSize();
_sp->setPosition(CCPoint(j * _size.width + 100, - i * _size.height + 600));
m_mapList.push_back(_sp);
this->addChild(_sp);
}
}
//设置障碍物
// for (int i = 0; i removeFromParent();
//设置起始和终点
PathSearchInfo::m_startX =0;
PathSearchInfo::m_startY = 0;
PathSearchInfo::m_endX = 4;
PathSearchInfo::m_endY = 9;
m_player = PathSprite::create("CloseSelected1.png");
m_player->setColor(Color3B::RED);
this->addChild(m_player);
m_player->m_x = PathSearchInfo::m_startX;
m_player->m_y = PathSearchInfo::m_startY;
m_player->setPosition(PathSearchInfo::getObjByPointOfMapCoord(m_mapList, PathSearchInfo::m_startX, PathSearchInfo::m_startY)->getPosition());
return true;
}
void HelloWorld::calculatePath()
{
//得到开始点的节点
PathSprite* _sp = PathSearchInfo::getObjByPointOfMapCoord(PathSearchInfo::m_inspectList, PathSearchInfo::m_startX, PathSearchInfo::m_startY);
//得到开始点的节点
PathSprite* _endNode = PathSearchInfo::getObjByPointOfMapCoord(PathSearchInfo::m_inspectList, PathSearchInfo::m_endX, PathSearchInfo::m_endY);
//因为是开始点 把到起始点的距离设为0
_sp->m_costToSource = 0;
_sp->m_FValue = 0;
//把已经检测过的点从检测列表中删除
PathSearchInfo::removeObjFromList(PathSearchInfo::m_inspectList, _sp);
//然后加入开放列表
PathSearchInfo::m_openList.push_back(_sp);
PathSprite* _node = NULL;
while (true)
{
//得到离起始点最近的点
_node = PathSearchInfo::getMinPathFormOpenList();
if (!_node)
{
//找不到路径
break;
}
//把计算过的点从开放列表中删除
PathSearchInfo::removeObjFromList(PathSearchInfo::m_openList, _node);
int _x = _node->m_x;
int _y = _node->m_y;
//
if (_x ==PathSearchInfo::m_endX && _y == PathSearchInfo::m_endY)
{
break;
}
//检测8个方向的相邻节点是否可以放入开放列表中
PathSprite* _adjacent = PathSearchInfo::getObjByPointOfMapCoord(PathSearchInfo::m_inspectList, _x + 1, _y + 1);
PathSearchInfo::inspectTheAdjacentNodes(_node, _adjacent, _endNode);
_adjacent = PathSearchInfo::getObjByPointOfMapCoord(PathSearchInfo::m_inspectList, _x +1, _y);
PathSearchInfo::inspectTheAdjacentNodes(_node, _adjacent, _endNode);
_adjacent = PathSearchInfo::getObjByPointOfMapCoord(PathSearchInfo::m_inspectList, _x +1, _y-1);
PathSearchInfo::inspectTheAdjacentNodes(_node, _adjacent, _endNode);
_adjacent = PathSearchInfo::getObjByPointOfMapCoord(PathSearchInfo::m_inspectList, _x , _y -1);
PathSearchInfo::inspectTheAdjacentNodes(_node, _adjacent, _endNode);
_adjacent = PathSearchInfo::getObjByPointOfMapCoord(PathSearchInfo::m_inspectList, _x -1, _y - 1);
PathSearchInfo::inspectTheAdjacentNodes(_node, _adjacent, _endNode);
_adjacent = PathSearchInfo::getObjByPointOfMapCoord(PathSearchInfo::m_inspectList, _x -1, _y);
PathSearchInfo::inspectTheAdjacentNodes(_node, _adjacent, _endNode);
_adjacent = PathSearchInfo::getObjByPointOfMapCoord(PathSearchInfo::m_inspectList, _x -1, _y+1);
PathSearchInfo::inspectTheAdjacentNodes(_node, _adjacent, _endNode);
_adjacent = PathSearchInfo::getObjByPointOfMapCoord(PathSearchInfo::m_inspectList, _x , _y+1);
PathSearchInfo::inspectTheAdjacentNodes(_node, _adjacent, _endNode);
}
while (_node)
{
//PathSprite* _sp = node;
PathSearchInfo::m_pathList.insert(PathSearchInfo::m_pathList.begin(), _node);
_node = _node->m_parent;
}
}
void HelloWorld::drawPath( )
{
for (vector<pathsprite>::iterator iter = PathSearchInfo::m_pathList.begin(); iter != PathSearchInfo::m_pathList.end(); iter++)
{
(*iter)->setColor(ccColor3B::GREEN);
}
}
bool HelloWorld::onTouchBegan(Touch* touch, Event* event)
{
//清除之前的路径
clearPath();
auto nodePosition = convertToNodeSpace( touch->getLocation() );
log("%f, %f", nodePosition.x, nodePosition.y);
for (int i = 0; i getBoundingBox().containsPoint(nodePosition))
{
//获取触摸点, 设置为终点
PathSearchInfo::m_endX = _sp->m_x;
PathSearchInfo::m_endY = _sp->m_y;
//计算路径
calculatePath();
//绘制路径
drawPath( );
playerMove();
}
}
return true;
}
void HelloWorld::onTouchMoved(Touch* touch, Event* event)
{
// If it weren't for the TouchDispatcher, you would need to keep a reference
// to the touch from touchBegan and check that the current touch is the same
// as that one.
// Actually, it would be even more complicated since in the Cocos dispatcher
// you get Sets instead of 1 UITouch, so you'd need to loop through the set
// in each touchXXX method.
}
void HelloWorld::onTouchEnded(Touch* touch, Event* event)
{
}
void HelloWorld::menuCloseCallback(Ref* pSender)
{
#if (CC_TARGET_PLATFORM == CC_PLATFORM_WP8) || (CC_TARGET_PLATFORM == CC_PLATFORM_WINRT)
MessageBox("You pressed the close button. Windows Store Apps do not implement a close button.","Alert");
return;
#endif
Director::getInstance()->end();
#if (CC_TARGET_PLATFORM == CC_PLATFORM_IOS)
exit(0);
#endif
}
void HelloWorld::clearPath()
{
for (vector<pathsprite>::iterator iter = m_mapList.begin(); iter != m_mapList.end(); iter++)
{
(*iter)->setColor(ccColor3B::WHITE);
(*iter)->m_costToSource = 0;
(*iter)->m_FValue = 0;
(*iter)->m_parent = NULL;
(*iter)->m_child = NULL;
}
//把移除了障碍物的地图放入检测列表中
PathSearchInfo::m_inspectList = m_mapList;
PathSearchInfo::m_openList.clear();
PathSearchInfo::m_pathList.clear();
PathSearchInfo::m_startX = m_player->m_x;
PathSearchInfo::m_startY = m_player->m_y;
m_player->stopAllActions();
m_playerMoveStep = 0;
}
void HelloWorld::playerMove()
{
m_playerMoveStep++;
if (m_playerMoveStep >= PathSearchInfo::m_pathList.size()) {
return;
}
m_player->m_x = PathSearchInfo::m_pathList[m_playerMoveStep]->m_x;
m_player->m_y = PathSearchInfo::m_pathList[m_playerMoveStep]->m_y;
m_player->runAction(Sequence::create(MoveTo::create(0.2, PathSearchInfo::m_pathList[m_playerMoveStep]->getPosition()), CallFunc::create(this, SEL_CallFunc(&HelloWorld::playerMove)) , NULL));
}
</pathsprite></pathsprite></pathsprite></pathsprite></pathsprite>
Hot AI Tools

Undresser.AI Undress
AI-powered app for creating realistic nude photos

AI Clothes Remover
Online AI tool for removing clothes from photos.

Undress AI Tool
Undress images for free

Clothoff.io
AI clothes remover

Video Face Swap
Swap faces in any video effortlessly with our completely free AI face swap tool!

Hot Article
Hot Tools

Notepad++7.3.1
Easy-to-use and free code editor

SublimeText3 Chinese version
Chinese version, very easy to use

Zend Studio 13.0.1
Powerful PHP integrated development environment

Dreamweaver CS6
Visual web development tools

SublimeText3 Mac version
God-level code editing software (SublimeText3)
Hot Topics
 1658
1658
 14
1415
52
1309
25
1257
29
1231
24
14
1415
52
1309
25
1257
29
1231
24

 What to do if the 0x80004005 error code appears. The editor will teach you how to solve the 0x80004005 error code.
Mar 21, 2024 pm 09:17 PM
What to do if the 0x80004005 error code appears. The editor will teach you how to solve the 0x80004005 error code.
Mar 21, 2024 pm 09:17 PM
When deleting or decompressing a folder on your computer, sometimes a prompt dialog box "Error 0x80004005: Unspecified Error" will pop up. How should you solve this situation? There are actually many reasons why the error code 0x80004005 is prompted, but most of them are caused by viruses. We can re-register the dll to solve the problem. Below, the editor will explain to you the experience of handling the 0x80004005 error code. Some users are prompted with error code 0X80004005 when using their computers. The 0x80004005 error is mainly caused by the computer not correctly registering certain dynamic link library files, or by a firewall that does not allow HTTPS connections between the computer and the Internet. So how about
 How to copy lyrics from QQ Music How to copy lyrics
Mar 12, 2024 pm 08:22 PM
How to copy lyrics from QQ Music How to copy lyrics
Mar 12, 2024 pm 08:22 PM
We users should be able to understand the diversity of some functions when using this platform. We know that the lyrics of some songs are very well written. Sometimes we even listen to it several times and feel that the meaning is very profound. So if we want to understand the meaning of it, we want to copy it directly and use it as copywriting. However, if we want to use it, we still need to You just need to learn how to copy lyrics. I believe that everyone is familiar with these operations, but it is indeed a bit difficult to operate on a mobile phone. So in order to give you a better understanding, today the editor is here to help you. A good explanation of some of the above operating experiences. If you also like it, come and take a look with the editor. Don’t miss it.
 How to transfer files from Quark Cloud Disk to Baidu Cloud Disk?
Mar 14, 2024 pm 02:07 PM
How to transfer files from Quark Cloud Disk to Baidu Cloud Disk?
Mar 14, 2024 pm 02:07 PM
Quark Netdisk and Baidu Netdisk are currently the most commonly used Netdisk software for storing files. If you want to save the files in Quark Netdisk to Baidu Netdisk, how do you do it? In this issue, the editor has compiled the tutorial steps for transferring files from Quark Network Disk computer to Baidu Network Disk. Let’s take a look at how to operate it. How to save Quark network disk files to Baidu network disk? To transfer files from Quark Network Disk to Baidu Network Disk, you first need to download the required files from Quark Network Disk, then select the target folder in the Baidu Network Disk client and open it. Then, drag and drop the files downloaded from Quark Cloud Disk into the folder opened by the Baidu Cloud Disk client, or use the upload function to add the files to Baidu Cloud Disk. Make sure to check whether the file was successfully transferred in Baidu Cloud Disk after the upload is completed. That's it
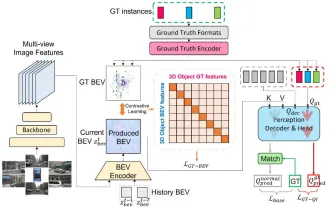 CLIP-BEVFormer: Explicitly supervise the BEVFormer structure to improve long-tail detection performance
Mar 26, 2024 pm 12:41 PM
CLIP-BEVFormer: Explicitly supervise the BEVFormer structure to improve long-tail detection performance
Mar 26, 2024 pm 12:41 PM
Written above & the author’s personal understanding: At present, in the entire autonomous driving system, the perception module plays a vital role. The autonomous vehicle driving on the road can only obtain accurate perception results through the perception module. The downstream regulation and control module in the autonomous driving system makes timely and correct judgments and behavioral decisions. Currently, cars with autonomous driving functions are usually equipped with a variety of data information sensors including surround-view camera sensors, lidar sensors, and millimeter-wave radar sensors to collect information in different modalities to achieve accurate perception tasks. The BEV perception algorithm based on pure vision is favored by the industry because of its low hardware cost and easy deployment, and its output results can be easily applied to various downstream tasks.
 Implementing Machine Learning Algorithms in C++: Common Challenges and Solutions
Jun 03, 2024 pm 01:25 PM
Implementing Machine Learning Algorithms in C++: Common Challenges and Solutions
Jun 03, 2024 pm 01:25 PM
Common challenges faced by machine learning algorithms in C++ include memory management, multi-threading, performance optimization, and maintainability. Solutions include using smart pointers, modern threading libraries, SIMD instructions and third-party libraries, as well as following coding style guidelines and using automation tools. Practical cases show how to use the Eigen library to implement linear regression algorithms, effectively manage memory and use high-performance matrix operations.
 Explore the underlying principles and algorithm selection of the C++sort function
Apr 02, 2024 pm 05:36 PM
Explore the underlying principles and algorithm selection of the C++sort function
Apr 02, 2024 pm 05:36 PM
The bottom layer of the C++sort function uses merge sort, its complexity is O(nlogn), and provides different sorting algorithm choices, including quick sort, heap sort and stable sort.
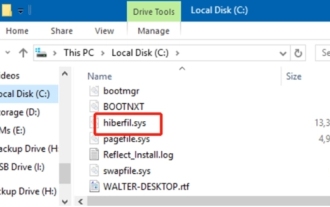 What is hiberfil.sys file? Can hiberfil.sys be deleted?
Mar 15, 2024 am 09:49 AM
What is hiberfil.sys file? Can hiberfil.sys be deleted?
Mar 15, 2024 am 09:49 AM
Recently, many netizens have asked the editor, what is the file hiberfil.sys? Can hiberfil.sys take up a lot of C drive space and be deleted? The editor can tell you that the hiberfil.sys file can be deleted. Let’s take a look at the details below. hiberfil.sys is a hidden file in the Windows system and also a system hibernation file. It is usually stored in the root directory of the C drive, and its size is equivalent to the size of the system's installed memory. This file is used when the computer is hibernated and contains the memory data of the current system so that it can be quickly restored to the previous state during recovery. Since its size is equal to the memory capacity, it may take up a larger amount of hard drive space. hiber
 Can artificial intelligence predict crime? Explore CrimeGPT's capabilities
Mar 22, 2024 pm 10:10 PM
Can artificial intelligence predict crime? Explore CrimeGPT's capabilities
Mar 22, 2024 pm 10:10 PM
The convergence of artificial intelligence (AI) and law enforcement opens up new possibilities for crime prevention and detection. The predictive capabilities of artificial intelligence are widely used in systems such as CrimeGPT (Crime Prediction Technology) to predict criminal activities. This article explores the potential of artificial intelligence in crime prediction, its current applications, the challenges it faces, and the possible ethical implications of the technology. Artificial Intelligence and Crime Prediction: The Basics CrimeGPT uses machine learning algorithms to analyze large data sets, identifying patterns that can predict where and when crimes are likely to occur. These data sets include historical crime statistics, demographic information, economic indicators, weather patterns, and more. By identifying trends that human analysts might miss, artificial intelligence can empower law enforcement agencies
