
 Web Front-end
JS Tutorial
How to use gulp, the JavaScript project building tool based on Node.js
Web Front-end
JS Tutorial
How to use gulp, the JavaScript project building tool based on Node.js
How to use gulp, the JavaScript project building tool based on Node.js

This article mainly introduces how to use the JavaScript project construction tool gulp based on Node.js. It has a certain reference value. Now I share it with you. Friends in need can refer to it
Maybe you If you have used grunt, you will be familiar with Amway gulp. Let’s take a look at the tutorial on using gulp, a JavaScript project construction tool based on Node.js.
npm install gulp --save-dev
What is gulp?
gulp is a new generation of front-end project building tool. You can use gulp and its plug-ins to compile your project code (less, sass), compress your js and css code, and even compress your For images, gulp has only a small amount of API, so it is very easy to learn. Gulp uses the stream method to process content. Node has spawned a number of automation tools, such as Bower, Yeoman, Grunt, etc.
The similarities and differences between gulp and grunt
Easy to use: Adopting a code-over-configuration strategy, Gulp makes simple things simple and complex tasks manageable.
Efficient: By utilizing the powerful flow of Node.js, there is no need to write intermediate files to disk, and the build can be completed faster.
High Quality: Gulp’s strict plugin guidelines ensure plugins are simple and work the way you expect.
Easy to learn: By keeping the API to a minimum, you can learn Gulp in a short time. The build works just like you imagine: a series of streaming pipes.
Because gulp is written in node.js, you need to install npm on your terminal. npm is the package manager for node.js, so install node.js on your machine first.
gulp installation command
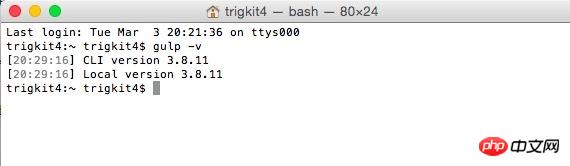
sudo npm install -g gulp
Create a new package.json file in the root directory
npm init .
Install the gulp package
After installation, enter gulp -v again to check the version number. If the following picture shows success:
Install the plug-in
Install common plug-ins:
Compilation of sass (gulp-ruby-sass)
Automatically add css prefix (gulp-autoprefixer)
Compress css (gulp-minify-css)
js code Verification (gulp-jshint)
Merge js files (gulp-concat)
Compress js code (gulp-uglify)
Compress images (gulp-image) min)
Automatically refresh the page (gulp-livereload)
Image cache, compress only when the image is replaced (gulp-cache)
Change reminder (gulp-notify)
Clear files (del)
To install these plug-ins, you need to run the following command:
$ npm install gulp-ruby-sass gulp-autoprefixer gulp-minify-css gulp-jshint gulp-concat gulp-uglify gulp-imagemin gulp-notify gulp-rename gulp-livereload gulp-cache del --save-dev-save和-save-dev可以省掉你手动修改package.json文件的步骤。
npm install module-name -save
Automatically add the module and version number to the dependencies section
npm install module-name -save-dev
Automatically add the module and version number to the devdependencies section
gulp command
You only need to know 5 A gulp command
gulp.task(name[, deps], fn) defines the task name: task name deps: dependent task name fn: callback function
gulp.run(tasks... ): Run as many tasks in parallel as possible
gulp.watch(glob, fn): When the content of glob changes, execute fn
gulp.src(glob): Set as needed The path of the file to be processed can be multiple files in the form of an array, or it can be a regular expression
gulp.dest(path[, options]): Set the path of the generated file
glob: It can be one Direct file path. What it means is pattern matching.
gulp directs the files to be processed to related plug-ins through the pipeline (pipe()) API. Perform file processing tasks through plug-ins.
gulp.task('default', function () {...});gulp.task This API is used to create tasks. You can enter $gulp [default] at the command line (brackets indicate optional) to perform the above tasks.
gulp official API documentation: https://github.com/gulpjs/gulp/blob/master/docs/API.md
gulp plug-in collection: http://gulpjs.com/ plugins/
Start building the project
Create a new gulpfile.js file in the project root directory and paste the following code:
//在项目根目录引入gulp和uglify插件
var gulp = require('gulp');
var uglify = require('gulp-uglify');

gulp.task('compress',function(){
  return gulp.src('script/*.js')
  .pipe(uglify())
  .pipe(gulp.dest('dist'));
});Note: The gulpfile.js file name cannot be changed.
The project needs to use uglify and rename plug-ins, execute the following command to install:
npm install --save-dev gulp-uglify
npm install --save-dev gulp-rename
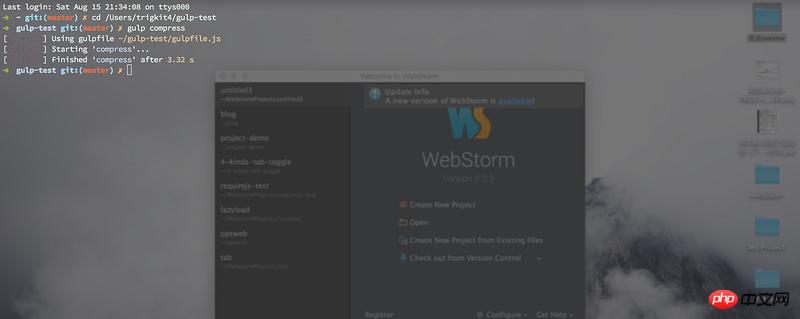
Take mine as an example, enter the directory where gulpfile.js is located:
cd /Users/trigkit4/gulp-test
Then enter:
var gulp = require('gulp');
var uglify = require('gulp-uglify');
var rename = require('gulp-rename');

gulp.task('compress',function(){
  return gulp.src('script/*.js')
  .pipe(uglify())
  .pipe(rename('jquery.ui.min.js'))
  .pipe(gulp.dest('dist'));
});该命令会安装package.json下的全部依赖,如下图所示:
完整的gulpfile.js
// 载入外挂
var gulp = require('gulp'),
  sass = require('gulp-ruby-sass'),
  autoprefixer = require('gulp-autoprefixer'),
  minifycss = require('gulp-minify-css'),
  jshint = require('gulp-jshint'),
  uglify = require('gulp-uglify'),
  imagemin = require('gulp-imagemin'),
  rename = require('gulp-rename'),
  clean = require('gulp-clean'),
  concat = require('gulp-concat'),
  notify = require('gulp-notify'),
  cache = require('gulp-cache'),
  livereload = require('gulp-livereload');

// 样式
gulp.task('styles', function() {
 return gulp.src('src/styles/main.scss')
  .pipe(sass({ style: 'expanded', }))
  .pipe(autoprefixer('last 2 version', 'safari 5', 'ie 8', 'ie 9', 'opera 12.1', 'ios 6', 'android 4'))
  .pipe(gulp.dest('dist/styles'))
  .pipe(rename({ suffix: '.min' }))
  .pipe(minifycss())
  .pipe(gulp.dest('dist/styles'))
  .pipe(notify({ message: 'Styles task complete' }));
});

// 脚本
gulp.task('scripts', function() {
 return gulp.src('src/scripts/**/*.js')
  .pipe(jshint('.jshintrc'))
  .pipe(jshint.reporter('default'))
  .pipe(concat('main.js'))
  .pipe(gulp.dest('dist/scripts'))
  .pipe(rename({ suffix: '.min' }))
  .pipe(uglify())
  .pipe(gulp.dest('dist/scripts'))
  .pipe(notify({ message: 'Scripts task complete' }));
});

// 图片
gulp.task('images', function() {
 return gulp.src('src/images/**/*')
  .pipe(cache(imagemin({ optimizationLevel: 3, progressive: true, interlaced: true })))
  .pipe(gulp.dest('dist/images'))
  .pipe(notify({ message: 'Images task complete' }));
});

// 清理
gulp.task('clean', function() {
 return gulp.src(['dist/styles', 'dist/scripts', 'dist/images'], {read: false})
  .pipe(clean());
});

// 预设任务
gulp.task('default', ['clean'], function() {
  gulp.start('styles', 'scripts', 'images');
});

// 看守
gulp.task('watch', function() {

 // 看守所有.scss档
 gulp.watch('src/styles/**/*.scss', ['styles']);

 // 看守所有.js档
 gulp.watch('src/scripts/**/*.js', ['scripts']);

 // 看守所有图片档
 gulp.watch('src/images/**/*', ['images']);

 // 建立即时重整伺服器
 var server = livereload();

 // 看守所有位在 dist/ 目录下的档案,一旦有更动,便进行重整
 gulp.watch(['dist/**']).on('change', function(file) {
  server.changed(file.path);
 });

});注:pipe()是stream模块里传递数据流的一个方法,第一个参数为插件方法,插件会接收从上游流下的文件,进行处理加工后,再往下流。
gulp.task('任务名称', function () {
  return gulp.src('文件路径')
    .pipe(...)
    .pipe(...)
    // 直到任务的最后一步
    .pipe(...);
});gulp插件
gulp-gh-pages:使用gulp来把markdown生成html文档并上传到git pages上
https://github.com/shinnn/gulp-gh-pages
var gulp = require('gulp');

var ghPages = require('gulp-gh-pages');


gulp.task('deploy', function() {

 return gulp.src('./dist/**/*')

  .pipe(ghPages());

});gulp-jade插件:将jade编译成html文件
gulp-less插件:将less编译成css文件
var less = require('gulp-less');

var path = require('path');


gulp.task('less', function () {

 return gulp.src('./less/**/*.less')

  .pipe(less({

   paths: [ path.join(__dirname, 'less', 'includes') ]

  }))

  .pipe(gulp.dest('./public/css'));

});
gulp-live-server 插件:方便的,轻量级的服务器

var gulp = require('gulp');

 var gls = require('gulp-live-server');

 gulp.task('serve', function() {

 //1. serve with default settings

 var server = gls.static(); //equals to gls.static('public', 3000);

 server.start();


 //2. serve at custom port

 var server = gls.static('dist', 8888);

 server.start();


 //3. serve multi folders

 var server = gls.static(['dist', '.tmp']);

 server.start();


 //use gulp.watch to trigger server actions(notify, start or stop)

 gulp.watch(['static/**/*.css', 'static/**/*.html'], function (file) {

  server.notify.apply(server, [file]);

 });

});gulp-livereload,可以实时保存刷新,那样就不用按F5和切换界面了
gulp-load-plugins:在你的package.json文件中自动加载任意的gulp插件
$ npm install --save-dev gulp-load-plugins
例如一个给定的package.json文件如下:
{

  "dependencies": {

    "gulp-jshint": "*",

    "gulp-concat": "*"

  }

}在gulpfile.js中添加如下代码:
var gulp = require('gulp');

var gulpLoadPlugins = require('gulp-load-plugins');

var plugins = gulpLoadPlugins();
plugins.jshint = require('gulp-jshint');

plugins.concat = require('gulp-concat');
gulp-babel:gulp 的babel插件,
$ npm install --save-dev gulp-babel babel-preset-es2015
使用方法:
const gulp = require('gulp');
const babel = require('gulp-babel');

gulp.task('default', () => {
  return gulp.src('src/app.js')
    .pipe(babel({
      presets: ['es2015']
    }))
    .pipe(gulp.dest('dist'));
});官方github: https://github.com/gulpjs/gulp
以上就是本文的全部内容,希望对大家的学习有所帮助,更多相关内容请关注PHP中文网!
相关推荐:
The above is the detailed content of How to use gulp, the JavaScript project building tool based on Node.js. For more information, please follow other related articles on the PHP Chinese website!

Hot AI Tools

Undresser.AI Undress
AI-powered app for creating realistic nude photos

AI Clothes Remover
Online AI tool for removing clothes from photos.

Undress AI Tool
Undress images for free

Clothoff.io
AI clothes remover

Video Face Swap
Swap faces in any video effortlessly with our completely free AI face swap tool!

Hot Article
Hot Tools

Notepad++7.3.1
Easy-to-use and free code editor

SublimeText3 Chinese version
Chinese version, very easy to use

Zend Studio 13.0.1
Powerful PHP integrated development environment

Dreamweaver CS6
Visual web development tools

SublimeText3 Mac version
God-level code editing software (SublimeText3)
Hot Topics


 How to implement an online speech recognition system using WebSocket and JavaScript
Dec 17, 2023 pm 02:54 PM
How to implement an online speech recognition system using WebSocket and JavaScript
Dec 17, 2023 pm 02:54 PM
How to use WebSocket and JavaScript to implement an online speech recognition system Introduction: With the continuous development of technology, speech recognition technology has become an important part of the field of artificial intelligence. The online speech recognition system based on WebSocket and JavaScript has the characteristics of low latency, real-time and cross-platform, and has become a widely used solution. This article will introduce how to use WebSocket and JavaScript to implement an online speech recognition system.
 WebSocket and JavaScript: key technologies for implementing real-time monitoring systems
Dec 17, 2023 pm 05:30 PM
WebSocket and JavaScript: key technologies for implementing real-time monitoring systems
Dec 17, 2023 pm 05:30 PM
WebSocket and JavaScript: Key technologies for realizing real-time monitoring systems Introduction: With the rapid development of Internet technology, real-time monitoring systems have been widely used in various fields. One of the key technologies to achieve real-time monitoring is the combination of WebSocket and JavaScript. This article will introduce the application of WebSocket and JavaScript in real-time monitoring systems, give code examples, and explain their implementation principles in detail. 1. WebSocket technology
 How to use JavaScript and WebSocket to implement a real-time online ordering system
Dec 17, 2023 pm 12:09 PM
How to use JavaScript and WebSocket to implement a real-time online ordering system
Dec 17, 2023 pm 12:09 PM
Introduction to how to use JavaScript and WebSocket to implement a real-time online ordering system: With the popularity of the Internet and the advancement of technology, more and more restaurants have begun to provide online ordering services. In order to implement a real-time online ordering system, we can use JavaScript and WebSocket technology. WebSocket is a full-duplex communication protocol based on the TCP protocol, which can realize real-time two-way communication between the client and the server. In the real-time online ordering system, when the user selects dishes and places an order
 How to implement an online reservation system using WebSocket and JavaScript
Dec 17, 2023 am 09:39 AM
How to implement an online reservation system using WebSocket and JavaScript
Dec 17, 2023 am 09:39 AM
How to use WebSocket and JavaScript to implement an online reservation system. In today's digital era, more and more businesses and services need to provide online reservation functions. It is crucial to implement an efficient and real-time online reservation system. This article will introduce how to use WebSocket and JavaScript to implement an online reservation system, and provide specific code examples. 1. What is WebSocket? WebSocket is a full-duplex method on a single TCP connection.
 Pi Node Teaching: What is a Pi Node? How to install and set up Pi Node?
Mar 05, 2025 pm 05:57 PM
Pi Node Teaching: What is a Pi Node? How to install and set up Pi Node?
Mar 05, 2025 pm 05:57 PM
Detailed explanation and installation guide for PiNetwork nodes This article will introduce the PiNetwork ecosystem in detail - Pi nodes, a key role in the PiNetwork ecosystem, and provide complete steps for installation and configuration. After the launch of the PiNetwork blockchain test network, Pi nodes have become an important part of many pioneers actively participating in the testing, preparing for the upcoming main network release. If you don’t know PiNetwork yet, please refer to what is Picoin? What is the price for listing? Pi usage, mining and security analysis. What is PiNetwork? The PiNetwork project started in 2019 and owns its exclusive cryptocurrency Pi Coin. The project aims to create a one that everyone can participate
 JavaScript and WebSocket: Building an efficient real-time weather forecasting system
Dec 17, 2023 pm 05:13 PM
JavaScript and WebSocket: Building an efficient real-time weather forecasting system
Dec 17, 2023 pm 05:13 PM
JavaScript and WebSocket: Building an efficient real-time weather forecast system Introduction: Today, the accuracy of weather forecasts is of great significance to daily life and decision-making. As technology develops, we can provide more accurate and reliable weather forecasts by obtaining weather data in real time. In this article, we will learn how to use JavaScript and WebSocket technology to build an efficient real-time weather forecast system. This article will demonstrate the implementation process through specific code examples. We
 Simple JavaScript Tutorial: How to Get HTTP Status Code
Jan 05, 2024 pm 06:08 PM
Simple JavaScript Tutorial: How to Get HTTP Status Code
Jan 05, 2024 pm 06:08 PM
JavaScript tutorial: How to get HTTP status code, specific code examples are required. Preface: In web development, data interaction with the server is often involved. When communicating with the server, we often need to obtain the returned HTTP status code to determine whether the operation is successful, and perform corresponding processing based on different status codes. This article will teach you how to use JavaScript to obtain HTTP status codes and provide some practical code examples. Using XMLHttpRequest
 How to use insertBefore in javascript
Nov 24, 2023 am 11:56 AM
How to use insertBefore in javascript
Nov 24, 2023 am 11:56 AM
Usage: In JavaScript, the insertBefore() method is used to insert a new node in the DOM tree. This method requires two parameters: the new node to be inserted and the reference node (that is, the node where the new node will be inserted).
