
 Web Front-end
JS Tutorial
Build React+Webpack desktop application using Electron (detailed tutorial)
Web Front-end
JS Tutorial
Build React+Webpack desktop application using Electron (detailed tutorial)
Build React+Webpack desktop application using Electron (detailed tutorial)
This article mainly introduces the method of using Electron to build React Webpack desktop applications. The editor thinks it is quite good, so I will share it with you now and give it as a reference. Let’s follow the editor and take a look.
Preface
Electron can use HTML, CSS, and JavaScript to build cross-platform desktop applications, but when using React and Webpack, You will encounter some configuration problems. This article will provide a general solution for Electron configuration under React Webpack.
Environment configuration
1 2 3 4 5 6 7 8 9 10 11 12 13 14 15 16 17 |
|
Configuration webpack.config.js
Because the default Webpack packaging is used, a very large file will be generated. Large bundle files affect performance on the desktop, but when debugging, bundles need to be generated quickly, but sourcemaps need to be used to locate bugs, so we use a function to switch between various environments:
1 2 3 4 5 |
|
And we write the following command in the package.json file:
1 2 |
|
to switch environments better.
The following are all webpack.config.js:
1 2 3 4 5 6 7 8 9 10 11 12 13 14 15 16 17 18 19 20 21 22 23 24 25 26 27 28 29 30 31 32 33 34 35 36 37 38 39 40 41 42 43 44 45 46 47 48 49 50 |
|
Note: target: 'electron-renderer', so that our App can only function under Electron during debugging.
React
This time I wrote a simple App to display time. The React module is as follows:
1 2 3 4 5 6 7 8 9 10 11 12 13 14 15 16 17 18 19 20 21 22 23 24 25 26 27 28 29 30 31 32 33 34 35 |
|
Electron
This App does not involve complex Electron API, it is just a container for display:
1 2 3 4 5 6 7 |
|
index.html
1 2 3 4 5 6 7 8 9 10 11 12 13 14 |
|
We load the js and css packaged by webpack into html.
Debugging
yarn run build:prod
First we use webpack to package the file and generate the bundle under dist/. js and style.css
yarn run electron
Start debugging:
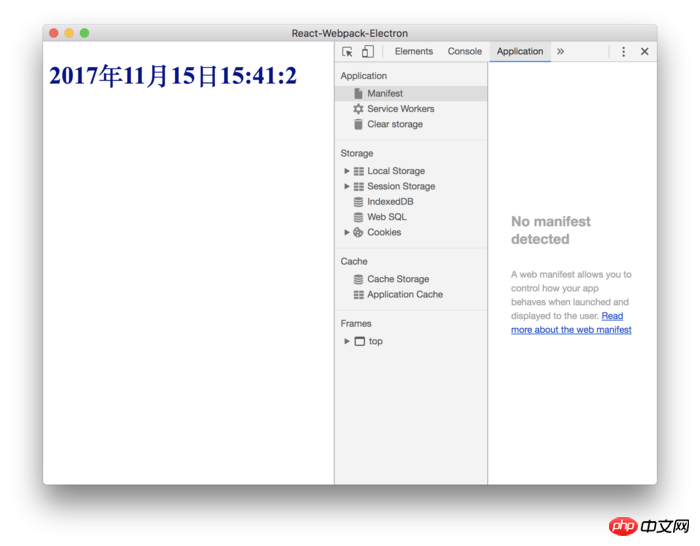
Build App
We add the following command to the package.json file:
"packager": "electron-packager . --platform=darwin --electron-version=1.7. 9 --overwrite"
means to build the Mac desktop application and overwrite the files we previously built using this command.
Wait for a while and you will see the built folder in the directory, which is our desktop application.
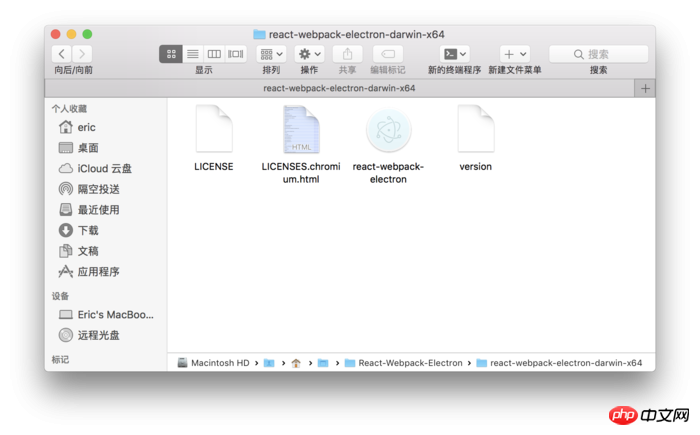
When we open the application, we will find that the navigation bar menu during debugging has disappeared, and there is only one exit option. This is because we have not set up the application Menu bar items, Electron will discard various menus for debugging when building the App.
Improvement
Everyone should notice that according to the previous method, we have to reuse webpack packaging every time we modify it during debugging. Of course, we can also use webpack-dev-server to monitor changes. But in this way we need to adjust the project:
Modify the loadURL in the index.js file to:
1 |
|
Then run:
yarn run electron
Because we are detecting the files under webpack-dev-server at this time, the modifications we make in the project can be seen in electron in real time.
If debugging and testing are completed, you only need to modify the loadURL to:
1 |
|
to proceed with the next build operation.
! Note that before building the final application, you should pay attention to whether the web file at this time is running under webpack-dev-server. If so, you should use webpack to generate static packaging files.
The project file address of this article: https://github.com/Voyager-One/react-webpack-electron
The above is what I compiled for everyone. I hope it will be helpful to everyone in the future.
Related articles:
Detailed introduction to controlled components and uncontrolled components in React
How to implement a basic shopping cart using Angular Function
Detailed introduction to routing and middleware in node.js
The above is the detailed content of Build React+Webpack desktop application using Electron (detailed tutorial). For more information, please follow other related articles on the PHP Chinese website!

Hot AI Tools

Undresser.AI Undress
AI-powered app for creating realistic nude photos

AI Clothes Remover
Online AI tool for removing clothes from photos.

Undress AI Tool
Undress images for free

Clothoff.io
AI clothes remover

Video Face Swap
Swap faces in any video effortlessly with our completely free AI face swap tool!
Hot Article
Hot Tools

Notepad++7.3.1
Easy-to-use and free code editor

SublimeText3 Chinese version
Chinese version, very easy to use

Zend Studio 13.0.1
Powerful PHP integrated development environment

Dreamweaver CS6
Visual web development tools

SublimeText3 Mac version
God-level code editing software (SublimeText3)
Hot Topics
 1663
1663
 14
1420
52
1313
25
1266
29
1239
24
14
1420
52
1313
25
1266
29
1239
24

 How to build a reliable messaging app with React and RabbitMQ
Sep 28, 2023 pm 08:24 PM
How to build a reliable messaging app with React and RabbitMQ
Sep 28, 2023 pm 08:24 PM
How to build a reliable messaging application with React and RabbitMQ Introduction: Modern applications need to support reliable messaging to achieve features such as real-time updates and data synchronization. React is a popular JavaScript library for building user interfaces, while RabbitMQ is a reliable messaging middleware. This article will introduce how to combine React and RabbitMQ to build a reliable messaging application, and provide specific code examples. RabbitMQ overview:
 React Router User Guide: How to implement front-end routing control
Sep 29, 2023 pm 05:45 PM
React Router User Guide: How to implement front-end routing control
Sep 29, 2023 pm 05:45 PM
ReactRouter User Guide: How to Implement Front-End Routing Control With the popularity of single-page applications, front-end routing has become an important part that cannot be ignored. As the most popular routing library in the React ecosystem, ReactRouter provides rich functions and easy-to-use APIs, making the implementation of front-end routing very simple and flexible. This article will introduce how to use ReactRouter and provide some specific code examples. To install ReactRouter first, we need
 PHP, Vue and React: How to choose the most suitable front-end framework?
Mar 15, 2024 pm 05:48 PM
PHP, Vue and React: How to choose the most suitable front-end framework?
Mar 15, 2024 pm 05:48 PM
PHP, Vue and React: How to choose the most suitable front-end framework? With the continuous development of Internet technology, front-end frameworks play a vital role in Web development. PHP, Vue and React are three representative front-end frameworks, each with its own unique characteristics and advantages. When choosing which front-end framework to use, developers need to make an informed decision based on project needs, team skills, and personal preferences. This article will compare the characteristics and uses of the three front-end frameworks PHP, Vue and React.
 Integration of Java framework and front-end React framework
Jun 01, 2024 pm 03:16 PM
Integration of Java framework and front-end React framework
Jun 01, 2024 pm 03:16 PM
Integration of Java framework and React framework: Steps: Set up the back-end Java framework. Create project structure. Configure build tools. Create React applications. Write REST API endpoints. Configure the communication mechanism. Practical case (SpringBoot+React): Java code: Define RESTfulAPI controller. React code: Get and display the data returned by the API.
 How to use React to develop a responsive backend management system
Sep 28, 2023 pm 04:55 PM
How to use React to develop a responsive backend management system
Sep 28, 2023 pm 04:55 PM
How to use React to develop a responsive backend management system. With the rapid development of the Internet, more and more companies and organizations need an efficient, flexible, and easy-to-manage backend management system to handle daily operations. As one of the most popular JavaScript libraries currently, React provides a concise, efficient and maintainable way to build user interfaces. This article will introduce how to use React to develop a responsive backend management system and give specific code examples. Create a React project first
 Vue.js vs. React: Project-Specific Considerations
Apr 09, 2025 am 12:01 AM
Vue.js vs. React: Project-Specific Considerations
Apr 09, 2025 am 12:01 AM
Vue.js is suitable for small and medium-sized projects and fast iterations, while React is suitable for large and complex applications. 1) Vue.js is easy to use and is suitable for situations where the team is insufficient or the project scale is small. 2) React has a richer ecosystem and is suitable for projects with high performance and complex functional needs.
 React's Role in HTML: Enhancing User Experience
Apr 09, 2025 am 12:11 AM
React's Role in HTML: Enhancing User Experience
Apr 09, 2025 am 12:11 AM
React combines JSX and HTML to improve user experience. 1) JSX embeds HTML to make development more intuitive. 2) The virtual DOM mechanism optimizes performance and reduces DOM operations. 3) Component-based management UI to improve maintainability. 4) State management and event processing enhance interactivity.
 What closures does react have?
Oct 27, 2023 pm 03:11 PM
What closures does react have?
Oct 27, 2023 pm 03:11 PM
React has closures such as event handling functions, useEffect and useCallback, higher-order components, etc. Detailed introduction: 1. Event handling function closure: In React, when we define an event handling function in a component, the function will form a closure and can access the status and properties within the component scope. In this way, the state and properties of the component can be used in the event processing function to implement interactive logic; 2. Closures in useEffect and useCallback, etc.
