

Realize dynamic display of process through js
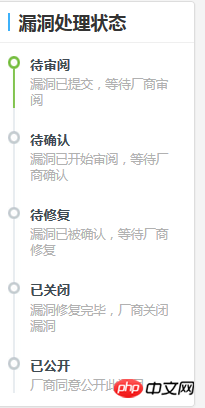
For things with many processes, we hope to display them correspondingly with process bars according to different stages, as shown below:
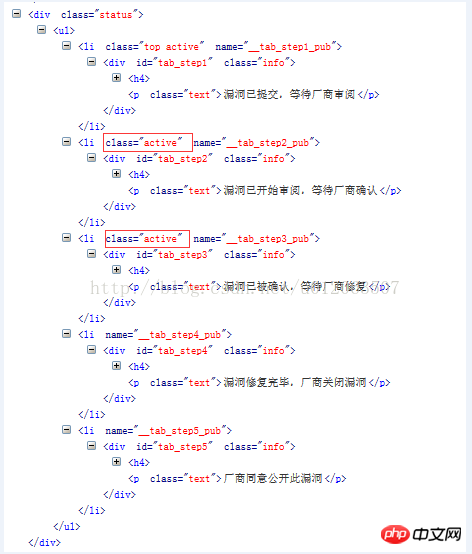
The html corresponding to the above functions The code is as follows:
 <p class="col-md-12 col-lg-3">
      <p class="panel panel-default">
        <p class="tit06">
          <h3>漏洞处理状态</h3>
        </p>
        <p class="status">
          <ul>
            <li  name="__tab_step1_pub" class="top active">
                <p  class="info" id="tab_step1">
                <h4>
                  <p class="heading"></p>
                  待审阅</h4>
                <p class="text" >漏洞已提交,等待厂商审阅</p>
                </p>
            </li>
            <li name="__tab_step2_pub" >
                <p  class="info" id="tab_step2">
                <h4>
                  <p class="heading"></p>
                  待确认</h4>
                <p class="text" >漏洞已开始审阅,等待厂商确认</p>
                </p>
            </li>
            <li name="__tab_step3_pub">
              <p  class="info" id="tab_step3">
                <h4>
                  <p class="heading"></p>
                  待修复</h4>
                  <p class="text" >漏洞已被确认,等待厂商修复</p>
              </p>
            </li>
            <li name="__tab_step4_pub">
                <p  class="info" id="tab_step4">
                <h4>
                  <p class="heading"></p>
                  已关闭</h4>
                    <p class="text" >漏洞修复完毕,厂商关闭漏洞</p>
                </p>
            </li>
            <li name="__tab_step5_pub" >
                <p  class="info" id="tab_step5">
                <h4> <p class="heading"></p>
                  已公开</h4>
                <p class="text" >厂商同意公开此漏洞</p>
                </p>
            </li>
          </ul>
        </p>
      </p>
</p>The method used here is based on the processing status, here is $status, correspondingly add the style class class to the corresponding
.status ul { padding: 15px; }
.status ul li { overflow: hidden; background: url("../threatrules/steps-line.jpg") repeat-y -3px 0px; padding: 26px 0 0px; }
.status .active { background: url("../threatrules/steps-line-over.jpg") repeat-y -3px 0px; }
.status .end { background: url("../threatrules/steps-line-over.jpg") repeat-y -3px 0px; }
.status .end .heading { background: url("../threatrules/steps-over.jpg") no-repeat 0px 0px; }
.status .bottom { background: url("../threatrules/steps-line.jpg") repeat-y -3px 0px; }
.status .skip { background: url("../threatrules/steps-line-skip.jpg") repeat-y -3px 0px; }
.status .skip .heading { background: url("../threatrules/steps-skip.jpg") no-repeat 0px 0px; }
.status .active .heading { background: url("../threatrules/steps-over.jpg") no-repeat 0px 0px; }
.status .heading { float: left; width: 20px; height: 20px; background: url("../threatrules/steps.jpg") no-repeat 0px 0px; margin-right: 5px; }
.status .top { padding-top: 0px; }
.status .bottom { background: url("../threatrules/steps-line-b1.jpg") no-repeat 0px 0px; }
.status .bottom-active { background: url("../threatrules/steps-line-b2.jpg") no-repeat 0px 0px; }The jpg resource link used: https://download.csdn.net/download/u012063507/10280748
After setting the corresponding css, the next step is to write js. According to the value of $status, in the corresponding Just add class to
<script type="text/javascript">
/*根据处理状态,添加或删除对应的样式名*/
function addClass(elem, className){ //增加类名
if(!elem.className){
elem.className = className;
return;
}
var clazz = ' ' + elem.className + ' ';
if(clazz.indexOf(' ' + className + ' ') === -1){
elem.className = elem.className + ' ' + className;
}
}
var step1 = document.getElementById('tab_step1'),
step2 = document.getElementById('tab_step2'),
step3 = document.getElementById('tab_step3') ,
step4 = document.getElementById('tab_step4'),
step5 = document.getElementById('tab_step5');
var status = '<?php echo $status;?>';
switch(status){
case '1': //待确认
addClass(step2.parentNode, 'active'); //parentNode即为包含step2的外一层标签,此处即为<li>标签
break;
case '2': //待修复
addClass(step2.parentNode, 'active');
addClass(step3.parentNode, 'active');
break;
case '3'://已关闭
addClass(step2.parentNode, 'active');
addClass(step3.parentNode, 'active');
addClass(step4.parentNode, 'active');
break;
case '4': //已公开
addClass(step2.parentNode, 'active');
addClass(step3.parentNode, 'active');
addClass(step4.parentNode, 'active');
addClass(step5.parentNode, 'end bottom-active');
break;
}
</script>After setting like this, change the status of $status to "to be repaired", and the web page process is implemented as follows:

View the corresponding web page html code:
You can see Class="active" is added to the corresponding
This article introduces the dynamic display of js implementation process. For more related content, please pay attention to the php Chinese website.
Related recommendations:
particlesJS usage introduction related content
Detailed analysis of operators i and i in JS
Bootstrap jq jqajax php database addition, deletion, modification and query source code
The above is the detailed content of Realize dynamic display of process through js. For more information, please follow other related articles on the PHP Chinese website!

Hot AI Tools

Undresser.AI Undress
AI-powered app for creating realistic nude photos

AI Clothes Remover
Online AI tool for removing clothes from photos.

Undress AI Tool
Undress images for free

Clothoff.io
AI clothes remover

Video Face Swap
Swap faces in any video effortlessly with our completely free AI face swap tool!

Hot Article
Hot Tools

Notepad++7.3.1
Easy-to-use and free code editor

SublimeText3 Chinese version
Chinese version, very easy to use

Zend Studio 13.0.1
Powerful PHP integrated development environment

Dreamweaver CS6
Visual web development tools

SublimeText3 Mac version
God-level code editing software (SublimeText3)
Hot Topics


 Table Border in HTML
Sep 04, 2024 pm 04:49 PM
Table Border in HTML
Sep 04, 2024 pm 04:49 PM
Guide to Table Border in HTML. Here we discuss multiple ways for defining table-border with examples of the Table Border in HTML.
 Nested Table in HTML
Sep 04, 2024 pm 04:49 PM
Nested Table in HTML
Sep 04, 2024 pm 04:49 PM
This is a guide to Nested Table in HTML. Here we discuss how to create a table within the table along with the respective examples.
 HTML margin-left
Sep 04, 2024 pm 04:48 PM
HTML margin-left
Sep 04, 2024 pm 04:48 PM
Guide to HTML margin-left. Here we discuss a brief overview on HTML margin-left and its Examples along with its Code Implementation.
 HTML Table Layout
Sep 04, 2024 pm 04:54 PM
HTML Table Layout
Sep 04, 2024 pm 04:54 PM
Guide to HTML Table Layout. Here we discuss the Values of HTML Table Layout along with the examples and outputs n detail.
 HTML Input Placeholder
Sep 04, 2024 pm 04:54 PM
HTML Input Placeholder
Sep 04, 2024 pm 04:54 PM
Guide to HTML Input Placeholder. Here we discuss the Examples of HTML Input Placeholder along with the codes and outputs.
 HTML Ordered List
Sep 04, 2024 pm 04:43 PM
HTML Ordered List
Sep 04, 2024 pm 04:43 PM
Guide to the HTML Ordered List. Here we also discuss introduction of HTML Ordered list and types along with their example respectively
 Moving Text in HTML
Sep 04, 2024 pm 04:45 PM
Moving Text in HTML
Sep 04, 2024 pm 04:45 PM
Guide to Moving Text in HTML. Here we discuss an introduction, how marquee tag work with syntax and examples to implement.
 HTML onclick Button
Sep 04, 2024 pm 04:49 PM
HTML onclick Button
Sep 04, 2024 pm 04:49 PM
Guide to HTML onclick Button. Here we discuss their introduction, working, examples and onclick Event in various events respectively.
