
 Web Front-end
JS Tutorial
How to implement OAuth2.0 authorization service authentication in nodejs
Web Front-end
JS Tutorial
How to implement OAuth2.0 authorization service authentication in nodejs
How to implement OAuth2.0 authorization service authentication in nodejs
This article mainly introduces nodejs to implement OAuth2.0 authorization service authentication. Now I share it with you and give it as a reference.
OAuth is a network standard for development authorization. It is spelled open authorization, which means open authorization. The latest protocol version is 2.0.
For example:
There is a "cloud printing" website that can print out photos stored by users on Google. In order to use this service, users must let "Cloud Print" read their photos stored on Google.
The traditional method is for the user to tell "Cloud Print" their Google username and password, and the latter can read the user's photos. This approach has several serious shortcomings.
"Cloud Printing" will save the user's password for subsequent services, which is very unsafe.
Google has to deploy password login, and we know that simple password login is not safe.
"Cloud Print" has the power to obtain all the user's data stored in Google, and users cannot limit the scope and validity period of "Cloud Print" authorization.
Only by changing the password can the user take back the power granted to "Cloud Printing". However, doing so will invalidate all other third-party applications authorized by the user.
As long as one third-party application is cracked, it will lead to the leakage of user passwords, as well as the leakage of all password-protected data.
So OAuth was born!
Third-party application: Third-party application, also called "client" in this article, which is the "cloud printing" in the example in the previous section.
HTTP service: HTTP service provider, referred to as "service provider" in this article, which is Google in the example in the previous section.
Resource Owner: Resource owner, also called "user" in this article.
User Agent: User agent, in this article refers to the browser.
Authorization server: Authentication server, that is, a server specifically used by the service provider to handle authentication.
Resource server: Resource server, that is, the server where the service provider stores user-generated resources. It and the authentication server can be the same server or different servers.
The login layer provides the generation of tokens, where tokens include: validity period and permission scope. The client gets the token to access restricted resources.
access_token: The token that needs to be carried when requesting resources, that is, the access token.
refresh_token: Refresh token. If the access_token expires, you can use this token to obtain a new access_token and a new refresh_token. Generally, refresh_token has a longer validity, such as one year, while access_token has a shorter validity, such as a few minutes.
Permission scope: Specify the resource permission range that the client can obtain.
OAuth authorization mode
OAuth has four authorization modes, namely:
Authorization Authorization code
Simplified mode(implicit)
Password mode(resource owner password credentials)
Client mode (client credentials)
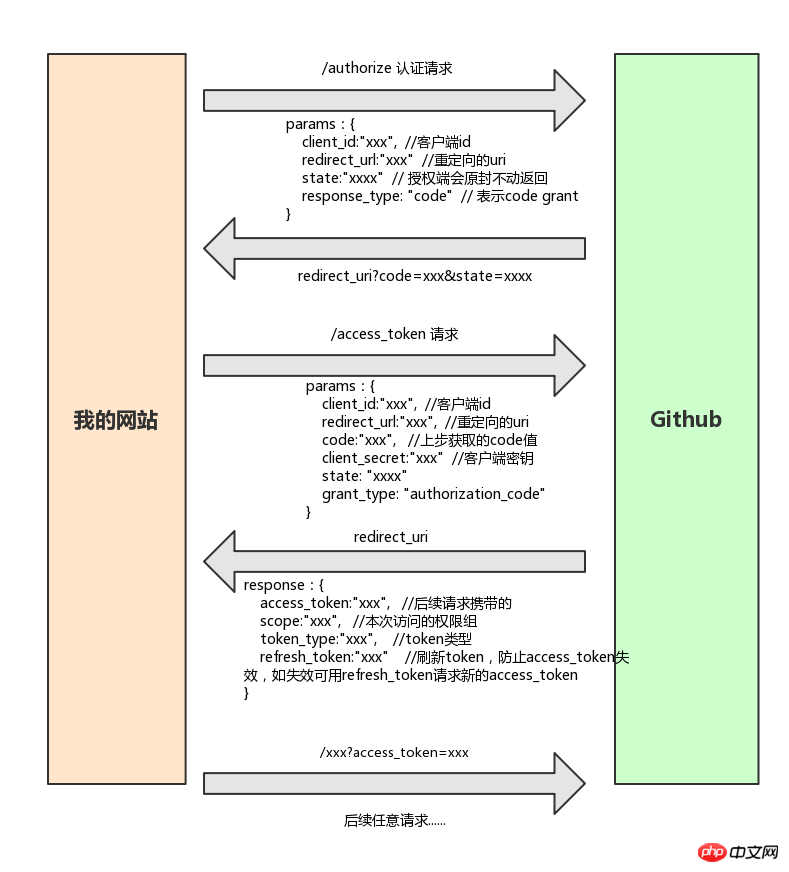
1. Authorization code mode
Authorization code mode is the most stringent authorization mode , the overall process is: the browser carries the necessary information to the authorization page. After successful normal login, a code (authorization code) is returned. After the client obtains the code, it obtains the code in the background in exchange for a token.

2. Password mode
Password mode is simply understood as using the user The steps to obtain access_token are as follows:
The user provides the user name and password to the client.
The client sends the username and password to the authentication server and requests a token from the latter.
After the authentication server confirms that it is correct, it provides the access token to the client.
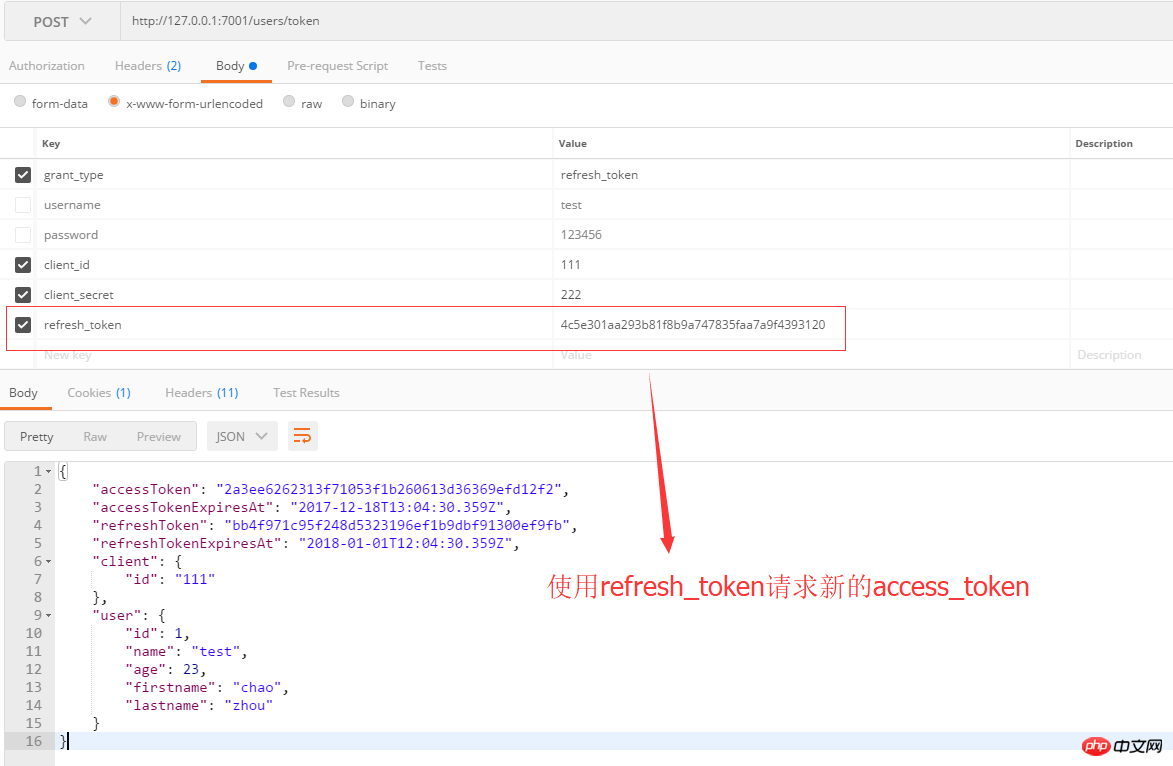
3. Application of refresh_token
refresh_token is used to obtain new access_token and refresh_token, use The method is simple as follows:
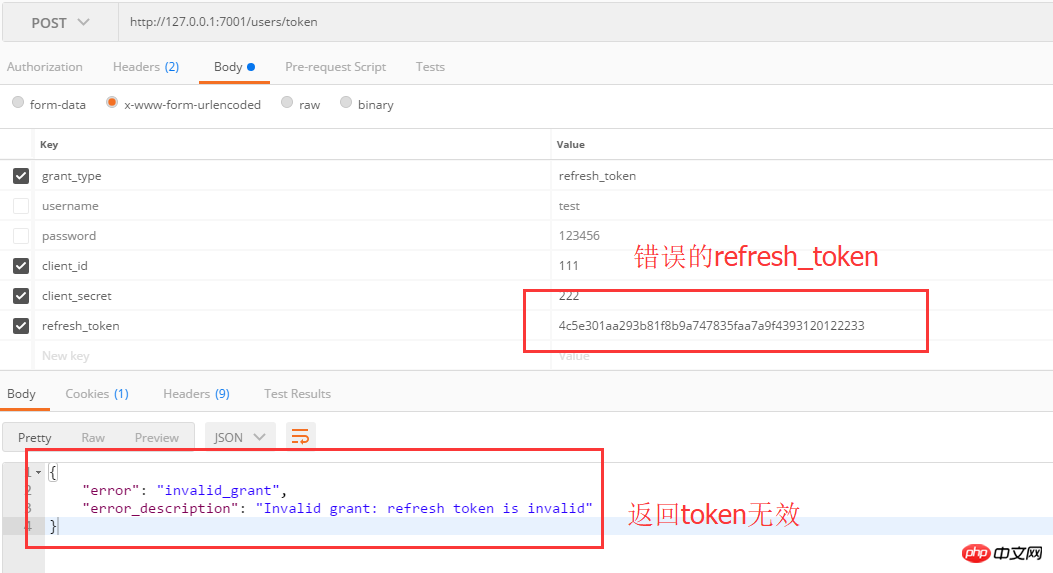
refresh_token is invalid:
##Use nodejs to implement OAuth authorization service
Technology stack:- nodejs eggjs ##eggjs-oAuth-server plug-in
For details, please refer to:
https://github.com/Azard/egg-oauth2-server
https://cnodejs.org/topic/592b2aedba8670562a40f60b
1. Code grant mode testing and single sign-on implementation
Here we build two sites, one is port 7001 (authorization service), and the other is port 7002 (client), authorization The mode is code grant.
First is the client login page:
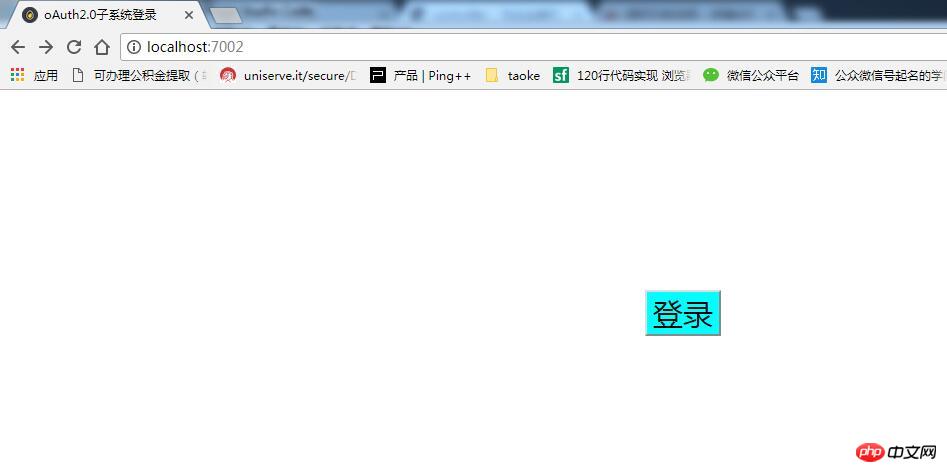
Log in directly after clicking the button:
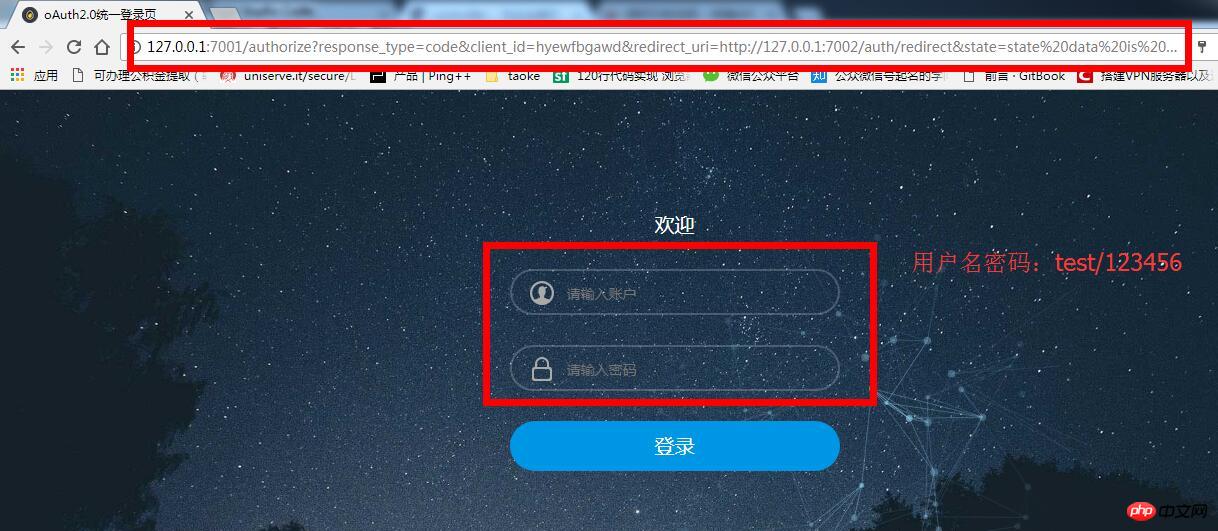
It can be found that the browser redirects to the authorized service address and carries the three parameters response_type, client_id, redirect_uri. After successful login, the browser will redirect to the address specified by redirect_uri , that is, *http://127.0.0.1:7002/auth/redirect* here:
The following is how to write the login page of the authorization service
<form action="/oauth2/authorize?{{query}}" id="form1" name="f" method="post">
<p class="input_outer">
<span class="u_user"></span>
<input name="username" class="text" style="color: #FFFFFF !important" type="text" placeholder="请输入账户">
</p>
<p class="input_outer">
<span class="us_uer"></span>
<input name="password" class="text" style="color: #FFFFFF !important; position:absolute; z-index:100;"value="" type="password" placeholder="请输入密码">
</p>
<p class="mb2"><a class="act-but submit" href="javascript:;" rel="external nofollow" onclick="document.getElementById('form1').submit()" style="color: #FFFFFF">登录</a></p>
</form>Here${query} is the complete query carried by the client login redirect, and then /oauth2/authorize How to write the route:
app.all('/oauth2/authorize', app.oAuth2Server.authorize());// 获取授权码
Call here app.oAuth2Server.authorize() , the plug-in will automatically perform a redirection operation. First, it will redirect to the address specified by the client. After the client gets the code and state, it will then go to the authorization layer to obtain the token:
async redirect(){
  // 服务端重定向过来的
  console.log(this.ctx.query)
  const result = await this.ctx.curl('http://127.0.0.1:7001/users/token', {
   dataType: 'json',
   // contentType: 'application/x-www-form-urlencoded', // 默认格式
   method: 'POST',
   timeout: 3000,
   data: {
    grant_type: 'authorization_code',
    code: this.ctx.query.code,
    state: this.ctx.query.state,
    client_id: client_id,
    client_secret: client_secret,
    redirect_uri: redirect_uri,
   }
  });
  this.ctx.body = result.data;
}After obtaining the token Normal return:

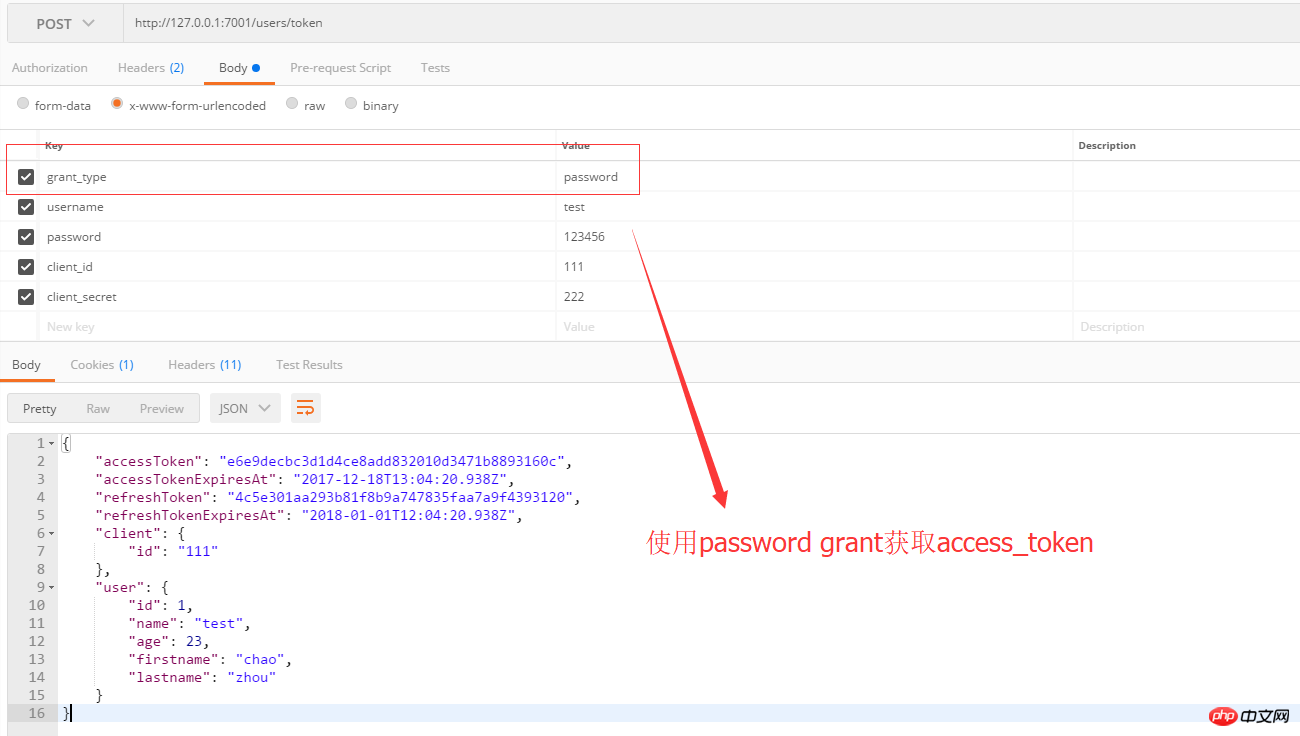
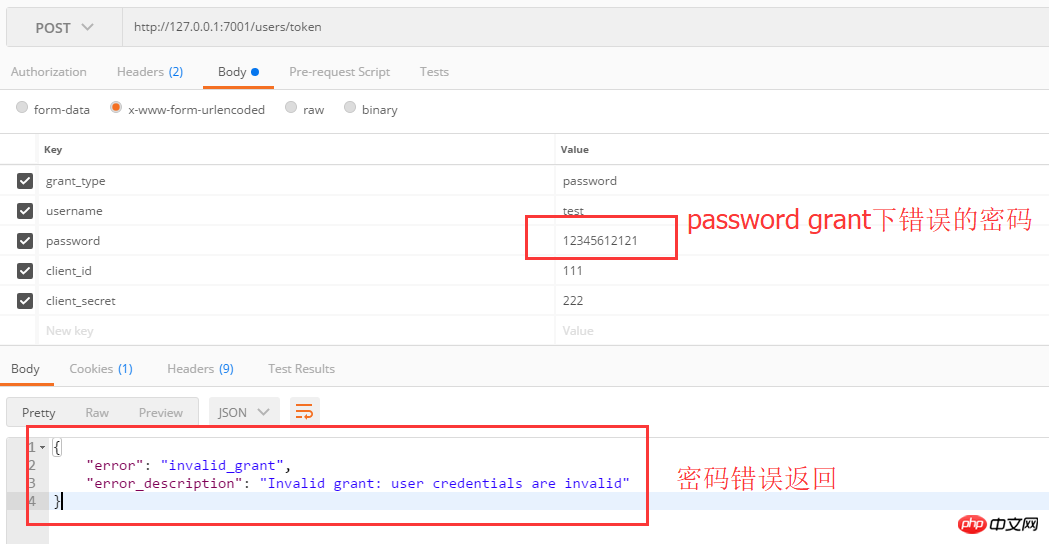
2. Password grant mode test
First use username and password to obtain access_token:
Returns when the username or password is incorrect:
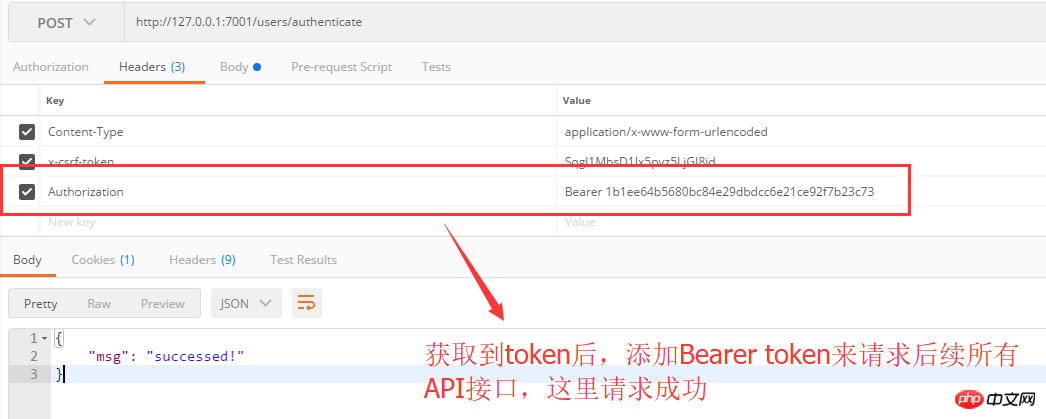
Use token to obtain authorized resources and returns normally:
Summary
When OAuth is actually used, https must be used, including the client and authorization server
The authorization service can use private key signatures, and the client uses public key verification to ensure data security
The above is what I compiled for everyone. I hope it will be helpful to everyone in the future.
Related articles:
How to build a multi-person chat room in the nodejs express environment
Explain the basic configuration in detail in Vue webpack
Detailed interpretation of the separation and combination of vue-admin and backend (flask)
The above is the detailed content of How to implement OAuth2.0 authorization service authentication in nodejs. For more information, please follow other related articles on the PHP Chinese website!

Hot AI Tools

Undresser.AI Undress
AI-powered app for creating realistic nude photos

AI Clothes Remover
Online AI tool for removing clothes from photos.

Undress AI Tool
Undress images for free

Clothoff.io
AI clothes remover

Video Face Swap
Swap faces in any video effortlessly with our completely free AI face swap tool!

Hot Article
Hot Tools

Notepad++7.3.1
Easy-to-use and free code editor

SublimeText3 Chinese version
Chinese version, very easy to use

Zend Studio 13.0.1
Powerful PHP integrated development environment

Dreamweaver CS6
Visual web development tools

SublimeText3 Mac version
God-level code editing software (SublimeText3)
Hot Topics


 The difference between nodejs and vuejs
Apr 21, 2024 am 04:17 AM
The difference between nodejs and vuejs
Apr 21, 2024 am 04:17 AM
Node.js is a server-side JavaScript runtime, while Vue.js is a client-side JavaScript framework for creating interactive user interfaces. Node.js is used for server-side development, such as back-end service API development and data processing, while Vue.js is used for client-side development, such as single-page applications and responsive user interfaces.
 Is nodejs a backend framework?
Apr 21, 2024 am 05:09 AM
Is nodejs a backend framework?
Apr 21, 2024 am 05:09 AM
Node.js can be used as a backend framework as it offers features such as high performance, scalability, cross-platform support, rich ecosystem, and ease of development.
 How to connect nodejs to mysql database
Apr 21, 2024 am 06:13 AM
How to connect nodejs to mysql database
Apr 21, 2024 am 06:13 AM
To connect to a MySQL database, you need to follow these steps: Install the mysql2 driver. Use mysql2.createConnection() to create a connection object that contains the host address, port, username, password, and database name. Use connection.query() to perform queries. Finally use connection.end() to end the connection.
 What are the global variables in nodejs
Apr 21, 2024 am 04:54 AM
What are the global variables in nodejs
Apr 21, 2024 am 04:54 AM
The following global variables exist in Node.js: Global object: global Core module: process, console, require Runtime environment variables: __dirname, __filename, __line, __column Constants: undefined, null, NaN, Infinity, -Infinity
 What is the difference between npm and npm.cmd files in the nodejs installation directory?
Apr 21, 2024 am 05:18 AM
What is the difference between npm and npm.cmd files in the nodejs installation directory?
Apr 21, 2024 am 05:18 AM
There are two npm-related files in the Node.js installation directory: npm and npm.cmd. The differences are as follows: different extensions: npm is an executable file, and npm.cmd is a command window shortcut. Windows users: npm.cmd can be used from the command prompt, npm can only be run from the command line. Compatibility: npm.cmd is specific to Windows systems, npm is available cross-platform. Usage recommendations: Windows users use npm.cmd, other operating systems use npm.
 Is there a big difference between nodejs and java?
Apr 21, 2024 am 06:12 AM
Is there a big difference between nodejs and java?
Apr 21, 2024 am 06:12 AM
The main differences between Node.js and Java are design and features: Event-driven vs. thread-driven: Node.js is event-driven and Java is thread-driven. Single-threaded vs. multi-threaded: Node.js uses a single-threaded event loop, and Java uses a multi-threaded architecture. Runtime environment: Node.js runs on the V8 JavaScript engine, while Java runs on the JVM. Syntax: Node.js uses JavaScript syntax, while Java uses Java syntax. Purpose: Node.js is suitable for I/O-intensive tasks, while Java is suitable for large enterprise applications.
 Is nodejs a back-end development language?
Apr 21, 2024 am 05:09 AM
Is nodejs a back-end development language?
Apr 21, 2024 am 05:09 AM
Yes, Node.js is a backend development language. It is used for back-end development, including handling server-side business logic, managing database connections, and providing APIs.
 Which one to choose between nodejs and java?
Apr 21, 2024 am 04:40 AM
Which one to choose between nodejs and java?
Apr 21, 2024 am 04:40 AM
Node.js and Java each have their pros and cons in web development, and the choice depends on project requirements. Node.js excels in real-time applications, rapid development, and microservices architecture, while Java excels in enterprise-grade support, performance, and security.
