

How to implement 3D model display in three.js
This article mainly introduces the sample code of three.js to realize 3D model display. Now I share it with you and give it as a reference.
Since the project needs to display the 3D model, I did some research on three and shared it in the hope it can help everyone
Let’s take a look at the effect first:

Three.js is not very difficult overall. As long as you calm down and study it, you will get started quickly.
First of all, we need to create a canvas on the page that can place the 3D model. It can also be said that Initializing Three
var WIDTH,HEIGHT;
  var  renderer;
  function initThree() {
    WIDTH = document.documentElement.clientWidth/2; <!--{foreach from=$recommended_goods item=rgoods}--> <!-- {/foreach} -->
    HEIGHT = document.documentElement.clientHeight/2;
    /* 渲染器 */
    renderer = new THREE.WebGLRenderer();
    renderer.setSize(WIDTH , HEIGHT);
    renderer.setClearColor(new THREE.Color(0x66666));
    renderer.gammaInput = true;
    renderer.gammaOutput = true;

    document.body.appendChild(renderer.domElement);
}It is not difficult to see from the above code that we have set up a canvas added to the body. The width and height are half of the client. The color is 0x66666. What should be noted here is that renderer = new THREE.WebGLRenderer(); because All our settings are set with renderer as the object.
We need to adjust the camera, that is, the visual angle
/* 摄像头 */
  var camera;
  function initCamera() {
    var VIEW_ANGLE = 45,
        ASPECT = WIDTH / HEIGHT,
        NEAR = 0.1,
        FAR = 10000;
    camera = new THREE.PerspectiveCamera(VIEW_ANGLE, ASPECT, NEAR, FAR);
    camera.position.set(20, 0, 0);
    //设置视野的中心坐标
    camera.lookAt(scene.position);
}The above code is mainly to control the visual angle value, which can be adjusted according to your own needs in the later stage
Load scene:
/* 场景 */
   var scene;
   function initScene() {
     scene = new THREE.Scene();
}Load lighting effect
/* 灯光 */
  var light,light2,light3;
  function initLight() {
    //平行光
    light = new THREE.DirectionalLight(0xFFFFFF);
    light.position.set(0, 99, 0).normalize();
    scene.add(light);
    //环境光
    light2 = new THREE.AmbientLight(0x999999);
    scene.add(light2);
    //点光源
    light3 = new THREE.PointLight(0x00FF00);
    light3.position.set(300, 0, 0);
    scene.add(light3);
}Display model object:
/* 显示对象 */
  var cube;
  function initObject(){
    // ASCII file
    var loader = new THREE.STLLoader();
    loader.addEventListener( 'load', function ( event ) {
      var loading = document.getElementById("Loading");
      loading.parentNode.removeChild(loading);
      var geometry = event.content;
      //砖红色
      var material = new THREE.MeshPhongMaterial( { ambient: 0xff5533, color: 0xff5533, specular: 0x111111, shininess: 200 } );
      //纯黑色
//      var material = new THREE.MeshBasicMaterial( { envMap: THREE.ImageUtils.loadTexture( 'http://localhost:8080/textures/metal.jpg', new THREE.SphericalReflectionMapping() ), overdraw: true } ) ;
      //粉色 带阴影
//      var material = new THREE.MeshLambertMaterial( { color:0xff5533, side: THREE.DoubleSide } );
      //灰色
//      var material = new THREE.MeshLambertMaterial({color: 000000});  //材质设定 (颜色)
      var mesh = new THREE.Mesh( geometry, material );
      var center = THREE.GeometryUtils.center(geometry);
      var boundbox=geometry.boundingBox;
      var vector3 = boundbox.size(null);
      var vector3 = boundbox.size(null);
      console.log(vector3);
      var scale = vector3.length();
      camera.position.set(scale, 0, 0);
      camera.lookAt(scene.position);
      scene.add(camera);
      //利用一个轴对象以可视化的3轴以简单的方式。X轴是红色的。Y轴是绿色的。Z轴是蓝色的。这有助于理解在空间的所有三个轴的方向。
      var axisHelper = new THREE.AxisHelper(800);
      scene.add(axisHelper);

      //周围边框
      bboxHelper = new THREE.BoxHelper();
      bboxHelper.visible = true;
      var meshMaterial = material;
      mainModel = new THREE.Mesh(geometry, meshMaterial);
      bboxHelper.update(mainModel);
      bboxHelper.geometry.computeBoundingBox();
      scene.add(bboxHelper);

      //地板网格
//      var gridHelper = new THREE.GridHelper(500, 40); // 500 is grid size, 20 is grid step
//      gridHelper.position = new THREE.Vector3(0, 0, 0);
//      gridHelper.rotation = new THREE.Euler(0, 0, 0);
//      scene.add(gridHelper);
//      var gridHelper2 = gridHelper.clone();
//      gridHelper2.rotation = new THREE.Euler(Math.PI / 2, 0, 0);
//      scene.add(gridHelper2);
//      var gridHelper3 = gridHelper.clone();
//      gridHelper3.rotation = new THREE.Euler(Math.PI / 2, 0, Math.PI / 2);
//      scene.add(gridHelper3);
//
//      var grid = new THREE.GridHelper(300, 40, 25, [0, 0, 1], 0x000055, 0.2, true, "#FFFFFF", "left");
//      scene.add(grid);
      var x = (boundbox.max.x - boundbox.min.x).toFixed(2);
      var y = (boundbox.max.y - boundbox.min.y).toFixed(2);
      var z = (boundbox.max.z - boundbox.min.z).toFixed(2);
      console.log(x);
      console.log(y);
      console.log(z);
      console.log(boundbox);
      mesh.position.set(0,0,0);
//      mesh.position.x = scene.position.x;
//      mesh.position.y = scene.position.y ;
//      mesh.position.z = scene.position.z;
      scene.add(mesh);
      renderer.clear();
      renderer.render(scene, camera);
    } );
    loader.load( '3dfile/莫比乌斯环.STL' );
}Here, select the corresponding js import according to the file type and I can load it It is an STL model, so I introduced STLLoader.js
<script src="js/STLLoader.js"></script>
If you need to display the grid ruler, just uncomment the grid part of the code
The following is the control method (although I am not displaying it The code is written to zoom in and out according to the keyboard keys, but it is still provided for your reference)
//控制
  var effect;
  var controls;
  function initControl(){
    effect = new THREE.AsciiEffect( renderer );
    effect.setSize( WIDTH, HEIGHT );
    controls = new THREE.TrackballControls( camera,renderer.domElement);
}The last is an initial call
function animate() {
    requestAnimationFrame( animate );
    controls.update();
    effect.render( scene, camera );
  }

  function threeStart() {
    initThree();
    initScene();
    initCamera();
    initLight();
    initObject();
    initControl();
    animate();
}Attached is the complete code
WebGL <script src="js/STLLoader.js"></script> <script> var WIDTH,HEIGHT; var renderer; function initThree() { WIDTH = document.documentElement.clientWidth/2; <!--{foreach from=$recommended_goods item=rgoods}--> <!-- {/foreach} --> HEIGHT = document.documentElement.clientHeight/2; /* 渲染器 */ renderer = new THREE.WebGLRenderer(); renderer.setSize(WIDTH , HEIGHT); renderer.setClearColor(new THREE.Color(0x66666)); renderer.gammaInput = true; renderer.gammaOutput = true; document.body.appendChild(renderer.domElement); } /* 摄像头 */ var camera; function initCamera() { var VIEW_ANGLE = 45, ASPECT = WIDTH / HEIGHT, NEAR = 0.1, FAR = 10000; camera = new THREE.PerspectiveCamera(VIEW_ANGLE, ASPECT, NEAR, FAR); camera.position.set(20, 0, 0); //设置视野的中心坐标 camera.lookAt(scene.position); } /* 场景 */ var scene; function initScene() { scene = new THREE.Scene(); } /* 灯光 */ var light,light2,light3; function initLight() { //平行光 light = new THREE.DirectionalLight(0xFFFFFF); light.position.set(0, 99, 0).normalize(); scene.add(light); //环境光 light2 = new THREE.AmbientLight(0x999999); scene.add(light2); //点光源 light3 = new THREE.PointLight(0x00FF00); light3.position.set(300, 0, 0); scene.add(light3); } /* 显示对象 */ var cube; function initObject(){ // ASCII file var loader = new THREE.STLLoader(); loader.addEventListener( 'load', function ( event ) { var loading = document.getElementById("Loading"); loading.parentNode.removeChild(loading); var geometry = event.content; //砖红色 var material = new THREE.MeshPhongMaterial( { ambient: 0xff5533, color: 0xff5533, specular: 0x111111, shininess: 200 } ); //纯黑色 // var material = new THREE.MeshBasicMaterial( { envMap: THREE.ImageUtils.loadTexture( 'http://localhost:8080/textures/metal.jpg', new THREE.SphericalReflectionMapping() ), overdraw: true } ) ; //粉色 带阴影 // var material = new THREE.MeshLambertMaterial( { color:0xff5533, side: THREE.DoubleSide } ); //灰色 // var material = new THREE.MeshLambertMaterial({color: 000000}); //材质设定 (颜色) var mesh = new THREE.Mesh( geometry, material ); var center = THREE.GeometryUtils.center(geometry); var boundbox=geometry.boundingBox; var vector3 = boundbox.size(null); var vector3 = boundbox.size(null); console.log(vector3); var scale = vector3.length(); camera.position.set(scale, 0, 0); camera.lookAt(scene.position); scene.add(camera); //利用一个轴对象以可视化的3轴以简单的方式。X轴是红色的。Y轴是绿色的。Z轴是蓝色的。这有助于理解在空间的所有三个轴的方向。 var axisHelper = new THREE.AxisHelper(800); scene.add(axisHelper); //周围边框 bboxHelper = new THREE.BoxHelper(); bboxHelper.visible = true; var meshMaterial = material; mainModel = new THREE.Mesh(geometry, meshMaterial); bboxHelper.update(mainModel); bboxHelper.geometry.computeBoundingBox(); scene.add(bboxHelper); //地板网格 // var gridHelper = new THREE.GridHelper(500, 40); // 500 is grid size, 20 is grid step // gridHelper.position = new THREE.Vector3(0, 0, 0); // gridHelper.rotation = new THREE.Euler(0, 0, 0); // scene.add(gridHelper); // var gridHelper2 = gridHelper.clone(); // gridHelper2.rotation = new THREE.Euler(Math.PI / 2, 0, 0); // scene.add(gridHelper2); // var gridHelper3 = gridHelper.clone(); // gridHelper3.rotation = new THREE.Euler(Math.PI / 2, 0, Math.PI / 2); // scene.add(gridHelper3); // // var grid = new THREE.GridHelper(300, 40, 25, [0, 0, 1], 0x000055, 0.2, true, "#FFFFFF", "left"); // scene.add(grid); var x = (boundbox.max.x - boundbox.min.x).toFixed(2); var y = (boundbox.max.y - boundbox.min.y).toFixed(2); var z = (boundbox.max.z - boundbox.min.z).toFixed(2); console.log(x); console.log(y); console.log(z); console.log(boundbox); mesh.position.set(0,0,0); // mesh.position.x = scene.position.x; // mesh.position.y = scene.position.y ; // mesh.position.z = scene.position.z; scene.add(mesh); renderer.clear(); renderer.render(scene, camera); } ); loader.load( '3dfile/莫比乌斯环.STL' ); } //控制 var effect; var controls; function initControl(){ effect = new THREE.AsciiEffect( renderer ); effect.setSize( WIDTH, HEIGHT ); controls = new THREE.TrackballControls( camera,renderer.domElement); } function animate() { requestAnimationFrame( animate ); controls.update(); effect.render( scene, camera ); } function threeStart() { initThree(); initScene(); initCamera(); initLight(); initObject(); initControl(); animate(); } </script>Loading...
Oh my file Structure
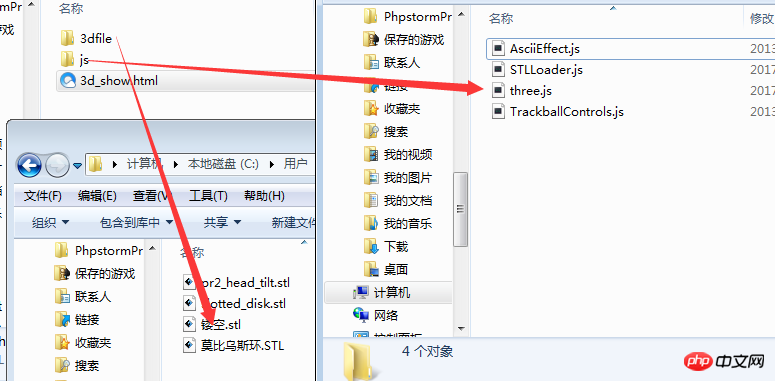
If you want all the files, just leave me a message
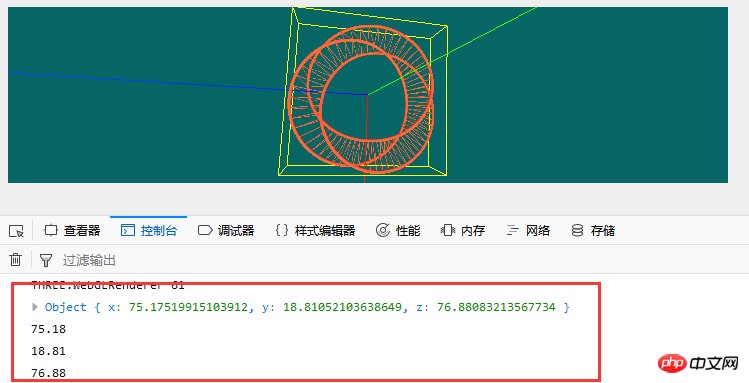
Add one point, because in the display I added bboxHelper = new THREE.BoxHelper() to the model method, so we can get the dimensions of the X, Y, and Z axes of the model and also regard it as the length, width, and height of the model.
The above is what I compiled for you. I hope it will be helpful to everyone in the future.
Related articles:
How to use the tangram.js library to implement js classes
How to use js code to implement the copy function
How to implement audio playback function using JavaScript
The above is the detailed content of How to implement 3D model display in three.js. For more information, please follow other related articles on the PHP Chinese website!

Hot AI Tools

Undresser.AI Undress
AI-powered app for creating realistic nude photos

AI Clothes Remover
Online AI tool for removing clothes from photos.

Undress AI Tool
Undress images for free

Clothoff.io
AI clothes remover

Video Face Swap
Swap faces in any video effortlessly with our completely free AI face swap tool!

Hot Article
Hot Tools

Notepad++7.3.1
Easy-to-use and free code editor

SublimeText3 Chinese version
Chinese version, very easy to use

Zend Studio 13.0.1
Powerful PHP integrated development environment

Dreamweaver CS6
Visual web development tools

SublimeText3 Mac version
God-level code editing software (SublimeText3)
Hot Topics


 What should I do if I encounter garbled code printing for front-end thermal paper receipts?
Apr 04, 2025 pm 02:42 PM
What should I do if I encounter garbled code printing for front-end thermal paper receipts?
Apr 04, 2025 pm 02:42 PM
Frequently Asked Questions and Solutions for Front-end Thermal Paper Ticket Printing In Front-end Development, Ticket Printing is a common requirement. However, many developers are implementing...
 Who gets paid more Python or JavaScript?
Apr 04, 2025 am 12:09 AM
Who gets paid more Python or JavaScript?
Apr 04, 2025 am 12:09 AM
There is no absolute salary for Python and JavaScript developers, depending on skills and industry needs. 1. Python may be paid more in data science and machine learning. 2. JavaScript has great demand in front-end and full-stack development, and its salary is also considerable. 3. Influencing factors include experience, geographical location, company size and specific skills.
 Demystifying JavaScript: What It Does and Why It Matters
Apr 09, 2025 am 12:07 AM
Demystifying JavaScript: What It Does and Why It Matters
Apr 09, 2025 am 12:07 AM
JavaScript is the cornerstone of modern web development, and its main functions include event-driven programming, dynamic content generation and asynchronous programming. 1) Event-driven programming allows web pages to change dynamically according to user operations. 2) Dynamic content generation allows page content to be adjusted according to conditions. 3) Asynchronous programming ensures that the user interface is not blocked. JavaScript is widely used in web interaction, single-page application and server-side development, greatly improving the flexibility of user experience and cross-platform development.
 How to merge array elements with the same ID into one object using JavaScript?
Apr 04, 2025 pm 05:09 PM
How to merge array elements with the same ID into one object using JavaScript?
Apr 04, 2025 pm 05:09 PM
How to merge array elements with the same ID into one object in JavaScript? When processing data, we often encounter the need to have the same ID...
 How to achieve parallax scrolling and element animation effects, like Shiseido's official website?
or:
How can we achieve the animation effect accompanied by page scrolling like Shiseido's official website?
Apr 04, 2025 pm 05:36 PM
How to achieve parallax scrolling and element animation effects, like Shiseido's official website?
or:
How can we achieve the animation effect accompanied by page scrolling like Shiseido's official website?
Apr 04, 2025 pm 05:36 PM
Discussion on the realization of parallax scrolling and element animation effects in this article will explore how to achieve similar to Shiseido official website (https://www.shiseido.co.jp/sb/wonderland/)...
 Is JavaScript hard to learn?
Apr 03, 2025 am 12:20 AM
Is JavaScript hard to learn?
Apr 03, 2025 am 12:20 AM
Learning JavaScript is not difficult, but it is challenging. 1) Understand basic concepts such as variables, data types, functions, etc. 2) Master asynchronous programming and implement it through event loops. 3) Use DOM operations and Promise to handle asynchronous requests. 4) Avoid common mistakes and use debugging techniques. 5) Optimize performance and follow best practices.
 The difference in console.log output result: Why are the two calls different?
Apr 04, 2025 pm 05:12 PM
The difference in console.log output result: Why are the two calls different?
Apr 04, 2025 pm 05:12 PM
In-depth discussion of the root causes of the difference in console.log output. This article will analyze the differences in the output results of console.log function in a piece of code and explain the reasons behind it. �...
 How to implement panel drag and drop adjustment function similar to VSCode in front-end development?
Apr 04, 2025 pm 02:06 PM
How to implement panel drag and drop adjustment function similar to VSCode in front-end development?
Apr 04, 2025 pm 02:06 PM
Explore the implementation of panel drag and drop adjustment function similar to VSCode in the front-end. In front-end development, how to implement VSCode similar to VSCode...
