

How Angular CLI implements Build
This time I will show you how Angular CLI implements Build, and what are the precautions for Angular CLI to implement Build. The following is a practical case, let's take a look.
Build.
Build will mainly do the following actions:
Compile the project file and output it Go to a certain directory
Build targets determine the output result
bundling packaging
Production The build of the environment will also perform uglify and tree-shaking (removing useless code)
ng build.
You can read the help first :
ng build --help
For the development environment, use the command ng build.
By default, its output directory is configured in the ourDir attribute in the .angular-cli.json file, and the default is /dist Directory.
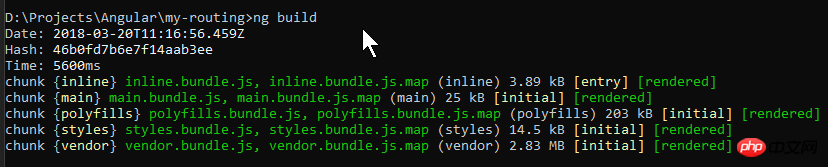
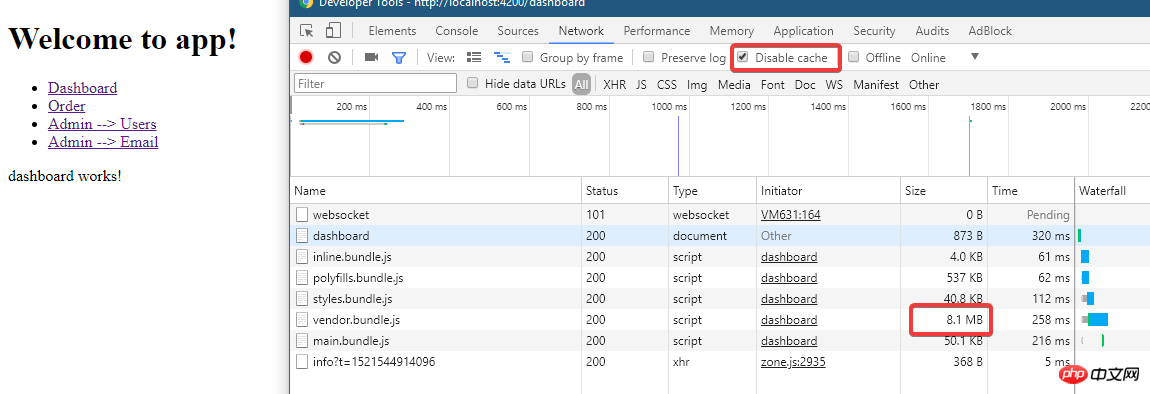
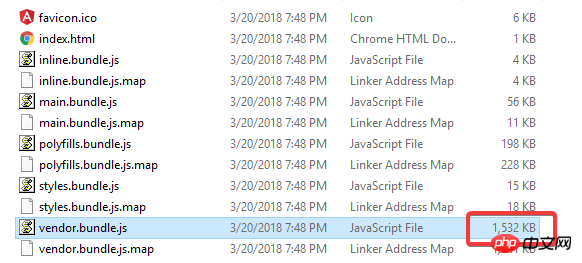
After building, you will see these files in dist:
inline.bundle.js This is the runtime of webpack.
main.bundle.js is the program code.
pollyfills.bundle.js is the browser’s Pollyfills.
styles. bundle.js style
vendor.bundle.js is angular and third-party library
You can use source-map-explorer to analyze dependencies, And check which modules and classes are in the bundle.
First modify the code in the previous example:

Execute ng build:
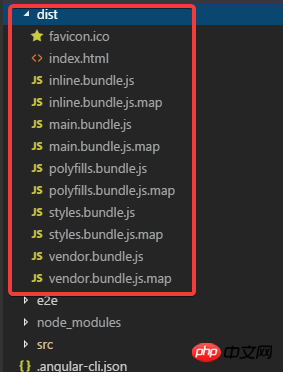
You can see that these files are generated.
Format the index.html in dist and take a look:
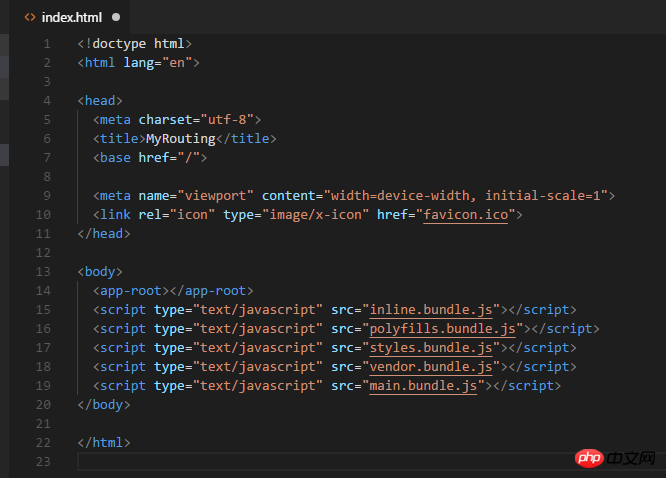
You can see that it references the 5 generated js files.
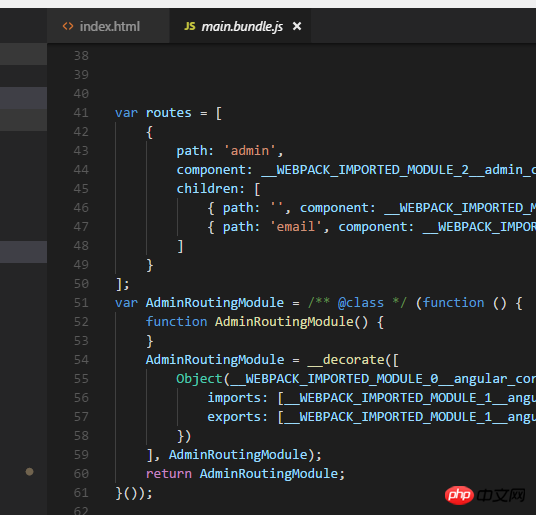
Open main.bundle.js and you can see the code I wrote:
Run the program below: ng serve -o:
You can see that the above file is loaded during ng serve.
Because ng build is a development build, no optimization has been done, and the file is quite large.
Now look at the file directory, there is no dist directory:
So how are these files served?
This is because webpack is served in memory at this time.
Use source-map-explorer below To analyze, first install it:
npm install --save-dev source-map-explorer
Then execute ng build, then execute:
.\node_modules\.bin\source-map-explorer dist\main.bundle.js
The result will generate this graph:
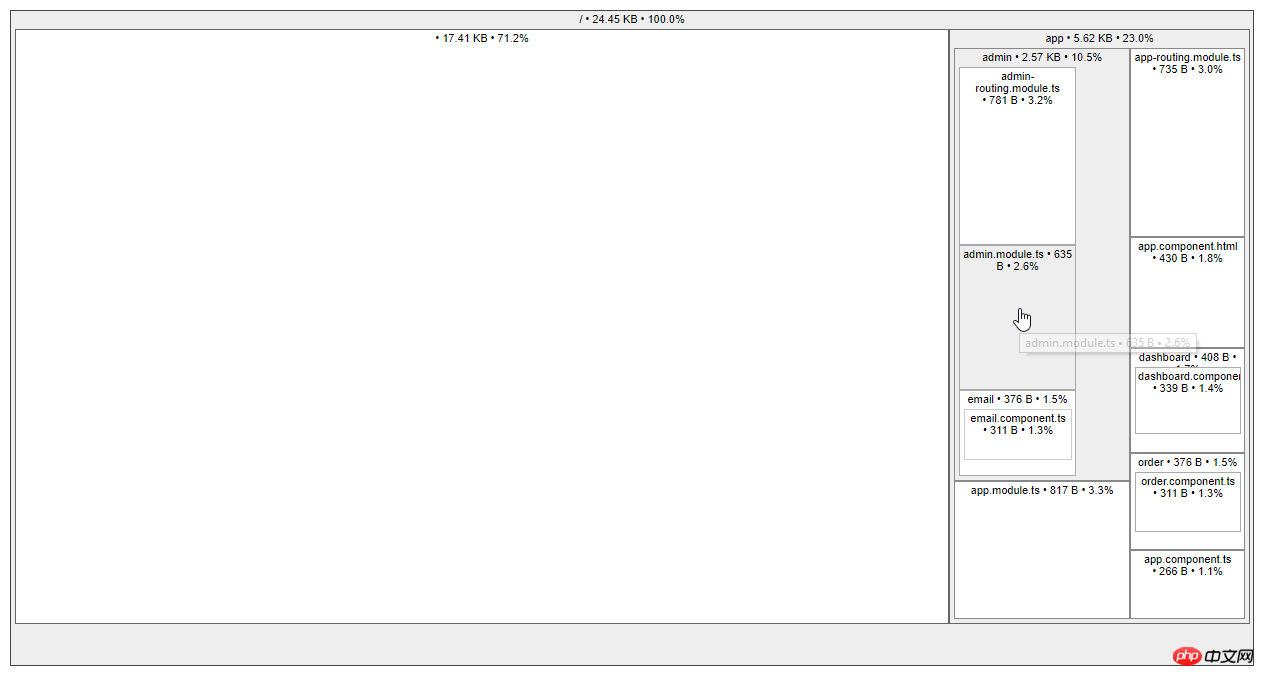
Let’s look at the situation of vendor.bundle:
.\node_modules\.bin\source-map-explorer dist\vendor.bundle.js
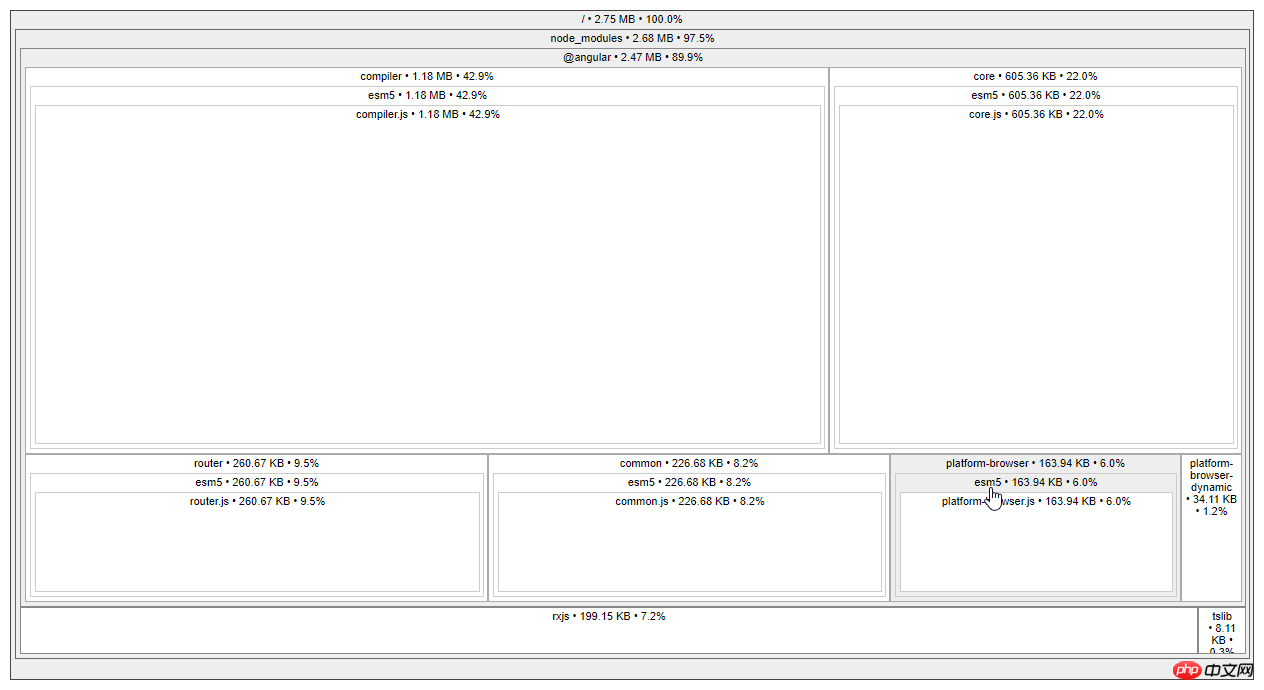
There are more things in it.
Build Targets and Environment.
Environment refers to which environment file is used:
And Targets is used to determine how the project file is optimized.
Look at the comparison between development and production builds.
ng build |
##ng build --prod | |
| Environment | environment.ts | ##environment..prod.ts|
| Only cache images referenced in css | All build files | |
| Generate | Do not generate | |
| Global css output to js file | The generated is css file | |
| not | is | |
| Do not remove useless code | Remove useless code | |
| No | is | |
| is | is | |
| No | ##Yes (with AOT and Angular5) |
--named-chunks |
Yes |
No | --output-hashing |
media |
all |
下面命令都是针对开发时的build, 它们的作用是一样的: ng build ng build --dev ng build --dev -e=dev ng build --target=development --environment=dev Copy after login 下面则是生产build: ng build --prod ng build --prod -e=prod ng build --target=production --environment=prod Copy after login 其它常用的参数还有:
Production Build. 先使用--aot: ng build --aot Copy after login
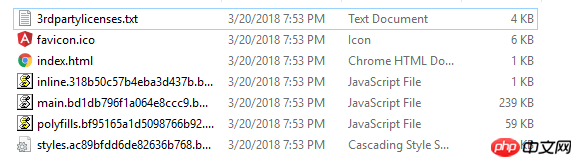
使用aot之后可以看到 vendor.bundle的大小降了很多, 只有1.5m左右了. 执行aot会去掉一些程序执行不需要的代码, 例如angular的compiler这时就不在build输出的文件里了(可以使用source-map-explorer查看). 试试生产环境: ng build --prod Copy after login
可以看到所有的文件都非常小了, 并且没有vendor了(因为prod下--build-optimizer起作用所以vendor没有了, 但可以使用--vendor-chunk true给弄出来). Serve. ng serve. 已经一直在用了, 下面看看它常用的参数:
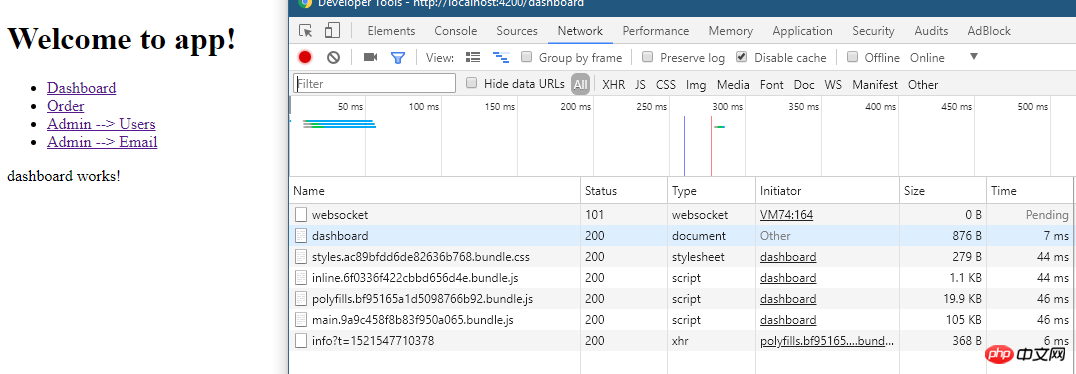
试试 --prod: ng serve --prod Copy after login
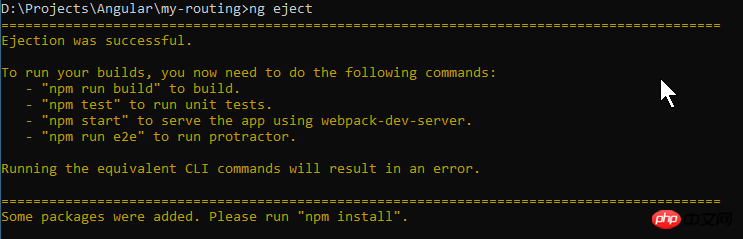
通过文件大小可以看出确实是prod build的. ng eject. 为项目生成webpack配置和脚本. 执行该命令试试:
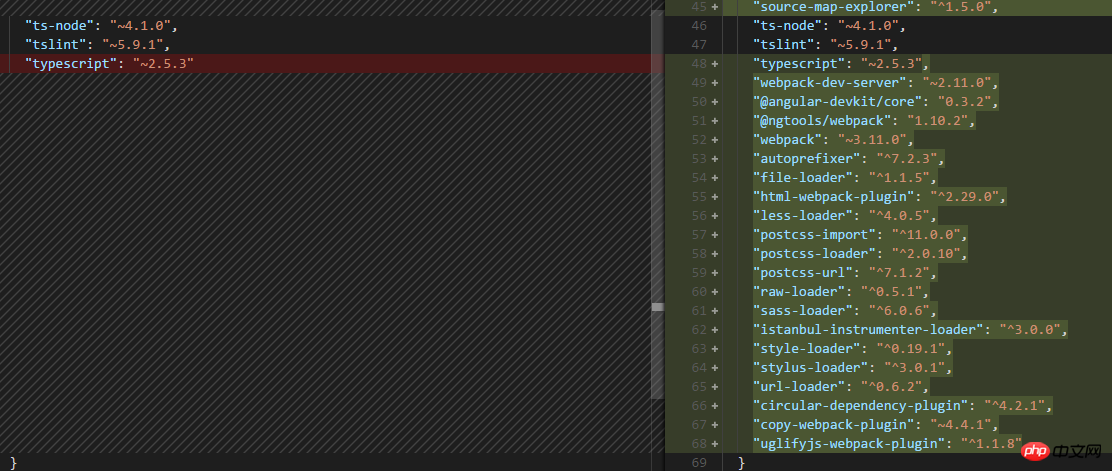
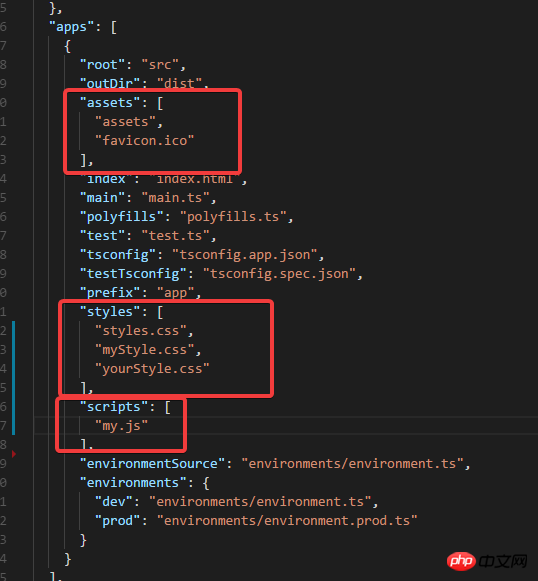
看看有哪些变化: .angular-cli.json:
package.json:
命令脚本都变了
还多出来一个webpack.config.js文件:
为什么要这么做呢? 可以对项目更深入的配置.... 这时运行程序就是 npm start了. 我还是把reject恢复回去吧, 使用git来恢复吧. 如果需要Serve 其他js/css/assets文件:
放在.angular-cli.json就行, 例如jquery就应该放在scripts里面. 相信看了本文案例你已经掌握了方法,更多精彩请关注php中文网其它相关文章! 推荐阅读: |


The above is the detailed content of How Angular CLI implements Build. For more information, please follow other related articles on the PHP Chinese website!

Hot AI Tools

Undresser.AI Undress
AI-powered app for creating realistic nude photos

AI Clothes Remover
Online AI tool for removing clothes from photos.

Undress AI Tool
Undress images for free

Clothoff.io
AI clothes remover

Video Face Swap
Swap faces in any video effortlessly with our completely free AI face swap tool!

Hot Article
Hot Tools

Notepad++7.3.1
Easy-to-use and free code editor

SublimeText3 Chinese version
Chinese version, very easy to use

Zend Studio 13.0.1
Powerful PHP integrated development environment

Dreamweaver CS6
Visual web development tools

SublimeText3 Mac version
God-level code editing software (SublimeText3)
Hot Topics


 How to install Angular on Ubuntu 24.04
Mar 23, 2024 pm 12:20 PM
How to install Angular on Ubuntu 24.04
Mar 23, 2024 pm 12:20 PM
Angular.js is a freely accessible JavaScript platform for creating dynamic applications. It allows you to express various aspects of your application quickly and clearly by extending the syntax of HTML as a template language. Angular.js provides a range of tools to help you write, update and test your code. Additionally, it provides many features such as routing and form management. This guide will discuss how to install Angular on Ubuntu24. First, you need to install Node.js. Node.js is a JavaScript running environment based on the ChromeV8 engine that allows you to run JavaScript code on the server side. To be in Ub
 How to use PHP and Angular for front-end development
May 11, 2023 pm 04:04 PM
How to use PHP and Angular for front-end development
May 11, 2023 pm 04:04 PM
With the rapid development of the Internet, front-end development technology is also constantly improving and iterating. PHP and Angular are two technologies widely used in front-end development. PHP is a server-side scripting language that can handle tasks such as processing forms, generating dynamic pages, and managing access permissions. Angular is a JavaScript framework that can be used to develop single-page applications and build componentized web applications. This article will introduce how to use PHP and Angular for front-end development, and how to combine them
 Microsoft Win11 24H2 Build 26100 has found multiple bugs and installation is not recommended
Apr 07, 2024 pm 09:22 PM
Microsoft Win11 24H2 Build 26100 has found multiple bugs and installation is not recommended
Apr 07, 2024 pm 09:22 PM
The latest news from this site on April 7 is that multiple bugs have been discovered in Microsoft Win1124H2Build26100, and it is temporarily not recommended to install it on commonly used devices. Windows 1124H2 is still in a very unstable stage. Although Microsoft will gradually fix the problem through monthly cumulative updates, it may take some time before this version is officially released and brings a stable experience to everyone. If any user has installed the 24H2 version image and encountered problems, it is recommended that the user reinstall it. It is now relatively stable. ZacBowden, encountered a Blue Screen of Death when trying to reset Windows 1124H2Build26100 version, and the "Reset this PC" function was supposed to fix system problems, but instead
 Windows 11 preview update supports deeper OneDrive integration
May 01, 2023 pm 07:07 PM
Windows 11 preview update supports deeper OneDrive integration
May 01, 2023 pm 07:07 PM
Windows 11 Build 25145 is now available to users in the development channel and includes some minor new features. For example, Build25145 enables tighter integration between OneDrive and Settings. Likewise, it also improves Narrator braille driver support and adds a new local administrator password solution. These improvements are only available to members of the Development Channel. According to the release notes, Windows 11 Build 25145 adds a braille driver solution. The company says braille devices will now work better as they can switch smoothly between Narrator and third-party screen readers because Narrator automatically changes the braille driver. to start
 Windows 11 Build 22616 brings back taskbar drag and drop functionality
May 04, 2023 pm 06:04 PM
Windows 11 Build 22616 brings back taskbar drag and drop functionality
May 04, 2023 pm 06:04 PM
Yes, it's time for us to talk about the new Insider Preview for Windows 11. If you're up to date on new operating systems, you'll know that Microsoft launched a brand new version in the Dev and Beta channels today. What's new you ask? Well, this time we talk about more fixes and enhancements, as well as improvements to remove some system trays. In fact, build 22616 returns the system tray to its state on public builds of Windows 11, which means the highlighting consistency improvements have been removed. What's new in Build 22616 for Windows 11? You may also wonder why this happens. this
 Token-based authentication with Angular and Node
Sep 01, 2023 pm 02:01 PM
Token-based authentication with Angular and Node
Sep 01, 2023 pm 02:01 PM
Authentication is one of the most important parts of any web application. This tutorial discusses token-based authentication systems and how they differ from traditional login systems. By the end of this tutorial, you will see a fully working demo written in Angular and Node.js. Traditional Authentication Systems Before moving on to token-based authentication systems, let’s take a look at traditional authentication systems. The user provides their username and password in the login form and clicks Login. After making the request, authenticate the user on the backend by querying the database. If the request is valid, a session is created using the user information obtained from the database, and the session information is returned in the response header so that the session ID is stored in the browser. Provides access to applications subject to
 How to debug PHP CLI scripts
May 31, 2024 am 10:44 AM
How to debug PHP CLI scripts
May 31, 2024 am 10:44 AM
How to debug PHPCLI script? Use the var_dump() function to display variable contents and types. Set display_errors and log_errors to display errors and log them in the error log. Install and configure Xdebug for advanced debugging capabilities, including stack tracing and variable inspection.
 Angular components and their display properties: understanding non-block default values
Mar 15, 2024 pm 04:51 PM
Angular components and their display properties: understanding non-block default values
Mar 15, 2024 pm 04:51 PM
The default display behavior for components in the Angular framework is not for block-level elements. This design choice promotes encapsulation of component styles and encourages developers to consciously define how each component is displayed. By explicitly setting the CSS property display, the display of Angular components can be fully controlled to achieve the desired layout and responsiveness.
