

How to manage head tags using vue-meta
This article mainly introduces in detail how vue-meta allows you to manage header tags more elegantly. Now I share it with you and give it as a reference.
In the Vue SPA application, if you want to modify the HTML head tag, you may do so directly in the code:
// 改下title
document.title = 'what?'
// 引入一段script
let s = document.createElement('script')
s.setAttribute('src', './vconsole.js')
document.head.appendChild(s)
// 修改meta信息,或者给html标签添加属性...
// 此处省略一大坨代码...
Today I will introduce to you a more elegant method way to manage the header tag vue-meta
vue-meta introduction
Manage page meta info in Vue 2.0 components. SSR Streaming supported. Inspired by react-helmet .
Borrowing from the introduction on vue-meta github, the vue-meta plug-in based on Vue 2.0 is mainly used to manage HMTL header tags and also supports SSR.
vue-meta has the following characteristics:
Set metaInfo in the component to easily manage the header tags
metaInfo data is all responsive. If the data changes, the header information will be automatically updated
Support SSR
How to use
Before introducing how to use it, let me popularize a recently popular term server side rendering (SSR, Server Side Render). Simply put, it is when visiting When a certain page is reached, the server will return the rendered page directly to the browser.
We know that vue-meta supports SSR. The following introduction is divided into two parts:
Client client
In the entry file, install vue-meta plugin
import Vue from 'vue'
import VueRouter from 'vue-router'
import VueMeta from 'vue-meta'
Vue.use(VueRouter)
Vue.use(VueMeta)
/* eslint-disable no-new */
new Vue({
el: '#app',
router,
template: '<App/>',
components: { App }
})Then you can use it in the component
export default {
data () {
return {
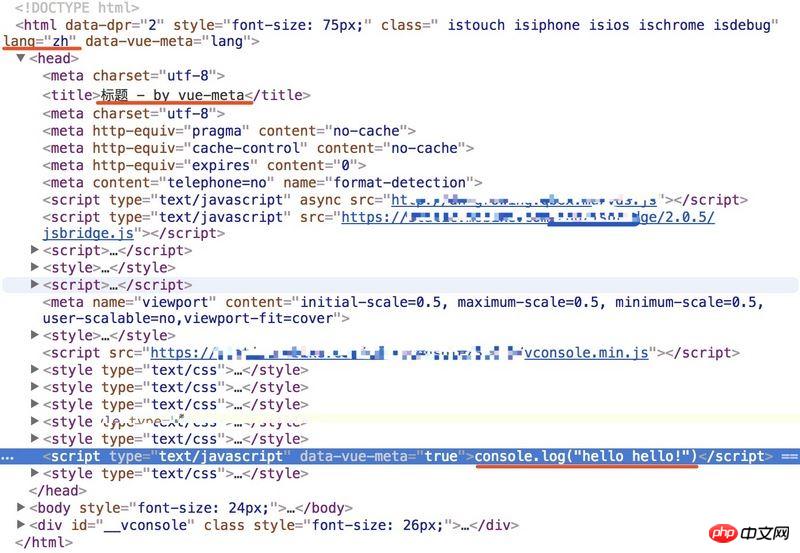
myTitle: '标题'
}
},
metaInfo: {
title: this.myTitle,
titleTemplate: '%s - by vue-meta',
htmlAttrs: {
lang: 'zh'
},
script: [{innerHTML: 'console.log("hello hello!")', type: 'text/javascript'}],
__dangerouslyDisableSanitizers: ['script']
},
...
}You can take a look at the page display
Be familiar with Nuxt.js Students will find that the keyName of the meta info configuration is inconsistent. It can be modified through the following configuration method:
// vue-meta configuration
Vue.use(Meta, {
 keyName: 'head', // the component option name that vue-meta looks for meta info on.
 attribute: 'data-n-head', // the attribute name vue-meta adds to the tags it observes
 ssrAttribute: 'data-n-head-ssr', // the attribute name that lets vue-meta know that meta info has already been server-rendered
 tagIDKeyName: 'hid' // the property name that vue-meta uses to determine whether to overwrite or append a tag
})For more comprehensive and detailed API, please refer to vue-meta github
Server server
Step 1. Inject the $meta object into the context
server-entry.js:
import app from './app'

const router = app.$router
const meta = app.$meta() // here

export default (context) => {
 router.push(context.url)
 context.meta = meta // and here
 return app
}$meta mainly provides the inject and refresh methods. The inject method, used on the server side, returns the set metaInfo; the refresh method, used on the client side, is used to update meta information.
Step 2. Use the inject() method to output the page
server.js:
app.get('*', (req, res) => {
 const context = { url: req.url }
 renderer.renderToString(context, (error, html) => {
  if (error) return res.send(error.stack)
  const bodyOpt = { body: true }
  const {
   title, htmlAttrs, bodyAttrs, link, style, script, noscript, meta
  } = context.meta.inject()
  return res.send(`
   <!doctype html>
   <html data-vue-meta-server-rendered ${htmlAttrs.text()}>
    <head>
     ${meta.text()}
     ${title.text()}
     ${link.text()}
     ${style.text()}
     ${script.text()}
     ${noscript.text()}
    </head>
    <body ${bodyAttrs.text()}>
     ${html}
     <script src="/assets/vendor.bundle.js"></script>
     <script src="/assets/client.bundle.js"></script>
     ${script.text(bodyOpt)}
    </body>
   </html>
  `)
 })
})Source code analysis
I mentioned how to use vue-meta earlier. Maybe you will wonder how these functions are implemented, so let me share the source code with you.
How to distinguish client and server rendering?
vue-meta will put the metaInfo set in the component in this.$metaInfo in the beforeCreate() hook function. We can access the properties under this.$metaInfo in other life cycles.
if (typeof this.$options[options.keyName] === 'function') {
 if (typeof this.$options.computed === 'undefined') {
  this.$options.computed = {}
 }
 this.$options.computed.$metaInfo = this.$options[options.keyName]
}vue-meta will monitor changes in $metaInfo in the hook functions of the life cycle such as created. If changes occur, the refresh method under $meta will be called. This is why metaInfo is responsive.
created () {
 if (!this.$isServer && this.$metaInfo) {
  this.$watch('$metaInfo', () => {
   batchID = batchUpdate(batchID, () => this.$meta().refresh())
  })
 }
},Server side mainly exposes the inject method under $meta. Calling the inject method will return the corresponding information.
How do the client and server modify the tag?
Modifying tags on the client side means directly modifying
return function updateTitle (title = document.title) {
 document.title = title
}on the server side through the native js mentioned at the beginning of this article. It uses the text method to return tags in string format
return function titleGenerator (type, data) {
 return {
  text () {
   return `<${type} ${attribute}="true">${data}</${type}>`
  }
 }
}__dangerouslyDisableSanitizers What do they do?
vue-meta will escape special strings by default. If __dangerouslyDisableSanitizers is set, it will not be escaped.
const escapeHTML = (str) => typeof window === 'undefined' // server-side escape sequence ? String(str) .replace(/&/g, '&') .replace(/</g, '<') .replace(/>/g, '>') .replace(/"/g, '"') .replace(/'/g, ''') // client-side escape sequence : String(str) .replace(/&/g, '\u0026') .replace(/</g, '\u003c') .replace(/>/g, '\u003e') .replace(/"/g, '\u0022') .replace(/'/g, '\u0027')
Finally
The first time I came into contact with vue-meta was in Nuxt.js. If you want to learn about Nuxt.js, you are welcome to read Nuxt.js Practical Practice and Nuxt.js Pitfall Sharing. If there is any unclear or inappropriate expression in the article, you are welcome to criticize and correct it.
The above is what I compiled for everyone. I hope it will be helpful to everyone in the future.
Related articles:
Using icon icons through Element in Vue
How to use Vue.set() to achieve dynamic data response
How to dynamically bind images and data return image paths in vue
How to dynamically change static images and request network images in vue
How to use the browser plug-in Batarang in Angular
How to implement the pasteboard copy function using JS
Number type in JS (detailed tutorial)
The above is the detailed content of How to manage head tags using vue-meta. For more information, please follow other related articles on the PHP Chinese website!

Hot AI Tools

Undresser.AI Undress
AI-powered app for creating realistic nude photos

AI Clothes Remover
Online AI tool for removing clothes from photos.

Undress AI Tool
Undress images for free

Clothoff.io
AI clothes remover

Video Face Swap
Swap faces in any video effortlessly with our completely free AI face swap tool!

Hot Article
Hot Tools

Notepad++7.3.1
Easy-to-use and free code editor

SublimeText3 Chinese version
Chinese version, very easy to use

Zend Studio 13.0.1
Powerful PHP integrated development environment

Dreamweaver CS6
Visual web development tools

SublimeText3 Mac version
God-level code editing software (SublimeText3)
Hot Topics


 How to use bootstrap in vue
Apr 07, 2025 pm 11:33 PM
How to use bootstrap in vue
Apr 07, 2025 pm 11:33 PM
Using Bootstrap in Vue.js is divided into five steps: Install Bootstrap. Import Bootstrap in main.js. Use the Bootstrap component directly in the template. Optional: Custom style. Optional: Use plug-ins.
 How to add functions to buttons for vue
Apr 08, 2025 am 08:51 AM
How to add functions to buttons for vue
Apr 08, 2025 am 08:51 AM
You can add a function to the Vue button by binding the button in the HTML template to a method. Define the method and write function logic in the Vue instance.
 How to use watch in vue
Apr 07, 2025 pm 11:36 PM
How to use watch in vue
Apr 07, 2025 pm 11:36 PM
The watch option in Vue.js allows developers to listen for changes in specific data. When the data changes, watch triggers a callback function to perform update views or other tasks. Its configuration options include immediate, which specifies whether to execute a callback immediately, and deep, which specifies whether to recursively listen to changes to objects or arrays.
 What does vue multi-page development mean?
Apr 07, 2025 pm 11:57 PM
What does vue multi-page development mean?
Apr 07, 2025 pm 11:57 PM
Vue multi-page development is a way to build applications using the Vue.js framework, where the application is divided into separate pages: Code Maintenance: Splitting the application into multiple pages can make the code easier to manage and maintain. Modularity: Each page can be used as a separate module for easy reuse and replacement. Simple routing: Navigation between pages can be managed through simple routing configuration. SEO Optimization: Each page has its own URL, which helps SEO.
 How to reference js file with vue.js
Apr 07, 2025 pm 11:27 PM
How to reference js file with vue.js
Apr 07, 2025 pm 11:27 PM
There are three ways to refer to JS files in Vue.js: directly specify the path using the <script> tag;; dynamic import using the mounted() lifecycle hook; and importing through the Vuex state management library.
 How to return to previous page by vue
Apr 07, 2025 pm 11:30 PM
How to return to previous page by vue
Apr 07, 2025 pm 11:30 PM
Vue.js has four methods to return to the previous page: $router.go(-1)$router.back() uses <router-link to="/" component window.history.back(), and the method selection depends on the scene.
 How to use vue traversal
Apr 07, 2025 pm 11:48 PM
How to use vue traversal
Apr 07, 2025 pm 11:48 PM
There are three common methods for Vue.js to traverse arrays and objects: the v-for directive is used to traverse each element and render templates; the v-bind directive can be used with v-for to dynamically set attribute values for each element; and the .map method can convert array elements into new arrays.
 How to jump to the div of vue
Apr 08, 2025 am 09:18 AM
How to jump to the div of vue
Apr 08, 2025 am 09:18 AM
There are two ways to jump div elements in Vue: use Vue Router and add router-link component. Add the @click event listener and call this.$router.push() method to jump.
