Image carousel is a function that often needs to be implemented in the front end. I recently learned Vue.js and encapsulated Swiper to implement a simple image carousel component. Interested friends, let’s learn together
Picture carousel is a function that often needs to be implemented in the front end. I recently learned Vue.js and encapsulated Swiper to implement a simple image carousel component.
1. Swiper
Before implementing encapsulation, let’s introduce Swiper first.
Swiper is a sliding special effects plug-in created purely with Javascript, targeting mobile terminals such as mobile phones and tablets.
Swiper can achieve common effects such as touch screen focus image, touch screen Tab switching, touch screen multi-image switching, etc.
Swiper is open source, free, stable, simple to use, and powerful. It is an important choice for building mobile terminal websites.
Swiper has a wide range of application scenarios and the implementation effect is very good. The following actual case is a typical application scenario of Swiper.
For specific usage tutorials and detailed API of Swiper, please refer to Swiper Chinese website .
2. Vue components
The original intention of Vue component design is to be used together to improve maintainability and reusability. The picture carousel is suitable to be completed using components, so before introducing the specific implementation, let's first introduce the Vue components and component communication.
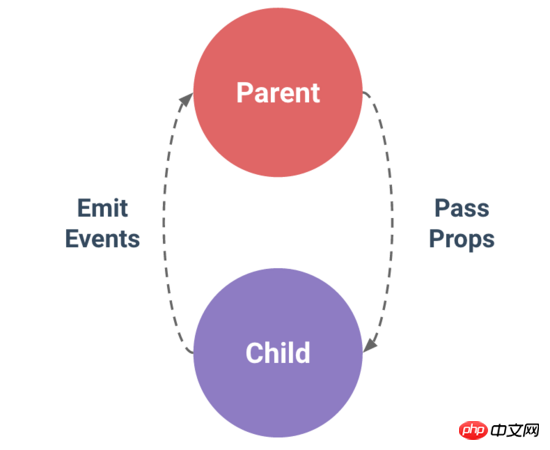
The most common thing among Vue components is the relationship between parent and child components: component A uses component B in its template.
They must communicate with each other: the parent component may need to send data to the child component, and the child component may need to inform the parent component of what is happening inside it. However, it is also important to decouple parent and child components as much as possible through a well-defined interface. This ensures that the code of each component can be written and understood in a relatively isolated environment, thereby improving its maintainability and reusability.
In Vue, the relationship between parent and child components can be summarized as props are passed downwards and events are passed upwards. The parent component sends data to the child component through props, and the child component sends messages to the parent component through events.
##3. Encapsulation implementation
1.Introducing Swiper
First, you need to install Swiper.
npm install --save swiper
Copy after login
Then, two files need to be referenced.
import Swiper from "swiper";
import "swiper/dist/css/swiper.min.css";
Copy after login
2.HTML code
Set the html layout of the carousel image in the template.
Use named slots to improve decoupling, so that when the parent component is used, different carousel content can be set according to different situations. In addition, you need to set up a pager, which is a page indicator in the image carousel. Common ones are small dots or digital indicators.
3. Initialize Swiper
Since Swiper is encapsulated to implement the carousel chart, and Swiper has been installed previously, it needs to be initialized now. Before initialization, based on the understanding of Swiper usage, first determine the attribute information required by the carousel component, and then pass it to the encapsulated Swiper component through the parent component. You need to use props at this time.
The meaning of each attribute is explained one by one below.
Attribute
Meaning
##swiped
Carousel The class name of the container class attribute.
effect
The switching effect of the picture, the default is "slide", and can also be set to "fade", "cube", "coverflow", "flip", See effect for details.
loop
Set to true to enable loop mode. Loop mode: several pictures will be copied before and after the original picture and switched at the appropriate time, making Swiper appear to be looping. For details, see loop.
direction
The sliding direction of the picture can be set to horizontal (horizontal) or vertical (vertical). For details, see direction.
pagination
Use pagination navigation, see pagination for details.
paginationType
Paginator style type can be set to "bullets", "fraction", "progressbar", "custom", see type for details.
autoPlay
Set to true to start automatic switching and use the default switching settings. See autoplay for details.
The above is the detailed content of How to implement image carousel by encapsulating Swiper in Vue. For more information, please follow other related articles on the PHP Chinese website!
Statement of this Website
The content of this article is voluntarily contributed by netizens, and the copyright belongs to the original author. This site does not assume corresponding legal responsibility. If you find any content suspected of plagiarism or infringement, please contact admin@php.cn
Using Bootstrap in Vue.js is divided into five steps: Install Bootstrap. Import Bootstrap in main.js. Use the Bootstrap component directly in the template. Optional: Custom style. Optional: Use plug-ins.
You can add a function to the Vue button by binding the button in the HTML template to a method. Define the method and write function logic in the Vue instance.
The watch option in Vue.js allows developers to listen for changes in specific data. When the data changes, watch triggers a callback function to perform update views or other tasks. Its configuration options include immediate, which specifies whether to execute a callback immediately, and deep, which specifies whether to recursively listen to changes to objects or arrays.
Vue multi-page development is a way to build applications using the Vue.js framework, where the application is divided into separate pages: Code Maintenance: Splitting the application into multiple pages can make the code easier to manage and maintain. Modularity: Each page can be used as a separate module for easy reuse and replacement. Simple routing: Navigation between pages can be managed through simple routing configuration. SEO Optimization: Each page has its own URL, which helps SEO.
There are three ways to refer to JS files in Vue.js: directly specify the path using the <script> tag;; dynamic import using the mounted() lifecycle hook; and importing through the Vuex state management library.
Vue.js has four methods to return to the previous page: $router.go(-1)$router.back() uses <router-link to="/" component window.history.back(), and the method selection depends on the scene.
There are three common methods for Vue.js to traverse arrays and objects: the v-for directive is used to traverse each element and render templates; the v-bind directive can be used with v-for to dynamically set attribute values for each element; and the .map method can convert array elements into new arrays.
There are two ways to jump div elements in Vue: use Vue Router and add router-link component. Add the @click event listener and call this.$router.push() method to jump.