

Comprehensive interpretation of cli in vue (detailed tutorial)
vue is a progressive framework for building user interfaces. This article mainly introduces the relevant knowledge of vue cli. This article is very comprehensive and timely for everyone. Friends who need it can refer to it
Write in front:
What is vue? It is a progressive framework for building user interfaces (explanation on the official website). What is a progressive framework? The simple answer is that it is the least advocated. These concepts can only be seen and understood by oneself. A thousand Hamlets per reader, but not too much explanation. The official Vue documentation is very comprehensive.
Using vue-cli can quickly create a vue project. vue-cli is very easy to use, but when initially setting up the environment to install vue-cli and related content, it is a headache for some people. , I also encountered a lot of pitfalls when building the vue-cli project environment. I hereby wrote a tutorial on building the environment, analyzing each step in detail as much as possible. Friends who need it can come and refer to it. If you like it, you can like it or follow me. I hope it can help everyone.
Advantages of vue-cli scaffolding:
- ## has a mature vue project architecture design that can quickly initialize a Vue project.
- vue-cli is an officially supported scaffolding and will be iteratively updated with this version.
- vue-cli provides a set of local node test servers. You can start the server using the commands provided by vue-cli itself.
- Integrated packaging and online plan.
This tutorial is based on windows system.
Now we will officially start building the vue-cli scaffolding.Command line tools
Command line tools are the basis for us to operate npm. This is a must-have. Many tutorials are not clearly written. Those There were a lot of commands posted at the beginning of the tutorial, and I didn’t know where to use the command line tools at first. . .git bash command line tool
1. Under windows, I recommend using the git bash command line tool that comes with GitHub’s desktop management tool. Just download and install normally. 2. Download address. The picture below shows how to use git bash after the download and installation are completed.
Install node.js
1. Just download and install node.js normally from the node.js Chinese official website. There is nothing special to pay attention to. point (foolproof installation). 2. After downloading and installing node.js from the official website, npm (package management tool) already comes with it, and there is no need to install npm separately. 3. Note that the downloaded node.js version must be above 4.0 to avoid using it if the version is too low. 4. Open the command line tool (any folder) and enter the command line node -v, npm -v, as shown below. If the corresponding version number appears, the installation is successful.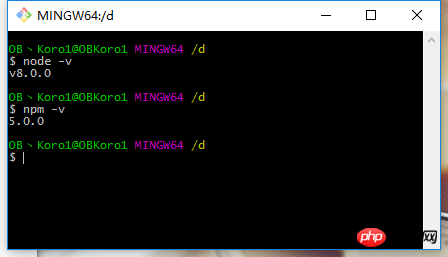
Install Taobao image
cnpm (Taobao image) related:
- This is a complete npmjs.org mirror, which is used to synchronize modules on npm.
- cnpm’s synchronization frequency is 10 minutes (newly released modules have lag, synchronization takes time, if you can’t wait, you can use npm).
- The reason for installing cnpm: npm's server is foreign, so sometimes when we install "modules" it will be very, very, very, very, very slow.
- The role of cnpm: Taobao mirror synchronizes the modules on npm to the domestic server, improving the time for us to install modules.
- After installing the Taobao image, both cnpm and npm command lines can be used. There is no conflict between the two.
$ npm install -g cnpm --registry=https://registry.npm.taobao.org
$ cnpm install [name]
Install webpack
Installation method: Open the command line Tool, enter the command line:npm install webpack -g
Install vue-cli scaffolding construction tool
Installation method: global installation, in any folder, enter the command line:npm install vue-cli -g
安装完成之后,输入命令行vue -V查看版本号,出现相应得到版本号即为成功:

注:这里是大写的V
通过vue-cli,初始化vue项目
通过以上几步,将我们安装脚手架所需要的环境和工具都准备好好了,下面就可以使用vue-cli来初始化项目。
1。新建一个vuetext(项目名)文件夹来放置项目,
在新建文件夹的上一级文件夹右键打开命令行工具,输入命令行:
vue init webpack vuetext1(项目名)
注:项目名不能大写,不能使用中文
解释一下这个命令,这个命令的意思是初始化一个vue项目,其中webpack是构建工具,也就是整个项目是基于webpack的。其中vuetext1是整个项目文件夹的名称,这个文件夹会自动生成在你指定的目录中。
2。以下是脚手架安装过程(安装步骤解析在图片下面)
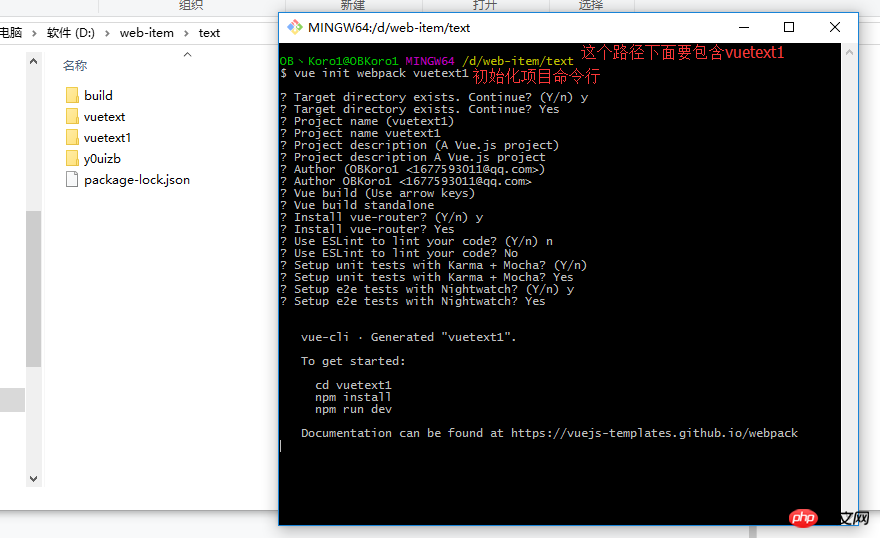
vue-cli初始化项目选项配置详细解析
$ vue init webpack vuetext1--------------------- 安装vue-cli,初始化vue项目的命令
 Target directory exists. Continue? (Y/n) y--------------------找到了vuetext1这个目录是否要继续
Target directory exists. Continue? Yes
Project name (vuetext1)---------------------项目的名称(默认是文件夹的名称),ps:项目的名称不能有大写,不能有中文,否则会报错
 Project name vuetext1
Project description (A Vue.js project)---------------------项目描述,可以自己写
 Project description A Vue.js project
 Author (OBKoro1)---------------------项目创建者
 Author OBKoro1
 Vue build (Use arrow keys)--------------------选择打包方式,有两种方式(runtime和standalone),使用默认即可
 Vue build standalone
 Install vue-router? (Y/n) y--------------------是否安装路由,一般都要安装
 Install vue-router? Yes
 Use ESLint to lint your code? (Y/n) n---------------------是否启用eslint检测规则,这里个人建议选no,因为经常会各种代码报错,新手还是不安装好
 Use ESLint to lint your code? No
 Setup unit tests with Karma + Mocha? (Y/n)--------------------是否安装单元测试
 Setup unit tests with Karma + Mocha? Yes
 Setup e2e tests with Nightwatch? (Y/n) y)--------------------是否安装e2e测试
 Setup e2e tests with Nightwatch? Yes
vue-cli · Generated "vuetext1".
To get started:)--------------------如何开始
 cd vuetext1)--------------------进入你安装的项目
 npm install)--------------------安装项目依赖
 npm run dev)--------------------运行项目
Documentation can be found at https://vuejs-templates.github.io/webpack)--------------------vue-cli官方文档
现在vuetext1项目已经初步初始化完成了,里面也有一些文件,但是现在还不能成功运行。
3.如何运行项目
进入你刚才创建在vuetext1项目的文件夹里面,在vuetext1项目的文件夹里面右键运行git bash 命令行工具。
安装项目依赖。命令行: npm install。前面在项目初始化的时候,已经存在了package.json文件,直接使用npm install 安装项目所需要的依赖,否则项目不能正确运行。
创建完成的“vuetext1”目录如下:
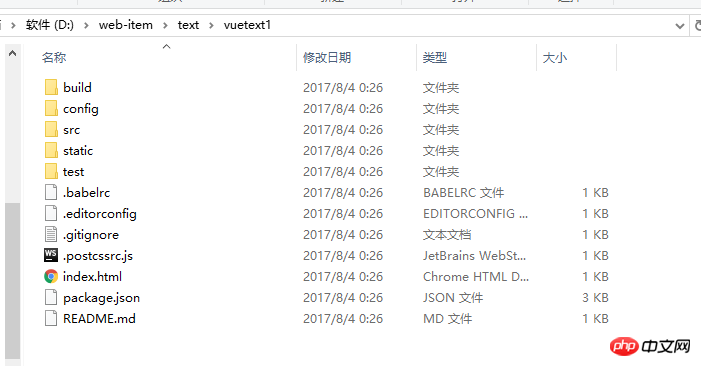
创建完成的项目结构
到这里,我们已经成功使用vue-cli初始化了一个vue项目。
启动项目:
在vuetext1目录运行命令行npm run dev,启动服务,服务启动成功后浏览器会默认打开一个“欢迎页面”,如下图。

上面是我整理给大家的,希望今后会对大家有帮助。
相关文章:
通过angularJS中的radio实现单项二选一的使用方法(详细教程)
在angularjs中获取默认选中的单选按钮的value方法(详细教程)
The above is the detailed content of Comprehensive interpretation of cli in vue (detailed tutorial). For more information, please follow other related articles on the PHP Chinese website!

Hot AI Tools

Undresser.AI Undress
AI-powered app for creating realistic nude photos

AI Clothes Remover
Online AI tool for removing clothes from photos.

Undress AI Tool
Undress images for free

Clothoff.io
AI clothes remover

Video Face Swap
Swap faces in any video effortlessly with our completely free AI face swap tool!

Hot Article
Hot Tools

Notepad++7.3.1
Easy-to-use and free code editor

SublimeText3 Chinese version
Chinese version, very easy to use

Zend Studio 13.0.1
Powerful PHP integrated development environment

Dreamweaver CS6
Visual web development tools

SublimeText3 Mac version
God-level code editing software (SublimeText3)
Hot Topics


 Tutorial on how to use Dewu
Mar 21, 2024 pm 01:40 PM
Tutorial on how to use Dewu
Mar 21, 2024 pm 01:40 PM
Dewu APP is currently a very popular brand shopping software, but most users do not know how to use the functions in Dewu APP. The most detailed usage tutorial guide is compiled below. Next is the Dewuduo that the editor brings to users. A summary of function usage tutorials. Interested users can come and take a look! Tutorial on how to use Dewu [2024-03-20] How to use Dewu installment purchase [2024-03-20] How to obtain Dewu coupons [2024-03-20] How to find Dewu manual customer service [2024-03-20] How to check the pickup code of Dewu [2024-03-20] Where to find Dewu purchase [2024-03-20] How to open Dewu VIP [2024-03-20] How to apply for return or exchange of Dewu
 How to display file suffix under Win11 system? Detailed interpretation
Mar 09, 2024 am 08:24 AM
How to display file suffix under Win11 system? Detailed interpretation
Mar 09, 2024 am 08:24 AM
How to display file suffix under Win11 system? Detailed explanation: In the Windows 11 operating system, the file suffix refers to the dot after the file name and the characters after it, which is used to indicate the type of file. By default, the Windows 11 system hides the suffix of the file, so that you can only see the name of the file in the file explorer but cannot intuitively understand the file type. However, for some users, displaying file suffixes is necessary because it helps them better identify file types and perform related operations.
 In summer, you must try shooting a rainbow
Jul 21, 2024 pm 05:16 PM
In summer, you must try shooting a rainbow
Jul 21, 2024 pm 05:16 PM
After rain in summer, you can often see a beautiful and magical special weather scene - rainbow. This is also a rare scene that can be encountered in photography, and it is very photogenic. There are several conditions for a rainbow to appear: first, there are enough water droplets in the air, and second, the sun shines at a low angle. Therefore, it is easiest to see a rainbow in the afternoon after the rain has cleared up. However, the formation of a rainbow is greatly affected by weather, light and other conditions, so it generally only lasts for a short period of time, and the best viewing and shooting time is even shorter. So when you encounter a rainbow, how can you properly record it and photograph it with quality? 1. Look for rainbows. In addition to the conditions mentioned above, rainbows usually appear in the direction of sunlight, that is, if the sun shines from west to east, rainbows are more likely to appear in the east.
 What software is photoshopcs5? -photoshopcs5 usage tutorial
Mar 19, 2024 am 09:04 AM
What software is photoshopcs5? -photoshopcs5 usage tutorial
Mar 19, 2024 am 09:04 AM
PhotoshopCS is the abbreviation of Photoshop Creative Suite. It is a software produced by Adobe and is widely used in graphic design and image processing. As a novice learning PS, let me explain to you today what software photoshopcs5 is and how to use photoshopcs5. 1. What software is photoshop cs5? Adobe Photoshop CS5 Extended is ideal for professionals in film, video and multimedia fields, graphic and web designers who use 3D and animation, and professionals in engineering and scientific fields. Render a 3D image and merge it into a 2D composite image. Edit videos easily
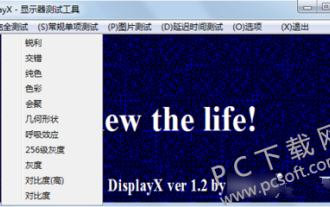 DisplayX (monitor testing software) tutorial
Mar 04, 2024 pm 04:00 PM
DisplayX (monitor testing software) tutorial
Mar 04, 2024 pm 04:00 PM
Testing a monitor when buying it is an essential part to avoid buying a damaged one. Today I will teach you how to use software to test the monitor. Method step 1. First, search and download the DisplayX software on this website, install it and open it, and you will see many detection methods provided to users. 2. The user clicks on the regular complete test. The first step is to test the brightness of the display. The user adjusts the display so that the boxes can be seen clearly. 3. Then click the mouse to enter the next link. If the monitor can distinguish each black and white area, it means the monitor is still good. 4. Click the left mouse button again, and you will see the grayscale test of the monitor. The smoother the color transition, the better the monitor. 5. In addition, in the displayx software we
 Tutorial on how to turn off the payment sound on WeChat
Mar 26, 2024 am 08:30 AM
Tutorial on how to turn off the payment sound on WeChat
Mar 26, 2024 am 08:30 AM
1. First open WeChat. 2. Click [+] in the upper right corner. 3. Click the QR code to collect payment. 4. Click the three small dots in the upper right corner. 5. Click to close the voice reminder for payment arrival.
 Experts teach you! The Correct Way to Cut Long Pictures on Huawei Mobile Phones
Mar 22, 2024 pm 12:21 PM
Experts teach you! The Correct Way to Cut Long Pictures on Huawei Mobile Phones
Mar 22, 2024 pm 12:21 PM
With the continuous development of smart phones, the functions of mobile phones have become more and more powerful, among which the function of taking long pictures has become one of the important functions used by many users in daily life. Long screenshots can help users save a long web page, conversation record or picture at one time for easy viewing and sharing. Among many mobile phone brands, Huawei mobile phones are also one of the brands highly respected by users, and their function of cropping long pictures is also highly praised. This article will introduce you to the correct method of taking long pictures on Huawei mobile phones, as well as some expert tips to help you make better use of Huawei mobile phones.
 PHP Tutorial: How to convert int type to string
Mar 27, 2024 pm 06:03 PM
PHP Tutorial: How to convert int type to string
Mar 27, 2024 pm 06:03 PM
PHP Tutorial: How to Convert Int Type to String In PHP, converting integer data to string is a common operation. This tutorial will introduce how to use PHP's built-in functions to convert the int type to a string, while providing specific code examples. Use cast: In PHP, you can use cast to convert integer data into a string. This method is very simple. You only need to add (string) before the integer data to convert it into a string. Below is a simple sample code
