
 Web Front-end
JS Tutorial
How to solve the problem that the selected value does not change after changing the calculated attribute in Vue. The specific operations are as follows
Web Front-end
JS Tutorial
How to solve the problem that the selected value does not change after changing the calculated attribute in Vue. The specific operations are as follows
How to solve the problem that the selected value does not change after changing the calculated attribute in Vue. The specific operations are as follows
Below I will share with you an article that solves the problem that the selected value does not change after vue changes the calculated attribute. It has a good reference value and I hope it will be helpful to everyone.
Let’s start with the code:
//...
<body>
<p id="qwe">
<select v-model="selected">
<option v-for="item in da" :value="item.value">{{item.value}}</option>
</select>
<span>{{selected}}</span>
</p>
<script>
var dt = [{
value: '111',
label: 'aaa'
}, {
value: '222',
label: 'bbb'
}, {
value: '333',
label: 'ccc'
}, {
value: '444',
label: 'ddd'
}, {
value: '555',
label: 'fff'
}];
var vm = new Vue({
el: '#qwe',
data: {
options: [{
value: '选项1',
label: '黄金糕'
}, {
value: '选项2',
label: '双皮奶'
}, {
value: '选项3',
label: '蚵仔煎'
}, {
value: '选项4',
label: '龙须面'
}, {
value: '选项5',
label: '北京烤鸭'
}],
selected: ''
},
computed: {
da: function () {
var _self = this;
return _self.options.filter(function (item) {
return +item.value.split('')[2] > 2;
});
}
}
})
</script>
</body>
</html>The above code uses vue’s v-for instruction to bind data to generate options, but today we are learning to write When I suddenly discovered a problem, I bound the calculated attribute da to the v-for instruction, and then replaced the source data options. As a result, the calculated attribute da was correct, but the selected attribute did not change. That is to say, the text of the drop-down box on the page has not changed when it is not expanded, as shown below:

Here you can see that the option of the drop-down box has been updated, but the selected attribute It is not updated synchronously because it caches the last selected value.
I don’t know if the design here is reasonable, because I rarely use it this way.
But if there are problems, they must be solved. Add selected='' to the calculated attribute in computed, and reset the selected attribute every time the dependency is updated.
The above is what I compiled for everyone. I hope it will be helpful to everyone in the future.
Related articles:
Examples of webpack packaging and compression methods for js and css
Examples of dynamic loading and removal of js/css files Code
webpack vue project development environment LAN access method
The above is the detailed content of How to solve the problem that the selected value does not change after changing the calculated attribute in Vue. The specific operations are as follows. For more information, please follow other related articles on the PHP Chinese website!

Hot AI Tools

Undresser.AI Undress
AI-powered app for creating realistic nude photos

AI Clothes Remover
Online AI tool for removing clothes from photos.

Undress AI Tool
Undress images for free

Clothoff.io
AI clothes remover

Video Face Swap
Swap faces in any video effortlessly with our completely free AI face swap tool!

Hot Article
Hot Tools

Notepad++7.3.1
Easy-to-use and free code editor

SublimeText3 Chinese version
Chinese version, very easy to use

Zend Studio 13.0.1
Powerful PHP integrated development environment

Dreamweaver CS6
Visual web development tools

SublimeText3 Mac version
God-level code editing software (SublimeText3)
Hot Topics


 How to change the storage location of wallpaper engine? How to set the save path in wallpaper engine
Mar 13, 2024 pm 12:40 PM
How to change the storage location of wallpaper engine? How to set the save path in wallpaper engine
Mar 13, 2024 pm 12:40 PM
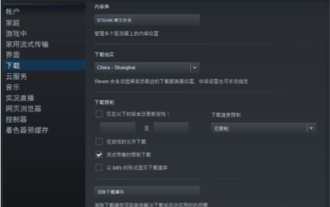
Many users like to download various wallpapers and videos on WallpaperEngine. Over time, they will find that more and more wallpapers are downloaded, resulting in insufficient hard disk space. At this time, the storage location of WallpaperEngine can be changed to reduce the space occupied. So let’s take a look at how to change the save path for wallpaperengine. Step 1: Click Settings under steam in the upper left corner to open the following interface. Step 2: Click Download to find the "Steam Library Folder" under the content library, and click Open above. Step 3: Click Add Library Folder, select the path you want to change to, and after adding it, right-click on the default column.
 How to change the font color of win7 desktop icons
Jan 02, 2024 pm 11:17 PM
How to change the font color of win7 desktop icons
Jan 02, 2024 pm 11:17 PM
The default desktop icon font of win7 is generally white. If we use a white desktop background, the desktop icon text may not be visible. At this time, we can customize the desktop font color through the advanced appearance settings in the personalization settings. The following is Let’s take a look together. Tutorial on changing the font color of win7 desktop icons 1. Right-click a blank space on the desktop and open the "Personalization" settings. 2. Under Theme, we can directly select the desired theme to change the font color of desktop icons. 3. If you are not satisfied with these themes, you can also turn on the "Window Color" as shown in the picture. 4. Click "Advanced Appearance Settings" below 5. Change the "Project" at the icon location to "Desktop" 6. Then you can change various attributes such as font color and size in the red box
 CUDA's universal matrix multiplication: from entry to proficiency!
Mar 25, 2024 pm 12:30 PM
CUDA's universal matrix multiplication: from entry to proficiency!
Mar 25, 2024 pm 12:30 PM
General Matrix Multiplication (GEMM) is a vital part of many applications and algorithms, and is also one of the important indicators for evaluating computer hardware performance. In-depth research and optimization of the implementation of GEMM can help us better understand high-performance computing and the relationship between software and hardware systems. In computer science, effective optimization of GEMM can increase computing speed and save resources, which is crucial to improving the overall performance of a computer system. An in-depth understanding of the working principle and optimization method of GEMM will help us better utilize the potential of modern computing hardware and provide more efficient solutions for various complex computing tasks. By optimizing the performance of GEMM
 How to calculate addition, subtraction, multiplication and division in word document
Mar 19, 2024 pm 08:13 PM
How to calculate addition, subtraction, multiplication and division in word document
Mar 19, 2024 pm 08:13 PM
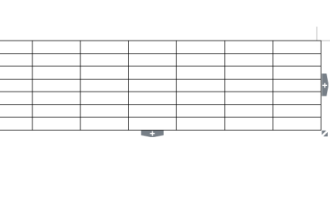
WORD is a powerful word processor. We can use word to edit various texts. In Excel tables, we have mastered the calculation methods of addition, subtraction and multipliers. So if we need to calculate the addition of numerical values in Word tables, How to subtract the multiplier? Can I only use a calculator to calculate it? The answer is of course no, WORD can also do it. Today I will teach you how to use formulas to calculate basic operations such as addition, subtraction, multiplication and division in tables in Word documents. Let's learn together. So, today let me demonstrate in detail how to calculate addition, subtraction, multiplication and division in a WORD document? Step 1: Open a WORD, click [Table] under [Insert] on the toolbar, and insert a table in the drop-down menu.
 Step-by-step guide to changing background color with Eclipse
Jan 28, 2024 am 08:28 AM
Step-by-step guide to changing background color with Eclipse
Jan 28, 2024 am 08:28 AM
Teach you step by step how to change the background color in Eclipse, specific code examples are required Eclipse is a very popular integrated development environment (IDE) that is often used to write and debug Java projects. By default, the background color of Eclipse is white, but some users may wish to change the background color to suit their preference or to reduce eye strain. This article will teach you step by step how to change the background color in Eclipse and provide specific code examples. Step 1: Open Eclipse First
 Teach you how to modify the temporary file location of Win7
Jan 04, 2024 pm 11:25 PM
Teach you how to modify the temporary file location of Win7
Jan 04, 2024 pm 11:25 PM
The temp folder is our temporary file storage location. The system will save temporary files to this folder. If there are too many temporary files, especially when the temp folder is on the system disk, it is likely to affect the system running speed. We can solve the problem by changing the temp location. Let’s take a look below. Tutorial on changing the location of win7temp 1. First, right-click "Computer" and open "Properties" 2. Click "Advanced System Settings" on the left 3. Click "Environment Variables" below 4. Select "temp" and click "Edit" 5. Then change Just change the "Variable Value" to the path that needs to be changed.
 Teach you how to modify the startup sequence of win7
Jan 04, 2024 pm 09:06 PM
Teach you how to modify the startup sequence of win7
Jan 04, 2024 pm 09:06 PM
Properly setting the startup sequence of win7 can make our computer boot faster, but many friends don’t know how to change the startup sequence. In fact, we can change it in the registry editor. Let’s take a look at it with the editor. A specific method. Tutorial on changing the win7 startup sequence 1. Search for "Run" in the lower left corner. 2. Open the "Run" program. 3. Enter “regedit” and press Enter to confirm. 4. Find the following path "HKEY_LOCAL_MACHINE\SYSTEM\CurrentControlSet\Control\ServiceGroupOrder" and right-click to modify the icon "list" file. 5. The position shown in the picture is from top to bottom.
 How to change the product key of Win7
Jan 13, 2024 am 09:51 AM
How to change the product key of Win7
Jan 13, 2024 am 09:51 AM
We can reactivate our win7 system by changing the win7 product key, and we can also upgrade our system to a more advanced system through this method. You only need to change it in the computer properties. Let’s take a look below. Win7 product key changing tutorial 1. First open the start menu, right-click "Computer" and select "Properties" 2. Then find and click "Change Product Key" below. 3. Then you can enter the key at the location shown. 4. If a dialog box pops up, click "OK" 5. Wait for the key to activate the win7 system. 6. Wait for activation to complete before you can use it.
