

How to use superagent and cheerio using nodejs crawler
This article mainly introduces the knowledge related to superagent and cheerio for the initial trial of nodejs crawler. It is very good and has reference value. Friends in need can refer to it
Preface
I have heard of crawlers for a long time. I started to learn nodejs in the past few days and wrote a crawler https://github.com/leichangchun/node-crawlers/tree/master/superagent_cheerio_demo to crawl the homepage of the blog park. Here is a brief summary of the article title, user name, number of reads, number of recommendations and user avatar.
Use these points:
1. The core module of node--file system
2. The third-party module used for http requests--superagent
3. Third-party module for parsing DOM--cheerio
Please go to each link for detailed explanations and APIs of several modules. There are only simple usages in the demo.
Preparation work
Use npm to manage dependencies, and the dependency information will be stored in package.json
//安装用到的第三方模块
cnpm install --save superagent cheerio
Introduction required Function module used
//引入第三方模块,superagent用于http请求,cheerio用于解析DOM
const request = require('superagent');
const cheerio = require('cheerio');
const fs = require('fs');
Request parsing page
If you want to crawl to the content of the blog park homepage, you must first request the homepage address, get To return the HTML, superagent is used here to make http requests. The basic usage method is as follows:
request.get(url)
      .end(error,res){
      //do something
}Initiate a get request to the specified URL. When the request is wrong, an error will be returned (if there is no error, the error is null or undefined), res is the returned data.
After getting the html content, we need to use cheerio to parse the DOM in order to get the data we want. Cheerio must first load the target html and then parse it. The API is very similar to the jquery API. , familiar with jquery and getting started very quickly. Look directly at the code example
//目标链接 博客园首页
let targetUrl = 'https://www.cnblogs.com/';
//用来暂时保存解析到的内容和图片地址数据
let content = '';
let imgs = [];
//发起请求
request.get(targetUrl)
    .end( (error,res) => {
      if(error){ //请求出错,打印错误,返回
        console.log(error)
        return;
      }
      // cheerio需要先load html
      let $ = cheerio.load(res.text);
      //抓取需要的数据,each为cheerio提供的方法用来遍历
      $('#post_list .post_item').each( (index,element) => {
        //分析所需要的数据的DOM结构
        //通过选择器定位到目标元素,再获取到数据
        let temp = {
          '标题' : $(element).find('h3 a').text(),
          '作者' : $(element).find('.post_item_foot > a').text(),
          '阅读数' : +$(element).find('.article_view a').text().slice(3,-2),
          '推荐数' : +$(element).find('.diggnum').text()
        }
        //拼接数据
        content += JSON.stringify(temp) + '\n';
        //同样的方式获取图片地址
        if($(element).find('img.pfs').length > 0){
          imgs.push($(element).find('img.pfs').attr('src'));
        }
      });
      //存放数据
      mkdir('./content',saveContent);
      mkdir('./imgs',downloadImg);
})Storing data
After parsing the DOM above, the required information content has been spliced and the image has been obtained URL, store it now, store the content in a txt file in the specified directory, and download the image to the specified directory
Create the directory first and use the nodejs core file system
//创建目录
function mkdir(_path,callback){
  if(fs.existsSync(_path)){
    console.log(`${_path}目录已存在`)
  }else{
    fs.mkdir(_path,(error)=>{
      if(error){
        return console.log(`创建${_path}目录失败`);
      }
      console.log(`创建${_path}目录成功`)
    })
  }
  callback(); //没有生成指定目录不会执行
}With the specification After the directory, you can write data. The content of the txt file is already there. Just write it directly. Use writeFile()
//将文字内容存入txt文件中
function saveContent() {
  fs.writeFile('./content/content.txt',content.toString());
}to get the link to the picture, so you need to use superagent to download the picture and save it locally. . superagent can directly return a response stream, and then cooperate with the nodejs pipeline to directly write the image content to the local
//下载爬到的图片
function downloadImg() {
  imgs.forEach((imgUrl,index) => {
    //获取图片名
    let imgName = imgUrl.split('/').pop();

    //下载图片存放到指定目录
    let stream = fs.createWriteStream(`./imgs/${imgName}`);
    let req = request.get('https:' + imgUrl); //响应流
    req.pipe(stream);
    console.log(`开始下载图片 https:${imgUrl} --> ./imgs/${imgName}`);
  } )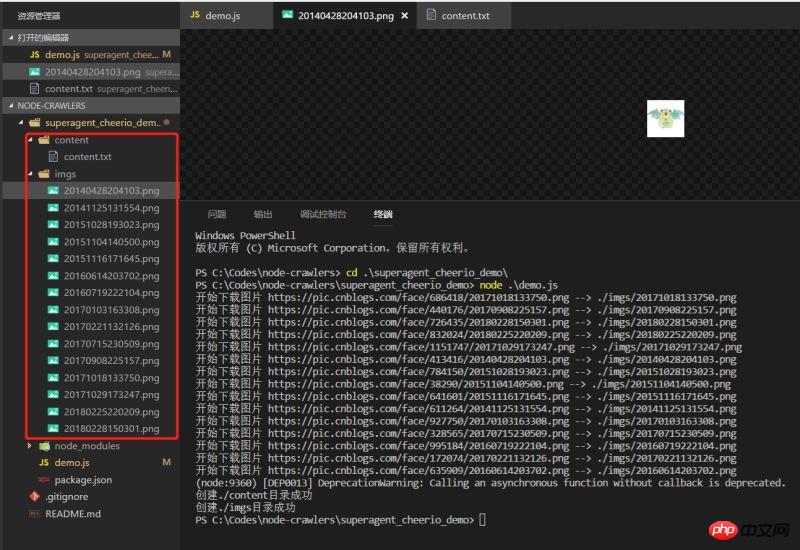
}Effect
Execute the demo and see the effect. The data has climbed down normally
A very simple demo, it may not be that rigorous, but it is always the first small step towards node.
The above is what I compiled for everyone. I hope it will be helpful to everyone in the future.
Related articles:
Vue’s routing dynamic redirection and navigation guard examples
Vue implements uploading images to the database and displaying them to Page function example
Solve the problem of failure after using vue.js routing
The above is the detailed content of How to use superagent and cheerio using nodejs crawler. For more information, please follow other related articles on the PHP Chinese website!

Hot AI Tools

Undresser.AI Undress
AI-powered app for creating realistic nude photos

AI Clothes Remover
Online AI tool for removing clothes from photos.

Undress AI Tool
Undress images for free

Clothoff.io
AI clothes remover

Video Face Swap
Swap faces in any video effortlessly with our completely free AI face swap tool!

Hot Article
Hot Tools

Notepad++7.3.1
Easy-to-use and free code editor

SublimeText3 Chinese version
Chinese version, very easy to use

Zend Studio 13.0.1
Powerful PHP integrated development environment

Dreamweaver CS6
Visual web development tools

SublimeText3 Mac version
God-level code editing software (SublimeText3)
Hot Topics


 Is nodejs a backend framework?
Apr 21, 2024 am 05:09 AM
Is nodejs a backend framework?
Apr 21, 2024 am 05:09 AM
Node.js can be used as a backend framework as it offers features such as high performance, scalability, cross-platform support, rich ecosystem, and ease of development.
 How to connect nodejs to mysql database
Apr 21, 2024 am 06:13 AM
How to connect nodejs to mysql database
Apr 21, 2024 am 06:13 AM
To connect to a MySQL database, you need to follow these steps: Install the mysql2 driver. Use mysql2.createConnection() to create a connection object that contains the host address, port, username, password, and database name. Use connection.query() to perform queries. Finally use connection.end() to end the connection.
 What are the global variables in nodejs
Apr 21, 2024 am 04:54 AM
What are the global variables in nodejs
Apr 21, 2024 am 04:54 AM
The following global variables exist in Node.js: Global object: global Core module: process, console, require Runtime environment variables: __dirname, __filename, __line, __column Constants: undefined, null, NaN, Infinity, -Infinity
 What is the difference between npm and npm.cmd files in the nodejs installation directory?
Apr 21, 2024 am 05:18 AM
What is the difference between npm and npm.cmd files in the nodejs installation directory?
Apr 21, 2024 am 05:18 AM
There are two npm-related files in the Node.js installation directory: npm and npm.cmd. The differences are as follows: different extensions: npm is an executable file, and npm.cmd is a command window shortcut. Windows users: npm.cmd can be used from the command prompt, npm can only be run from the command line. Compatibility: npm.cmd is specific to Windows systems, npm is available cross-platform. Usage recommendations: Windows users use npm.cmd, other operating systems use npm.
 Is there a big difference between nodejs and java?
Apr 21, 2024 am 06:12 AM
Is there a big difference between nodejs and java?
Apr 21, 2024 am 06:12 AM
The main differences between Node.js and Java are design and features: Event-driven vs. thread-driven: Node.js is event-driven and Java is thread-driven. Single-threaded vs. multi-threaded: Node.js uses a single-threaded event loop, and Java uses a multi-threaded architecture. Runtime environment: Node.js runs on the V8 JavaScript engine, while Java runs on the JVM. Syntax: Node.js uses JavaScript syntax, while Java uses Java syntax. Purpose: Node.js is suitable for I/O-intensive tasks, while Java is suitable for large enterprise applications.
 Is nodejs a back-end development language?
Apr 21, 2024 am 05:09 AM
Is nodejs a back-end development language?
Apr 21, 2024 am 05:09 AM
Yes, Node.js is a backend development language. It is used for back-end development, including handling server-side business logic, managing database connections, and providing APIs.
 Which one to choose between nodejs and java?
Apr 21, 2024 am 04:40 AM
Which one to choose between nodejs and java?
Apr 21, 2024 am 04:40 AM
Node.js and Java each have their pros and cons in web development, and the choice depends on project requirements. Node.js excels in real-time applications, rapid development, and microservices architecture, while Java excels in enterprise-grade support, performance, and security.
 How to deploy nodejs project to server
Apr 21, 2024 am 04:40 AM
How to deploy nodejs project to server
Apr 21, 2024 am 04:40 AM
Server deployment steps for a Node.js project: Prepare the deployment environment: obtain server access, install Node.js, set up a Git repository. Build the application: Use npm run build to generate deployable code and dependencies. Upload code to the server: via Git or File Transfer Protocol. Install dependencies: SSH into the server and use npm install to install application dependencies. Start the application: Use a command such as node index.js to start the application, or use a process manager such as pm2. Configure a reverse proxy (optional): Use a reverse proxy such as Nginx or Apache to route traffic to your application
