
 Web Front-end
JS Tutorial
Use vuex to store login status and disable browsing in non-login status. What are the specific methods?
Web Front-end
JS Tutorial
Use vuex to store login status and disable browsing in non-login status. What are the specific methods?
Use vuex to store login status and disable browsing in non-login status. What are the specific methods?
Below I will share with you an article on how vuex implements the storage of login status and does not allow browsing in unlogged status. It has a good reference value and I hope it will be helpful to everyone.
The basic idea is to use vuex state management to store the login status (actually, it means to store a value, such as token), and then judge the login status before routing jump. You can use the global pre-guard of vue-router. beforeEach, you can also use the route-exclusive guard beforeEnter.
Navigation guard
As the name suggests, the navigation guard provided by vue-router" is mainly used to guard navigation by jumping or canceling There are multiple opportunities to build into the route navigation process: globally, exclusive to a single route, or at the component level. Remember that changes to parameters or queries will not trigger entering/leaving navigation guards. You can do this by observing $route Object to respond to these changes, or use the guard within the component of beforeRouteUpdate.
Complete navigation parsing process
1. Navigation is triggered.
2. Call the leave guard in the deactivated component.
3. Call the global beforeEach guard.
4. Call the beforeRouteUpdate guard (2.2) in the reused component .
5. Call beforeEnter in the routing configuration.
6. Parse the asynchronous routing component.
7. Call beforeRouteEnter in the activated component.
8. Call the global beforeResolve guard (2.5).
9. Navigation is confirmed.
10. Call the global afterEach hook.
11. Trigger DOM update .
12. Use the created instance to call the callback function passed to next in the beforeRouteEnter guard.
Global guard
You can use router.beforeEach to register a global front guard
const router = new VueRouter({ ... })
router.beforeEach((to, from, next) => {
 // ...
})When a navigation is triggered, the global front guard is called in the order of creation. The guard is executed asynchronously, and the navigation is resolved before all guards are completed. Always waiting.
Each guard method receives three parameters:
to: Route: the target routing object to be entered
from: Route: the current navigation Route to leave
next: Function: This method must be called to resolve this hook. The execution effect depends on the calling parameters of the next method.
next(): Perform the next hook in the pipeline .If all hooks are executed, the navigation status is confirmed.
next(false): Interrupt the current navigation. If the browser URL changes (maybe the user manually or the browser backs off) button), then the URL address will be reset to the address corresponding to the from route.
next('/') or next({ path: '/' }): Jump to a different address. The current navigation is interrupted and a new navigation is started.
next(error):(2.4.0) If the parameter passed to next is an Error instance, the navigation will be terminated and the error will be passed to the callback registered by router.onError().
Make sure to call the next method, otherwise the hook will not be resolved.
Route-exclusive guards
You can directly define the beforeEnter guard in the routing configuration:
const router = new VueRouter({
 routes: [
  {
   path: '/foo',
   component: Foo,
   beforeEnter: (to, from, next) => {
    // ...
   }
  }
 ]
})There are other guards. For details, please see the official document https://router.vuejs.org/zh-cn/advanced/navigation-guards.html
After installing vuex
Create store.js
import Vue from 'vue'
import Vuex from 'vuex'
Vue.use(Vuex);
const state = {
  isLogin: 0
}
const mutations = {
  changeLogin(state,status){
    state.isLogin = status;
  }
}
const actions = {
  loginAction({commit}){
    commit('changeLogin',1);
  }
}
export default new Vuex.Store({
  state,
  actions,
  mutations
})In login.vue
Introduce import { mapActions,mapState } from 'vuex'
Then log in To change the state, base_url is the path
export default {
    name: 'Login',
    data(){
      return{
        loginForm: {
          username: '',
          password: '',
        },
        rules: {
          username: [
            { required: true, message: '请输入用户名', trigger: 'blur' },
          ],
          password: [
            { required: true, message: '请输入密码', trigger: 'blur' }
          ],
        },
        showLogin: false
      }
    },
    mounted(){
      this.showLogin = true;
    },
    computed: {
      ...mapState(['isLogin'])
    },
    methods: {
      ...mapActions(['loginAction']),
      submitForm(formName){
        this.$refs[formName].validate((valid) => {
          if(valid){
            if(this.loginForm.username == 'aaa' && this.loginForm.password == '111'){
              console.log('验证通过');
              this.loginAction();
              this.$router.push('manage');
            }else{
              console.log('账号密码出错');
              // this.$message.error('账号密码出错');
              this.$message({
                type: 'error',
                message: '账号密码出错'
              });
            }
            console.log('请求地址: ' + base_url);
          }else{
            console.log('验证失败');
            return false;
          }
        })
      }
    }
}Next, just use the routing guard
beforeEach usage example
router.beforeEach((to,from,next)=>{
  if(to.meta.check){
    var check = async function(){
      const result = await checkUser();
      if(result.status == 0){
        next();
      }else{
        alert('用户未登录');
        next({path: '/login'});
      }
    }
    check(); //后台验证session
  }else{
    next();
  }
})beforeEnter usage instance
export default new Router({
  routes: [
    {
     path: '/login',
     component: Login
    },
    {
      path: '/manage',
      name: '',
      component: Manage,
      beforeEnter: (to,from,next)=> {  //导航守卫
      console.log(to)
      console.log(from)
      if(store.state.isLogin == 1){
       console.log('用户已经登录');
       next();
      }else{
       console.log('用户未登录');
       next({path: '/login',query:{ Rurl: to.fullPath}}); //未登录则跳转到登陆界面,query:{ Rurl: to.fullPath}表示把当前路由信息传递过去方便登录后跳转回来
     }
   }
    }
   ]
})The above is what I compiled for everyone. I hope it will be helpful to everyone in the future.
Related articles:
Node.js method example to implement registration email activation function
Webpack babel-loader file preprocessor Detailed explanation
jQuery implementation of news broadcast scrolling and fade-in and fade-out effects
The above is the detailed content of Use vuex to store login status and disable browsing in non-login status. What are the specific methods?. For more information, please follow other related articles on the PHP Chinese website!

Hot AI Tools

Undresser.AI Undress
AI-powered app for creating realistic nude photos

AI Clothes Remover
Online AI tool for removing clothes from photos.

Undress AI Tool
Undress images for free

Clothoff.io
AI clothes remover

Video Face Swap
Swap faces in any video effortlessly with our completely free AI face swap tool!

Hot Article
Hot Tools

Notepad++7.3.1
Easy-to-use and free code editor

SublimeText3 Chinese version
Chinese version, very easy to use

Zend Studio 13.0.1
Powerful PHP integrated development environment

Dreamweaver CS6
Visual web development tools

SublimeText3 Mac version
God-level code editing software (SublimeText3)
Hot Topics


 How do I log in to my previous account on Xiaohongshu? What should I do if the original number is lost after it is reconnected?
Mar 21, 2024 pm 09:41 PM
How do I log in to my previous account on Xiaohongshu? What should I do if the original number is lost after it is reconnected?
Mar 21, 2024 pm 09:41 PM
With the rapid development of social media, Xiaohongshu has become a popular platform for many young people to share their lives and explore new products. During use, sometimes users may encounter difficulties logging into previous accounts. This article will discuss in detail how to solve the problem of logging into the old account on Xiaohongshu, and how to deal with the possibility of losing the original account after changing the binding. 1. How to log in to Xiaohongshu’s previous account? 1. Retrieve password and log in. If you do not log in to Xiaohongshu for a long time, your account may be recycled by the system. In order to restore access rights, you can try to log in to your account again by retrieving your password. The operation steps are as follows: (1) Open the Xiaohongshu App or official website and click the "Login" button. (2) Select "Retrieve Password". (3) Enter the mobile phone number you used when registering your account
 What should I do if I download other people's wallpapers after logging into another account on wallpaperengine?
Mar 19, 2024 pm 02:00 PM
What should I do if I download other people's wallpapers after logging into another account on wallpaperengine?
Mar 19, 2024 pm 02:00 PM
When you log in to someone else's steam account on your computer, and that other person's account happens to have wallpaper software, steam will automatically download the wallpapers subscribed to the other person's account after switching back to your own account. Users can solve this problem by turning off steam cloud synchronization. What to do if wallpaperengine downloads other people's wallpapers after logging into another account 1. Log in to your own steam account, find cloud synchronization in settings, and turn off steam cloud synchronization. 2. Log in to someone else's Steam account you logged in before, open the Wallpaper Creative Workshop, find the subscription content, and then cancel all subscriptions. (In case you cannot find the wallpaper in the future, you can collect it first and then cancel the subscription) 3. Switch back to your own steam
 'Onmyoji' Ibaraki Doji's collection skin can be obtained as soon as you log in, and the new Zen Heart Cloud Mirror skin will be launched soon!
Jan 05, 2024 am 10:42 AM
'Onmyoji' Ibaraki Doji's collection skin can be obtained as soon as you log in, and the new Zen Heart Cloud Mirror skin will be launched soon!
Jan 05, 2024 am 10:42 AM
Thousands of ghosts screamed in the mountains and fields, and the sound of the exchange of weapons disappeared. The ghost generals who rushed over the mountains, with fighting spirit raging in their hearts, used the fire as their trumpet to lead hundreds of ghosts to charge into the battle. [Blazing Flame Bairen·Ibaraki Doji Collection Skin is now online] The ghost horns are blazing with flames, the gilt eyes are bursting with unruly fighting spirit, and the white jade armor pieces decorate the shirt, showing the unruly and wild momentum of the great demon. On the snow-white fluttering sleeves, red flames clung to and intertwined, and gold patterns were imprinted on them, igniting a crimson and magical color. The will-o'-the-wisps formed by the condensed demon power roared, and the fierce flames shook the mountains. Demons and ghosts who have returned from purgatory, let's punish the intruders together. [Exclusive dynamic avatar frame·Blazing Flame Bailian] [Exclusive illustration·Firework General Soul] [Biography Appreciation] [How to obtain] Ibaraki Doji’s collection skin·Blazing Flame Bailian will be available in the skin store after maintenance on December 28.
 Discuz background login problem solution revealed
Mar 03, 2024 am 08:57 AM
Discuz background login problem solution revealed
Mar 03, 2024 am 08:57 AM
The solution to the Discuz background login problem is revealed. Specific code examples are needed. With the rapid development of the Internet, website construction has become more and more common, and Discuz, as a commonly used forum website building system, has been favored by many webmasters. However, precisely because of its powerful functions, sometimes we encounter some problems when using Discuz, such as background login problems. Today, we will reveal the solution to the Discuz background login problem and provide specific code examples. We hope to help those in need.
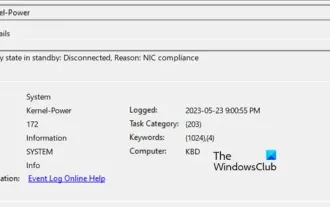 Connection status in standby: Disconnected, reason: NIC Compliance
Feb 19, 2024 pm 03:15 PM
Connection status in standby: Disconnected, reason: NIC Compliance
Feb 19, 2024 pm 03:15 PM
"The connection status in the event log message shows Standby: Disconnected due to NIC compliance. This means that the system is in standby mode and the network interface card (NIC) has been disconnected. Although this is usually a network issue , but can also be caused by software and hardware conflicts. In the following discussion, we will explore how to solve this problem." What is the reason for standby connection disconnection? NIC compliance? If you see the "ConnectivityStatusinStandby:DisConnected,Reason:NICCompliance" message in Windows Event Viewer, this indicates that there may be a problem with your NIC or network interface controller. This situation is usually
 How to log in to Kuaishou PC version - How to log in to Kuaishou PC version
Mar 04, 2024 pm 03:30 PM
How to log in to Kuaishou PC version - How to log in to Kuaishou PC version
Mar 04, 2024 pm 03:30 PM
Recently, some friends have asked me how to log in to the Kuaishou computer version. Here is the login method for the Kuaishou computer version. Friends who need it can come and learn more. Step 1: First, search Kuaishou official website on Baidu on your computer’s browser. Step 2: Select the first item in the search results list. Step 3: After entering the main page of Kuaishou official website, click on the video option. Step 4: Click on the user avatar in the upper right corner. Step 5: Click the QR code to log in in the pop-up login menu. Step 6: Then open Kuaishou on your phone and click on the icon in the upper left corner. Step 7: Click on the QR code logo. Step 8: After clicking the scan icon in the upper right corner of the My QR code interface, scan the QR code on your computer. Step 9: Finally log in to the computer version of Kuaishou
 How to set Momo status
Mar 01, 2024 pm 12:10 PM
How to set Momo status
Mar 01, 2024 pm 12:10 PM
Momo, a well-known social platform, provides users with a wealth of functional services for their daily social interactions. On Momo, users can easily share their life status, make friends, chat, etc. Among them, the setting status function allows users to show their current mood and status to others, thereby attracting more people's attention and communication. So how to set your own Momo status? The following will give you a detailed introduction! How to set status on Momo? 1. Open Momo, click More in the lower right corner, find and click Daily Status. 2. Select the status. 3. The setting status will be displayed.
 How to install GitHub Copilot on Windows 11/10
Oct 21, 2023 pm 11:13 PM
How to install GitHub Copilot on Windows 11/10
Oct 21, 2023 pm 11:13 PM
GitHubCopilot is the next level for coders, with an AI-based model that successfully predicts and autocompletes your code. However, you might be wondering how to get this AI genius on your device so that your coding becomes even easier! However, using GitHub isn't exactly easy, and the initial setup process is a tricky one. Therefore, we created this step-by-step tutorial on how to install and implement GitHub Copilot in VSCode on Windows 11, 10. How to install GitHubCopilot on Windows There are several steps to this process. So, follow the steps below now. Step 1 – You must have the latest version of Visual Studio installed on your computer
