
 Web Front-end
JS Tutorial
Detailed explanation of the configuration method using sass based on css preloading in vue
Web Front-end
JS Tutorial
Detailed explanation of the configuration method using sass based on css preloading in vue
Detailed explanation of the configuration method using sass based on css preloading in vue
Below I will share with you a detailed explanation of the configuration method of using sass based on css preloading in vue. It has a good reference value and I hope it will be helpful to everyone.
1. Install the sass dependency package
npm install --save-dev sass-loader
//sass-loader依赖于node-sass
npm install --save-dev node-sass
2. Add configuration in the rules of webpack.base.conf.js under the build folder, as shown in the red part below
{
 test: /\.sass$/,
 loaders: ['style', 'css', 'sass']
}<span style="color:#454545;">// module用来解析不同的模块
module: {
rules: [
...(config.dev.useEslint ? [createLintingRule()] : []),
{
test: /\.vue$/,
// 也就是说,对.js和.vue文件在编译之前进行检测,检查有没有语法错误'eslint-loader'
// enforce: 'pre'选项可以确保,eslint插件能够在编译之前检测,如果不添加此项,就要把这个配置项放到末尾,确保第一个执行
// 对vue文件使用vue-loader,该loader是vue单文件组件的实现核心,专门用来解析.vue文件的
loader: 'vue-loader',
// 将vueLoaderConfig当做参数传递给vue-loader,就可以解析文件中的css相关文件
options: vueLoaderConfig
},
{
test: /\.js$/,
// 对js文件使用babel-loader转码,该插件是用来解析es6等代码
loader: 'babel-loader',
// 指明src和test目录下的js文件要使用该loader
include: [resolve('src'), resolve('test')]
},
{
test: /\.(png|jpe?g|gif|svg)(\?.*)?$/,
// 对图片相关的文件使用 url-loader 插件,这个插件的作用是将一个足够小的文件生成一个64位的DataURL
// 可能有些老铁还不知道 DataURL 是啥,当一个图片足够小,为了避免单独请求可以把图片的二进制代码变成64位的
// DataURL,使用src加载,也就是把图片当成一串代码,避免请求,神不神奇??
loader: 'url-loader',
options: {
// 限制 10000 个字节一下的图片才使用DataURL
limit: 10000,
name: utils.assetsPath('img/[name].[hash:7].[ext]')
}
},
{
test: /\.(mp4|webm|ogg|mp3|wav|flac|aac)(\?.*)?$/,
// 字体文件处理,和上面一样
loader: 'url-loader',
options: {
limit: 10000,
name: utils.assetsPath('media/[name].[hash:7].[ext]')
}
},
{
test: /\.(woff2?|eot|ttf|otf)(\?.*)?$/,
loader: 'url-loader',
options: {
limit: 10000,
name: utils.assetsPath('fonts/[name].[hash:7].[ext]')
}
},
</span><span style="color:#ff0000;">{
test: /\.sass$/,
loaders: ['style', 'css', 'sass']
}</span><span style="color:#454545;">
]
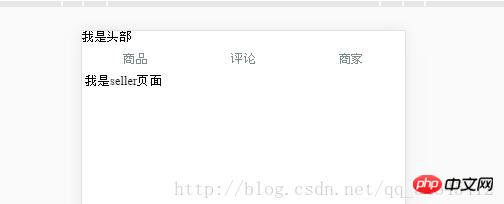
},</span>##3. Modify the style lang="scss" in the template; for example, the template is red Tag
<style lang="scss">
商品
评论
商家 <style lang="scss"> #indexContent { .tab{ display: flex; width:100%; height: 40px; line-height: 40px; .tab-item { flex: 1; text-align: center; a{ display:block; } } } }
##4.npm run dev
5. Effect
 The above is what I compiled for you, I hope it will be helpful to everyone in the future.
Related articles:
The use of el expressions and non-empty judgment methods in jsJS implements left list shift Go to the right list functionHow to use EL expression to obtain the context parameter value in JS
The above is the detailed content of Detailed explanation of the configuration method using sass based on css preloading in vue. For more information, please follow other related articles on the PHP Chinese website!

Hot AI Tools

Undresser.AI Undress
AI-powered app for creating realistic nude photos

AI Clothes Remover
Online AI tool for removing clothes from photos.

Undress AI Tool
Undress images for free

Clothoff.io
AI clothes remover

Video Face Swap
Swap faces in any video effortlessly with our completely free AI face swap tool!

Hot Article
Hot Tools

Notepad++7.3.1
Easy-to-use and free code editor

SublimeText3 Chinese version
Chinese version, very easy to use

Zend Studio 13.0.1
Powerful PHP integrated development environment

Dreamweaver CS6
Visual web development tools

SublimeText3 Mac version
God-level code editing software (SublimeText3)
Hot Topics


 How to use bootstrap in vue
Apr 07, 2025 pm 11:33 PM
How to use bootstrap in vue
Apr 07, 2025 pm 11:33 PM
Using Bootstrap in Vue.js is divided into five steps: Install Bootstrap. Import Bootstrap in main.js. Use the Bootstrap component directly in the template. Optional: Custom style. Optional: Use plug-ins.
 The Roles of HTML, CSS, and JavaScript: Core Responsibilities
Apr 08, 2025 pm 07:05 PM
The Roles of HTML, CSS, and JavaScript: Core Responsibilities
Apr 08, 2025 pm 07:05 PM
HTML defines the web structure, CSS is responsible for style and layout, and JavaScript gives dynamic interaction. The three perform their duties in web development and jointly build a colorful website.
 How to write split lines on bootstrap
Apr 07, 2025 pm 03:12 PM
How to write split lines on bootstrap
Apr 07, 2025 pm 03:12 PM
There are two ways to create a Bootstrap split line: using the tag, which creates a horizontal split line. Use the CSS border property to create custom style split lines.
 Understanding HTML, CSS, and JavaScript: A Beginner's Guide
Apr 12, 2025 am 12:02 AM
Understanding HTML, CSS, and JavaScript: A Beginner's Guide
Apr 12, 2025 am 12:02 AM
WebdevelopmentreliesonHTML,CSS,andJavaScript:1)HTMLstructurescontent,2)CSSstylesit,and3)JavaScriptaddsinteractivity,formingthebasisofmodernwebexperiences.
 How to set up the framework for bootstrap
Apr 07, 2025 pm 03:27 PM
How to set up the framework for bootstrap
Apr 07, 2025 pm 03:27 PM
To set up the Bootstrap framework, you need to follow these steps: 1. Reference the Bootstrap file via CDN; 2. Download and host the file on your own server; 3. Include the Bootstrap file in HTML; 4. Compile Sass/Less as needed; 5. Import a custom file (optional). Once setup is complete, you can use Bootstrap's grid systems, components, and styles to create responsive websites and applications.
 How to insert pictures on bootstrap
Apr 07, 2025 pm 03:30 PM
How to insert pictures on bootstrap
Apr 07, 2025 pm 03:30 PM
There are several ways to insert images in Bootstrap: insert images directly, using the HTML img tag. With the Bootstrap image component, you can provide responsive images and more styles. Set the image size, use the img-fluid class to make the image adaptable. Set the border, using the img-bordered class. Set the rounded corners and use the img-rounded class. Set the shadow, use the shadow class. Resize and position the image, using CSS style. Using the background image, use the background-image CSS property.
 How to use bootstrap button
Apr 07, 2025 pm 03:09 PM
How to use bootstrap button
Apr 07, 2025 pm 03:09 PM
How to use the Bootstrap button? Introduce Bootstrap CSS to create button elements and add Bootstrap button class to add button text
 How to resize bootstrap
Apr 07, 2025 pm 03:18 PM
How to resize bootstrap
Apr 07, 2025 pm 03:18 PM
To adjust the size of elements in Bootstrap, you can use the dimension class, which includes: adjusting width: .col-, .w-, .mw-adjust height: .h-, .min-h-, .max-h-
