

Initializing the project structure in the front-end project
This time I will bring you the initialization project structure in the front-end project. What are the precautions for initializing the project structure in the front-end project? The following is a practical case, let’s take a look.
I usually work on mobile H5, so I built my own front-end project (x-build) through webpack, mainly compiling stylus, jade, es6, adaptive solutions, and some Some plug-ins I wrote myself.
When working on a new project, every time I copy the folder and then modify package.json, README.md, etc., it feels very "elegant". If I want to use something like vue-cli, use vue init downloaded my own front-end project from github, which looks very "elegant".
Initialize the project structure
First of all, you already have a front-end project you built yourself, assuming it is named x-build and has been uploaded to github.
At this time, create a new project and name it x-build-cli. I refer to vue’s approach, so that even if x-build is updated, x-build-cli is not updated, you can also pull the latest x-build.
mkdir x-build-cli
cd x-build-cli
npm init
Create a folder named x-build-cli, initialize it using npm, create a bin directory inside the folder, and create x- build.js, the project structure at this time:
x-build-cli
  |-  bin
  |     |- x-build.js
  |-  package.json
Configure package.json
"bin": {
  "x-build": "./bin/x-build.js"
}Add "bin" to package.json, "x-build" is the command number to enter command, "./bin/x-build.js" is the file when the command is executed.
Configuration x-build.js
#! /usr/bin/env node
const program = require('commander');
const download = require('download-git-repo');
const chalk = require('chalk');
const ora = require('ora');#! /usr/bin/env node specifies that this file is executed using node.
Modules that need to be installed npm i commander download-git-repo chalk ora --save:
commander can parse the commands entered by the user.
download-git-repo Pull the files on github.
chalkChange the color of the output text
oraSmall icons (loading, succeed, warn, etc.)
program
  .version('0.1.0')
  .option('-i, init [name]', '初始化x-build项目')
.parse(process.argv);.option ()
-i is an abbreviation, similar to the [name after npm i -g
init ]can be obtained through program.init.
The last item is the description, which will usually be prompted in x-build -h
if (program.init) {
  const spinner = ora('正在从github下载x-build').start();
  download('codexu/x-build#x-build4.1', program.init, function (err) {
    if(!err){
      // 可以输出一些项目成功的信息
      console.info(chalk.blueBright('下载成功'));
    }else{
      // 可以输出一些项目失败的信息
    }
  })
}ora().start()You can create one loading small icon. >>> For other icons, refer to ora
download() to download the project we need from github. Because we are using a branch, we added #x-build4.1 at the end. , the default is master. ParametersConfiguration referencedownload-git-repo
chalk.blueBright() will convert the output text into blue. >>> For other colors, please refer to chalk
Upload to npm
Students who do not have an account can go to npm to register an account.
// 登录账号
npm login
// 上传项目
npm publish
After the upload is successful, install it into the global environment through npm install x-build-cli -g.
Use build init [project name] to pull the corresponding files from github.
Optimization
The downloaded file at this time is consistent with github. I want to change package.json, change name to the initialized project name, and change versionChanged to 1.0.0.
At this time, you can use node's own api to do it:
const fs = require('fs');
fs.readFile(`${process.cwd()}/${program.init}/package.json`, (err, data) => {
  if (err) throw err;
  let _data = JSON.parse(data.toString())
  _data.name = program.init
  _data.version = '1.0.0'
  let str = JSON.stringify(_data, null, 4);
  fs.writeFile(`${process.cwd()}/${program.init}/package.json`, str, function (err) {
    if (err) throw err;
  })
});Read the file through readFile, writeFile to write the file, be careful to pass it in when writing StringJSON.stringify(_data, null, 4), this way you can output a formatted json file.
I believe you have mastered the method after reading the case in this article. For more exciting information, please pay attention to other related articles on the php Chinese website!
Recommended reading:
Detailed explanation of using React high-order components
Encapsulate a function that can obtain the text content of an element
Detailed explanation of the difference between Component and PureComponent
The above is the detailed content of Initializing the project structure in the front-end project. For more information, please follow other related articles on the PHP Chinese website!

Hot AI Tools

Undresser.AI Undress
AI-powered app for creating realistic nude photos

AI Clothes Remover
Online AI tool for removing clothes from photos.

Undress AI Tool
Undress images for free

Clothoff.io
AI clothes remover

Video Face Swap
Swap faces in any video effortlessly with our completely free AI face swap tool!

Hot Article
Hot Tools

Notepad++7.3.1
Easy-to-use and free code editor

SublimeText3 Chinese version
Chinese version, very easy to use

Zend Studio 13.0.1
Powerful PHP integrated development environment

Dreamweaver CS6
Visual web development tools

SublimeText3 Mac version
God-level code editing software (SublimeText3)
Hot Topics


 Share an easy way to package PyCharm projects
Dec 30, 2023 am 09:34 AM
Share an easy way to package PyCharm projects
Dec 30, 2023 am 09:34 AM
Share the simple and easy-to-understand PyCharm project packaging method. With the popularity of Python, more and more developers use PyCharm as the main tool for Python development. PyCharm is a powerful integrated development environment that provides many convenient functions to help us improve development efficiency. One of the important functions is project packaging. This article will introduce how to package projects in PyCharm in a simple and easy-to-understand way, and provide specific code examples. Why package projects? Developed in Python
 Can AI conquer Fermat's last theorem? Mathematician gave up 5 years of his career to turn 100 pages of proof into code
Apr 09, 2024 pm 03:20 PM
Can AI conquer Fermat's last theorem? Mathematician gave up 5 years of his career to turn 100 pages of proof into code
Apr 09, 2024 pm 03:20 PM
Fermat's last theorem, about to be conquered by AI? And the most meaningful part of the whole thing is that Fermat’s Last Theorem, which AI is about to solve, is precisely to prove that AI is useless. Once upon a time, mathematics belonged to the realm of pure human intelligence; now, this territory is being deciphered and trampled by advanced algorithms. Image Fermat's Last Theorem is a "notorious" puzzle that has puzzled mathematicians for centuries. It was proven in 1993, and now mathematicians have a big plan: to recreate the proof using computers. They hope that any logical errors in this version of the proof can be checked by a computer. Project address: https://github.com/riccardobrasca/flt
 What to do if the dynamic link library initialization routine fails
Dec 29, 2023 am 10:30 AM
What to do if the dynamic link library initialization routine fails
Dec 29, 2023 am 10:30 AM
Solution: 1. Reinstall the application; 2. Repair or reinstall the DLL; 3. System restore or checkpoint recovery; 4. Scan using System File Checker (SFC); 5. Check startup items and services; 6. Use Tools; 7. Check official documentation or forums; 8. Consider security software; 9. Check the event viewer; 10. Seek expert help, etc.
 A closer look at PyCharm: a quick way to delete projects
Feb 26, 2024 pm 04:21 PM
A closer look at PyCharm: a quick way to delete projects
Feb 26, 2024 pm 04:21 PM
Title: Learn more about PyCharm: An efficient way to delete projects. In recent years, Python, as a powerful and flexible programming language, has been favored by more and more developers. In the development of Python projects, it is crucial to choose an efficient integrated development environment. As a powerful integrated development environment, PyCharm provides Python developers with many convenient functions and tools, including deleting project directories quickly and efficiently. The following will focus on how to use delete in PyCharm
 PyCharm Practical Tips: Convert Project to Executable EXE File
Feb 23, 2024 am 09:33 AM
PyCharm Practical Tips: Convert Project to Executable EXE File
Feb 23, 2024 am 09:33 AM
PyCharm is a powerful Python integrated development environment that provides a wealth of development tools and environment configurations, allowing developers to write and debug code more efficiently. In the process of using PyCharm for Python project development, sometimes we need to package the project into an executable EXE file to run on a computer that does not have a Python environment installed. This article will introduce how to use PyCharm to convert a project into an executable EXE file, and give specific code examples. head
 How to initialize the computer in win7
Jan 07, 2024 am 11:53 AM
How to initialize the computer in win7
Jan 07, 2024 am 11:53 AM
The win7 system is a very excellent high-performance system. During the continuous use of win7, many friends are asking how to initialize the computer in win7! Today, the editor will bring you how to restore the factory settings of a win7 computer. Related information on how to initialize the computer in win7: Detailed instructions with pictures and text. Steps: 1. Open the "Start Menu" and enter. 2. Click to enter the settings at the bottom of the left side. 3. In the Win10 update and recovery settings interface, select. 4. Click below "Remove all content and reinstall Windows". 5. You can see the following "Initialization" settings, and then click. 6. Enter the "Your computer has multiple drives" setting option. There are two options here, you can choose according to the situation.
 How to Make a Shopping List in the iOS 17 Reminders App on iPhone
Sep 21, 2023 pm 06:41 PM
How to Make a Shopping List in the iOS 17 Reminders App on iPhone
Sep 21, 2023 pm 06:41 PM
How to Make a GroceryList on iPhone in iOS17 Creating a GroceryList in the Reminders app is very simple. You just add a list and populate it with your items. The app automatically sorts your items into categories, and you can even work with your partner or flat partner to make a list of what you need to buy from the store. Here are the full steps to do this: Step 1: Turn on iCloud Reminders As strange as it sounds, Apple says you need to enable reminders from iCloud to create a GroceryList on iOS17. Here are the steps for it: Go to the Settings app on your iPhone and tap [your name]. Next, select i
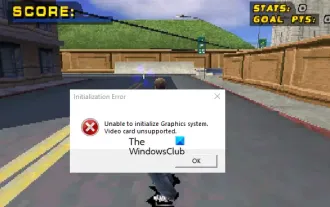 Fix Unable to initialize graphics system error on PC
Mar 08, 2024 am 09:55 AM
Fix Unable to initialize graphics system error on PC
Mar 08, 2024 am 09:55 AM
Many gamers have encountered the frustrating issue of the game failing to initialize the graphics system. This article will delve into the common reasons behind this problem and find simple yet effective solutions that will get you back on the board and beating the level in no time. So, if you are getting Unable to initialize graphics system error message in Rollercoaster Tycoon, Assassin’s Creed, Tony Hawk’s Pro Skater, etc., then follow the solutions mentioned in this article. Initialization error Unable to initialize the graphics system. Graphics cards are not supported. Fix the Unable to initialize the graphics system error message To resolve the Unable to initialize the graphics system error in games like Rollercoaster Tycoon, Assassin's Creed, Tony Hawk's Pro Skater, etc., you can try the following workarounds: Update your graphics card driver in Compatibility Mode
