

Vue.js implements custom login form
This time I will bring you Vue.js to implement a custom login form. What are the precautions for Vue.js to implement a custom login form? The following is a practical case, let's take a look.
zForm is a common component in back-end project business. This time, the login function has been reconstructed to meet the needs of configurable login methods. I will record and share it here.Business Scenario
In the past, the project only supported login with mobile phone number and password, and the form was written directly on the front end. Later, some customers hoped It can support 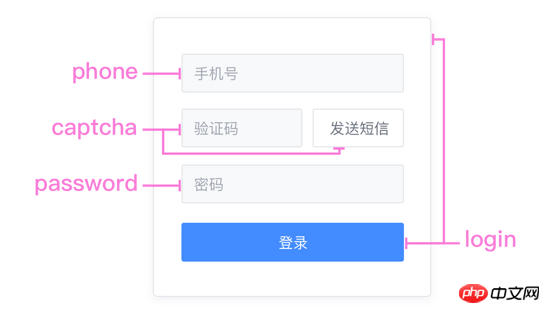
Form verificationMethod, through combination, you can quickly complete login, registration, password retrieval, etc. Form components. High cohesion and low coupling, high cohesion and low coupling... repeat it ten times~
.
├ common
├ captcha.vue
|  ├ password.vue
|  └ phone.vue
├ login
|  └ index.vue
├ register
|  └ index.vue
└ resetPassword
  └ index.vue
Code
Request server configuration data:/* 参数说明:
* 'password': 密码登录
* 'captcha': 短信验证码登录
* 'password_or_captcha': 密码或短信登录
* 'password_with_captcha': 密码+短信登录
*/
config: {
login_methods: 'password'
}.login-card .login-header h3 登录 .login-content phone(ref="phone") password( v-if="isPasswordMode" ref="password" ) captcha( v-if="isCaptchaMode" ref="captcha" ) template(v-if="isPasswordWithCaptchaMode") captcha(ref="captcha") password(ref="password") template(v-if="isPasswordOrCaptchaMode") ... el-button(@click="login") 登录
async login () {
 if (!this.validate()) return
 const loginData = this.getLoginData()
 await this.postLogin(loginData)
 ...
}validate () {
const phone = this.$refs.phone.validate()
let isPass = false
if (this.isPasswordMode) {
if (this.$refs.password) isPass = this.$refs.password.validate()
}
if (this.isCaptchaMode) {
if (this.$refs.captcha) isPass = this.$refs.captcha.validate()
}
if (this.isPasswordWithCaptchaMode) ...
if (this.isPasswordOrCaptchaMode) ...
isPass = phone && isPass
return isPass
}.login-password el-form( :model="form" :rules="rules" ref="form" @submit.native.prevent="" ) el-form-item(prop="password") el-input( v-model="form.password" type="password" name="password" )
validate () {
 let res = false
 this.$refs.form.validate((valid) => {
  res = valid
 })
 return res
}computed: {
...mapState('login', {
phone: state => state.phone,
password: state => state.password,
captcha: state => state.captcha
}),
},
methods: {
...
getLoginData () {
let mode = ''
const phone = this.phone
...
const data = { phone }
if (this.isPasswordMode) {
mode = 'password'
data.password = password
}
if (this.isCaptchaMode) {
mode = 'captcha'
data.captcha = captcha
}
if (this.isPasswordWithCaptchaMode) ...
if (this.isPasswordOrCaptchaMode) ...
data.mode = mode
return data
}
}Supplement:
vue.js Example code for selecting all and deselecting allnew Vue({
el: '#app',
data: {
checked: false,
checkedNames: [],
checkedArr: ["Runoob", "Taobao", "Google"]
},
methods: {
changeAllChecked: function() {
if (this.checked) {
this.checkedNames = this.checkedArr
} else {
this.checkedNames = []
}
}
},
watch: {
"checkedNames": function() {
if (this.checkedNames.length == this.checkedArr.length) {
this.checked = true
} else {
this.checked = false
}
}
}
})Detailed explanation of vue's method of packaging domain names based on parameter methods
String conversion with html tags For HTML tags
The above is the detailed content of Vue.js implements custom login form. For more information, please follow other related articles on the PHP Chinese website!

Hot AI Tools

Undresser.AI Undress
AI-powered app for creating realistic nude photos

AI Clothes Remover
Online AI tool for removing clothes from photos.

Undress AI Tool
Undress images for free

Clothoff.io
AI clothes remover

Video Face Swap
Swap faces in any video effortlessly with our completely free AI face swap tool!

Hot Article
Hot Tools

Notepad++7.3.1
Easy-to-use and free code editor

SublimeText3 Chinese version
Chinese version, very easy to use

Zend Studio 13.0.1
Powerful PHP integrated development environment

Dreamweaver CS6
Visual web development tools

SublimeText3 Mac version
God-level code editing software (SublimeText3)
Hot Topics


 How to quickly set up a custom avatar in Netflix
Feb 19, 2024 pm 06:33 PM
How to quickly set up a custom avatar in Netflix
Feb 19, 2024 pm 06:33 PM
An avatar on Netflix is a visual representation of your streaming identity. Users can go beyond the default avatar to express their personality. Continue reading this article to learn how to set a custom profile picture in the Netflix app. How to quickly set a custom avatar in Netflix In Netflix, there is no built-in feature to set a profile picture. However, you can do this by installing the Netflix extension on your browser. First, install a custom profile picture for the Netflix extension on your browser. You can buy it in the Chrome store. After installing the extension, open Netflix on your browser and log into your account. Navigate to your profile in the upper right corner and click
 How to implement an online speech recognition system using WebSocket and JavaScript
Dec 17, 2023 pm 02:54 PM
How to implement an online speech recognition system using WebSocket and JavaScript
Dec 17, 2023 pm 02:54 PM
How to use WebSocket and JavaScript to implement an online speech recognition system Introduction: With the continuous development of technology, speech recognition technology has become an important part of the field of artificial intelligence. The online speech recognition system based on WebSocket and JavaScript has the characteristics of low latency, real-time and cross-platform, and has become a widely used solution. This article will introduce how to use WebSocket and JavaScript to implement an online speech recognition system.
 How to customize shortcut key settings in Eclipse
Jan 28, 2024 am 10:01 AM
How to customize shortcut key settings in Eclipse
Jan 28, 2024 am 10:01 AM
How to customize shortcut key settings in Eclipse? As a developer, mastering shortcut keys is one of the keys to improving efficiency when coding in Eclipse. As a powerful integrated development environment, Eclipse not only provides many default shortcut keys, but also allows users to customize them according to their own preferences. This article will introduce how to customize shortcut key settings in Eclipse and give specific code examples. Open Eclipse First, open Eclipse and enter
 WebSocket and JavaScript: key technologies for implementing real-time monitoring systems
Dec 17, 2023 pm 05:30 PM
WebSocket and JavaScript: key technologies for implementing real-time monitoring systems
Dec 17, 2023 pm 05:30 PM
WebSocket and JavaScript: Key technologies for realizing real-time monitoring systems Introduction: With the rapid development of Internet technology, real-time monitoring systems have been widely used in various fields. One of the key technologies to achieve real-time monitoring is the combination of WebSocket and JavaScript. This article will introduce the application of WebSocket and JavaScript in real-time monitoring systems, give code examples, and explain their implementation principles in detail. 1. WebSocket technology
 The operation process of edius custom screen layout
Mar 27, 2024 pm 06:50 PM
The operation process of edius custom screen layout
Mar 27, 2024 pm 06:50 PM
1. The picture below is the default screen layout of edius. The default EDIUS window layout is a horizontal layout. Therefore, in a single-monitor environment, many windows overlap and the preview window is in single-window mode. 2. You can enable [Dual Window Mode] through the [View] menu bar to make the preview window display the playback window and recording window at the same time. 3. You can restore the default screen layout through [View menu bar>Window Layout>General]. In addition, you can also customize the layout that suits you and save it as a commonly used screen layout: drag the window to a layout that suits you, then click [View > Window Layout > Save Current Layout > New], and in the pop-up [Save Current Layout] Layout] enter the layout name in the small window and click OK
 JavaScript and WebSocket: Building an efficient real-time weather forecasting system
Dec 17, 2023 pm 05:13 PM
JavaScript and WebSocket: Building an efficient real-time weather forecasting system
Dec 17, 2023 pm 05:13 PM
JavaScript and WebSocket: Building an efficient real-time weather forecast system Introduction: Today, the accuracy of weather forecasts is of great significance to daily life and decision-making. As technology develops, we can provide more accurate and reliable weather forecasts by obtaining weather data in real time. In this article, we will learn how to use JavaScript and WebSocket technology to build an efficient real-time weather forecast system. This article will demonstrate the implementation process through specific code examples. We
 How to customize x-axis and y-axis in excel? (How to customize excel axis scale)
Mar 14, 2024 pm 02:10 PM
How to customize x-axis and y-axis in excel? (How to customize excel axis scale)
Mar 14, 2024 pm 02:10 PM
In an excel table, sometimes you may need to insert coordinate axes to see the changing trend of the data more intuitively. Some friends still don’t know how to insert coordinate axes in the table. Next, I will share with you how to customize the coordinate axis scale in Excel. Coordinate axis insertion method: 1. In the excel interface, select the data. 2. In the insertion interface, click to insert a column chart or bar chart. 3. In the expanded interface, select the graphic type. 4. In the right-click interface of the table, click Select Data. 5. In the expanded interface, you can customize it.
 Simple JavaScript Tutorial: How to Get HTTP Status Code
Jan 05, 2024 pm 06:08 PM
Simple JavaScript Tutorial: How to Get HTTP Status Code
Jan 05, 2024 pm 06:08 PM
JavaScript tutorial: How to get HTTP status code, specific code examples are required. Preface: In web development, data interaction with the server is often involved. When communicating with the server, we often need to obtain the returned HTTP status code to determine whether the operation is successful, and perform corresponding processing based on different status codes. This article will teach you how to use JavaScript to obtain HTTP status codes and provide some practical code examples. Using XMLHttpRequest
