
 Web Front-end
JS Tutorial
Detailed explanation of the steps to implement Vue multi-page development and packaging
Web Front-end
JS Tutorial
Detailed explanation of the steps to implement Vue multi-page development and packaging
Detailed explanation of the steps to implement Vue multi-page development and packaging
This time I will bring you a detailed explanation of the steps to implement vue multi-page development and packaging. What are the precautions for implementing vue multi-page development and packaging? The following is a practical case, let's take a look.

I was working on a project some time ago. The technology stack was vue webpack. It mainly consisted of the official website homepage and the backend management system. Based on the situation at the time, I analyzed three solutions
One project code embeds two spa applications (official website and backend system)
Separate two sets of project source codes
One There is only one spa application in the set of project source code
Thinking:
Directly negates the fact that there is one spa in the set of project source code Application (ui styles will cover each other, if there is no code specificationit will be difficult to maintain later)
If there are two sets of source codes, two ports may be opened in the background, and then you need to use The nginx reverse proxy may be troublesome, and front-end development is also troublesome. After all, two git warehouses and two sets of git online processes need to be maintained, which may waste a lot of time.
I am (blindly) confident in my own technology and want to try new things. It is not very complicated to analyze the needs. I chose the first option, which is to apply multiple single pages in a set of source code
Previous multi-page structure diagram

Download vue spa template
1 2 |
|
Modify multi-page application
1 |
|
Modify the directory structure under the src folder

Add
1 2 3 4 5 6 7 8 9 10 11 12 13 14 15 16 17 18 19 20 21 22 23 24 25 26 27 28 29 30 31 32 33 34 35 36 37 38 39 40 41 42 43 44 45 46 47 48 49 50 51 52 53 54 55 56 57 58 59 60 61 62 63 64 65 66 67 68 69 70 71 72 73 74 75 76 77 78 79 80 81 82 83 84 85 86 87 88 89 90 91 92 93 94 |
|
Introduce third-party ui library in util.js
1 |
|
Introduce different ui on different pages index.js
1 2 |
|
admin.js
1 2 3 |
|
The above multi-page configuration is based on the Internet, and the ideas on the Internet are mostly similar. The core is to change multiple entries. After the configuration is completed, No problem was found during development, and it took about a month to develop. After the development, when performing performance analysis on the official website, it was found that the network loading time of vendor.js packaged by webpack was particularly long, resulting in a very long white screen on the first screen. Finally, the conclusion was obtained through -webpack-bundle-analyzer analysis
1 |
|

You will find that vendor.js contains the common parts of index.html and admin.html, so this vendor The package is destined to be large and redundant
Solution idea
Since the vendor is too large and causes slow loading, then separate the vendor. alright. This is what I think, extract the third-party code used in each page into vendor.js, and then package the third-party code used in each page into its own vendor-x.js, such as the existing page index .html, admin.html, vendor.js, vendor-index.js, vendor-admin.js will eventually be packaged.
webpack.prod.conf.js file
1 2 3 4 5 6 7 8 9 10 11 12 13 14 15 16 17 18 19 20 21 22 23 24 |
|
Analysis again, everything is ok, vendor.js is separated into vendor.js, vendor-index, vendor-admin.js
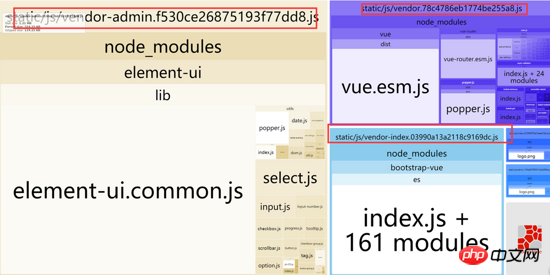
I originally thought that the problem of separating vendor.js of CommonsChunkPlugin was solved, and that was it. Then I packaged it and found that both index.html and admin.html were missing an introduction (each corresponding The vendor-xx.js)

Solution
This problem is actually a problem with HtmlWebpackPlugin Change the original chunksSortMode: 'dependency' to the configuration of custom function, as follows
util.js file
1 2 3 4 5 |
|
final implementation
Each page loads its own chunk
Each page has different parameters
Each page Can share public chunk
Browser cache, better performance
If it is still too slow, enable gzip
Impressions
It’s done. Although the configuration looks very simple, I thought about it for a long time when I was developing it, so if you are not familiar with CommonsChunkPlugin and HtmlWebpackPlugin or only use other third-party configurations Table, it may be a big pitfall. For example, CommonsChunkPlugin does not specify chunks, what is the default? Most people can only write a numerical value in minChunks, but the writing method of defining a function by yourself is actually the most powerful. According to my personal experience, the writing method of chunks combined with the minChunks custom function can solve almost all CommonsChunkPlugin Supernatural events.
I believe you have mastered the method after reading the case in this article. For more exciting information, please pay attention to other related articles on the php Chinese website! Recommended reading:echarts node display dynamic data implementation steps
detailed explanation of the use of .sync modifier in vue
The above is the detailed content of Detailed explanation of the steps to implement Vue multi-page development and packaging. For more information, please follow other related articles on the PHP Chinese website!

Hot AI Tools

Undresser.AI Undress
AI-powered app for creating realistic nude photos

AI Clothes Remover
Online AI tool for removing clothes from photos.

Undress AI Tool
Undress images for free

Clothoff.io
AI clothes remover

Video Face Swap
Swap faces in any video effortlessly with our completely free AI face swap tool!
Hot Article
Hot Tools

Notepad++7.3.1
Easy-to-use and free code editor

SublimeText3 Chinese version
Chinese version, very easy to use

Zend Studio 13.0.1
Powerful PHP integrated development environment

Dreamweaver CS6
Visual web development tools

SublimeText3 Mac version
God-level code editing software (SublimeText3)
Hot Topics
 1663
1663
 14
1419
52
1313
25
1264
29
1237
24
14
1419
52
1313
25
1264
29
1237
24

 How to make Google Maps the default map in iPhone
Apr 17, 2024 pm 07:34 PM
How to make Google Maps the default map in iPhone
Apr 17, 2024 pm 07:34 PM
The default map on the iPhone is Maps, Apple's proprietary geolocation provider. Although the map is getting better, it doesn't work well outside the United States. It has nothing to offer compared to Google Maps. In this article, we discuss the feasible steps to use Google Maps to become the default map on your iPhone. How to Make Google Maps the Default Map in iPhone Setting Google Maps as the default map app on your phone is easier than you think. Follow the steps below – Prerequisite steps – You must have Gmail installed on your phone. Step 1 – Open the AppStore. Step 2 – Search for “Gmail”. Step 3 – Click next to Gmail app
 Steps to upgrade to the latest version of WeChat (Easily master the upgrade method to the latest version of WeChat)
Jun 01, 2024 pm 10:24 PM
Steps to upgrade to the latest version of WeChat (Easily master the upgrade method to the latest version of WeChat)
Jun 01, 2024 pm 10:24 PM
WeChat is one of the social media platforms in China that continuously launches new versions to provide a better user experience. Upgrading WeChat to the latest version is very important to keep in touch with family and colleagues, to stay in touch with friends, and to keep abreast of the latest developments. 1. Understand the features and improvements of the latest version. It is very important to understand the features and improvements of the latest version before upgrading WeChat. For performance improvements and bug fixes, you can learn about the various new features brought by the new version by checking the update notes on the WeChat official website or app store. 2. Check the current WeChat version We need to check the WeChat version currently installed on the mobile phone before upgrading WeChat. Click to open the WeChat application "Me" and then select the menu "About" where you can see the current WeChat version number. 3. Open the app
 This Apple ID is not yet in use in the iTunes Store: Fix
Jun 10, 2024 pm 05:42 PM
This Apple ID is not yet in use in the iTunes Store: Fix
Jun 10, 2024 pm 05:42 PM
When logging into iTunesStore using AppleID, this error saying "This AppleID has not been used in iTunesStore" may be thrown on the screen. There are no error messages to worry about, you can fix them by following these solution sets. Fix 1 – Change Shipping Address The main reason why this prompt appears in iTunes Store is that you don’t have the correct address in your AppleID profile. Step 1 – First, open iPhone Settings on your iPhone. Step 2 – AppleID should be on top of all other settings. So, open it. Step 3 – Once there, open the “Payment & Shipping” option. Step 4 – Verify your access using Face ID. step
 Shazam app not working in iPhone: Fix
Jun 08, 2024 pm 12:36 PM
Shazam app not working in iPhone: Fix
Jun 08, 2024 pm 12:36 PM
Having issues with the Shazam app on iPhone? Shazam helps you find songs by listening to them. However, if Shazam isn't working properly or doesn't recognize the song, you'll have to troubleshoot it manually. Repairing the Shazam app won't take long. So, without wasting any more time, follow the steps below to resolve issues with Shazam app. Fix 1 – Disable Bold Text Feature Bold text on iPhone may be the reason why Shazam is not working properly. Step 1 – You can only do this from your iPhone settings. So, open it. Step 2 – Next, open the “Display & Brightness” settings there. Step 3 – If you find that “Bold Text” is enabled
 Clock app missing in iPhone: How to fix it
May 03, 2024 pm 09:19 PM
Clock app missing in iPhone: How to fix it
May 03, 2024 pm 09:19 PM
Is the clock app missing from your phone? The date and time will still appear on your iPhone's status bar. However, without the Clock app, you won’t be able to use world clock, stopwatch, alarm clock, and many other features. Therefore, fixing missing clock app should be at the top of your to-do list. These solutions can help you resolve this issue. Fix 1 – Place the Clock App If you mistakenly removed the Clock app from your home screen, you can put the Clock app back in its place. Step 1 – Unlock your iPhone and start swiping to the left until you reach the App Library page. Step 2 – Next, search for “clock” in the search box. Step 3 – When you see “Clock” below in the search results, press and hold it and
 iPhone screenshots not working: How to fix it
May 03, 2024 pm 09:16 PM
iPhone screenshots not working: How to fix it
May 03, 2024 pm 09:16 PM
Screenshot feature not working on your iPhone? Taking a screenshot is very easy as you just need to hold down the Volume Up button and the Power button at the same time to grab your phone screen. However, there are other ways to capture frames on the device. Fix 1 – Using Assistive Touch Take a screenshot using the Assistive Touch feature. Step 1 – Go to your phone settings. Step 2 – Next, tap to open Accessibility settings. Step 3 – Open Touch settings. Step 4 – Next, open the Assistive Touch settings. Step 5 – Turn on Assistive Touch on your phone. Step 6 – Open “Customize Top Menu” to access it. Step 7 – Now you just need to link any of these functions to your screen capture. So click on the first
 Four recommended AI-assisted programming tools
Apr 22, 2024 pm 05:34 PM
Four recommended AI-assisted programming tools
Apr 22, 2024 pm 05:34 PM
This AI-assisted programming tool has unearthed a large number of useful AI-assisted programming tools in this stage of rapid AI development. AI-assisted programming tools can improve development efficiency, improve code quality, and reduce bug rates. They are important assistants in the modern software development process. Today Dayao will share with you 4 AI-assisted programming tools (and all support C# language). I hope it will be helpful to everyone. https://github.com/YSGStudyHards/DotNetGuide1.GitHubCopilotGitHubCopilot is an AI coding assistant that helps you write code faster and with less effort, so you can focus more on problem solving and collaboration. Git
 WiFi calling not working on iPhone: Fix
Jun 03, 2024 am 11:16 AM
WiFi calling not working on iPhone: Fix
Jun 03, 2024 am 11:16 AM
Can't enable Wi-Fi calling on iPhone? Call quality is improved and you can communicate even from remote locations where cellular networks are not as strong. Wi-Fi Calling also improves standard call and video call quality. So, if you can't use Wi-Fi calling on your phone, these solutions might help you fix the problem. Fix 1 – Enable Wi-Fi Calling Manually You must enable the Wi-Fi Calling feature in your iPhone settings. Step 1 – For this, you have to open Settings. Step 2 – Next, just scroll down to find and open the “Phone” settings Step 3 – In the phone settings, scroll down and open the “Wi-Fi Calling” setting. Step 4 – In the Wi-Fi Calling page, change “This iPhone
