

Detailed explanation of vue todo-list component case
这次给大家带来vue todo-list组件案例详解,vue todo-list组件使用的注意事项有哪些,下面就是实战案例,一起来看一下。
前言
最近几个人合作完成了一个项目,发现有一些公用的基础业务组件,可以提取出来,不仅方便大家在各自模块直接引用,也可以在以后的项目中使用。想到了可不可以自己动手把组件打包发布到内部的npm上,避免以后小伙伴们的重复工作呢?于是乎,说干就干,在这里操练一下,写个todo-list的vue组件案例。案例源码:https://github.com/wuwhs/todoList
建立npm项目
1. 初始化npm项目
建一个文件夹(todoList),在这个文件夹路径下打开cmd窗口,输入指令npm init,前提是已经装好了node(自带npm)。
$ npm init
This utility will walk you through creating a package.json file.
It only covers the most common items, and tries to guess sensible defaults.
See `npm help json` for definitive documentation on these fields
and exactly what they do.
Use `npm install <pkg>` afterwards to install a package and
save it as a dependency in the package.json file.
Press ^C at any time to quit.
package name: (todolist)
提示输入项目包名称,这里的名称将作为发布到npm上这个包的名称,以后别人使用就可以直接import或require到项目中使用。
package name: (todolist) todolist
version: (1.0.0)
接下来提示输入版本,这里的版本将作为发布到npm上这个包版本控制号,每次发布必须要改一下版本号,才允许发布,在这里作为第一个版本可以直接回车,默认是1.0.0。
version: (1.0.0)
description:
然后提示输入描述信息,描述一下这个包的功能作用。于是输入:
description: a vue component of todolist
entry point:(webpack.config.js)
再者,提示整个项目的入口文件,这里是我们打包后的文件,打包后文件都放到dist目录下,先设定生成的文件是todoList.min.js,于是:
entry point:(webpack.config.js) ./dist/todoList.min.js
test command:
git repository:
接下来提示输入测试命令、git仓库,先不管,后面再详细写,回车默认空。
再提示输入关键字,便于其他人在npm上搜索得到你写的包,最后就是作者和认证,根据自己实际情况填。
keywords: todolist vue
author: wuwhs
license: (ISC)
About to write to D:\WampServer\wamp\www\todoList\package.json:
{
 "name": "vue-todolist",
 "version": "1.0.0",
 "description": "a vue component of todolist",
 "main": "dist/todolist.min.js",
 "scripts": {
  "test": "echo \"Error: no test specified\" && exit 1"
 },
 "keywords": [
  "todolist",
  "vue"
 ],
 "author": "wuwhs",
 "license": "ISC"
}
Is this ok? (yes) yes这样,一个npm项目就初始化完了。接下来,来发布一个已经打包好了的组件包(先为空的)到npm上。
发布包到npm上
首先需要有npm官网的一个注册账号,然后输入npm adduser,依次输入npm登录账号、密码和注册激活邮箱。这样就轻松的登录上了。(PS:在window的CMD窗口,输入密码时不显示输入密码,盲输入,确定后回车即可,这里被坑了一下)
$ npm adduser
Username: wuwhs
Password: balabala...
Email: (this IS public) balabala...
Logged in as wuwhs on https://registry.npmjs.org/.
最后,直接输入指令publish即可大功告成。
$ npm publish
+ vue-todolist@1.0.0

不过,好事多磨,可能事情没有那么顺利。
一个可能取的包名称跟别人的重名了,这样是不能上传上去的,会提示你没有权限发布这个包。
$ npm publish
npm ERR! publish Failed PUT 403
npm ERR! code E403
npm ERR! You do not have permission to publish "vue-router". Are you logged in as the correct user? : vue-router
npm ERR! A complete log of this run can be found in:
npm ERR!   C:\Users\Administrator\AppData\Roaming\npm-cache\_logs\2018-04-02T15_41_56_696Z-debug.log
解决方法:需要到package.json里改一下包名称name,或者去npm官网搜一下你要取的名称,有没有同名,再回头来改。
还有就是每次发布,没改版本号。
$ npm publish
npm ERR! publish Failed PUT 403
npm ERR! code E403
npm ERR! You cannot publish over the previously published versions: 1.0.1. : vue-todolist
npm ERR! A complete log of this run can be found in:
npm ERR!   C:\Users\Administrator\AppData\Roaming\npm-cache\_logs\2018-04-02T15_40_28_571Z-debug.log
解决方法:需要到package.json里改一下版本号后发布。
把npm线路打通了,接下来就是打包输出,上传资源了。
webpack打包
组件写好后,一般要借助自动化工具,将资源整合打包压缩,提供一个入口文件,供别人直接引用。在这里,选用webpack来打包。
为了方便演示,写一个vue官网上todo-list的例子,作为组件打包发布。
整个目录结构
--todoList
  --src
    --components
      --todoItem.vue
      --todoList.vue
    --App.vue
    --index.js
    --main.js
  --index.html
  --webpack.config.js
  --package.json
  --.babelrc
  --.npmignore
下面来分别说明文件内容:
1. package.json文件
{
 "name": "vue-todolist",
 "description": "a vue component of todolist",
 "version": "1.0.0",
 "author": "wuwhs",
 "license": "MIT",
 "private": false,
 "main": "./dist/todoList.min.js",
 "scripts": {
  "dev": "cross-env NODE_ENV=development webpack-dev-server --open --hot",
  "build": "cross-env NODE_ENV=production webpack --progress --hide-modules"
 },
 "dependencies": {
  "vue": "^2.5.11"
 },
 "browserslist": [
  "> 1%",
  "last 2 versions",
  "not ie <= 8"
 ],
 "devDependencies": {
  "babel-core": "^6.26.0",
  "babel-loader": "^7.1.2",
  "babel-preset-env": "^1.6.0",
  "babel-preset-stage-3": "^6.24.1",
  "cross-env": "^5.0.5",
  "css-loader": "^0.28.7",
  "file-loader": "^1.1.4",
  "vue-loader": "^13.0.5",
  "vue-template-compiler": "^2.4.4",
  "webpack": "^3.6.0",
  "webpack-dev-server": "^2.9.1"
 }
}主要安装一些必要的依赖插件,如vue、babel和webpack
2. webpack.config.js文件
var path = require('path')
var webpack = require('webpack')
module.exports = {
 entry: './src/main.js',
 output: {
  path: path.resolve(dirname, './dist'),
  publicPath: '/dist/',
  filename: 'build.js'
 },
 module: {
  rules: [
   {
    test: /\.css$/,
    use: [
     'vue-style-loader',
     'css-loader'
    ],
   },
   {
    test: /\.vue$/,
    loader: 'vue-loader',
    options: {
     loaders: {
     }
     // other vue-loader options go here
    }
   },
   {
    test: /\.js$/,
    loader: 'babel-loader',
    exclude: /node_modules/
   },
   {
    test: /\.(png|jpg|gif|svg)$/,
    loader: 'file-loader',
    options: {
     name: '[name].[ext]?[hash]'
    }
   }
  ]
 },
 resolve: {
  alias: {
   'vue$': 'vue/dist/vue.esm.js'
  },
  extensions: ['*', '.js', '.vue', '.json']
 },
 devServer: {
  historyApiFallback: true,
  noInfo: true,
  overlay: true
 },
 performance: {
  hints: false
 },
 devtool: '#eval-source-map'
}
if (process.env.NODE_ENV === 'production') {
 module.exports.devtool = '#source-map'
 module.exports.plugins = (module.exports.plugins || []).concat([
  new webpack.DefinePlugin({
   'process.env': {
    NODE_ENV: '"production"'
   }
  }),
  new webpack.optimize.UglifyJsPlugin({
   sourceMap: true,
   compress: {
    warnings: false
   }
  }),
  new webpack.LoaderOptionsPlugin({
   minimize: true
  })
 ])
}webpack的基本热更新以及打包配置,可以参考webpack中文官网
3. .babelrc文件
{
 "presets": [
  ["env", { "modules": false }],
  "stage-3"
 ]
}ES6转化工具babel配置
4. main.js项目入口文件
import Vue from 'vue'
import App from './App.vue'
new Vue({
 el: '#app',
 render: h => h(App)
})5. App.vue vue根组件
<template>
 <p id="app">
  Hello, todo-list!
 </p>
</template>
<script>
export default {
 name: 'app'
}
</script>6. index.html 页面
<!DOCTYPE html>
<html lang="en">
 <head>
  <meta charset="utf-8">
  <title>todolist</title>
 </head>
 <body>
  <p id="app"></p>
  <script src="./dist/build.js"></script>
 </body>
</html>
输入命令npm install,所有依赖包安装完成后,npm run dev,启动成功。

PS:遇到一个坑,先用npm install感觉太慢了,于是断掉了,用cnpm install,安装完成后,启动总是缺少这个依赖包,那个依赖包,没完没了,于是,把node_modules全删了,重新cnpm install一气呵成正常了。cnpm安装会引入一些版本文件,前面npm已装好的包没有,于是就出现了报错,找不到某某依赖包。
至此,打包工具webpack的基本配置就完成了,接下来就是写vue组件了。
写todo-list的vue组件
todo-list组件在很多地方都会作为一个案例使用,在这就直接模范vue官网的案例来写了。
1. todoList.vue组件——列表
<template>
<p">
 <input
  v-model="newTodoText"
  v-on:keyup.enter="addNewTodo"
  placeholder="Add a todo"
 >
 <ul>
  <li
   is="todo-item"
   v-for="(todo, index) in todos"
   v-bind:key="todo.id"
   v-bind:title="todo.title"
   v-on:remove="todos.splice(index, 1)"
  ></li>
 </ul>
</p>
</template>
<script>
import TodoItem from './TodoItem'
export default {
 components: {
  TodoItem
 },
 data () {
  return {
   newTodoText: '',
   todos: [
    {
     id: 1,
     title: 'Do the dishes',
    }
   ],
   nextTodoId: 2
  }
 },
 methods: {
  addNewTodo: function () {
   this.todos.push({
    id: this.nextTodoId++,
    title: this.newTodoText
   })
   this.newTodoText = ''
  }
 }
}
</script>2. todoList.vue组件——列表项
减小耦合度,把列表项单独拿出来做一个组件。
<template>
<li>
{{ title }}
<button v-on:click="$emit('remove')">X</button>
</li>
</template>
<script>
export default {
props: ['title']
}
</script>3. App.vue根组件
将todo-list组件引入并挂载到根节点。
<template>
 <p id="app">
  <todo-list></todo-list>
 </p>
</template>
<script>
import TodoList from './components/todoList'
export default {
 name: 'app',
 components: {
  TodoList
 }
}
</script>刷新浏览器,查看效果
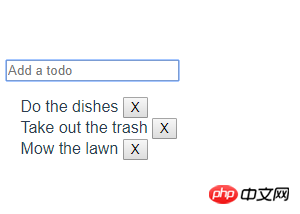
OK,组件基本完成。
组件打包
前面已经验证了,我们写的todo-list组件没问题了,要将这个组件独立打包成一个文件。这时就需要更换一下入口文件了,把测试案例用的main.js换成index.js文件。
独立组件入口文件 index.js
目的只是将要打包的组件引入。
import TodoList from './components/todoList.vue'
export default TodoList
更改webpack配置 webpack.config.js
将入口文件更换成./src/index.js,文件出口路径和名称更换成package.json的main的路径和名称,这样方便不调整npm的发布目录。
module.exports = {
 entry: './src/index.js',
 output: {
  path: path.resolve(dirname, './dist'),
  publicPath: '/dist/',
  filename: 'todoList.min.js'
 },
 ...
}改好后,npm run build,打包组件,结果就在dist目录下有了todoList.min.js文件。这就是打包组件后的文件。也是将要发布到npm上别人真正使用的入口文件。
测试打包好的文件
刚打包好的文件能不能直接使用,在发布到npm上之前先在本地测试一下。要测试方法很简单,就是把跟组件引入的vue组件改成引入刚打包的文件。于是App.vue这样改:
<script>
import TodoList from '../dist/todoList.min.js'
export default {
 name: 'app',
 components: {
  TodoList
 }
}
</script>再改回测试案例入口,刷新浏览器,报错!
vue.esm.js?3153:591 [Vue warn]: Failed to mount component: template or render function not defined.
found in
---> <TodoList>
    <App> at src\App.vue
     <Root>
有点小奔溃,没有渲染函数?难道自己打包出来的组件竟然不能用!后来查资料才知道,打包需要指定一种模块输出类型,可以是commonjs,AMD,script,UMD模式。在这里是写插件,要采用UMD模式,即libraryTarget: 'umd'。于是webpack.config.js出口文件配置修改为:
 output: {
  path: path.resolve(dirname, './dist'),
  publicPath: '/dist/',
  filename: 'todoList.min.js',
  library: 'vueTodoList',
  libraryTarget: 'umd',
  umdNamedDefine: true
}再打包独立组件,更新todoList.min.js文件,改回测试文件(entry: './src/main.js',)入口,npm run dev,刷新浏览器,成功!
发布和使用npm组件包
发布npm组件包
已经验证了我们已经打包生成的todoList.min.js可以正常使用,接下来就可以发布到npm上了,同样npm跟git一样,可以使用.npmignore忽略一些上传文件,比如node_moudules就不要上传上去了。
.DS_Store
node_modules/
npm-debug.log
yarn-error.log
# Editor directories and files
.idea
.editorconfig
*.suo
*.ntvs*
*.njsproj
*.sln
更改一下package.json的version,执行npm publish即可
$ npm publish
+ vue-todolist@1.0.3
使用npm组件包
发布成功后,这就是一个平常使用的插件了,cnpm install vue-todolist --save即可安装(使用npm或cnpm安装均可)完成,
$ cnpm install vue-todolist --save
√ Installed 1 packages
√ Linked 1 latest versions
√ Run 0 scripts
Recently updated (since 2018-03-27): 1 packages (detail see file D:\appSoft\wampserver\wamp64\www\todoList\node_modules\.recently_updates.txt)
 Today:
  → vue-todolist@*(1.0.3) (11:15:22)
√ All packages installed (1 packages installed from npm registry, used 564ms, speed 528.68kB/s, json 2(281.56kB), tarball 16.62kB)
然后直接在页面中引入使用。
在App.vue引入todolist组件,就不需要引入本地写的了,直接引入刚才安装好的
<script>
import TodoList from 'vue-todolist'
export default {
 name: 'app',
 components: {
  TodoList
 }
}
</script>再次运行npm run dev,刷新浏览器,一切正常,good。
总结
至此,打包、发布和使用自己写的vue组件就完成了。总结一下这几条需要关注:
npm包配置(
package.json)中,提供对外使用的入口文件最好跟打包后的文件一致,这样打包完成后就可直接测试和发布;每次发布要改版本号;
webpack配置文件出口要加库输出类型libraryTarget: 'umd';最好单独用一个文件作为组件输出打包,不要跟测试案例入口文件弄混;
相信看了本文案例你已经掌握了方法,更多精彩请关注php中文网其它相关文章!
推荐阅读:
The above is the detailed content of Detailed explanation of vue todo-list component case. For more information, please follow other related articles on the PHP Chinese website!

Hot AI Tools

Undresser.AI Undress
AI-powered app for creating realistic nude photos

AI Clothes Remover
Online AI tool for removing clothes from photos.

Undress AI Tool
Undress images for free

Clothoff.io
AI clothes remover

Video Face Swap
Swap faces in any video effortlessly with our completely free AI face swap tool!

Hot Article
Hot Tools

Notepad++7.3.1
Easy-to-use and free code editor

SublimeText3 Chinese version
Chinese version, very easy to use

Zend Studio 13.0.1
Powerful PHP integrated development environment

Dreamweaver CS6
Visual web development tools

SublimeText3 Mac version
God-level code editing software (SublimeText3)
Hot Topics


 How to install the Windows 10 old version component DirectPlay
Dec 28, 2023 pm 03:43 PM
How to install the Windows 10 old version component DirectPlay
Dec 28, 2023 pm 03:43 PM
Many users always encounter some problems when playing some games on win10, such as screen freezes and blurred screens. At this time, we can solve the problem by turning on the directplay function, and the operation method of the function is also Very simple. How to install directplay, the old component of win10 1. Enter "Control Panel" in the search box and open it 2. Select large icons as the viewing method 3. Find "Programs and Features" 4. Click on the left to enable or turn off win functions 5. Select the old version here Just check the box
 Detailed explanation of obtaining administrator rights in Win11
Mar 08, 2024 pm 03:06 PM
Detailed explanation of obtaining administrator rights in Win11
Mar 08, 2024 pm 03:06 PM
Windows operating system is one of the most popular operating systems in the world, and its new version Win11 has attracted much attention. In the Win11 system, obtaining administrator rights is an important operation. Administrator rights allow users to perform more operations and settings on the system. This article will introduce in detail how to obtain administrator permissions in Win11 system and how to effectively manage permissions. In the Win11 system, administrator rights are divided into two types: local administrator and domain administrator. A local administrator has full administrative rights to the local computer
 Detailed explanation of division operation in Oracle SQL
Mar 10, 2024 am 09:51 AM
Detailed explanation of division operation in Oracle SQL
Mar 10, 2024 am 09:51 AM
Detailed explanation of division operation in OracleSQL In OracleSQL, division operation is a common and important mathematical operation, used to calculate the result of dividing two numbers. Division is often used in database queries, so understanding the division operation and its usage in OracleSQL is one of the essential skills for database developers. This article will discuss the relevant knowledge of division operations in OracleSQL in detail and provide specific code examples for readers' reference. 1. Division operation in OracleSQL
 Angular components and their display properties: understanding non-block default values
Mar 15, 2024 pm 04:51 PM
Angular components and their display properties: understanding non-block default values
Mar 15, 2024 pm 04:51 PM
The default display behavior for components in the Angular framework is not for block-level elements. This design choice promotes encapsulation of component styles and encourages developers to consciously define how each component is displayed. By explicitly setting the CSS property display, the display of Angular components can be fully controlled to achieve the desired layout and responsiveness.
 How to open the settings of the old version of win10 components
Dec 22, 2023 am 08:45 AM
How to open the settings of the old version of win10 components
Dec 22, 2023 am 08:45 AM
Win10 old version components need to be turned on by users themselves in the settings, because many components are usually closed by default. First we need to enter the settings. The operation is very simple. Just follow the steps below. Where are the win10 old version components? Open 1. Click Start, then click "Win System" 2. Click to enter the Control Panel 3. Then click the program below 4. Click "Enable or turn off Win functions" 5. Here you can choose what you want to open
 Detailed explanation of the role and usage of PHP modulo operator
Mar 19, 2024 pm 04:33 PM
Detailed explanation of the role and usage of PHP modulo operator
Mar 19, 2024 pm 04:33 PM
The modulo operator (%) in PHP is used to obtain the remainder of the division of two numbers. In this article, we will discuss the role and usage of the modulo operator in detail, and provide specific code examples to help readers better understand. 1. The role of the modulo operator In mathematics, when we divide an integer by another integer, we get a quotient and a remainder. For example, when we divide 10 by 3, the quotient is 3 and the remainder is 1. The modulo operator is used to obtain this remainder. 2. Usage of the modulo operator In PHP, use the % symbol to represent the modulus
 Detailed explanation of the linux system call system() function
Feb 22, 2024 pm 08:21 PM
Detailed explanation of the linux system call system() function
Feb 22, 2024 pm 08:21 PM
Detailed explanation of Linux system call system() function System call is a very important part of the Linux operating system. It provides a way to interact with the system kernel. Among them, the system() function is one of the commonly used system call functions. This article will introduce the use of the system() function in detail and provide corresponding code examples. Basic Concepts of System Calls System calls are a way for user programs to interact with the operating system kernel. User programs request the operating system by calling system call functions
 Detailed explanation of Linux curl command
Feb 21, 2024 pm 10:33 PM
Detailed explanation of Linux curl command
Feb 21, 2024 pm 10:33 PM
Detailed explanation of Linux's curl command Summary: curl is a powerful command line tool used for data communication with the server. This article will introduce the basic usage of the curl command and provide actual code examples to help readers better understand and apply the command. 1. What is curl? curl is a command line tool used to send and receive various network requests. It supports multiple protocols, such as HTTP, FTP, TELNET, etc., and provides rich functions, such as file upload, file download, data transmission, proxy
