

Vue's routing permission management
This time I will bring you Vue's routingPermission management, what are the notes of Vue routing permission management, the following is a practical case, let's come together take a look.
Preface
I have done research on vue routing permission management at work. I have seen several related articles in the past few days, plus yesterday It was mentioned again in the interview, so I simply compiled some of my opinions, hoping it will be helpful to everyone.
Implementation
Generally speaking, the idea of implementation is very simple. First, the picture above:
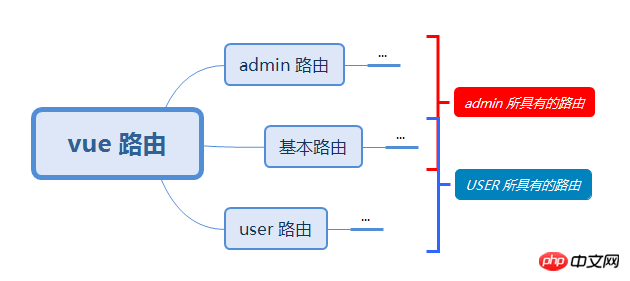
is nothing more than routing The configuration is divided into user routing and basic routing according to user type. Different user types may have different user routes, which depends on the actual business.
User routing: A routing unique to the current user
Basic routing: A routing accessible to all users
There are two ways to implement control:
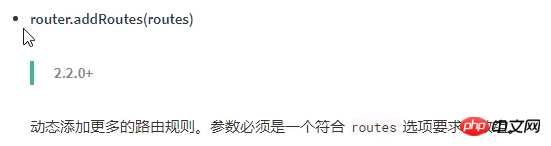
Through vue-router addRoutes Method injectionRoute implementation control
Restrict route jumps through vue-router beforeEach hook
addRoutes method:
Obtain the current user routing configuration by requesting the server, encoding it into the basic format supported by vue-router (the specific encoding depends on the data format negotiated by the front and back ends), by calling The this.$router.addRoutes method injects the encoded user routes into the existing vue-router instance to implement user routing.
beforeEach method
Obtain the current user routing configuration by requesting the server, manage each jump of the route by registering the router.beforeEach hook, and check each jump if the target The route is no longer stored in the basic route and the user route of the current user. The jump is canceled and the jump error page is redirected.
Both of the above methods require configuring an error page in vue-router to ensure that users perceive insufficient permissions.
The principles of both methods are actually the same, except that the addRoutes method tells vue-router by injecting routing configuration: "Currently we only have these routes, and we do not know other routing addresses "Recognize", while beforeEach relies more on us to manually help vue-router identify which pages can be accessed and which pages cannot be accessed. To put it bluntly, it is the difference between automatic and manual. Speaking of this, I guess everyone will think that since it is automatic, addRoutes must be the most convenient and fast, and it can also simplify the business code. The author thought so at the beginning, but! Many people have overlooked one point: the
addRoutes method only helps you inject new routes, but does not help you eliminate other routes!
Imagine a situation where the user logs in to the administrator account on his or her computer. At this time, the administrator's route will be injected into the routing, and then the user will log out, keep the page from refreshing, and switch to an ordinary user. Log in with the account. At this time, the routes of ordinary users will be injected into the routing. Then, there will be routes for two user types in the routing. Even if the user is not aware of it, ordinary users can also access the administrator's page by changing the URL!
There is also a solution to this problem:
import Vue from 'vue'
import Router from 'vue-router'
Vue.use(Router)
const createRouter = () => new Router({
 mode: 'history',
 routes: []
})
const router = createRouter()
export function resetRouter () {
 const newRouter = createRouter()
 router.matcher = newRouter.matcher
}
export default routerBy creating a new Router, and then assigning the new Router.matcher to the management Router of the current page, in order to update the routing configuration Purpose.
The author made a small demo for everyone to experience.
Regarding the above issues, there have been discussions under the github issues of vue-router, which are:
Add option to Reset/Delete Routes #1436
Feature request: replace routes dynamically #1234
I believe you have mastered the method after reading the case in this article. For more exciting information, please pay attention to other related articles on the php Chinese website!
Recommended reading:
How to solve the file error after angularjs compression
How to use axios for cross-domain processing in vue
The above is the detailed content of Vue's routing permission management. For more information, please follow other related articles on the PHP Chinese website!

Hot AI Tools

Undresser.AI Undress
AI-powered app for creating realistic nude photos

AI Clothes Remover
Online AI tool for removing clothes from photos.

Undress AI Tool
Undress images for free

Clothoff.io
AI clothes remover

Video Face Swap
Swap faces in any video effortlessly with our completely free AI face swap tool!

Hot Article
Hot Tools

Notepad++7.3.1
Easy-to-use and free code editor

SublimeText3 Chinese version
Chinese version, very easy to use

Zend Studio 13.0.1
Powerful PHP integrated development environment

Dreamweaver CS6
Visual web development tools

SublimeText3 Mac version
God-level code editing software (SublimeText3)
Hot Topics


 Enable root permissions with one click (quickly obtain root permissions)
Jun 02, 2024 pm 05:32 PM
Enable root permissions with one click (quickly obtain root permissions)
Jun 02, 2024 pm 05:32 PM
It allows users to perform more in-depth operations and customization of the system. Root permission is an administrator permission in the Android system. Obtaining root privileges usually requires a series of tedious steps, which may not be very friendly to ordinary users, however. By enabling root permissions with one click, this article will introduce a simple and effective method to help users easily obtain system permissions. Understand the importance and risks of root permissions and have greater freedom. Root permissions allow users to fully control the mobile phone system. Strengthen security controls, customize themes, and users can delete pre-installed applications. For example, accidentally deleting system files causing system crashes, excessive use of root privileges, and inadvertent installation of malware are also risky, however. Before using root privileges
 How to set permission access in QQ space
Feb 23, 2024 pm 02:22 PM
How to set permission access in QQ space
Feb 23, 2024 pm 02:22 PM
How to set permission access in QQ space? You can set permission access in QQ space, but most friends don’t know how to set permission access in QQ space. Next is the diagram of how to set permission access in QQ space brought by the editor for users. Text tutorial, interested users come and take a look! QQ usage tutorial QQ space how to set permission access 1. First open the QQ application, click [Avatar] in the upper left corner of the main page; 2. Then expand the personal information area on the left and click the [Settings] function in the lower left corner; 3. Enter the settings page Swipe to find the [Privacy] option; 4. Next in the privacy interface, select the [Permission Settings] service; 5. Then challenge to the latest page and select [Space Dynamics]; 6. Set up in QQ Space again
 Discuz Forum Permission Management: Read Permission Setting Guide
Mar 10, 2024 pm 05:33 PM
Discuz Forum Permission Management: Read Permission Setting Guide
Mar 10, 2024 pm 05:33 PM
Discuz forum permission management: Read the permission setting guide In Discuz forum management, permission setting is a crucial part. Among them, the setting of reading permissions is particularly important, as it determines the scope of content that different users can see in the forum. This article will introduce in detail the reading permission settings of the Discuz forum and how to flexibly configure it for different needs. 1. Basic concepts of reading permissions In the Discuz forum, reading permissions mainly include the following concepts that need to be understood: Default reading permissions: Default after new user registration
 Java Apache Camel: Building a flexible and efficient service-oriented architecture
Feb 19, 2024 pm 04:12 PM
Java Apache Camel: Building a flexible and efficient service-oriented architecture
Feb 19, 2024 pm 04:12 PM
Apache Camel is an Enterprise Service Bus (ESB)-based integration framework that can easily integrate disparate applications, services, and data sources to automate complex business processes. ApacheCamel uses route-based configuration to easily define and manage integration processes. Key features of ApacheCamel include: Flexibility: ApacheCamel can be easily integrated with a variety of applications, services, and data sources. It supports multiple protocols, including HTTP, JMS, SOAP, FTP, etc. Efficiency: ApacheCamel is very efficient, it can handle a large number of messages. It uses an asynchronous messaging mechanism, which improves performance. Expandable
 How to obtain trustedinstaller permission 'Recommended steps to obtain TrustedInstaller permission'
Feb 06, 2024 pm 05:48 PM
How to obtain trustedinstaller permission 'Recommended steps to obtain TrustedInstaller permission'
Feb 06, 2024 pm 05:48 PM
This article will take you to understand the essence of TI and further explore how to obtain TI permissions with the help of powershell and NtObjectManager modules to complete any operation you want in the operating system. If you have ever administered a Windows system, you should be familiar with the concept of the trustedInstaller (TI) group. The TI group has important permissions in the operation of system files and registry. For example, you can view the properties of files under the System32 folder. In the security options, the TI group and the file owner have permission to delete and modify files. Even administrators cannot directly modify the security options. Therefore, for the operation of system files and registry, it is necessary to
 What to do if the right-click menu management cannot be opened in Windows 10
Jan 04, 2024 pm 07:07 PM
What to do if the right-click menu management cannot be opened in Windows 10
Jan 04, 2024 pm 07:07 PM
When we use the win10 system, when we use the mouse to right-click the desktop or the right-click menu, we find that the menu cannot be opened and we cannot use the computer normally. At this time, we need to restore the system to solve the problem. Win10 right-click menu management cannot be opened: 1. First open our control panel, and then click. 2. Then click under Security and Maintenance. 3. Click on the right to restore the system. 4. If it still cannot be used, check whether there is something wrong with the mouse itself. 5. If you are sure there is no problem with the mouse, press + and enter. 6. After the execution is completed, restart the computer.
 Introduction to how to set everyone permissions on win7 computer
Mar 26, 2024 pm 04:11 PM
Introduction to how to set everyone permissions on win7 computer
Mar 26, 2024 pm 04:11 PM
1. Take e-disk as an example. Open [Computer], and click [eDisk], right-click [Properties]. As shown in the figure: 2. In the [Window] page, switch the interface to the [Security] option, and click the [Edit] option below. As shown in the figure: 3. In the [Permissions] option, click the [Add] option. As shown in the figure: 4. The users and groups window pops up and click the [Advanced] option. As shown in the figure: 5. Click to expand the [Find Now] - [Everyone] options in order. When completed, click OK. As shown in the figure: 6. When you see that the user [everyone] has been added to [Group or User] on the [E Disk Permissions] page, select [everyone] and check the box in front of [Full Control]. After the setting is completed, Just press [OK]
 Where to set the permissions of shared folders? Tips for setting the permissions of shared folders in Win10 to be read-only and cannot be modified
Feb 29, 2024 pm 03:43 PM
Where to set the permissions of shared folders? Tips for setting the permissions of shared folders in Win10 to be read-only and cannot be modified
Feb 29, 2024 pm 03:43 PM
How to set shared folder read-only permissions in Win10? After the host shares the folder, some users only want others to access, read and view the files, but do not want others to modify the files on the host. This article is a tutorial on how to set the permissions of a shared folder to be read-only and cannot be modified. 1. First, share the folder according to the normal process. On the host side, right-click the folder that needs to be shared, and select: Properties-Sharing-Advanced Sharing-check Share this folder; 2. Then, click the permission option below. By default Everyone account, if there is not one, add an Everyone account; 3. Only check the read permission below, and then click OK; 4. Find the folder properties-security, and add an Ever
