

Angular2 parent-child component communication method
This time I will bring you the Angular2 parent-child component communication method. What are the precautions when using the Angular2 parent-child component communication method. The following is a practical case, let's take a look.
Angular2 official documentation has a detailed introduction to component interaction-->Documentation--Interaction between components. According to the document, there are 4 ways to interact between components, including:
Transfer data from parent component to child component through input binding (@Input decoration); child component Expose an EventEmitter property (@Output decoration), and use this property to emit events to the parent component when an event occurs.
Parent components and child components interact through local variables. (# var)
The parent component calls @ViewChild.
Parent components and child components communicate through services.
Here I will only summarize and introduce in detail three methods that I have used in the project. After reading this article, you can probably achieve the following results:
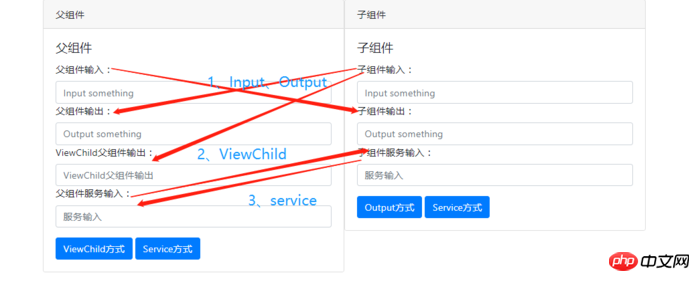
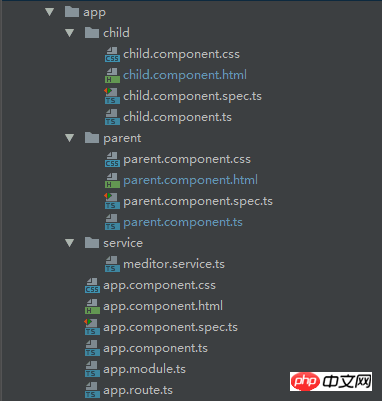
Create a project with the following project structure:
Communication between parent and child components through @Input and @Output decorators
@Input: This property binding is used by the parent component to pass data to the child component. Subcomponents can intercept property changes through the following two methods:
Use an input property setter to intercept value changes in the parent component.
Use ngOnchanges() to intercept changes in input attribute values.
@Output: This Data binding is used by child components to pass data and events to parent components.
<!--parent.component.html-->
<p style="width: 1000px;margin: auto">
<p class="card" style="width: 500px;float: left">
 <p class="card-header">
  父组件
 </p>
 <p class="card-body">
  <h5 class="card-title">父组件</h5>
  <p class="form-group">
   <label for="input">父组件输入:</label>
   <input type="text"
       class="form-control"
       id="input"
       placeholder="Input something"
       [(ngModel)]="parentPrint"
   >
   <label for="output">父组件输出:</label>
   <input type="text"
       class="form-control"
       id="output"
       placeholder="Output something"
       [(ngModel)]="contentFromChild"
   >
  </p>
 </p>
</p>
<app-child
 [fromParent]="parentPrint"
 (fromChild)="fromChild($event)"
></app-child>
</p><!--child.component.html-->
<p class="card" style="width: 500px;">
<p class="card-header">
子组件
</p>
<p class="card-body">
<h5 class="card-title">子组件</h5>
<p class="form-group">
<label for="input">子组件输入:</label>
<input type="text"
class="form-control"
id="input"
placeholder="Input something"
[(ngModel)]="contentFromChild"
>
<label for="output">子组件输出:</label>
<input type="text"
class="form-control"
id="output"
placeholder="Output something"
[(ngModel)]="fromParent"
>
</p>
<button class="btn btn-primary" (click)="clickChild()">Output方式</button>
</p>
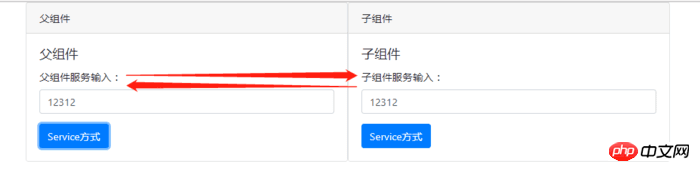
</p>The effect is as follows: (1. Parent component input, sub-component can output synchronously; 2. Sub-component input requires (3.) Click the button to trigger the launch event and transmit the data to the parent component.)
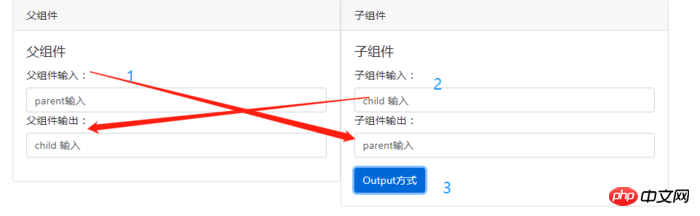
@Input: While the parent component is inputting, the child component can simultaneously obtain data for display. The core code is as follows:
//父组件
parentPrint: any;      //ts中,声明一个变量
[(ngModel)]="parentPrint"  //html中,绑定变量,获取用户输入
//html中,将数据传给子组件
<app-child [fromParent]="parentPrint"></app-child>
//子组件
@Input() fromParent;    //ts中,用于直接接收从父组件获取的数据
[(ngModel)]="fromParent"  //html中,用于显示数据
Use the setter to intercept changes in input attribute values, and declare a private variable in the child component to obtain the data passed by the parent component, thus shielding the upper layer from obtaining the lower layer information. (A simple point is not to let the parent component know what the child component uses to receive the passed data) The same effect can be obtained through this method.
//子组件
 private _fromParent: any;   //私有变量,通过setter获取父组件的数据
@Input()            //通过setter获取父组件的数据
 set fromParent(fromParent: any) {
  this._fromParent = fromParent;
 }
 get fromParent(): any {
  return this._fromParent;
}@Output: When the parent component receives data from the child component, the child component exposes an EventEmitter property. When an event occurs, the child component uses this property to emit (upward ejection) events. The parent component binds to this event property and responds when the event occurs. The core code is as follows:
//子组件
@Output() fromChild = new EventEmitter<any>(); //暴露一个输出属性
<button class="btn btn-primary" (click)="clickChild()">Output方式</button>
 //触发发射函数,将数据发送给父组件
 clickChild() {
  console.log('click child' , this.contentFromChild);
  this.fromChild.emit(this.contentFromChild);
}//父组件
[(ngModel)]="contentFromChild" //绑定输出子组件的数据
//使用子组件,绑定事件属性
<app-child
[fromParent]="parentPrint"
(fromChild)="fromChild($event)"
></app-child>
//事件处理函数
fromChild(event) {
console.log(event);
this.contentFromChild = event;
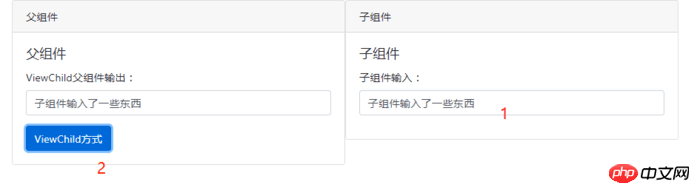
}The parent component obtains the data of the child component by calling @ViewChild()
If the class of the parent component needs to read the properties and properties of the child component When you add a value or call a method of a subcomponent, you can inject the subcomponent into the parent component as ViewChild. ViewChild, as its name implies, means that you can see the properties and methods in the subcomponent.
<!--parent.component.html-->
<p style="width: 1000px;margin: auto">
<p class="card" style="width: 500px;float: left">
 <p class="card-header">
  父组件
 </p>
 <p class="card-body">
  <h5 class="card-title">父组件</h5>
  <p class="form-group">
   <label for="viewoutput">ViewChild父组件输出:</label>
   <input type="text"
       class="form-control"
       id="viewoutput"
       placeholder="ViewChild父组件输出"
       [(ngModel)]="viewOutput"
   >
  </p>
  <button class="btn btn-primary" (click)="clickView()">ViewChild方式</button>
 </p>
</p>
<app-child></app-child>
</p><!--child.component.html-->
<p class="card" style="width: 500px;">
<p class="card-header">
子组件
</p>
<p class="card-body">
<h5 class="card-title">子组件</h5>
<p class="form-group">
<label for="input">子组件输入:</label>
<input type="text"
class="form-control"
id="input"
placeholder="Input something"
[(ngModel)]="contentFromChild"
>
</p>
</p>
</p>The effect is as follows:
Core code of parent component:
//ts
@ViewChild(ChildComponent)         // 使用viewChild导入引用
private childComponent: ChildComponent;   // 将子组件注入到私有属性
//获取子组件数据并显示
clickView() {
  //直接获取子组件的属性
  this.viewOutput = this.childComponent.contentFromChild;
}//html [(ngModel)]="viewOutput" <button class="btn btn-primary" (click)="clickView()">ViewChild方式</button>
Parent component and child component communicate through services
The parent component and its child components share the same service and use this service to achieve two-way communication within the family.
<!--parent.component.html-->
<p style="width: 1000px;margin: auto">
<p class="card" style="width: 500px;float: left">
 <p class="card-header">
  父组件
 </p>
 <p class="card-body">
  <h5 class="card-title">父组件</h5>
  <p class="form-group">
   <label for="serviceoutput">父组件服务输入:</label>
   <input type="text"
       class="form-control"
       id="serviceoutput"
       placeholder="服务输入"
       [(ngModel)]="serviceInput"
   >
  </p>
  <button class="btn btn-primary" (click)="clickService()">Service方式</button>
 </p>
</p>
<app-child></app-child>
</p><!--child.component.html-->
<p class="card" style="width: 500px;">
<p class="card-header">
子组件
</p>
<p class="card-body">
<h5 class="card-title">子组件</h5>
<p class="form-group">
<label for="serviceoutput">子组件服务输入:</label>
<input type="text"
class="form-control"
id="serviceoutput"
placeholder="服务输入"
[(ngModel)]="serviceInput"
>
</p>
<button class="btn btn-primary" (click)="clickService()">Service方式</button>
</p>
</p>//服务
//meditor.service.ts
import {Injectable} from '@angular/core';
import {Subject} from 'rxjs/Subject';
import {Observable} from 'rxjs/Observable';
@Injectable()
export class MeditorService {
private subject = new Subject<MeditorMsg>();
constructor() {}
// 获取订阅者
public getObservable(): Observable<MeditorMsg> {
return this.subject.asObservable();
}
// 推送信息
public push(msg: MeditorMsg) {
this.subject.next(msg);
}
}
// 中间者信息
export interface MeditorMsg {
id: string;
body: any;
}The effect is as follows:
The core code of the parent and child components is similar, inject the service instance into itself in the constructor, Both parent and child components have a unique id. Whether the parent component or the child component calls the push() method to push data, both parties can receive the data. At this time, it is necessary to determine whether the parent component or the child component uses the data based on the ID. The core code is as follows:
subscription: Subscription = null; //初始化一个订阅对象
//子组件构造函数,用于监听数据推送
constructor(
  private meditor: MeditorService
 ) {
  this.subscription = meditor.getObservable().subscribe(
   msg => {
    console.log(msg);
    if (msg.id === 'parent') {   //id为parent,获取父组件数据
     this.serviceInput = msg.body;
    }
   }
  );
 }
// 子组件将数据推送到中间着,给订阅者
clickService() {
  this.meditor.push({id: 'parent', body: this.serviceInput});
 }
//父组件构造函数,用于监听数据推送
constructor(
  private meditor: MeditorService
 ) {
  this.subscription = meditor.getObservable().subscribe(
   msg => {
    console.log(msg);
    if (msg.id === 'child') {    //id为child,获取子组件数据
     this.serviceInput = msg.body;
    }
   }
  );
 }
// 父组件将数据推送到中间着,给订阅者
clickService() {
  this.meditor.push({id: 'parent', body: this.serviceInput});
}我上面写的还不是很完善,就是在生命周期结束前,也就是在onDestroy周期中,要取消订阅。
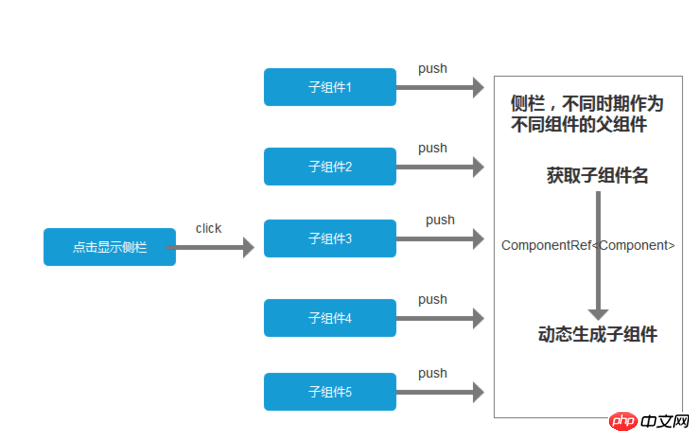
以上,就是最近在使用的组件交互的总结。个人觉得通过服务来交互的可扩展性更强。例如,我们项目中用到了一个动态显示的侧栏,不同时期点击显示侧栏要显示不同的东西。这个时候把侧栏作为父组件,子组件作为消息的一部分传递给父组件,父组件根据子组件名动态生成模板,显示在侧栏上面。说了这么多废话大概就是下图的意思:
最后附上demo源码:父子组件交互demo
以上就是本文的全部内容,希望对大家的学习有所帮助,也希望大家多多支持脚本之家。
相信看了本文案例你已经掌握了方法,更多精彩请关注php中文网其它相关文章!
推荐阅读:
The above is the detailed content of Angular2 parent-child component communication method. For more information, please follow other related articles on the PHP Chinese website!

Hot AI Tools

Undresser.AI Undress
AI-powered app for creating realistic nude photos

AI Clothes Remover
Online AI tool for removing clothes from photos.

Undress AI Tool
Undress images for free

Clothoff.io
AI clothes remover

Video Face Swap
Swap faces in any video effortlessly with our completely free AI face swap tool!

Hot Article
Hot Tools

Notepad++7.3.1
Easy-to-use and free code editor

SublimeText3 Chinese version
Chinese version, very easy to use

Zend Studio 13.0.1
Powerful PHP integrated development environment

Dreamweaver CS6
Visual web development tools

SublimeText3 Mac version
God-level code editing software (SublimeText3)
Hot Topics


 New generation of optical fiber broadband technology - 50G PON
Apr 20, 2024 pm 09:22 PM
New generation of optical fiber broadband technology - 50G PON
Apr 20, 2024 pm 09:22 PM
In the previous article (link), Xiao Zaojun introduced the development history of broadband technology from ISDN, xDSL to 10GPON. Today, let’s talk about the upcoming new generation of optical fiber broadband technology-50GPON. █F5G and F5G-A Before introducing 50GPON, let’s talk about F5G and F5G-A. In February 2020, ETSI (European Telecommunications Standards Institute) promoted a fixed communication network technology system based on 10GPON+FTTR, Wi-Fi6, 200G optical transmission/aggregation, OXC and other technologies, and named it F5G. That is, the fifth generation fixed network communication technology (The5thgenerationFixednetworks). F5G is a fixed network
 Analysis of communication between Vue and server: How to deal with network disconnection
Aug 10, 2023 am 10:55 AM
Analysis of communication between Vue and server: How to deal with network disconnection
Aug 10, 2023 am 10:55 AM
Analysis of Vue and server-side communication: Strategies for dealing with network outages Introduction: In modern web development, Vue.js has become a widely used front-end framework. However, due to the instability of the network environment, handling disconnections is an important issue that we need to consider. This article will analyze how to handle network disconnection in Vue and give corresponding code examples. 1. Analysis of disconnection situations When the network conditions are good, Vue can communicate with the server through Ajax requests or WebSocket. but,
 How to achieve point-to-point communication through PHP and P2P protocol
Jul 28, 2023 pm 10:13 PM
How to achieve point-to-point communication through PHP and P2P protocol
Jul 28, 2023 pm 10:13 PM
How to realize point-to-point communication through PHP and P2P protocol. With the development of the Internet, peer-to-peer (P2P) communication has gradually become an important communication method. Compared with the traditional client-server communication method, P2P communication has better stability and scalability. In this article, we will introduce how to use PHP with the P2P protocol to achieve peer-to-peer communication and provide corresponding code examples. First, we need to understand the basic principles of P2P communication. The P2P protocol allows multiple computers to directly
 The development history of wireless mice
Jun 12, 2024 pm 08:52 PM
The development history of wireless mice
Jun 12, 2024 pm 08:52 PM
Original title: "How does a wireless mouse become wireless?" 》Wireless mice have gradually become a standard feature of today’s office computers. From now on, we no longer have to drag long cords around. But, how does a wireless mouse work? Today we will learn about the development history of the No.1 wireless mouse. Did you know that the wireless mouse is now 40 years old? In 1984, Logitech developed the world's first wireless mouse, but this wireless mouse used infrared as a The signal carrier is said to look like the picture below, but later failed due to performance reasons. It was not until ten years later in 1994 that Logitech finally successfully developed a wireless mouse that works at 27MHz. This 27MHz frequency also became the wireless mouse for a long time.
 A brief history of broadband Internet technology
Apr 16, 2024 am 09:00 AM
A brief history of broadband Internet technology
Apr 16, 2024 am 09:00 AM
In today's digital age, broadband has become a necessity for each of us and every family. Without it, we would be restless and restless. So, do you know the technical principles behind broadband? From the earliest 56k "cat" dial-up to the current Gigabit cities and Gigabit homes, what kind of changes has our broadband technology experienced? In today’s article, let’s take a closer look at the “Broadband Story”. Have you seen this interface between █xDSL and ISDN? I believe that many friends born in the 70s and 80s must have seen it and are very familiar with it. That's right, this was the interface for "dial-up" when we first came into contact with the Internet. That was more than 20 years ago, when Xiao Zaojun was still in college. In order to surf the Internet, I
 Methods and techniques for implementing Socket communication in PHP
Mar 07, 2024 pm 02:06 PM
Methods and techniques for implementing Socket communication in PHP
Mar 07, 2024 pm 02:06 PM
PHP is a commonly used development language that can be used to develop various web applications. In addition to common HTTP requests and responses, PHP also supports network communication through Sockets to achieve more flexible and efficient data interaction. This article will introduce the methods and techniques of how to implement Socket communication in PHP, and attach specific code examples. What is Socket Communication Socket is a method of communication in a network that can transfer data between different computers. by S
 Nokia plans to sell its device management and service management platform businesses for €185 million
Dec 21, 2023 am 08:07 AM
Nokia plans to sell its device management and service management platform businesses for €185 million
Dec 21, 2023 am 08:07 AM
Nokia today announced the sale of its device management and service management platform business to Lumine Group for €185 million, which is expected to close in the first quarter of next year. According to our findings, Lumine is a communications and media software company that was recently spun off from Constellation Software. come out. As part of the deal, approximately 500 Nokia employees are expected to join Lumine. According to public information, the business of these platforms was mainly formed by Nokia through its two previous acquisitions of Motive and mFormation. Lumine said it intends to revive the Motive brand as an independent business unit. Lumine said the acquisition price includes a sum of up to
 The main peak of Changbai Mountain can access the Internet normally: Jilin Mobile and ZTE completed 2.6G + 700M three-carrier aggregation for commercial use, with a peak rate of more than 2.53Gbps
Jul 25, 2024 pm 01:20 PM
The main peak of Changbai Mountain can access the Internet normally: Jilin Mobile and ZTE completed 2.6G + 700M three-carrier aggregation for commercial use, with a peak rate of more than 2.53Gbps
Jul 25, 2024 pm 01:20 PM
According to news on July 25, Jilin Mobile and ZTE have completed commercial use of three-carrier aggregation based on the 2.6G frequency band (100+60M) and the 700M frequency band (30M) on the main peak of Changbai Mountain. The peak rate in field testing can reach more than 2.53Gbps. Officials pointed out that Changbai Mountain is one of the top ten famous mountains in China. It is now a national AAAAA tourist attraction, a world geological park, a world biosphere reserve, and the world's best nature reserve. The number of tourists received in 2023 will reach 2.7477 million, and 3CC will be deployed this time. It will greatly meet users’ network needs. According to reports, Jilin Mobile has taken the lead in completing the carrier aggregation pilot of a three-carrier network in the 2.6G (100+60M) plus 4.9G (100M) frequency band in early 2024, with peak downloads
