

Detailed explanation of Datagrid in EasyUi control

Recently I have a web project that requires the use of third-party controls (EasyUi). After all, the effect produced by using third-party controls is slightly more beautiful than the original one. There is a requirement in this project, which needs to be in the data list. Direct editing of data saves is called inline editing in jargon. This article mainly introduces the relevant information of Datagrid in EasyUi control in detail. Friends who need it can refer to it. I hope it can help everyone.

Before talking about in-line editing, we need to first understand how to use EasyUi to create a DataGrid. Of course, there are many ways (1.easyui.js, or direct html code plus easyui Style), I use the JS method:
1. Use Js to create the DataGrid
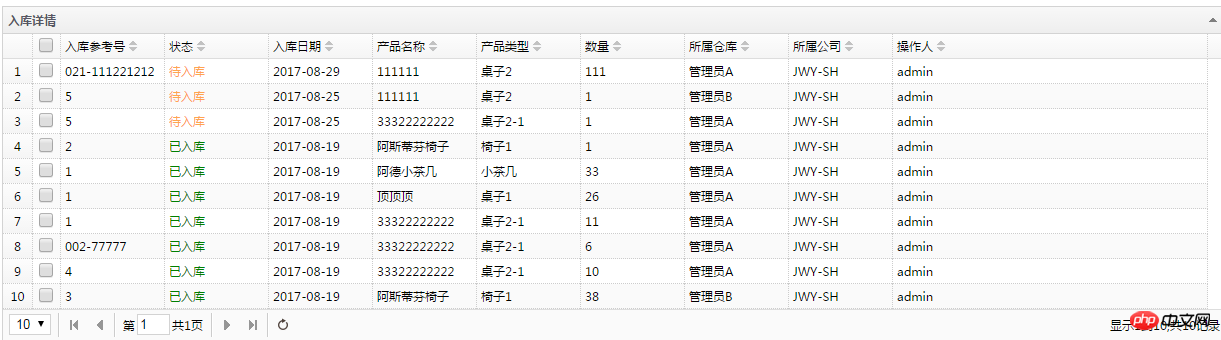
The above is the rendering,
The Html code is as follows: Define a table on the page
##
<!--数据展示 -->
 <p>
   <table id="DataGridInbound"></table>
 </p>
$("#DataGridInbound").datagrid({
title: '入库详情',
idField: 'Id',
rownumbers: 'true',
url: '/Inbound/GetPageInboundGoodsDetail',
pagination: true,//表示在datagrid设置分页
rownumbers: true,
singleSelect: true,
striped: true,
nowrap: true,
collapsible: true,
fitColumns: true,
remoteSort: false,
loadMsg: "正在努力加载数据,请稍后...",
queryParams: { ProductName: "", Status: "",SqNo:"" },
onLoadSuccess: function (data) {
if (data.total == 0) {
var body = $(this).data().datagrid.dc.body2;
body.find('table tbody').append('<tr><td width="' + body.width() + '" style="height: 35px; text-align: center;"><h1>暂无数据</h1></td></tr>');
$(this).closest('p.datagrid-wrap').find('p.datagrid-pager').hide();
}
//如果通过调用reload方法重新加载数据有数据时显示出分页导航容器
else $(this).closest('p.datagrid-wrap').find('p.datagrid-pager').show();
},
columns: [[
{ field: 'ck', checkbox: true },
{ field: 'Id', hidden: 'true' },
{ field: 'InBoundId', hidden: 'true' },
{ field: 'ProductId', hidden: 'true' },
{ field: 'ProductTypeId', hidden: 'true' },
{ field: 'SqNo', title: '入库参考号', width: '100', align: 'left', sortable: true },
{
field: 'Status', title: '状态', width: '100', align: 'left', sortable: true,
formatter: function (value, index, row) {
if (value == "1") {
return '<span style="color:green;">已入库</span>';
}
else if (value == "-1") {
return '<span style="color:#FFA54F;">待入库</span>';
}
}
},
{
field: 'InboundDate', title: '入库日期', width: '100', align: 'left', sortable: true,
formatter: function (date) {
var pa = /.*\((.*)\)/;
var unixtime = date.match(pa)[1].substring(0, 10); //通过正则表达式来获取到时间戳的字符串
return getTime(unixtime);
}
},
{ field: 'ProductName', title: '产品名称', width: '100', align: 'left', sortable: true },
{ field: 'ProductType', title: '产品类型', width: '100', align: 'left', sortable: true },
{ field: 'Num', title: '数量', width: '100', align: 'left', sortable: true },
{ field: 'Storage', title: '所属仓库', width: '100', align: 'left', sortable: true },
{ field: 'CompanyCode', title: '所属公司', width: '100', align: 'left', sortable: true },
{ field: 'CreateBy', title: '操作人', width: '100', align: 'left', sortable: true },
]],
});2. Today’s focus, DataGrid inline editing

var InboundStatus = [{ "value": "1", "text": "入库" }, { "value": "-1", "text": "待入库" }];function unitformatter(value, rowData, rowIndex) {
if (value == 0) {
return;
}
for (var i = 0; i < InboundStatus.length; i++) {
if (InboundStatus[i].value == value) {
return InboundStatus[i].text;
}
}
}{
field: 'Status', title: '入库状态', formatter: unitformatter, editor: {
type: 'combobox', options: { data: InboundStatus, valueField: "value", textField: "text" }
}
},
//这部分代码请结合下面的创建Grid的Js代码查看。
$("#dataGrid").datagrid({
title: "产品列表",
idField: 'ProductID',
treeField: 'ProductName',
onClickCell: onClickCell,
striped: true,
nowrap: true,
collapsible: true,
fitColumns: true,
remoteSort: false,
sortOrder: "desc",
pagination: true,//表示在datagrid设置分页
rownumbers: true,
singleSelect: false,
loadMsg: "正在努力加载数据,请稍后...",
url: "/Inbound/GetProductPage",
onLoadSuccess: function (data) {
if (data.total == 0) {
var body = $(this).data().datagrid.dc.body2;
body.find('table tbody').append('<tr><td width="' + body.width() + '" style="height: 35px; text-align: center;"><h1>暂无数据</h1></td></tr>');
$(this).closest('p.datagrid-wrap').find('p.datagrid-pager').hide();
}
//如果通过调用reload方法重新加载数据有数据时显示出分页导航容器
else $(this).closest('p.datagrid-wrap').find('p.datagrid-pager').show();
},
columns: [[
{ field: 'ck', checkbox: true },
{ field: 'ProductID', title: '产品ID', hidden: true },
{ field: 'CategoryID', title: '分类ID', hidden: true },
{ field: 'ProductName', title: '产品名称', width: '100', align: 'left', sortable: true },
{ field: 'CompanyCode', title: '所属公司', width: '100', align: 'center', sortable: true },
{ field: 'CategoryName', title: '所属分类', width: '100', align: 'center', sortable: true },
{ field: 'Num', title: '数量', editor: 'numberbox' },
{
field: 'Status', title: '入库状态', formatter: unitformatter, editor: {
type: 'combobox', options: { data: InboundStatus, valueField: "value", textField: "text" }
}
},
{
field: 'InDate', title: '入库日期', width: '100', editor: {
type: 'datebox'
}
},
{
field: 'Storage', width: '100', title: '所入仓库',
formatter: function (value, row) {
return row.Storage || value;
},
editor: {
type: 'combogrid', options: {
//url: '/Storage/GetAllStorage',
//url:'/Product/GetAllCustomerAddress',
rownumbers: true,
data: $.extend(true, [], sdata),
idField: 'AddressID',
textField: 'Name',
columns: [[
{ field: 'AddressID', hidden: true },
{ field: 'Name', title: '库名' },
{ field: 'Country', title: '国家' },
{ field: 'Province', title: '省份' },
{ field: 'City', title: '市' },
{ field: 'Area', title: '区' },
{ field: 'Address', title: '详细地址' },
]],
loadFilter: function (sdata) {
if ($.isArray(sdata)) {
sdata = {
total: sdata.length,
rows: sdata
}
}
return sdata;
},
}
}
}
]],
onBeginEdit: function (index, row) {
var ed = $(this).datagrid('getEditor', { index: index, field: 'Storage' });
$(ed.target).combogrid('setValue', { AddressID: row.AddressID, Name: row.Name });
},
onEndEdit: function (index, row) {
var ed = $(this).datagrid('getEditor', { index: index, field: 'Storage' });
row.Storage = $(ed.target).combogrid('getText');
},
onClickRow: function (index, row) {//getEditor
var ed = $(this).datagrid('getEditor', { index: index, field: 'Storage' });
if (ed != undefined) {
var s = row.Storage;
for (var i = 0; i < sdata.length; i++) {
if (s == sdata[i].Name) {
$(ed.target).combogrid('setValue', sdata[i].AddressID);
}
}
}
}
});Third, the highlight is also the problem I encountered.
Description: I added a drop-down datagrid control to the datagrid. When I select it for the first time, if I click on the datagrid row, the value of the selected drop-down datagrid control will be erased. , this problem really bothered me for a long time, but later I solved it, and the feeling was extremely refreshing!
onClickRow: function (index, row) {//getEditor
      var ed = $(this).datagrid('getEditor', { index: index, field: 'Storage' });
            $(ed.target).combogrid('setValue', row.Name);
        }
      }
}var ed = $(this).datagrid('getEditor', { index: index, field: 'Storage' }) ;", and then found that ed was null, Js threw an exception, but the interface could not see it, and it just erased the selected data. After finding the problem, I was still not sure. After modifying the code, I ran it again and it displayed normally without erasing the value I selected.
onClickRow: function (index, row) {//getEditor
var ed = $(this).datagrid('getEditor', { index: index, field: 'Storage' });
if (ed != undefined) {
var s = row.Storage;
for (var i = 0; i < sdata.length; i++) {
if (s == sdata[i].Name) {
$(ed.target).combogrid('setValue', sdata[i].AddressID);
}
}
}
}function synchroAjaxByUrl(url) {
var temp;
$.ajax({
url: url,
async: false,
type: 'get',
dataType: "json",
success: function (data) {
temp = data;
}
});
return temp;
}
var sdata = synchroAjaxByUrl('/Product/GetAllCustomerAddress');Detailed explanation of EasyUI's DataGrid binding Json data source method
Solution to sending two requests after easyui's datagrid component page is loaded
EasyUI's dataGrid inline editing
The above is the detailed content of Detailed explanation of Datagrid in EasyUi control. For more information, please follow other related articles on the PHP Chinese website!

Hot AI Tools

Undresser.AI Undress
AI-powered app for creating realistic nude photos

AI Clothes Remover
Online AI tool for removing clothes from photos.

Undress AI Tool
Undress images for free

Clothoff.io
AI clothes remover

Video Face Swap
Swap faces in any video effortlessly with our completely free AI face swap tool!

Hot Article
Hot Tools

Notepad++7.3.1
Easy-to-use and free code editor

SublimeText3 Chinese version
Chinese version, very easy to use

Zend Studio 13.0.1
Powerful PHP integrated development environment

Dreamweaver CS6
Visual web development tools

SublimeText3 Mac version
God-level code editing software (SublimeText3)
Hot Topics


 Detailed explanation of obtaining administrator rights in Win11
Mar 08, 2024 pm 03:06 PM
Detailed explanation of obtaining administrator rights in Win11
Mar 08, 2024 pm 03:06 PM
Windows operating system is one of the most popular operating systems in the world, and its new version Win11 has attracted much attention. In the Win11 system, obtaining administrator rights is an important operation. Administrator rights allow users to perform more operations and settings on the system. This article will introduce in detail how to obtain administrator permissions in Win11 system and how to effectively manage permissions. In the Win11 system, administrator rights are divided into two types: local administrator and domain administrator. A local administrator has full administrative rights to the local computer
 Detailed explanation of the mode function in C++
Nov 18, 2023 pm 03:08 PM
Detailed explanation of the mode function in C++
Nov 18, 2023 pm 03:08 PM
Detailed explanation of the mode function in C++ In statistics, the mode refers to the value that appears most frequently in a set of data. In C++ language, we can find the mode in any set of data by writing a mode function. The mode function can be implemented in many different ways, two of the commonly used methods will be introduced in detail below. The first method is to use a hash table to count the number of occurrences of each number. First, we need to define a hash table with each number as the key and the number of occurrences as the value. Then, for a given data set, we run
 Detailed explanation of division operation in Oracle SQL
Mar 10, 2024 am 09:51 AM
Detailed explanation of division operation in Oracle SQL
Mar 10, 2024 am 09:51 AM
Detailed explanation of division operation in OracleSQL In OracleSQL, division operation is a common and important mathematical operation, used to calculate the result of dividing two numbers. Division is often used in database queries, so understanding the division operation and its usage in OracleSQL is one of the essential skills for database developers. This article will discuss the relevant knowledge of division operations in OracleSQL in detail and provide specific code examples for readers' reference. 1. Division operation in OracleSQL
 Detailed explanation of remainder function in C++
Nov 18, 2023 pm 02:41 PM
Detailed explanation of remainder function in C++
Nov 18, 2023 pm 02:41 PM
Detailed explanation of the remainder function in C++ In C++, the remainder operator (%) is used to calculate the remainder of the division of two numbers. It is a binary operator whose operands can be any integer type (including char, short, int, long, etc.) or a floating-point number type (such as float, double). The remainder operator returns a result with the same sign as the dividend. For example, for the remainder operation of integers, we can use the following code to implement: inta=10;intb=3;
 Detailed explanation of the usage of Vue.nextTick function and its application in asynchronous updates
Jul 26, 2023 am 08:57 AM
Detailed explanation of the usage of Vue.nextTick function and its application in asynchronous updates
Jul 26, 2023 am 08:57 AM
Detailed explanation of the usage of Vue.nextTick function and its application in asynchronous updates. In Vue development, we often encounter situations where data needs to be updated asynchronously. For example, data needs to be updated immediately after modifying the DOM or related operations need to be performed immediately after the data is updated. The .nextTick function provided by Vue emerged to solve this type of problem. This article will introduce the usage of the Vue.nextTick function in detail, and combine it with code examples to illustrate its application in asynchronous updates. 1. Vue.nex
 Detailed explanation of the role and usage of PHP modulo operator
Mar 19, 2024 pm 04:33 PM
Detailed explanation of the role and usage of PHP modulo operator
Mar 19, 2024 pm 04:33 PM
The modulo operator (%) in PHP is used to obtain the remainder of the division of two numbers. In this article, we will discuss the role and usage of the modulo operator in detail, and provide specific code examples to help readers better understand. 1. The role of the modulo operator In mathematics, when we divide an integer by another integer, we get a quotient and a remainder. For example, when we divide 10 by 3, the quotient is 3 and the remainder is 1. The modulo operator is used to obtain this remainder. 2. Usage of the modulo operator In PHP, use the % symbol to represent the modulus
 Detailed explanation of the linux system call system() function
Feb 22, 2024 pm 08:21 PM
Detailed explanation of the linux system call system() function
Feb 22, 2024 pm 08:21 PM
Detailed explanation of Linux system call system() function System call is a very important part of the Linux operating system. It provides a way to interact with the system kernel. Among them, the system() function is one of the commonly used system call functions. This article will introduce the use of the system() function in detail and provide corresponding code examples. Basic Concepts of System Calls System calls are a way for user programs to interact with the operating system kernel. User programs request the operating system by calling system call functions
 Detailed explanation of Linux curl command
Feb 21, 2024 pm 10:33 PM
Detailed explanation of Linux curl command
Feb 21, 2024 pm 10:33 PM
Detailed explanation of Linux's curl command Summary: curl is a powerful command line tool used for data communication with the server. This article will introduce the basic usage of the curl command and provide actual code examples to help readers better understand and apply the command. 1. What is curl? curl is a command line tool used to send and receive various network requests. It supports multiple protocols, such as HTTP, FTP, TELNET, etc., and provides rich functions, such as file upload, file download, data transmission, proxy
