

Introduction to html screenshots based on canvas

This article mainly introduces a small screenshot demo implemented in HTML based on canvas, which has certain reference value. If you are interested, you can learn more
Write it first
I remember seeing a share on Renren before, explaining the screenshot solution based on js. I don’t remember the details. I just remember that it was quite interesting and seemed to use canvas? So this time I plan to write one myself to share with everyone the author’s ideas. This is just a very simple small demo. If there are any bugs, please submit issues. As usual, po code address.
Rendering
Overall idea
Set start/end shortcut keys
After starting, draw the DOM into canvas to cover the original DOM interface
Add a canvas simulation mouse screenshot area
Add A canvas is used to draw the browser interface corresponding to the mouse screenshot area (captured from the first canvas)
Save the captured image
1. Set the start/end shortcut keys
Due to the conflicts that shortcut keys may cause, we hope that the start shortcut key can not limit the number of shortcut keys, so an array is used in the first parameter transmitted in the form.
function screenShot(quickStartKey, EndKey) {
  //兼容性考虑不使用...扩展字符串
  var keyLength = quickStartKey.length
  var isKeyTrigger = {}
  var cantStartShot = false
  ...
  quickStartKey.forEach(function(item) { //遍历参数数组
    isKeyTrigger[item] = false //默认数组中所有键都没有触发
  })
  $('html').on('keyup', function(e) {
    var keyCode = e.which
    if(keyCode === EndKey) {
      ...
    } else if(!cantStartShot) {
      isKeyTrigger[keyCode] = true
      var notTrigger = Object.keys(isKeyTrigger).filter(function(item) {
        return isKeyTrigger[item] === false //查看有没有需要触发的快捷键
      })
      if(notTrigger.length === 0) { //没有需要触发的快捷键即可以开始截图
        cantStartShot = true
        beginShot(cantStartShot)
      }
    }
})2. Draw the DOM into canvas to cover the original DOM interface
If you use the native method, you can refer to the introduction of drawing DOM in canvas under MDN. The trickiest part is that you need to create an SVG image containing XML involving the element
function beginShot(cantStartShot) {
    if(cantStartShot) {
        html2canvas(document.body, {
            onrendered: function(canvas) {
                //得到与界面一致的canvas图像
            }
        })
    }
}3. Add a canvas simulation mouse screenshot area
The implementation of this place was originally intended to use the native canvasAPI, but there is a problem involved. That is, after the mouse is pressed and started dragging, the canvas needs to be drawn in real time, which leads to a concept similar to PS layers. Every time mousemove is used, a current screenshot frame is drawn, but when mousemove is triggered next time Just delete the previous screenshot box. This is used to simulate the real-time drawing process. Unfortunately, the author has not found a way to use the canvas native API. If there is, please tell me how to mark the drawn pictures. Here the author uses a Jq-based canvas library called Jcanvas, which gives the concept of layers, that is, only one picture can be drawn on a layer, and the layer can be marked with a name. This meets the author's needs and is implemented as follows:
$('#' + canvasId).mousedown(function(e) {
    $("#"+canvasId).removeLayer(layerName) //删除上一图层
    layerName += 1
    startX = that._calculateXY(e).x //计算鼠标位置
    startY = that._calculateXY(e).y
    isShot = true
    $("#"+canvasId).addLayer({
        type: 'rectangle', //矩形
        ...
        name:layerName, //图层名称
        x: startX,
        y: startY,
        width: 1,
        height: 1
    })
}).mousemove(function(e) {
    if(isShot) {
        $("#"+canvasId).removeLayer(layerName)
        var moveX = that._calculateXY(e).x
        var moveY = that._calculateXY(e).y
        var width = moveX - startX
        var height = moveY - startY
        $("#"+canvasId).addLayer({
            type: 'rectangle',
            ...
            name:layerName,
            fromCenter: false,
            x: startX,
            y: startY,
            width: width,
            height: height
        })
        $("#"+canvasId).drawLayers(); //绘制
    }
})4. Add a canvas to draw the browser interface corresponding to the mouse screenshot area
var canvasResult = document.getElementById('canvasResult')
              var ctx = canvasResult.getContext("2d");
              ctx.drawImage(copyDomCanvas, moveX - startX > 0 ? startX : moveX, moveY - startY > 0 ? startY : moveY, width, height, 0, 0, width, height )
var dataURL = canvasResult.toDataURL("image/png");pass drawImage intercepts the image, and then uses the toDataURL method to convert the image to base64 encoding
5. Save the intercepted image
function downloadFile(el, fileName, href){
      el.attr({
        'download':fileName,
        'href': href
      })
  }
  ...
downloadFile($('.ok'), 'screenShot' + Math.random().toString().split('.')[1] || Math.random()  + '.png', dataURL)
// 传入按键对象、图像保存随机名、base64编码的图像The download attribute of the a tag is used. When Users can download directly after clicking.
Deployment
##Dependencies
<script src="https://cdn.bootcss.com/jquery/3.2.1/jquery.min.js"></script>
<script src="https://cdn.bootcss.com/jcanvas/16.7.3/jcanvas.min.js"></script>
<script src="https://cdn.bootcss.com/html2canvas/0.5.0-beta4/html2canvas.min.js"></script>
Configuration shortcut keys
screenShot([16, 65], 27) // 开始快捷键设置为shift+a;退出键为ESC
Finally
The most disgusting parts of the article (DOM writing to canvas, canvas setting layer) are implemented using two libraries respectively. The author will also pay attention to how to use the native API in the future. To implement these operations, although I personally think it's a bit difficult to write it yourself. . The above is the entire content of this article. I hope it will be helpful to everyone's study. For more related content, please pay attention to the PHP Chinese website! Related recommendations:canvas simulates the code for electronic lottery scratch-offs
Method of using HTML5 Canvas to draw shadow effects
The above is the detailed content of Introduction to html screenshots based on canvas. For more information, please follow other related articles on the PHP Chinese website!

Hot AI Tools

Undresser.AI Undress
AI-powered app for creating realistic nude photos

AI Clothes Remover
Online AI tool for removing clothes from photos.

Undress AI Tool
Undress images for free

Clothoff.io
AI clothes remover

Video Face Swap
Swap faces in any video effortlessly with our completely free AI face swap tool!

Hot Article
Hot Tools

Notepad++7.3.1
Easy-to-use and free code editor

SublimeText3 Chinese version
Chinese version, very easy to use

Zend Studio 13.0.1
Powerful PHP integrated development environment

Dreamweaver CS6
Visual web development tools

SublimeText3 Mac version
God-level code editing software (SublimeText3)
Hot Topics


 Fix: Snipping Tool notification missing in Windows 11, 10
May 16, 2023 pm 06:34 PM
Fix: Snipping Tool notification missing in Windows 11, 10
May 16, 2023 pm 06:34 PM
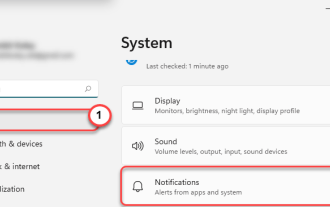
Snip&Sketch is an excellent Windows screenshot tool. Microsoft has added tons of new cool features and shortcuts to make this tool almost indispensable for users. However, you may have noticed an issue after taking the screenshot, the preview notification does not appear in the notification panel! There are many reasons that could be the source of the problem. So, no need to waste more time, just follow these solutions to find a quick solution. Fix 1 – Check notification settings You may have blocked Snip & Sketch notification settings. 1. You have to open settings. So, press Windows key + I key at the same time. 2. Now, go to “System” from the left pane. 3. On the right side, click All Options
 How to Take Screenshots on Lenovo ThinkPad X13 Notebook: Shortcut Key Guide
Jan 01, 2024 pm 09:11 PM
How to Take Screenshots on Lenovo ThinkPad X13 Notebook: Shortcut Key Guide
Jan 01, 2024 pm 09:11 PM
Screenshotting is a very common feature on computers, as it makes it easy to capture and share what's on your screen. There are many ways to take screenshots on a computer. Now, let’s introduce the commonly used screenshot methods on Lenovo ThinkPad X13 notebook. Lenovo ThinkPad X13 screenshot method introduction Regarding the screenshot method on the computer, there are many options available. Here, we will focus on the methods of taking screenshots with ThinkPad X13’s shortcut keys and taking screenshots with mainstream software. ThinkPadX13 provides a simple shortcut key screenshot function. You only need to press the Fn key and the PrtSc key to save a screenshot of the current screen contents to the clipboard. After that you can open any picture editing software like Paint
 How to take screenshots on Redmi 13c?
Mar 04, 2024 pm 09:13 PM
How to take screenshots on Redmi 13c?
Mar 04, 2024 pm 09:13 PM
Recently, many consumers are considering replacing their mobile phones, and Redmi13C is a very cost-effective choice. The performance configuration of this phone is excellent. In order to facilitate daily use, let me briefly introduce how to take screenshots on Redmi 13C. Let’s find out together! How to take a screenshot on Redmi 13c 1. Shortcut key to take a screenshot: Press the power button and volume down key of the Redmi phone at the same time to take a screenshot. 2. Gesture screenshot: Enter the settings of the Redmi phone, find "More settings", find and click "Gesture and key shortcuts", then enable the "three-finger pull-down" operation and set it to take a screenshot. In this way, when you need to take a screenshot, you only need to slide down on the screen with three fingers to take a screenshot. 3. Take a screenshot of the notification bar: from the phone screen
 iPhone screenshots not working: How to fix it
May 03, 2024 pm 09:16 PM
iPhone screenshots not working: How to fix it
May 03, 2024 pm 09:16 PM
Screenshot feature not working on your iPhone? Taking a screenshot is very easy as you just need to hold down the Volume Up button and the Power button at the same time to grab your phone screen. However, there are other ways to capture frames on the device. Fix 1 – Using Assistive Touch Take a screenshot using the Assistive Touch feature. Step 1 – Go to your phone settings. Step 2 – Next, tap to open Accessibility settings. Step 3 – Open Touch settings. Step 4 – Next, open the Assistive Touch settings. Step 5 – Turn on Assistive Touch on your phone. Step 6 – Open “Customize Top Menu” to access it. Step 7 – Now you just need to link any of these functions to your screen capture. So click on the first
 What to do if a black screen appears when taking a screenshot on a win10 computer_How to deal with a black screen when taking a screenshot on a win10 computer
Mar 27, 2024 pm 01:01 PM
What to do if a black screen appears when taking a screenshot on a win10 computer_How to deal with a black screen when taking a screenshot on a win10 computer
Mar 27, 2024 pm 01:01 PM
1. Press the win key + r key, enter regedit, and click OK. 2. In the opened registry editor window, expand: HKEY_LOCAL_MACHINESYSTEMCurrentControlSetControlGraphicsDriversDCI, select Timeout on the right and double-click. 3. Then change 7 in [Numeric Data] to 0, and confirm to exit.
 How to send Mac screenshot to WeChat
Feb 06, 2024 am 09:55 AM
How to send Mac screenshot to WeChat
Feb 06, 2024 am 09:55 AM
How to send a Mac screenshot to WeChat? First, find launchpad on the desktop, open it, find WeChat, then click WeChat to log in, and finally enter the shortcut key setting window in the pop-up preferences. How to send Mac screenshots to WeChat 1. Find launchpad on the desktop. 2. Then find WeChat. 3. Click to log in to WeChat. 4. After logging in, find the WeChat option in the upper left corner of the computer page and open it. 5. Then go to the preference settings option in the pop-up menu to enter the shortcut settings window. Finally, find the screenshot function in the shortcut key settings page and set the keys.
 How to use shortcut keys to take screenshots in Win8?
Mar 28, 2024 am 08:33 AM
How to use shortcut keys to take screenshots in Win8?
Mar 28, 2024 am 08:33 AM
How to use shortcut keys to take screenshots in Win8? In our daily use of computers, we often need to take screenshots of the content on the screen. For users of Windows 8 system, taking screenshots through shortcut keys is a convenient and efficient operation method. In this article, we will introduce several commonly used shortcut keys to take screenshots in Windows 8 system to help you take screenshots more quickly. The first method is to use the "Win key + PrintScreen key" key combination to perform full
 One-click screenshot tutorial: How to take screenshots of Honor Magic5Pro
Dec 28, 2023 pm 10:09 PM
One-click screenshot tutorial: How to take screenshots of Honor Magic5Pro
Dec 28, 2023 pm 10:09 PM
Honor Magic5Pro is equipped with MagicOS7.1 operating system, which operates very smoothly. So, how to take a screenshot on Magic5Pro? This article will provide you with a detailed one-click screenshot tutorial. Honor Magic5Pro screenshot tutorial. Honor Magic5Pro supports standard screenshots, partial screenshots and long screenshots. Here's how to take a screenshot: Swipe down on the top edge of your phone's screen to open the Control Center. Find the screenshot icon in the control center and click it to quickly take a screenshot. In addition, you can also press [Volume -] and [Power button] at the same time to take a screenshot. If you need to take a partial or long screenshot, you need to click the inverted triangle in the lower right corner of the screenshot icon. Once clicked, it will display [Bureau
