

HTML5 and JS implement local image cropping and uploading functions

This article mainly introduces the relevant information of HTML5 local image cropping and uploading in detail. It has certain reference value. Interested friends can refer to it.
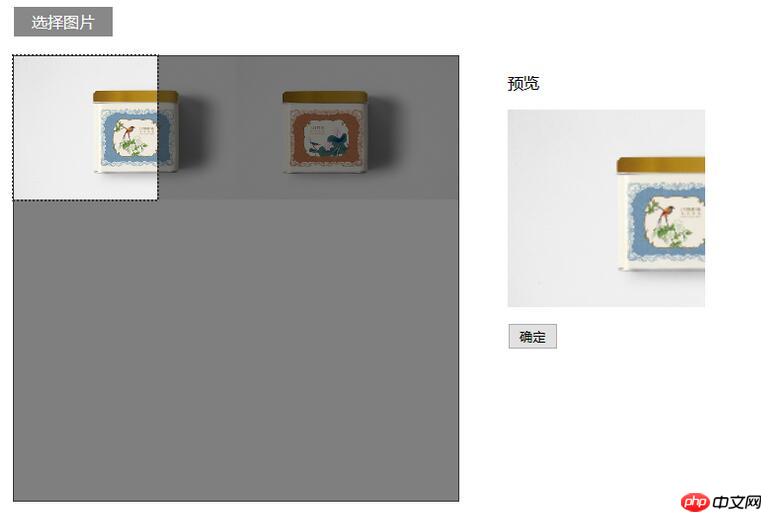
I have recently done a project, this One function that needs to be implemented in the project is: user-defined avatar (the user selects a picture locally and crops the picture locally to a size that meets the system requirements). The requirements for this function are: the avatar is initially cut into a square. If the selected image is smaller than the required avatar size, the entire image will be used as the avatar. If it is larger than the specified size, then the user can select the area to be cropped. When the user clicks the OK button, the cropped image data is sent to the server, and the image data is saved as a file on the backend.
To complete the above functions, the knowledge involved is: ajax, canvas and the files interface in html5. I encapsulated the code to implement this function into 4 modules, namely ajax.js, preview.js, shear.js and customerImg.js.
ajax.js: used to send ajax requests.
preview.js: For image preview
shear.js: For cropping images
customer.js: Custom avatar. In this module, Chinese medicine introduces ajax.js, preview.js and shear.js
I use webpack for packaging. I also used jquery and jquery-ui.
I extracted this functionality from this project. Below is the detailed code for this function.
1.HTML code
<p class="m-warp" id="warp">
  <p class="item">
   <input type="file" name="img" id="img" hidden>
   <label for="img">选择图片</label>
  </p>
  <p class="item clearfix">
   <p class="col col-1">
    <p class="preview" id="preview">
     <p class="mask"></p>
     <canvas class="cvsMove" id="cvsMove"></canvas>
    </p>
   </p>

   <p class="thum col-2 col">
    <p>预览</p>
    <img src="" id="thum">
    <p class="f-text-l f-marTop-20">
     <button class="shear" id="submit">确定</button>
    </p>
   </p>
  </p>
</p>2.CSS code
.clearfix:after{
content: "";
display: block;
clear: both;
height: 0;
overflow: hidden;
visibility: hidden;
}
img{
vertical-align: middle;
max-width:100%
}
.m-warp{
width: 800px;
}
.item{
margin-top: 20px;
}
.col{
float: left;
}
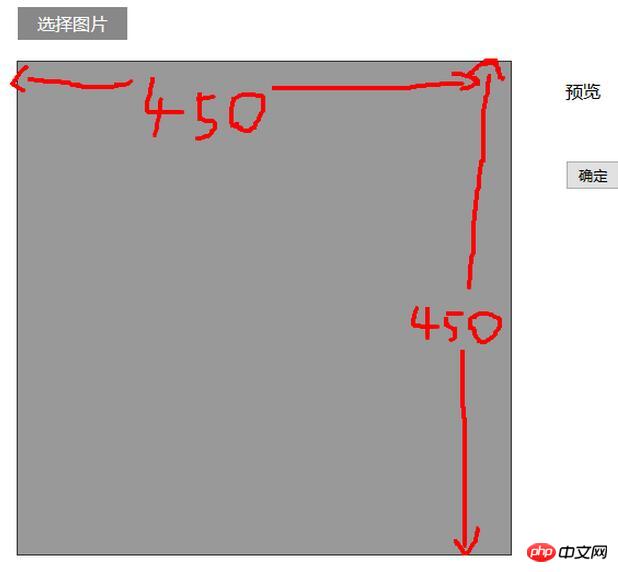
.col-1{
position: relative;
width: 450px;
height: 450px;
outline: 1px solid #333;
}
.preview{
display: inline-block;
}
.col-2{
width: 300px;
margin-left: 50px;
}
label{
display: block;
text-align: center;
width: 100px;
font-size: 16px;
color: #fff;
background-color: #888888;
height: 30px;
line-height: 30px;
}
.mask{
position: absolute;
z-index: 1;
top:0;
left: 0;
bottom: 0;
right: 0;
background-color: rgba(0,0,0,.4);
}
.cvsMove{
position: absolute;
z-index: 2;
outline: 2px dotted #333;
cursor: move;
display: none;
}With css and html, the running results are as follows:
3. js code
customerImg.js
var $ = require('jquery');
var ajax = require('./ajax.js');
var preview = require('./preview.js');
var shear = require('./shear.js');
/**
* 自定义头像
* @constructor
*/
function CustomerImg() {
this.isSupport = null;
this.previewBox = null;
this.warp = null;
}
/**
* 入口
* @param warp 操作区域 jquery节点
*/
CustomerImg.prototype.start = function (warp) {
var info,me,warpBox;
me = this;
this.isSupport = this.__isSupport();
if(!this.isSupport) {
info = $('<p>你的浏览器不支持自定义头像,可更换高版本的浏览器自定义头像</p>');
$('body').html(info);
return this;
}
//判断操作区域示范存在
if(warp && warp.length > 0){
this.warp = warp;
}else{
return this;
}
//预览
preview.start(warp,shear.start.bind(shear,warp));
this.previewBox = warp.find('#preview');
//确定
warp
.find('#submit')
.unbind('click')
.on('click',me.__submit.bind(me));
};
/**
* 提交
* @private
*/
CustomerImg.prototype.__submit = function () {
var cvsMove,data,fd;
cvsMove = this.previewBox.find('#cvsMove');
data = cvsMove[0].toDataURL('image/jpg',1);
fd = {
'customerImg':data
};
ajax.upload(fd);
};
/**
* 判断是否支持自定义头像
* @returns {boolean}
* @private
*/
CustomerImg.prototype.__isSupport = function () {
var canvas,context;
canvas= document.createElement('canvas');
if(typeof FileReader === 'function'&& canvas.getContext && canvas.toDataURL){
return true;
}else{
return false;
}
};
var customerImg = new CustomerImg();
module.exports = customerImg;preview.js
/**
* Created by star on 2017/3/7.
*/
var $ = require('jquery');
/**
* 预览类
* @constructor
*/
function Preview() {
this.boxElem = null;
this.callback = null;
this.type = null;
}
/**
* 入口
* @param boxElem 操作区域
* @param callback 预览结束的回调函数
*/
Preview.prototype.start = function (boxElem,callback) {
var chooseFile,me;
me = this;
if(! boxElem || boxElem.length <= 0) return this;
this.boxElem = boxElem;
if(typeof callback === 'function'){
this.callback = callback;
}
if(this.__isSupport()){
chooseFile = boxElem.find('input[type="file"]');
chooseFile
.on('change',me.fileChange.bind(me))
}
};
/**
* 选择图片的事件处理程序
* @param event
*/
Preview.prototype.fileChange = function (event) {
var target,reader,file,me,type;
target = event.target;
me = this;
file = target.files[0];
type = file.type;
this.type = type;
if(type !== 'image/png' && type !== 'image/jpg' && type !== 'image/jpeg'){
alert('文件格式不正确');
return this;
}
reader = new FileReader();
if(file){
reader.readAsDataURL(file);
}
reader.onload = function () {
me.show(reader);
}
};
/**
* 显示从本地选择的图片
* @param reader fileReader对象
*/
Preview.prototype.show = function (reader) {
var preView,img,me;
preView = this.boxElem.find('#preview');
img = preView.find('#preImg');
me = this;
if(img.length <= 0){
preView.append($('<img id="preImg">'));
}
img = preView.find('#preImg');
//确保图片加载完成后再执行回调
img.on('load',function () {
if(me.callback){
me.callback(me.type);
}
});
img.attr('src',reader.result);
};
/**
* 是否支持预览
* @returns {boolean}
* @private
*/
Preview.prototype.__isSupport = function () {
return typeof FileReader === 'function';
};
var preview = new Preview();
module.exports = preview;shear.js
var $ = require('jquery');
//由于要使用jquery-ui,所以将$暴露到window上。
window.$ = $;
require('./jquery-ui.min.js');
/**
* 切割
* @constructor
*/
function Shear() {
this.previewBox = null;
this.cvsMove = null;
this.maxW = 200;
this.maxH = 200;
this.thum = null;
this.fileType = 'image/jpeg';
}
/**
* 入口
* @param previewBox 预览元素的父元素
* @param fileType 裁剪的图片的类型 如:'image/jpg'
* @returns {Shear}
*/
Shear.prototype.start = function (previewBox,fileType) {
if(!arguments.length) return this;
var me = this;
this.previewBox = previewBox;
if(fileType){
this.fileType = fileType;
}
this.thum = this.previewBox.find('#thum');
this.cvsMove = this.previewBox.find('#cvsMove');
this.showCanvas();
return this;
};
/**
* 显示出canvas
*/
Shear.prototype.showCanvas = function () {
var preImg,h,w,me,cvsH,cvsW,rateH,rateW,naturalH,naturalW,preview;
me = this;
preImg = this.previewBox.find('#preImg');
preview = this.previewBox.find('#preview');
naturalH = preImg[0].naturalHeight;
naturalW = preImg[0].naturalWidth;
//将canvas显示出来
this.cvsMove.show();
//将canvas置于(0,0)
this.cvsMove
.css({
"left":'0',
'top':'0'
});
h = preImg.height();
w = preImg.width();
//规定裁剪出的图片尺寸为200px*200px
//要保证裁剪的图片不变形
if(h < this.maxH || w < this.maxW){
this.cvsMove[0].width = cvsW = Math.min(h,w);
this.cvsMove[0].height = cvsH = Math.min(h,w);
}else{
this.cvsMove[0].width= cvsW = this.maxW;
this.cvsMove[0].height= cvsH = this.maxH;
}
rateH = h/naturalH;
rateW = w/naturalW;
this.__drawImg(preImg,0,0,cvsW/rateW,cvsH/rateH,0,0,cvsW,cvsH);
//使用jquery-ui中的功能使canvas可以移动
this.cvsMove.draggable(
{
containment: "parent",
drag:function (event,ui) {
var left,top;
left = ui.position.left;
top = ui.position.top;
//canvas每次移动都有从新绘制图案
me.__drawImg(preImg,left/rateW,top/rateH,cvsW/rateW,cvsH/rateH,0,0,cvsW,cvsH);
}
}
)
};
/**
* 在canvas上显示图片
* @param myImg 要显示的图片节点
* @param sx 图片的起点在原图片上的x坐标
* @param sy 图片的起点在原图上的y坐标
* @param sW 在原图上的宽度
* @param sH 在原图上的高度
* @param dx 起点在canvas上的x坐标
* @param dy 起点在canvas上的y坐标
* @param dW 在canvas上的宽度
* @param dH 在canvas上的高度
* @private
*/
Shear.prototype.__drawImg = function (myImg,sx,sy,sW,sH,dx,dy,dW,dH) {
var cxt,thum,me;
me = this;
cxt = this.cvsMove[0].getContext('2d');
cxt.drawImage(myImg[0],sx,sy,sW,sH,dx,dy,dW,dH);
thum = this.thum;
//将canvas上的图案显示到右侧
thum
.attr('src',this.cvsMove[0].toDataURL(me.fileType,1))
.width(this.maxW)
.height(this.maxH)
};
var shear = new Shear();
module.exports = shear;ajax.js
var $ = require('jquery');
function Ajax() {

}
/**
 * 上传图片数据
 */
Ajax.prototype.upload = function (data) {
 $.ajax({
  type:'POST',
  data:data,
  dataType:'json',
  url:'/test/PHP/upload.php',
  success:function (result) {
   if(result.status){
    location.reload();
   }else{
    alert(result.msg);
   }
  }
 });
};
var ajax = new Ajax();
module.exports = ajax;Finally, in another file, call the start method of the customerImg object
var $ = require('jquery');
var customerImg =require('./customerImg.js');
customerImg.start($('#warp'));
The configuration file of webpack is as follows:
var webpack = require('webpack');
module.exports = {
 entry:{
  'customerImg':'./js/test.js',
  'jQuery':['jquery']
 },
 output:{
  filename:'[name].js',
  library:'jQuery',
  libraryTarget:'umd'
 },
 plugins:[
  new webpack.optimize.CommonsChunkPlugin({
   name:'jQuery',
   filename:'jquery.js'
  })
 ]
};Effect:
if(!empty($_POST) && isset($_POST['customerImg'])){
 $img = $_POST['customerImg'];
 $imgdata = explode(',', $img);
 $uniName = md5 ( uniqid ( microtime ( true ), true ) );
 $a = file_put_contents('./../uploads/'.$uniName.'.jpg', base64_decode($imgdata[1]));
}Using HTML5 to implement web music player
Express code analysis using html template
The above is the detailed content of HTML5 and JS implement local image cropping and uploading functions. For more information, please follow other related articles on the PHP Chinese website!

Hot AI Tools

Undresser.AI Undress
AI-powered app for creating realistic nude photos

AI Clothes Remover
Online AI tool for removing clothes from photos.

Undress AI Tool
Undress images for free

Clothoff.io
AI clothes remover

Video Face Swap
Swap faces in any video effortlessly with our completely free AI face swap tool!

Hot Article
Hot Tools

Notepad++7.3.1
Easy-to-use and free code editor

SublimeText3 Chinese version
Chinese version, very easy to use

Zend Studio 13.0.1
Powerful PHP integrated development environment

Dreamweaver CS6
Visual web development tools

SublimeText3 Mac version
God-level code editing software (SublimeText3)
Hot Topics


 How to run the h5 project
Apr 06, 2025 pm 12:21 PM
How to run the h5 project
Apr 06, 2025 pm 12:21 PM
Running the H5 project requires the following steps: installing necessary tools such as web server, Node.js, development tools, etc. Build a development environment, create project folders, initialize projects, and write code. Start the development server and run the command using the command line. Preview the project in your browser and enter the development server URL. Publish projects, optimize code, deploy projects, and set up web server configuration.
 What exactly does H5 page production mean?
Apr 06, 2025 am 07:18 AM
What exactly does H5 page production mean?
Apr 06, 2025 am 07:18 AM
H5 page production refers to the creation of cross-platform compatible web pages using technologies such as HTML5, CSS3 and JavaScript. Its core lies in the browser's parsing code, rendering structure, style and interactive functions. Common technologies include animation effects, responsive design, and data interaction. To avoid errors, developers should be debugged; performance optimization and best practices include image format optimization, request reduction and code specifications, etc. to improve loading speed and code quality.
 How to make h5 click icon
Apr 06, 2025 pm 12:15 PM
How to make h5 click icon
Apr 06, 2025 pm 12:15 PM
The steps to create an H5 click icon include: preparing a square source image in the image editing software. Add interactivity in the H5 editor and set the click event. Create a hotspot that covers the entire icon. Set the action of click events, such as jumping to the page or triggering animation. Export H5 documents as HTML, CSS, and JavaScript files. Deploy the exported files to a website or other platform.
 What application scenarios are suitable for H5 page production
Apr 05, 2025 pm 11:36 PM
What application scenarios are suitable for H5 page production
Apr 05, 2025 pm 11:36 PM
H5 (HTML5) is suitable for lightweight applications, such as marketing campaign pages, product display pages and corporate promotion micro-websites. Its advantages lie in cross-platformity and rich interactivity, but its limitations lie in complex interactions and animations, local resource access and offline capabilities.
 What Does H5 Refer To? Exploring the Context
Apr 12, 2025 am 12:03 AM
What Does H5 Refer To? Exploring the Context
Apr 12, 2025 am 12:03 AM
H5referstoHTML5,apivotaltechnologyinwebdevelopment.1)HTML5introducesnewelementsandAPIsforrich,dynamicwebapplications.2)Itsupportsmultimediawithoutplugins,enhancinguserexperienceacrossdevices.3)SemanticelementsimprovecontentstructureandSEO.4)H5'srespo
 What is the H5 programming language?
Apr 03, 2025 am 12:16 AM
What is the H5 programming language?
Apr 03, 2025 am 12:16 AM
H5 is not a standalone programming language, but a collection of HTML5, CSS3 and JavaScript for building modern web applications. 1. HTML5 defines the web page structure and content, and provides new tags and APIs. 2. CSS3 controls style and layout, and introduces new features such as animation. 3. JavaScript implements dynamic interaction and enhances functions through DOM operations and asynchronous requests.
 Is H5 page production a front-end development?
Apr 05, 2025 pm 11:42 PM
Is H5 page production a front-end development?
Apr 05, 2025 pm 11:42 PM
Yes, H5 page production is an important implementation method for front-end development, involving core technologies such as HTML, CSS and JavaScript. Developers build dynamic and powerful H5 pages by cleverly combining these technologies, such as using the <canvas> tag to draw graphics or using JavaScript to control interaction behavior.
 How to make pop-up windows with h5
Apr 06, 2025 pm 12:12 PM
How to make pop-up windows with h5
Apr 06, 2025 pm 12:12 PM
H5 pop-up window creation steps: 1. Determine the triggering method (click, time, exit, scroll); 2. Design content (title, text, action button); 3. Set style (size, color, font, background); 4. Implement code (HTML, CSS, JavaScript); 5. Test and deployment.
