Photoshop打造出一条漂亮如丝带的红色叠加光束
单一的光束制作可能比较简单,不过几条或更多的光束叠加的效果制作就比较麻烦,尤其是叠加部分的制作比较复杂。因为叠加的时候光会明显加强,需要单独进行处理。
最终效果
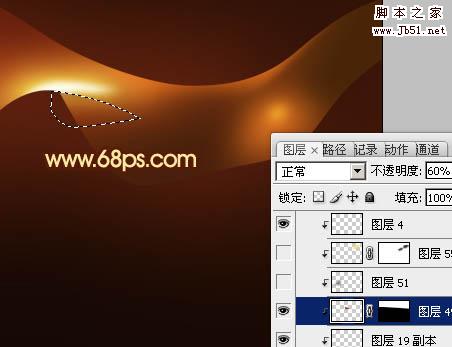
1、新建一个1024 * 768像素的文档,背景填充黑色,新建一个图层,用套索工具拉出下图所示的选区,按Ctrl + Alt + D 羽化120个像素后填充暗红色,如下图。
<图1>
2、新建一个组,在组里新建一个图层,用钢笔勾出下图所示的选区,填充颜色:#621E0C,作为光束的底色。
<图2>
3、新建一个组,按Ctrl + Alt + G 与前一个图层编组,然后在当前图层下面新建一个图层,用钢笔勾出下图所示的选区,羽化20个像素后填充颜色:#753610。
<图3>
4、新建一个图层,用钢笔勾出下图所示的选区,羽化6个像素后填充橙红色:#E6721B。
<图4>
5、新建一个图层,用钢笔勾出左下部暗调部分的选区,羽化10个像素后填充颜色:#481F0B。
<图5>
6、新建一个图层,用钢笔勾出左边部分暗调的选区,羽化10个像素后填充颜色:#481F0B。
<图6>
7、新建一个图层,用钢笔勾出图7所示的选区,羽化10个像素后填充颜色:#ED7922,如图7,中间部分用减淡工具涂亮一点,效果如图8。
<图7> 
<图8>
8、新建一个图层,用钢笔勾出下图所示的选区,羽化25个像素后填充颜色:#F56636。
<图9>
9、新建一个图层,用钢笔勾出右边暗角部分的选区,羽化15个像素后填充颜色:#440C08。
<图10>
10、新建一个图层,用钢笔勾出中间高光部分的选区,羽化15个像素后填充颜色:#E56A21,效果如下图。
<图11>
11、新建一个图层,用钢笔勾出下图所示的选区,羽化10个像素后填充颜色:#FBCE51。
<图12>
12、新建一个图层,用钢笔勾出下图所示的选区,羽化6个像素后填充颜色:#ECC874,混合模式改为“颜色减淡”,效果如下图。
<图13>
13、新建一个图层,用钢笔勾出下图所示的选区,羽化3个像素后填充白色。
<图14>
14、新建一个图层,用钢笔勾出下图所示的选区,羽化15个像素后填充红色。
<图15>
15、新建一个图层,用钢笔勾出右边高光部分的选区,羽化10个像素后填充橙色,效果如下图。
<图16>
16、新建一个图层,用钢笔勾出下图所示的选区,填充颜色:#8D4015,取消选区后加上图层蒙版,用黑色画笔把底部的过渡涂出来,再适当降低图层不透明度,效果如下图。
<图17>
17、新建一个图层,用钢笔勾出右下角暗部选区,羽化15个像素后填充暗红色。到这一步底色部分制作基本完成,效果如图19。
<图18> 
<图19>
18、下面需要制作上层的光束,需要完成的效果如下图。
<图20>
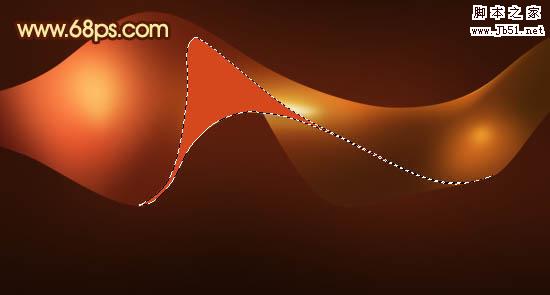
19、在图层的最上面新建一个组,新建图层后用钢笔工具勾出图21所示的选区,填充颜色:#D5481D。取消选区后天就图层蒙版,用黑色画笔把图22选区部分以外的部分擦出来。
<图21> 
<图22>
20、新建一个图层,按Ctrl + Alt + G 与前一图层编组,然后在当前图层下面新建一个图层,用椭圆选框工具拉出下图所示的选区,羽化5个像素后填充橙黄色。
<图23>
21、新建一个图层,用钢笔勾出下图所示的选区,羽化25个像素后填充颜色:#672D0F。
<图24>
22、新建一个图层,用钢笔勾出右边暗部的选区,羽化2个像素后填充暗红色。
<图25>
23、新建一个图层,用钢笔勾出右边高光部分的选区,羽化3个像素后填充橙红色。
<图26>
24、新建一个图层,用钢笔勾出下图所示的选区,羽化1个像素后填充橙黄色。
<图27>
25、新建一个图层,用钢笔勾出下图所示的选区,羽化1个像素后填充白色。
<图28>
26、新建一个图层,用钢笔勾出下图所示的选区,羽化3个像素后填充颜色:#FEF191。
<图29>
27、新建一个图层,同上的方法制作高光及暗调部分,过程如图30,31,效果如图32。
<图30> 
<图31> 
<图32>
28、新建一个组,同上的方法制作左边的光束,效果如下图。
<图33>
最后调整一下整体颜色和对比度,完成最终效果。

Hot AI Tools

Undresser.AI Undress
AI-powered app for creating realistic nude photos

AI Clothes Remover
Online AI tool for removing clothes from photos.

Undress AI Tool
Undress images for free

Clothoff.io
AI clothes remover

Video Face Swap
Swap faces in any video effortlessly with our completely free AI face swap tool!

Hot Article

Hot Tools

Notepad++7.3.1
Easy-to-use and free code editor

SublimeText3 Chinese version
Chinese version, very easy to use

Zend Studio 13.0.1
Powerful PHP integrated development environment

Dreamweaver CS6
Visual web development tools

SublimeText3 Mac version
God-level code editing software (SublimeText3)

Hot Topics
 1664
1664
 14
14
 1423
1423
 52
52
 1317
1317
 25
25
 1268
1268
 29
29
 1242
1242
 24
24
 Photoshop's Value: Weighing the Cost Against Its Features
Apr 11, 2025 am 12:02 AM
Photoshop is worth the investment because it provides powerful features and a wide range of application scenarios. 1) Core functions include image editing, layer management, special effects production and color adjustment. 2) Suitable for professional designers and photographers, but amateurs may consider alternatives such as GIMP. 3) Subscribe to AdobeCreativeCloud can be used as needed to avoid high one-time spending.
 Advanced Photoshop Tutorial: Master Retouching & Compositing
Apr 17, 2025 am 12:10 AM
Photoshop's advanced photo editing and synthesis technologies include: 1. Use layers, masks and adjustment layers for basic operations; 2. Use image pixel values to achieve photo editing effects; 3. Use multiple layers and masks for complex synthesis; 4. Use "liquefaction" tools to adjust facial features; 5. Use "frequency separation" technology to perform delicate photo editing, these technologies can improve image processing level and achieve professional-level effects.
 Photoshop's Key Features: A Deep Dive
Apr 19, 2025 am 12:08 AM
Key features of Photoshop include layers and masks, adjustment tools, filters and effects. 1. Layers and masks allow independent editing of image parts. 2. Adjust tools such as brightness/contrast can modify image tone and brightness. 3. Filters and effects can quickly add visual effects. Mastering these features can help creative professionals achieve their creative vision.
 Using Photoshop: Creative Possibilities and Practical Uses
Apr 22, 2025 am 12:09 AM
Photoshop is very practical and creative in practical applications. 1) It provides basic editing, repairing and synthesis functions, suitable for beginners and professionals. 2) Advanced features such as content recognition fill and layer style can improve image effects. 3) Mastering shortcut keys and optimizing layer structure can improve work efficiency.
 Is Photoshop Free? Understanding Subscription Plans
Apr 12, 2025 am 12:11 AM
Photoshop is not free, but there are several ways to use it at low cost or free: 1. The free trial period is 7 days, and you can experience all functions during this period; 2. Student and teacher discounts can cut costs by half, and school proof is required; 3. The CreativeCloud package is suitable for professional users and includes a variety of Adobe tools; 4. PhotoshopElements and Lightroom are low-cost alternatives, with fewer functions but lower prices.
 The Core Purpose of Photoshop: Creative Image Design
Apr 10, 2025 am 09:29 AM
Photoshop’s core use in creative image design is its powerful functionality and flexibility. 1) It allows designers to transform creativity into visual reality through layers, masks and filters. 2) Basic usages include cropping, resizing and color correction. 3) Advanced usages such as layer styles, blend modes and smart objects can create complex effects. 4) Common mistakes include improper layer management and excessive use of filters, which can be solved by organizing layers and using filters reasonably. 5) Performance optimization and best practices include rational use of layers, regular saving of files, and using shortcut keys.
 Photoshop: Investigating Free Trials and Discount Options
Apr 14, 2025 am 12:06 AM
You can get the access to Photoshop in the most economical way: 1. Experience the software features with a 7-day free trial; 2. Find student or teacher discounts, as well as seasonal promotions; 3. Use coupons on third-party websites; 4. Subscribe to Adobe CreativeCloud's monthly or annual plan.
 Photoshop for Designers: Creating Visual Concepts
Apr 13, 2025 am 12:09 AM
Creating visual concepts in Photoshop can be achieved through the following steps: 1. Create a new document, 2. Add a background layer, 3. Use the brush tool to draw basic shapes, 4. Adjust colors and brightness, 5. Add text and graphics, 6. Use masks for local editing, 7. Apply filter effects, these steps help designers build a complete visual work from scratch.


