
 Computer Tutorials
System Installation
What you need to know when reinstalling the system from a USB flash drive: How to set up the BIOS correctly
Computer Tutorials
System Installation
What you need to know when reinstalling the system from a USB flash drive: How to set up the BIOS correctly
What you need to know when reinstalling the system from a USB flash drive: How to set up the BIOS correctly

Although reinstalling the system is common, the problem continues to bother people! How to set up the BIOS and how to choose the installation disk? Faced with these troubles, PHP editor Baicao will give you some advice today, explaining in detail what you must know about reinstalling the system from a USB flash drive. From BIOS settings to installation selection, we will guide you step by step to overcome the difficulty of reinstalling the system, allowing you to experience a smooth system like a new one!

Tool materials:
System version: Windows 10 20H2
Brand model: Lenovo Xiaoxin Air 14
Software version: Pocket machine one-click reinstallation system software v1.0
1. Preparation work
1. Prepare a U disk with a capacity of no less than 8GB, preferably USB3.0 , which will be faster.
2. Go to Microsoft’s official website to download the latest version of the Windows 10 system image file, or use a pocket machine to reinstall the system software and download it automatically with one click.
3. Unzip the downloaded system image file to the root directory of the U disk. Remember not to put it in any folder.
2. Set BIOS
1. Insert the USB flash drive, restart the computer, and press the F2 (or DEL) key to enter the BIOS interface.
2. Find the "Boot" tab and set the U disk as the first boot item.
3. If you cannot find the U disk boot item, you can try to set the "CSM Support" option to "Enabled".
4. In the "Security" tab, set the "Secure Boot" option to "Disabled".
5. Save the settings and exit the BIOS. The computer will automatically boot from the USB disk and enter the PE system.
3. Install the system
1. After entering the PE system, run Pocket Installer to reinstall the system software with one click.
2. Select the system version to be installed. Generally, select "Windows10 Professional Edition".
3. Select the system disk (usually C drive), and the software will automatically format the system disk and install the system.
4. Wait for the system installation to be completed. During this period, the computer will automatically restart several times. Do not do it manually.
5. After the installation is completed, follow the prompts to set the user name, password and other information, and then you can enter the new system.
Content extension:
1. If you encounter problems when installing the system, don't worry, you can try to replace the U disk of another brand or re-download the system image file.
2. If you don’t want to manually set the BIOS every time you reinstall the system, you can consider using a one-click USB boot tool, such as UltraISO or Laomaotao USB boot disk creation tool.
3. In addition to the one-click system reinstallation software for pocket machines, there are many other excellent installation software, such as Magic Pig Installation Master, Xiaoyu one-click system reinstallation, etc. You can choose the right one according to your needs. software.
Summary:
Reinstalling the system seems complicated, but as long as you master the correct method, it is not that difficult. Choose a reliable system reinstallation software and follow the steps step by step to easily complete the system reinstallation. I hope today’s content can be helpful to everyone. If you have any questions or suggestions, please leave a message in the comment area.
The above is the detailed content of What you need to know when reinstalling the system from a USB flash drive: How to set up the BIOS correctly. For more information, please follow other related articles on the PHP Chinese website!

Hot AI Tools

Undresser.AI Undress
AI-powered app for creating realistic nude photos

AI Clothes Remover
Online AI tool for removing clothes from photos.

Undress AI Tool
Undress images for free

Clothoff.io
AI clothes remover

Video Face Swap
Swap faces in any video effortlessly with our completely free AI face swap tool!

Hot Article
Hot Tools

Notepad++7.3.1
Easy-to-use and free code editor

SublimeText3 Chinese version
Chinese version, very easy to use

Zend Studio 13.0.1
Powerful PHP integrated development environment

Dreamweaver CS6
Visual web development tools

SublimeText3 Mac version
God-level code editing software (SublimeText3)
Hot Topics


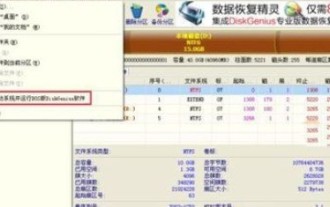 Specific steps for expanding the C drive using the partition tool diskgenius
May 08, 2024 pm 08:04 PM
Specific steps for expanding the C drive using the partition tool diskgenius
May 08, 2024 pm 08:04 PM
First, download and install the [DiskGenius] tool on your computer, then open the tool, then click [File Menu] at the top, and then click [Restart the system and run the DiskGenius software], as shown in the figure. Then click [OK] in the pop-up prompt box, as shown in the figure. After that, the computer will restart and then enter the Diskgen hard disk partition interface. At this time, if we want to expand the C drive, we only need to right-click the D drive next to the logical partition and click "Adjust Partition Size" in the pop-up menu, as shown in the figure shown. Then you need to adjust the size of the D drive partition. For example, the current capacity of the D drive is 14.99GB, as shown in the figure below. At this time, we can adjust the installment of the D drive. For example, if we want to allocate 1.03GB to the C drive, we only need to allocate 1.03GB to the C drive.
 How to enable tpm2.0 in win11_How to enable tpm2.0 in win11
May 08, 2024 pm 06:10 PM
How to enable tpm2.0 in win11_How to enable tpm2.0 in win11
May 08, 2024 pm 06:10 PM
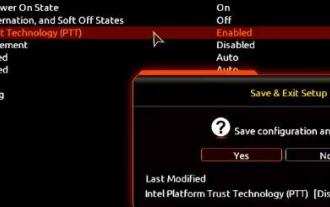
1. Gigabyte motherboard 1. First, we restart the computer and use the keyboard [DEL] to enter the BIOS settings when restarting. 2. Find and enter the [Settings] tab above. 3. Then find and enter [Miscellaneous] under settings. 4. Set [Intel Platform Trust Technology (PTT)] to [Enabled]. 5. After the settings are completed, use the keyboard [F10] to save, and then click [YES] to exit. 2. ASUS motherboard 1. First restart the computer and continuously tap [del] on the keyboard to enter the bios settings when booting. 2. Click [AdvancedMode] or press [F7] to find [A
 How to assemble an acer desktop computer?
May 08, 2024 pm 08:25 PM
How to assemble an acer desktop computer?
May 08, 2024 pm 08:25 PM
How to assemble an acer desktop computer? The assembly method of Acer desktop computer is as follows: open the case, install the power supply into the case, and tighten the screws. Install the CPU onto the motherboard, making sure the pins on the CPU are aligned with the slots on the motherboard, and tighten the screws on the CPU heat sink. Install the memory module onto the motherboard, making sure that the bumps on the memory module are aligned with the slots on the motherboard. Press down hard until you hear a "pop" sound to complete the installation. Install graphics cards, sound cards, network cards and other boards onto the motherboard, making sure the screws on the boards are tightened. Install storage devices such as hard drives and optical drives into the chassis, making sure the screws are tightened. Connect the motherboard to the chassis, including power cables, hard drive cables, optical drive cables, etc. Finally, close the chassis cover and tighten the screws to complete the assembly. exist
 What should I do if my graphics card is blackened by flashing the BIOS?
May 10, 2024 am 12:09 AM
What should I do if my graphics card is blackened by flashing the BIOS?
May 10, 2024 am 12:09 AM
Flashing the BIOS of the graphics card refers to the situation where an error occurs when modifying the BIOS and the graphics card cannot start. Solutions include: 1. Power-off method: release the residual power and then restart; 2. Short-circuit method: short-circuit the short-circuit point on the PCB; 3. Restore the BIOS to default values; 4. Use third-party tools to refresh the BIOS; 5. Contact technology Support seeking help. Be careful to back up the original BIOS, use a compatible version, and proceed with caution to avoid damage.
 What harm does flashing the graphics card's bios do to the graphics card?
May 10, 2024 am 12:18 AM
What harm does flashing the graphics card's bios do to the graphics card?
May 10, 2024 am 12:18 AM
Flashing the graphics card BIOS may cause potential harm to the graphics card, including: 1. Damage to the graphics card chip; 2. Loss of warranty; 3. Reduced performance; 4. Stability issues; 5. Compatibility issues.
 What should I do if there is a power surge on the hub port in the lower right corner of win7?
May 10, 2024 am 12:51 AM
What should I do if there is a power surge on the hub port in the lower right corner of win7?
May 10, 2024 am 12:51 AM
Power surge error solution on hub ports: Remove excessive or power-hungry devices. Check if the USB port is damaged, replace the port/cable. Make sure the power supply is stable and replace the socket. Update drivers and run SFC scan. Reset BIOS, update BIOS, contact manufacturer if necessary.
 China Telecom Tiantong satellite covers Hong Kong! Xiaomi Mi 14 Ultra officially announced that it supports two-way satellite communication
May 09, 2024 am 09:01 AM
China Telecom Tiantong satellite covers Hong Kong! Xiaomi Mi 14 Ultra officially announced that it supports two-way satellite communication
May 09, 2024 am 09:01 AM
According to news on May 8, China Telecom held a launch conference for the direct-connect mobile phone satellite service in Hong Kong today, officially announcing the launch of the direct-connect mobile phone satellite service based on Tiantong Satellite System in Hong Kong. According to Xiaomi Mobile’s official WeChat account, Xiaomi Mi 14 Ultra currently supports two-way satellite communication in Hong Kong, China. Users only need to use a China Telecom or China Telecom (Hong Kong) SIM card and activate the direct connection satellite service of their mobile phones. It is worth noting that Xiaomi 14 Ultra needs to be the version sold in mainland China, and the system version must be upgraded to V1.0.9.0. Because only the version sold in the mainland of Xiaomi Mi 14 Ultra previously supported satellite communications, other versions did not support this function in hardware. Only telecom cards are supported because Tiantong satellite is operated by China Telecom. It is reported that
 What systems does oracle database support?
May 10, 2024 am 02:06 AM
What systems does oracle database support?
May 10, 2024 am 02:06 AM
Operating systems supported by Oracle Database include Unix systems (such as Linux, Solaris), Windows systems (such as Windows Server, Windows 11), z/OS, and macOS, with specific requirements varying by database version and operating system. Supported platforms include x86, x86-64, ARM, SPARC, and POWER, depending on database version and compatibility. Factors such as hardware compatibility, performance, security, usability, and budget constraints should be considered when selecting an operating system.
