

Photoshop设计制作逼真可爱的粉色棒棒糖

今天小编教大家使用PS制作一款粉色棒棒糖,教程很简单,喜欢的朋友可以一起来学习
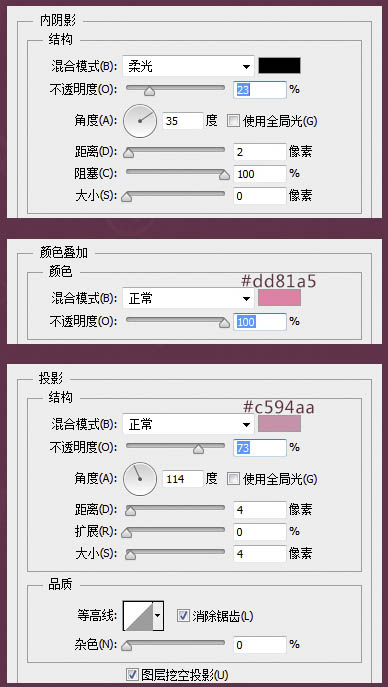
4、这一步制作Dribbble的Logo,用形状图层交叉运算方法结合钢笔工具画出Logo形状,命名dribbble并添加斜面和浮雕、内阴影、颜色叠加和投影。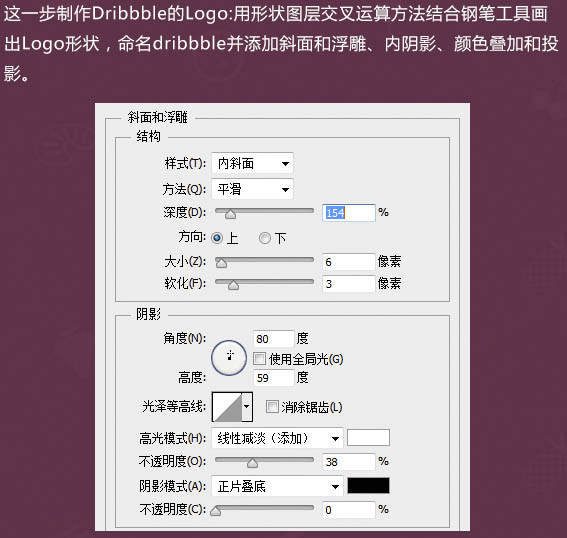

5、复制一层右键清除图层样式,dribbble副本图层填充0%,添加内阴影并建立黑色蒙版,只擦出需要的部位。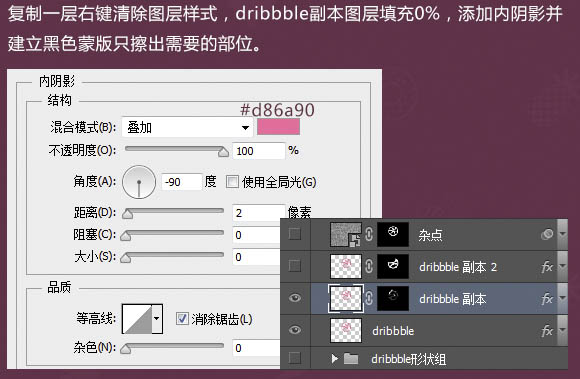
6、副本dribbble副本图层为dribbble副本2,重置内阴影参数,蒙版填充全黑色,如上图擦出细节部分。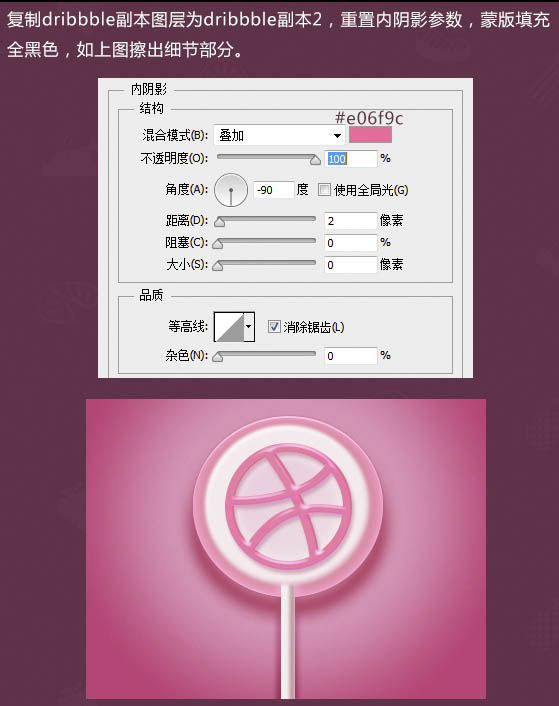
7、复制背景纹理图层置于dribbble副本2图层之上,混合模式“正片叠底”,填充3%,添加蒙版只保留dribbble图形上的纹理杂色。
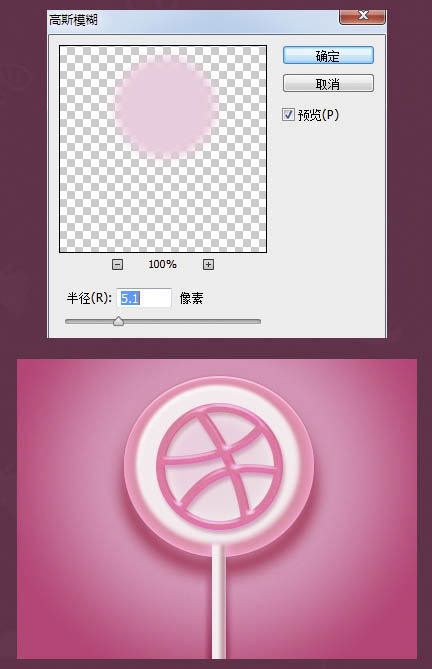
8、为dribbble形状营造一点环境色;用椭圆工具画一个略小于dribbble形状的正圆,转为智能对象后添加渐变叠加和高斯模糊效果,图层置于dribbble形状之下白色糖核之上。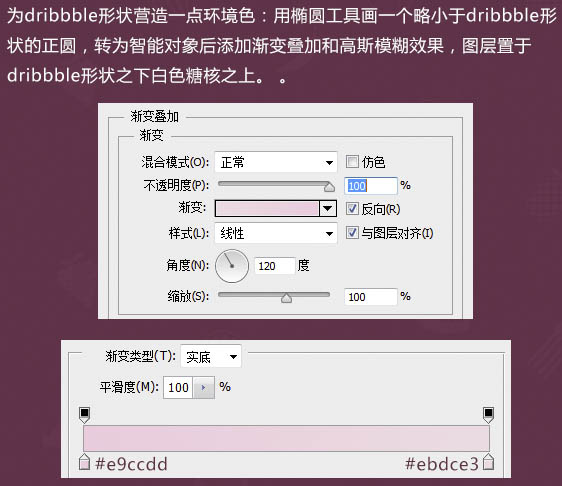
四、点缀制作:
1、自制白色方形糖粒笔刷:新建50 * 50px透明文档,填充黑色,定义成画笔预设,设置好笔尖形状和白色前景色后沿着糖块半透明的环形部分画出错落有致的糖粒,画好后图层填充调为0%,添加内发光效果,并建立蒙版只保留环形部分的糖粒,图层不透明度适当降低。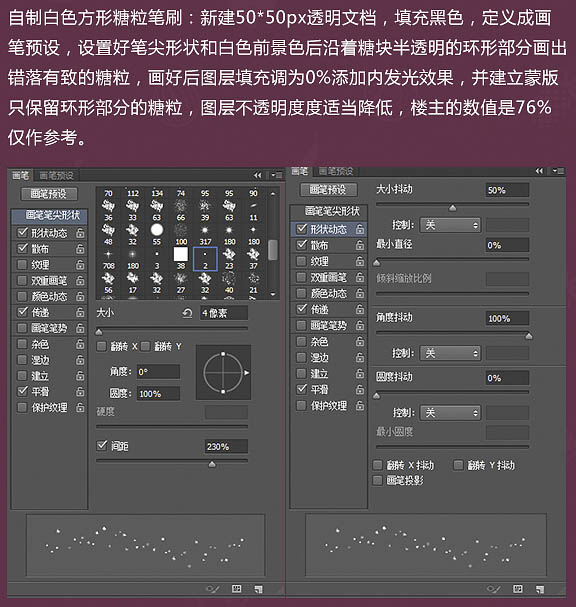
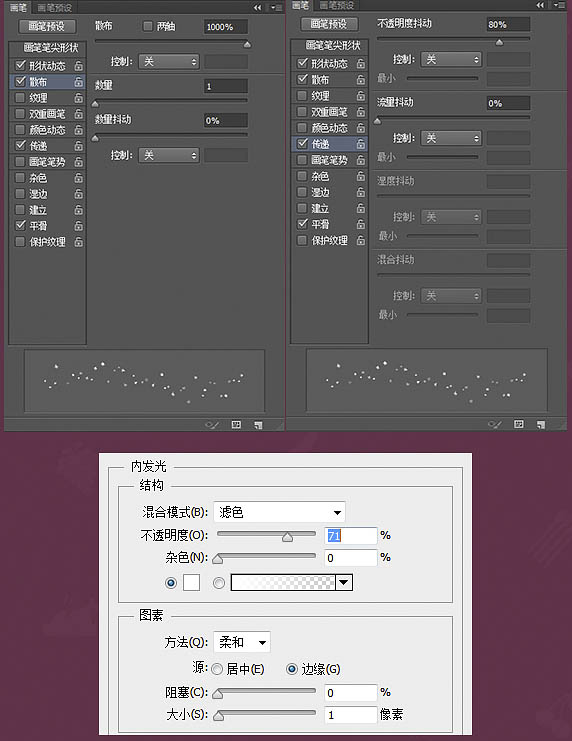
2、根据效果可调大一点笔刷再刷一层,同上填充0%,拷贝之前糖粒图层的内发光样式和蒙版,不透明度100%即可。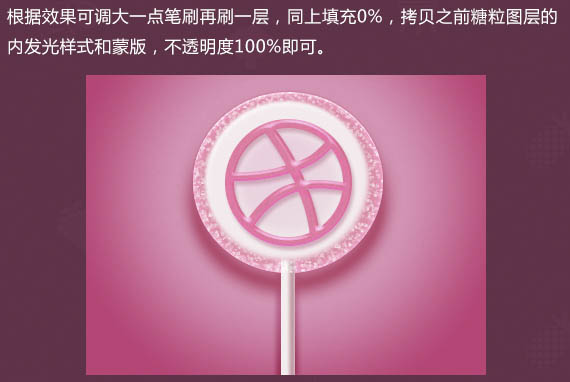
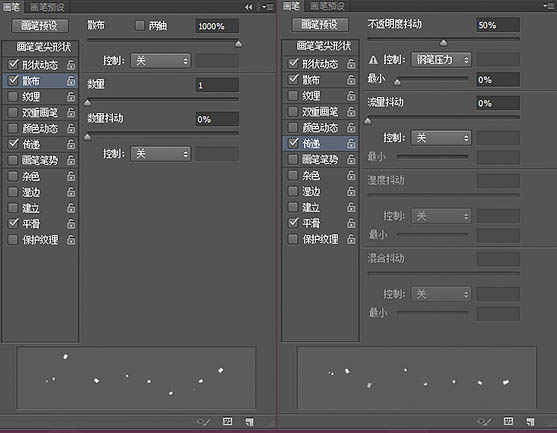
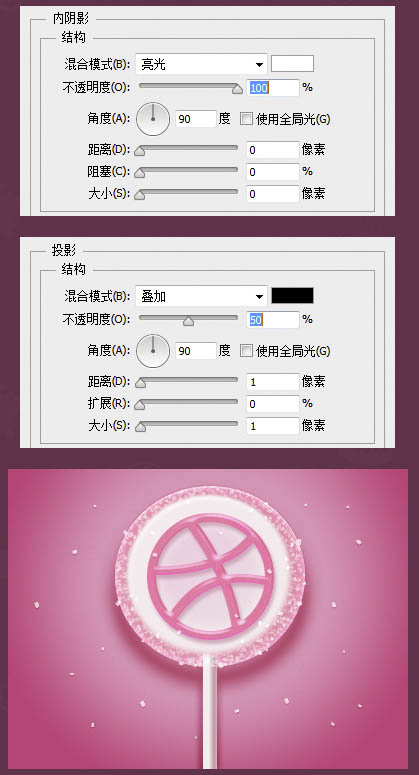
3、自制白色长方形糖粒笔刷:新建4 * 4px透明文档,放大至最大,用矩形工具框选出4 * 3px的黑色长方形并定义成画笔预设,然后设置好笔尖形状、前景色白色随意画在背景和糖块上,画好后填充63%并添加投影、内阴影效果。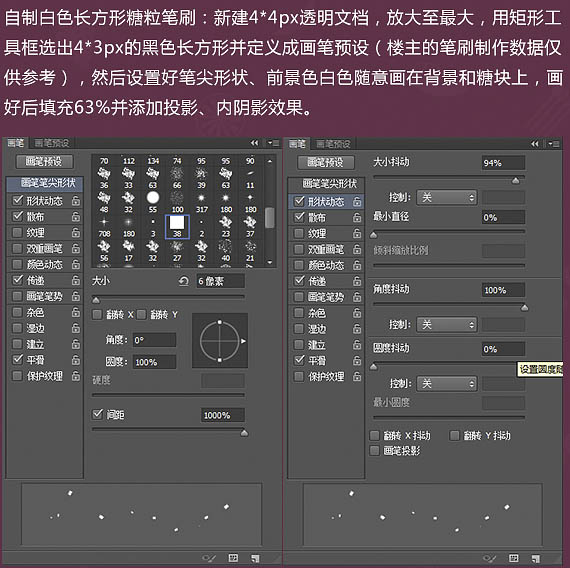
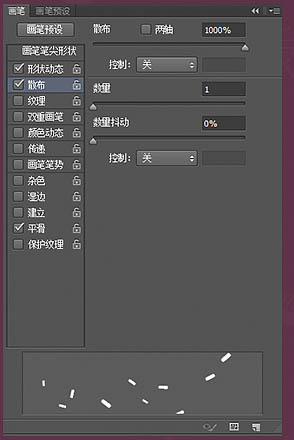
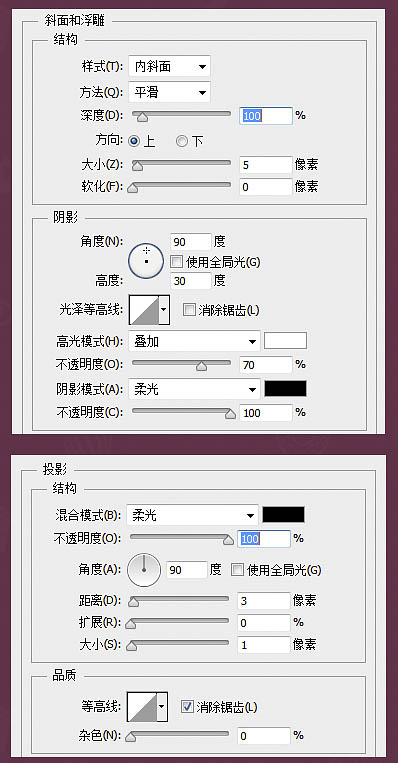
4、自制彩针笔刷:新建50 * 50px透明文档,前景色黑色,用圆角矩形工具画出一个长椭圆定义成画笔预设,设置好笔尖形状和前景色随意画在糖块上,并添加斜面和浮雕、投影效果。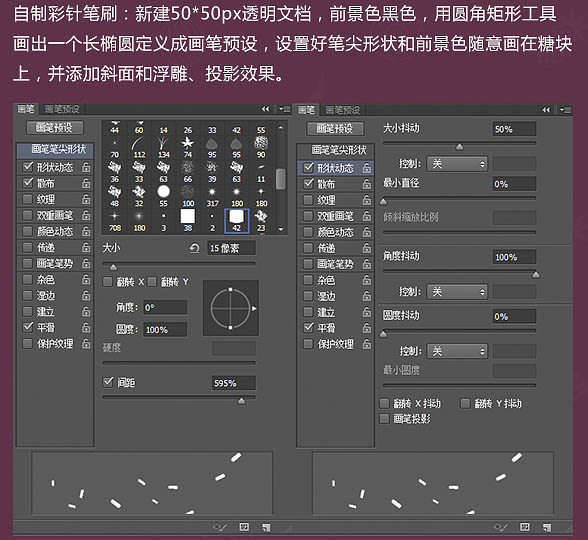

5、制作背景上的花朵:用自定义形状工具里面的花朵形状,按住Shift键的同时拉出一枚小花,色值#caaf11,添加内发光和投影,完成后复制几朵放在其他的位置上就好。
6、终于到最后一个步骤了,那就是加上渲染的光源:用色值#f9e8fd的柔角大笔刷在糖块顶部点一下,混合模式“叠加”,不透明度95%,建立蒙版只保留需要的部位。同样的方法用色值#ffffff的柔角小笔刷在左侧边画一个小光源,混合模式“线性减淡”,不透明度52%,建蒙版擦去多余部分。
最终效果:

Hot AI Tools

Undresser.AI Undress
AI-powered app for creating realistic nude photos

AI Clothes Remover
Online AI tool for removing clothes from photos.

Undress AI Tool
Undress images for free

Clothoff.io
AI clothes remover

Video Face Swap
Swap faces in any video effortlessly with our completely free AI face swap tool!

Hot Article
Hot Tools

Notepad++7.3.1
Easy-to-use and free code editor

SublimeText3 Chinese version
Chinese version, very easy to use

Zend Studio 13.0.1
Powerful PHP integrated development environment

Dreamweaver CS6
Visual web development tools

SublimeText3 Mac version
God-level code editing software (SublimeText3)
Hot Topics
 1662
1662
 14
1419
52
1312
25
1262
29
1235
24
14
1419
52
1312
25
1262
29
1235
24

 Photoshop's Value: Weighing the Cost Against Its Features
Apr 11, 2025 am 12:02 AM
Photoshop's Value: Weighing the Cost Against Its Features
Apr 11, 2025 am 12:02 AM
Photoshop is worth the investment because it provides powerful features and a wide range of application scenarios. 1) Core functions include image editing, layer management, special effects production and color adjustment. 2) Suitable for professional designers and photographers, but amateurs may consider alternatives such as GIMP. 3) Subscribe to AdobeCreativeCloud can be used as needed to avoid high one-time spending.
 Advanced Photoshop Tutorial: Master Retouching & Compositing
Apr 17, 2025 am 12:10 AM
Advanced Photoshop Tutorial: Master Retouching & Compositing
Apr 17, 2025 am 12:10 AM
Photoshop's advanced photo editing and synthesis technologies include: 1. Use layers, masks and adjustment layers for basic operations; 2. Use image pixel values to achieve photo editing effects; 3. Use multiple layers and masks for complex synthesis; 4. Use "liquefaction" tools to adjust facial features; 5. Use "frequency separation" technology to perform delicate photo editing, these technologies can improve image processing level and achieve professional-level effects.
 Photoshop for Web Design: Advanced Techniques for UI/UX
Apr 08, 2025 am 12:19 AM
Photoshop for Web Design: Advanced Techniques for UI/UX
Apr 08, 2025 am 12:19 AM
Photoshop can be used in web design to create high-fidelity prototypes, design UI elements, and simulate user interactions. 1. Use layers, masks and smart objects for basic design. 2. Simulate user interaction through animation and timeline functions. 3. Use scripts to automate the design process and improve efficiency.
 Photoshop's Key Features: A Deep Dive
Apr 19, 2025 am 12:08 AM
Photoshop's Key Features: A Deep Dive
Apr 19, 2025 am 12:08 AM
Key features of Photoshop include layers and masks, adjustment tools, filters and effects. 1. Layers and masks allow independent editing of image parts. 2. Adjust tools such as brightness/contrast can modify image tone and brightness. 3. Filters and effects can quickly add visual effects. Mastering these features can help creative professionals achieve their creative vision.
 Using Photoshop: Creative Possibilities and Practical Uses
Apr 22, 2025 am 12:09 AM
Using Photoshop: Creative Possibilities and Practical Uses
Apr 22, 2025 am 12:09 AM
Photoshop is very practical and creative in practical applications. 1) It provides basic editing, repairing and synthesis functions, suitable for beginners and professionals. 2) Advanced features such as content recognition fill and layer style can improve image effects. 3) Mastering shortcut keys and optimizing layer structure can improve work efficiency.
 Is Photoshop Free? Understanding Subscription Plans
Apr 12, 2025 am 12:11 AM
Is Photoshop Free? Understanding Subscription Plans
Apr 12, 2025 am 12:11 AM
Photoshop is not free, but there are several ways to use it at low cost or free: 1. The free trial period is 7 days, and you can experience all functions during this period; 2. Student and teacher discounts can cut costs by half, and school proof is required; 3. The CreativeCloud package is suitable for professional users and includes a variety of Adobe tools; 4. PhotoshopElements and Lightroom are low-cost alternatives, with fewer functions but lower prices.
 Photoshop Advanced Typography: Creating Stunning Text Effects
Apr 07, 2025 am 12:15 AM
Photoshop Advanced Typography: Creating Stunning Text Effects
Apr 07, 2025 am 12:15 AM
In Photoshop, you can create text effects through layer styles and filters. 1. Create a new document and add text. 2. Apply layer styles such as shadows and outer glow. 3. Use filters such as wave effects and add bevel and relief effects. 4. Use masks to adjust the effect range and intensity to optimize the visual impact of the text effect.
 The Core Purpose of Photoshop: Creative Image Design
Apr 10, 2025 am 09:29 AM
The Core Purpose of Photoshop: Creative Image Design
Apr 10, 2025 am 09:29 AM
Photoshop’s core use in creative image design is its powerful functionality and flexibility. 1) It allows designers to transform creativity into visual reality through layers, masks and filters. 2) Basic usages include cropping, resizing and color correction. 3) Advanced usages such as layer styles, blend modes and smart objects can create complex effects. 4) Common mistakes include improper layer management and excessive use of filters, which can be solved by organizing layers and using filters reasonably. 5) Performance optimization and best practices include rational use of layers, regular saving of files, and using shortcut keys.
