

How to format a drive using GUID on Mac


Formatting the drive of your Mac system is crucial for proper operation. It helps prevent various system problems and makes your Mac more stable overall.
While naturally Mac supports various partitioning schemes, GUID offers more modern and versatile functionality compared to other options. Also essential for newer Macs and supports larger drives, giving you the best compatibility and stability.
This guide will dive into how to format a drive using a GUID on macOS. That said, let's get started.
Why GUID is important for macOS installation
GUID (full form of Globally Unique Identifier) is a partitioning scheme that helps with installation and operation macOS operating system. It is a more advanced storage space than a traditional MBR (Master Boot Record) system because it can handle larger hard drives.
The old partitioning system used in macOS (called MBR) has a limited capacity. It only allows up to 2TB of storage on the hard drive, with up to four partitions allowed.
As the need for a wider range of storage solutions increases, macOS users are finding GUID to be a better choice than traditional MBR. GUID supports large-capacity hard drives, especially macOS installations that require larger storage space.
Because GUID can handle these wide range of storage needs with ease, users can take full advantage of the latest, larger hard drives on the market. They also get well-organized and segmented storage structures for various purposes such as data organization, system backup, and application installation.
How to format a drive using GUID on macOS?
Formatting a drive with a GUID on macOS ensures it works with larger storage space and supports more partitions. The process is simple, but there are a few things to remember before you start formatting:
- Back up all your data somewhere to avoid losing it.
- Keep macOS updated for compatibility with new formatting protocols.
- Make sure your Mac has enough battery to complete the format without interruption.
- Use a stable power supply to avoid sudden power outages during the formatting process.
- Confirm there is enough space for formatting to avoid overloading the drive.
After you have everything set up, follow these steps to format the drive using a GUID on macOS:
- Connect the external drive to your Mac.
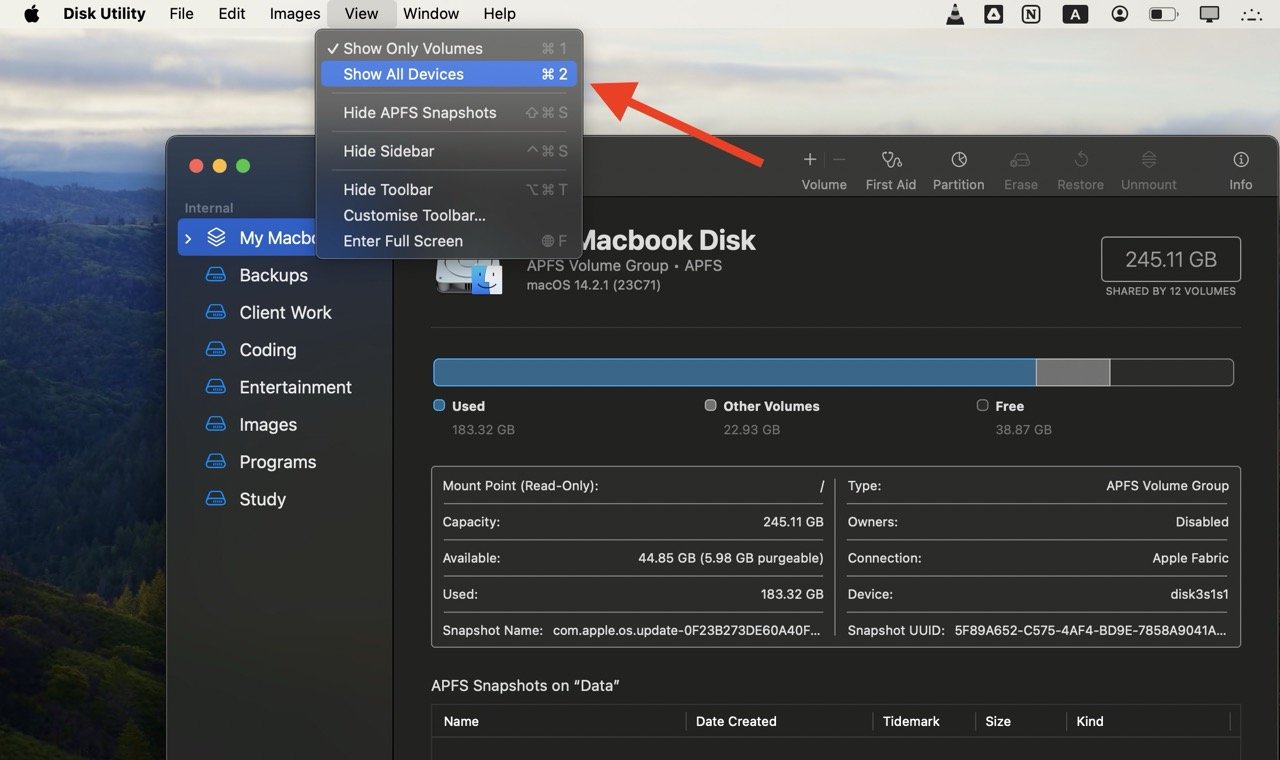
- Open "Disk Utility".
- Click "View" in the upper left corner and select "Show All Devices" from the drop-down menu.
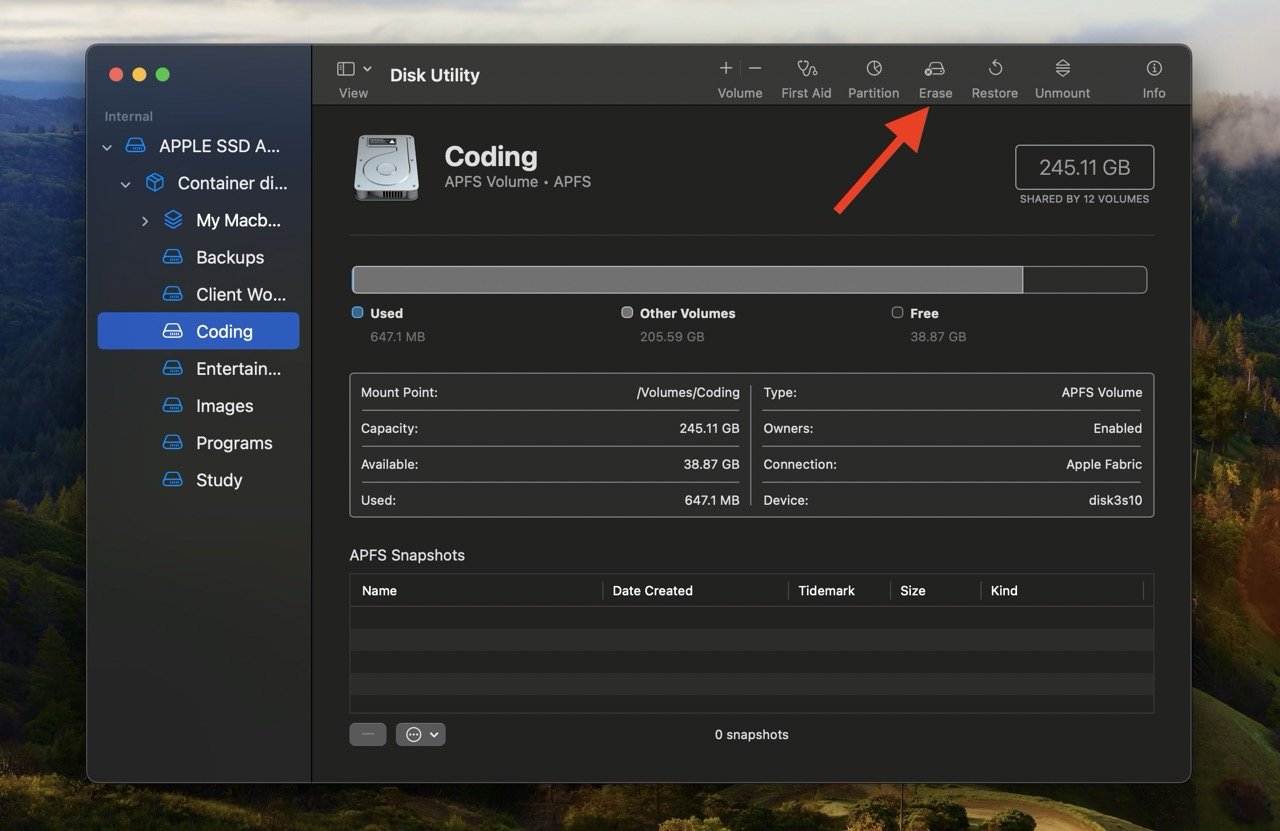
- #Select the drive you want to format.
- Click "Erase" at the top of the window.
- Assign a name to the drive, select the format (exFAT or APFS), and then select GUID Partition Mapping under Scheme.
- Press the "Erase" button.
That's it. Your drive is now successfully formatted using the GUID partition mapping scheme.
Should you choose "exFAT" or "APFS" format?

"exFAT" and "APFS" are two different file system formats used to format macOS drives.
If you want cross-platform compatibility, the drive will work on both Mac and Windows systems, "exFAT" is preferred. It acts like a universal language, ensuring smooth data exchange between different operating systems.
On the other hand, if your drive only interacts within a macOS environment, especially on newer Macs, choose "APFS." Developed by Apple specifically for macOS, the system offers enhanced performance and features such as space sharing and an improved file system.
Simply put, if your drive will interact with Windows, choose "exFAT"; if it is going to be used with a Mac, choose "APFS" for a better experience.
What to do if the error "Erase process failed" appears
Sometimes, the process of formatting a drive using GUID on macOS gets interrupted with an "Erase process failed" error. This means there is an issue with the drive itself; a damaged drive, physical damage, or even a bad connection can cause this error.
If you receive this error, follow these quick solutions to troubleshoot and resolve the issue:
- Retry formatting: This error may be a temporary glitch, so please try formatting again. Please make sure to choose the correct format and partition scheme during this process.
- Change Partition Scheme: If formatting with a specific scheme (such as GUID) repeatedly fails, try using an alternative such as Master Boot Record (MBR). After formatting using the alternate scheme, you can switch back to the original scheme.
- Test with a different drive: If the error appears frequently, it may mean the drive is faulty. To confirm this, test the formatting process using another drive. If the error does not occur with the new drive, the original drive may be damaged and needs to be replaced.
FAQ
When should I format a disk using the GUID partition mapping scheme?
The disk should be formatted using the GUID partition mapping scheme for macOS installations, especially if you have a newer Mac or plan to use a larger hard drive. It supports large storage capacities, which is crucial for compatibility with modern macOS systems.
Should I use Apple partitions or GUIDs?
Although the Apple partition functions normally, its capacity is limited. In comparison, GUID partitioning is a more modern and versatile option. It's compatible with Intel and Apple Silicon Macs, supports larger drives, and offers better flexibility for a variety of use cases.
How to fix GUID errors?
If you encounter GUID error issues, please try formatting again and make sure to select the correct partition scheme. If it still doesn't work, switch to another solution, such as Master Boot Record (MBR), and then switch back. If the problem persists, check with a different drive to see if it's the original drive that's causing the problem, meaning there's something wrong with it.
The above is the detailed content of How to format a drive using GUID on Mac. For more information, please follow other related articles on the PHP Chinese website!

Hot AI Tools

Undresser.AI Undress
AI-powered app for creating realistic nude photos

AI Clothes Remover
Online AI tool for removing clothes from photos.

Undress AI Tool
Undress images for free

Clothoff.io
AI clothes remover

Video Face Swap
Swap faces in any video effortlessly with our completely free AI face swap tool!

Hot Article
Hot Tools

Notepad++7.3.1
Easy-to-use and free code editor

SublimeText3 Chinese version
Chinese version, very easy to use

Zend Studio 13.0.1
Powerful PHP integrated development environment

Dreamweaver CS6
Visual web development tools

SublimeText3 Mac version
God-level code editing software (SublimeText3)
Hot Topics


 How to open a terminal for macos
Apr 12, 2025 pm 05:30 PM
How to open a terminal for macos
Apr 12, 2025 pm 05:30 PM
The following five methods can be used to open a macOS terminal: Use Spotlight Search through application folders Use Launchpad to use shortcut keys Command Shift U through terminal menus
 How to delete more than server names of apache
Apr 13, 2025 pm 01:09 PM
How to delete more than server names of apache
Apr 13, 2025 pm 01:09 PM
To delete an extra ServerName directive from Apache, you can take the following steps: Identify and delete the extra ServerName directive. Restart Apache to make the changes take effect. Check the configuration file to verify changes. Test the server to make sure the problem is resolved.
 How to view the system name of macos
Apr 12, 2025 pm 05:24 PM
How to view the system name of macos
Apr 12, 2025 pm 05:24 PM
How to view system name in macOS: 1. Click the Apple menu; 2. Select "About Native"; 3. The "Device Name" field displayed in the "Overview" tab is the system name. System name usage: identify Mac, network settings, command line, backup. To change the system name: 1. Access About Native Machine; 2. Click the "Name" field; 3. Enter a new name; 4. Click "Save".
 How to open macos terminal
Apr 12, 2025 pm 05:39 PM
How to open macos terminal
Apr 12, 2025 pm 05:39 PM
Open a file in a macOS terminal: Open the terminal to navigate to the file directory: cd ~/Desktop Use open command: open test.txtOther options: Use the -a option to specify that a specific application uses the -R option to display files only in Finder
 How to restart the apache server
Apr 13, 2025 pm 01:12 PM
How to restart the apache server
Apr 13, 2025 pm 01:12 PM
To restart the Apache server, follow these steps: Linux/macOS: Run sudo systemctl restart apache2. Windows: Run net stop Apache2.4 and then net start Apache2.4. Run netstat -a | findstr 80 to check the server status.
 How to record macos screen
Apr 12, 2025 pm 05:33 PM
How to record macos screen
Apr 12, 2025 pm 05:33 PM
macOS has a built-in "Screen Recording" application that can be used to record screen videos. Steps: 1. Start the application; 2. Select the recording range (the entire screen or a specific application); 3. Enable/disable the microphone; 4. Click the "Record" button; 5. Click the "Stop" button to complete. Save the recording file in .mov format in the "Movies" folder.
 What computer configuration is required for vscode
Apr 15, 2025 pm 09:48 PM
What computer configuration is required for vscode
Apr 15, 2025 pm 09:48 PM
VS Code system requirements: Operating system: Windows 10 and above, macOS 10.12 and above, Linux distribution processor: minimum 1.6 GHz, recommended 2.0 GHz and above memory: minimum 512 MB, recommended 4 GB and above storage space: minimum 250 MB, recommended 1 GB and above other requirements: stable network connection, Xorg/Wayland (Linux)
 How to install fonts for macos
Apr 12, 2025 pm 05:21 PM
How to install fonts for macos
Apr 12, 2025 pm 05:21 PM
Steps to install fonts in macOS: Download the font file from a reliable source. Use the font preview program or terminal to install it into the system font folder (the sudo command is required to share it by users). Verify the installation in Font Book. Select the installed font to use in the application.
