

Laptop cannot enter bios


Why can’t the computer enter the bios
Your BIOS battery is dead. Solution: Just replace the battery.
Cause Analysis The user did not figure out the brand of his motherboard during installation and pressed the wrong start button. Memory detection takes a long time when booting.
Cause: The setting parameters of the motherboard BIOS are wrong or the hardware is faulty. The symptoms include battery failure, configuration errors, poor memory or hard disk contact, etc. Setting method: (1) If you enter the BIOS due to misoperation, you can press the ESC key on the keyboard to exit.
This is because the boot item is missing, just set it in the bios. Tools: Computer. If this interface is displayed after turning on the computer, it means that the boot item is missing. At this time, restart the computer. Restart the computer, press F1 (different computers may be different) to enter the setup interface and select restart in the upper right corner of the interface.
Aptio Setup Utility is a program used to manage computer BIOS settings.
What should I do if my ThinkPad notebook cannot enter the BIOS?
You can purchase a motherboard battery to replace it, then turn on the computer and press the DEL key (F2 or other designated hotkeys for the notebook) to enter the BIOS interface, and Reset the correct parameters, and finally press F10 to save, exit and restart. Configuration error: This situation can also occur because the manually configured BIOS parameters are inconsistent with the local hardware environment.
To enter the bios interface of Lenovo computers, you need to press the F2 shortcut key; on some Lenovo computers, you need to press the F2 and FN keys at the same time. You can try F2 FN.
This is because the boot item is missing, just set it in the bios. Tools: Computer. If this interface is displayed after turning on the computer, it means that the boot item is missing. At this time, restart the computer. Restart the computer, press F1 (different computers may be different) to enter the setup interface and select restart in the upper right corner of the interface.
Taking ThinkPad E40 as an example, the steps are as follows: Shut down the laptop first. After the laptop is completely shut down, press the power button to turn it on. After turning it on, when you see the Lenovo logo, press the "F2" button on the keyboard several times quickly and continuously. Then the computer will automatically enter the BIOS menu.
thinkpad T440 needs to press F2 when booting to enter the BIOS. The specific steps are as follows: Turn on the computer and shut down the laptop first. If the computer is turned off, you can ignore this step. After the computer is turned off and then turned on again, you can see the Lenovo startup logo when it is turned on.
Why can’t I enter the bios on my Lenovo notebook?
1. Check whether the power connection is stable. If the power supply is unstable, reconnect the power supply. Check your hardware settings. If you have recently changed your hardware settings, try reverting to your previous settings. Check if your BIOS firmware version is up to date. If it is not the latest version, please download and install the latest version.
2. This is because the boot item is missing, just set it in the bios. Tools: Computer. If this interface is displayed after turning on the computer, it means that the boot item is missing. At this time, restart the computer. Restart the computer, press F1 (different computers may be different) to enter the setup interface and select restart in the upper right corner of the interface.
3. If you have recently replaced accessories, it may also be caused by an error in the motherboard BIOS. The solution is to turn on the computer and press the DEL key (or the key prompted on the boot screen) to enter the motherboard BIOS and initialize the BIOS setting information. Usually, press F9 to restore the factory default settings, then press F10 to save and exit and restart the computer.
4. Cause analysis. The user did not know the brand of his motherboard during installation and pressed the wrong start button. Memory check takes a long time when booting up.
5. Press F2 to enter the BIOS interface: (1) Under the Boot Sequence menu, click "Load Defaults". (2) Under the Advanced Boot Options menu, check "Enable Legacy Option ROMs".
What to do if the computer turns on with a black screen and cannot enter the bios
The solution is as follows: Press F8 on boot and select the last known correct configuration to enter. Press F8 when booting, select safe mode to enter, uninstall recently installed updates and software, and perform anti-virus and junk cleaning at the same time. If you cannot enter safe mode, it is recommended to reinstall the operating system.
Restart the computer at the startup interface. Keep pressing F2 on the keyboard until you enter the BIOS interface. Switch the tab to boot. Set the system disk as the first boot in EFI. After the setup is complete, go to exit.
Restart the computer. Try restarting the computer to see if it boots normally. Check the power cord and plug. Make sure the power cord is plugged in and well connected. Check the graphics card and memory module. Try unplugging the graphics card and memory module again to make sure they are plugged in properly. Enter the BIOS.
Replace memory slots, etc.! 5. Download and install "Driver Wizard" and upgrade: graphics card driver! 6.
Regarding this problem, the editor thinks that we can try to restart our computer. If the problem cannot be solved, we can reinstall the operating system.
What to do if you cannot enter the BIOS of your Lenovo notebook
1. If your Lenovo notebook cannot enter the BIOS, you can try the following methods: restart the computer and press the F2 or DEL key during startup to enter the BIOS. . Different computer models may require pressing different keys, please refer to the instructions or your computer manufacturer's website. Check that the power connection is stable.
2. Press F2 to enter the BIOS interface: (1) Under the Boot Sequence menu, click "Load Defaults". (2) Under the Advanced Boot Options menu, check "Enable Legacy Option ROMs". (3) In System Configuration-SATA Operation, change the hard disk mode to: ATA.
3. Computer motherboard failure or keyboard failure: If the computer motherboard fails or the keyboard operation fails, you will also be unable to enter the BIOS setup program, and you need to contact a professional for detection and repair.
4. First, turn on the computer and keep clicking F1 to enter the computer Bios settings. Then in the bios page, press the right arrow key on the computer keyboard and select Startup. Then on the Boot option, press the Enter key on the computer keyboard.
5. Lenovo laptop cannot enter the bios. Generally, you can press F2, F10, DEL and other keys when starting up, and you should be able to enter.
6. To enter the bios interface of Lenovo computers, you need to press the F2 shortcut key; on some Lenovo computers, you need to press the F2 and FN keys at the same time. You can try F2 FN.
Why can’t the computer enter the bios interface?
1. The user did not know the brand of his motherboard during installation and pressed the wrong start button. Memory check takes a long time when booting up. Solution Before installing the system, the most important thing is to find out what brand the motherboard is, because different brands have different startup keys to enter the BIOS interface.
2. Your BIOS battery is out of power. Solution: Just replace the battery.
3. This is because the boot item is missing, just set it in the bios. Tools: Computer. If this interface is displayed after turning on the computer, it means that the boot item is missing. At this time, restart the computer. Restart the computer, press F1 (different computers may be different) to enter the setup interface and select restart in the upper right corner of the interface.
The above is the detailed content of Laptop cannot enter bios. For more information, please follow other related articles on the PHP Chinese website!

Hot AI Tools

Undresser.AI Undress
AI-powered app for creating realistic nude photos

AI Clothes Remover
Online AI tool for removing clothes from photos.

Undress AI Tool
Undress images for free

Clothoff.io
AI clothes remover

Video Face Swap
Swap faces in any video effortlessly with our completely free AI face swap tool!

Hot Article
Hot Tools

Notepad++7.3.1
Easy-to-use and free code editor

SublimeText3 Chinese version
Chinese version, very easy to use

Zend Studio 13.0.1
Powerful PHP integrated development environment

Dreamweaver CS6
Visual web development tools

SublimeText3 Mac version
God-level code editing software (SublimeText3)
Hot Topics
 1655
1655
 14
1414
52
1307
25
1253
29
1227
24
14
1414
52
1307
25
1253
29
1227
24

 How to enter bios on hp motherboard
May 04, 2024 pm 09:01 PM
How to enter bios on hp motherboard
May 04, 2024 pm 09:01 PM
How to set up the U disk boot in the HP notebook bios (how to enter the HP computer bios) and then insert the U disk to be booted first into the USB port of the notebook. If you want to install the system, the system program must have been prepared in the U disk. First, open the laptop. Make sure the laptop is turned off. Setting the bios must be done with the computer turned off. Then insert the U disk that you want to boot first into the USB port of the notebook. If you want to install the system, the prerequisite is that the system program has been prepared in the U disk. Take the HP ProDesk400G5SFF desktop computer as an example. Set the BIOS disk startup method: First, restart the computer and wait for the startup screen to appear. There are two ways to set up USB disk startup on HP notebooks. One is to directly press the shortcut key to select
 MSI motherboard boot logo
May 08, 2024 pm 02:20 PM
MSI motherboard boot logo
May 08, 2024 pm 02:20 PM
How to cancel the MSI motherboard icon when booting 1. Press the DEL key when booting to enter the BIOS. Generally, in the "Advanced Features" item, you can find the words MSI motherboard LOGO screen. Select DISABLED, save and exit. There will no longer be this MSI motherboard LOGO screen when you turn on the computer in the future. MSI motherboard refers to the motherboard brand developed by MSI (MSI Technology Company). 2. The logo displayed when the computer is turned on is basically that of the motherboard manufacturer. You can set QUICKPOST to DISENABLE in the BIOS, so that the logo will generally no longer be displayed. It will display computer configuration-related information and give you more details. 3. First, teach you how to flash the BIOS in Windows environment. First: Go online
 Tutorial on assembling a computer and installing a system? How to install win11 system when assembling a computer?
Apr 27, 2024 pm 03:38 PM
Tutorial on assembling a computer and installing a system? How to install win11 system when assembling a computer?
Apr 27, 2024 pm 03:38 PM
Tutorial on assembling a computer and installing a system? Nowadays, the system installation for assembling computers is very simple and convenient, and only requires a CD. First enter the bios settings, set the computer to boot first with the CD-ROM drive, then restart the computer and load the system CD into the CD-ROM drive. The CD will automatically enter the installation state. At this time, you only need to manually repartition the partitions, and the rest will be completed automatically. How to install win11 system when assembling a computer? 1. First, we need to download a win11 image file from this site before installing it. 2. The win11 image file has undergone a large number of professional tests to ensure stable installation and smooth operation. 3. After the download is completed, load the folder in the download path and run the "windowssetup" process in it.
 Huawei mobile phone USB sharing network to computer
May 08, 2024 am 08:25 AM
Huawei mobile phone USB sharing network to computer
May 08, 2024 am 08:25 AM
How to connect a Huawei phone to a computer via USB to access the Internet. First, we open the phone settings and search for "HDB". Then we click to open "Mobile Network Sharing" in More. Then we can click to open "USB Sharing Network" in the pop-up window. Summary First, connect the Huawei mobile phone to the computer through the data cable. Open "Settings" on your phone and enter the settings interface. Click "Personal Hotspot", select "USB tethering" and click the switch button at the back to turn it on. First click "Settings About Phone", then click "Version Number" 7 times in succession. You will be prompted to enter developer mode. Then return to the "Settings" list, "Developer Options" will appear, then click to enter "Developer Options", turn on the "USB Debugging" switch, and click
 How to enter bios after assembling a computer? How to enter bios when assembling a computer?
May 07, 2024 am 09:13 AM
How to enter bios after assembling a computer? How to enter bios when assembling a computer?
May 07, 2024 am 09:13 AM
How to enter bios after assembling a computer? Before entering the BIOS, you need to make sure that the computer is completely shut down and powered off. Here are several common ways to enter the BIOS: 1. Use shortcut keys: Most computer manufacturers will display a prompt message at startup telling you which key to press to enter the BIOS settings. Usually the F2, F10, F12 or Delete key. After pressing the appropriate keys, you should be able to see a screen with information about your computer's hardware and BIOS settings. 2. Use the button on the motherboard: Some computer motherboards have a dedicated button for entering BIOS settings. This button is usually labeled "BIOS" or "UEFI". After pressing the button you should be able to see
 What you need to know when reinstalling the system from a USB flash drive: How to set up the BIOS correctly
May 06, 2024 pm 03:00 PM
What you need to know when reinstalling the system from a USB flash drive: How to set up the BIOS correctly
May 06, 2024 pm 03:00 PM
Reinstalling the system is a problem that many computer users often encounter. Whether it is due to system crash, poisoning or wanting to upgrade the system, reinstalling the system is a good choice. However, many people encounter various problems when reinstalling the system, such as not knowing how to set up the BIOS, not knowing how to choose a suitable installation disk, etc. Today, we will talk about some things you must know when reinstalling the system from a USB flash drive, and teach you how to set up the BIOS correctly and successfully complete the system reinstallation. Tool materials: System version: Windows1020H2 Brand model: Lenovo Xiaoxin Air14 Software version: Pocket machine One-click reinstallation of system software v1.0 1. Preparation 1. Prepare a U disk with a capacity of no less than 8GB, preferably USB3. 0, so the speed will be faster
 How to upgrade Gigabyte motherboard to Win11_How to upgrade Gigabyte motherboard to Win11
May 06, 2024 pm 12:04 PM
How to upgrade Gigabyte motherboard to Win11_How to upgrade Gigabyte motherboard to Win11
May 06, 2024 pm 12:04 PM
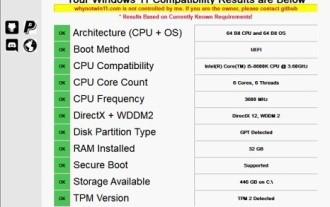
1. Win11 does not have very high requirements for the motherboard. You can first download healthcheck or whynotwin11 to check whether your other hardware devices support it (you can download it from this site). 2. If other conditions are met and only tpm does not meet the requirements, you can enable tpm in the bios settings. 3. Restart the system, and then press [DEL] on the keyboard to enter the BIOS settings when the logo pops up. 4. Enter the [Settings] option and [Miscellaneous] option in sequence. 5. Find [Intel Platform Trust Technology (PTT)] below and set it to [Start]. 6. If it is an AMD platform, then
 Does the newly assembled computer keyboard light not light up?
May 07, 2024 pm 04:40 PM
Does the newly assembled computer keyboard light not light up?
May 07, 2024 pm 04:40 PM
Does the newly assembled computer keyboard light not light up? The motherboard model should be UEFIbios. First find a keyboard with PS2 port, enter bios, turn off UEFI boot, and change to Legacy mode. If there is fast boot, turn off options like FastBoot, UEFI boot, turn on fast boot, and enter the system. USB interface detection may be turned off before, and USB devices can be used to assemble the computer after entering the system. The mouse and keyboard lights do not light up when the computer is turned on? If the keyboard light does not come on, there is a high possibility of memory failure, or it may be caused by static electricity on the motherboard or the motherboard is faulty. Use an eraser to wipe the gold finger of the memory graphics card, and remove and insert the memory several times. The problem remains. There are dual memory sticks and a single memory stick is used for testing. The problem persists. Re-plug the various cables inside and outside the chassis, and then unplug the connector on the motherboard.
