
 Software Tutorial
Computer Software
How to upload 3D models to Kujiale_Introduction to the method of uploading 3D models to Kujiale
Software Tutorial
Computer Software
How to upload 3D models to Kujiale_Introduction to the method of uploading 3D models to Kujiale
How to upload 3D models to Kujiale_Introduction to the method of uploading 3D models to Kujiale

php Xiaobian Yuzai today will introduce how to upload a 3D model. 3D models have become a hot trend in the design field today, and many designers hope to master this skill. However, for beginners, making 3D models may be difficult. However, as long as you master the correct methods and techniques, it is actually easy to get started. Next, let’s learn how to upload a 3D model!
1. First click on the model upload location or drag the model into the blue box.

2. Upload a single model and click the classification position separately, select the category, or enter the product type in the rendering classification position: such as bed, sofa, coffee table, etc.

3. Upload supports multiple model uploads at the same time (note: in the current version, it is best to upload product models of the same category, such as all beds or all sofas)
Any If there are categories, you need to click on the category separately for each model, so it is recommended to upload products of the same category.

4. If you upload multiple models of the same category, you can select all and click Edit to batch set the rendering classification.


#5. Finally, be sure to wait until the model is fully rendered before clicking submit, otherwise there will be no model after submission.

The above is the detailed content of How to upload 3D models to Kujiale_Introduction to the method of uploading 3D models to Kujiale. For more information, please follow other related articles on the PHP Chinese website!

Hot AI Tools

Undresser.AI Undress
AI-powered app for creating realistic nude photos

AI Clothes Remover
Online AI tool for removing clothes from photos.

Undress AI Tool
Undress images for free

Clothoff.io
AI clothes remover

Video Face Swap
Swap faces in any video effortlessly with our completely free AI face swap tool!

Hot Article
Hot Tools

Notepad++7.3.1
Easy-to-use and free code editor

SublimeText3 Chinese version
Chinese version, very easy to use

Zend Studio 13.0.1
Powerful PHP integrated development environment

Dreamweaver CS6
Visual web development tools

SublimeText3 Mac version
God-level code editing software (SublimeText3)
Hot Topics


 How to rotate the perspective of Kujiale - How to rotate the perspective of Kujiale
Mar 05, 2024 pm 09:16 PM
How to rotate the perspective of Kujiale - How to rotate the perspective of Kujiale
Mar 05, 2024 pm 09:16 PM
The content brought to you in this chapter is about Kujiale. Do you know how to rotate the perspective of Kujiale? The following tutorial brings the method of rotating the perspective of Kujiale. Interested users can take a look below. Step 1: Enter Kujiale and choose to create a new or open project. Step 2: Click 3D in the lower left corner. Step 3: Click the left mouse button to change the cursor to a palm shape. Step 4: Slide the mouse left or right to rotate the perspective left or right.
 How to export the cross-section diagram in Kujiale_How to export the cross-section diagram in Kujiale
Apr 02, 2024 pm 06:01 PM
How to export the cross-section diagram in Kujiale_How to export the cross-section diagram in Kujiale
Apr 02, 2024 pm 06:01 PM
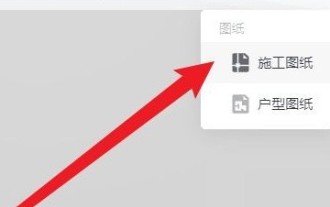
1. First, open the design plan to be processed in Kujiale and click on the construction drawings under the drawing list above. 2. Then click to select the full-color floor plan. 3. Then hide the unnecessary furniture in the drawing, leaving only the furniture that needs to be exported. 4. Finally, click Download.
 How to render orthogonal top view in Kujiale_Tutorial on rendering orthogonal top view in Kujiale
Apr 02, 2024 pm 01:10 PM
How to render orthogonal top view in Kujiale_Tutorial on rendering orthogonal top view in Kujiale
Apr 02, 2024 pm 01:10 PM
1. First open the design plan to be rendered in Kujiale. 2. Then open top view rendering under the rendering menu. 3. Then click Orthogonal in the parameter settings in the top view rendering interface. 4. Finally, after adjusting the model angle, click Render Now to render the orthogonal top view.
 How to set shortcut keys in Kujiale_Tutorial on setting shortcut keys in Kujiale
Apr 02, 2024 pm 01:55 PM
How to set shortcut keys in Kujiale_Tutorial on setting shortcut keys in Kujiale
Apr 02, 2024 pm 01:55 PM
1. First open the Kujiale client. 2. Then click the Settings button in the lower left corner. 3. Then click Shortcut Key Settings. 4. Finally, you can modify the corresponding settings as needed.
 How to edit the combined model in Kujiale_Tutorial on editing the combined model in Kujiale
Apr 02, 2024 pm 01:13 PM
How to edit the combined model in Kujiale_Tutorial on editing the combined model in Kujiale
Apr 02, 2024 pm 01:13 PM
1. First open the Kujiale client and design the house plan. 2. Then add a sofa combination to the apartment. 3. Select the added sofa organization, and then click Ungroup on the floating menu. 4. Then select the unwanted part of the model in the combination. 5. Finally, click the delete button on the floating tool to delete it.
 How to change the color of the light strip in Kujiale_Tutorial on changing the color of the light strip in Kujiale
Apr 02, 2024 pm 01:22 PM
How to change the color of the light strip in Kujiale_Tutorial on changing the color of the light strip in Kujiale
Apr 02, 2024 pm 01:22 PM
1. First open the design plan to be processed in Kujiale. 2. Then select the ceiling to enter the ceiling design interface. 3. Then select the light strip whose color you want to adjust. 4. Finally, adjust the color in the properties panel in the lower left corner.
 How to download cad floor plans from Kujiale_How to download cad floor plans from Kujiale
Apr 02, 2024 pm 01:25 PM
How to download cad floor plans from Kujiale_How to download cad floor plans from Kujiale
Apr 02, 2024 pm 01:25 PM
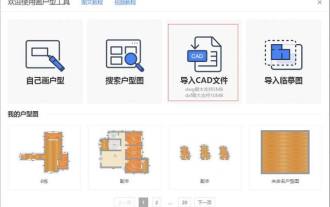
1. Import from the pop-up window of the home-building tool when you first enter it. Click [Start Design] in Cloud Design, enter the tool page and select CAD import. Note: Currently only DWG/DXF format is supported, DWG does not exceed 5MB, and DXF does not exceed 10MB. 2. Import from the House Plan Tool. Click [Import]-[Import CAD] on the House Plan Tool page. Step 2: Adjust the imported CAD house plan. After importing into CAD, as shown in the figure below, there are some walls that have not been generated. Click the wall drawing tool in the upper left corner of the house plan interface to fill it (the red box position in the figure). After drawing the wall, on the left Select the door and window model and drag it to the wall for decoration. Note: 3D decoration design cannot be carried out for units that are not closed. After adjusting the positions of doors and windows and the door opening direction, remember to assign commands to each room.
 How to change the interface appearance of Kujiale_How to change the interface appearance of Kujiale
Apr 02, 2024 pm 08:13 PM
How to change the interface appearance of Kujiale_How to change the interface appearance of Kujiale
Apr 02, 2024 pm 08:13 PM
1. First open the design plan in Kujiale and click on the small robot icon in the upper right corner. 2. Then click Preferences in the drop-down menu. 3. Finally, click on the general settings to select the appearance you want to use.
