

How to connect the computer switch cable to the motherboard

How to plug the computer switch cable into the motherboard
1. Arrange all the cables together. According to the above markings, first clarify the definition of each wire: a. Power switch: POWER SW, POWER, POWER SWITCH, ONOFF, POWER SETUP, PWR, etc., function definition: reset button on the front of the chassis.
2. First, connect the power cord from the chassis. One of them is relatively wide, as pointed by the arrow in the picture below. If it is marked USB, then it is connected to the USB on the chassis panel. For the socket cable, look for the USB pin on the edge of the motherboard and plug it in. This one is relatively large and easy to find.
3. The motherboard generally has four sets of switch indicator lines and POWER SW power switch. POWER LED power indicator light. RESET SW reset switch. H.D.D LED keyboard status indicator. Pay attention to the positive and negative poles when connecting. Usually, colored lines such as red, green, and yellow represent the positive pole, and white and black represent the negative pole. Pay attention to the distinction.
4. The computer chassis has a bunch of wires with plugs. These plugs are marked with power on, reset, speak and other characters. Power on is the plug corresponding to the switch wire, and reset is the plug corresponding to the reset button.
5. First connect the power cord from the chassis, one of which is wider, as shown by the arrow in the picture below. If it's labeled USB, it's the cable that connects to the USB slot on the case panel. Find the USB pin on the edge of the motherboard and plug it in.
 第1张")
How to connect the wire inside the desktop computer’s power-on button to the motherboard
How to connect the desktop computer’s power-on cable: Put all the cables together , based on the above annotation, first clarify the definition of each wire: a. Power switch: POWER SW, POWER, POWER SWITCH, ONOFF, POWER SETUP, PWR, etc. Function definition: Reset button on the front of the chassis.
First, find the PWR SW or Power Switch pin socket and determine where the power-on key wire needs to be inserted. Insert the copper pin on the power button wire into the PWR SW pin socket. If you have a second pin socket on your computer's motherboard, you can repeat this step to connect another copper pin.
First of all, the motherboard supplies power. Currently, most motherboards have 24PIN interfaces. There are also 24PIN interfaces in the power supply, which can be plugged in accordingly. After the motherboard power supply connection is completed, connect the installed CPU power supply 4PIN interface to the corresponding slot position.
How to connect the power-on button wire on the computer motherboard: Put all the wires together. According to the above label, first clarify the definition of each wire: a. Power switch: POWER SW, which may be named : POWER, POWER SWITCH, ONOFF, POWER SETUP, PWR, etc. Function definition: Reset button on the front of the chassis.
Find the plug with the POWER (PWR) mark on the chassis panel, then find the corresponding marked pin on the motherboard and insert it. Often, the chassis wiring will have English letters or English abbreviations identifying each person's identity, just like the model number of the monitor. Players can easily distinguish them through such logos.
Question 3: How to connect the boot cable of a desktop computer? There is a mark on the motherboard, and there is also a mark on the boot cable. Once the two are aligned, you can insert them. For example, when the boot line is plugged into the motherboard, there is the word POWER ON, and the motherboard also has the corresponding words.
How to insert the restart line and switch line on the computer motherboard
Find the plug with the POWER (PWR) mark on the chassis panel, and then find the corresponding marked pin on the motherboard and insert it. Often the chassis wiring will be marked with their respective identities or English abbreviations, just like the model number of the monitor. Players can easily distinguish them through such logos.
Arrange all the cables together. According to the above markings, first clarify the definition of each cable: a. Power switch: POWER SW, POWER, POWER SWITCH, ONOFF, POWER SETUP, PWR, etc., function Definition: The reset button on the front of the chassis.
The first is the power switch (POWER): The plug of this switch has two pins. One of the connections is yellow or black, while the other connection is usually white.
The computer power switch wire connection diagram is as follows: The jumpers connecting the chassis to the motherboard generally include USB0, USB0, front audio interface (HD_AUDIO), and four motherboard jumpers: POWERSW, RESETSW, POWERLED, and HDDLED.
First of all, the motherboard supplies power. Currently, most motherboards have 24PIN interfaces. There are also 24PIN interfaces in the power supply, which can be plugged in accordingly. After the motherboard power supply connection is completed, connect the installed CPU power supply 4PIN interface to the corresponding slot position.
How to connect the power button cable to the motherboard
1. The g and USB connections to the front interface are generally integrated. Find the location of each pin on the motherboard. After all cables are plugged in, check that all hardware is installed correctly and is secure. Also check that all connections are correct and secure.
2. First, the motherboard supplies power. Currently, most motherboards have 24PIN interfaces. There are also 24PIN interfaces in the power supply, which can be plugged in accordingly. After the motherboard power supply connection is completed, connect the installed CPU power supply 4PIN interface to the corresponding slot position.
3. The method is as follows: First, connect the power cord from the chassis. One of them is relatively wide, as pointed by the arrow in the picture below. If it is marked USB, then it is connected to the USB on the chassis panel. For the socket cable, look for the USB pin on the edge of the motherboard and plug it in. This one is relatively large and easy to find.
The above is the detailed content of How to connect the computer switch cable to the motherboard. For more information, please follow other related articles on the PHP Chinese website!

Hot AI Tools

Undresser.AI Undress
AI-powered app for creating realistic nude photos

AI Clothes Remover
Online AI tool for removing clothes from photos.

Undress AI Tool
Undress images for free

Clothoff.io
AI clothes remover

Video Face Swap
Swap faces in any video effortlessly with our completely free AI face swap tool!

Hot Article
Hot Tools

Notepad++7.3.1
Easy-to-use and free code editor

SublimeText3 Chinese version
Chinese version, very easy to use

Zend Studio 13.0.1
Powerful PHP integrated development environment

Dreamweaver CS6
Visual web development tools

SublimeText3 Mac version
God-level code editing software (SublimeText3)
Hot Topics


 We just got our first look at the eShop on the Nintendo Switch 2
Apr 03, 2025 am 09:11 AM
We just got our first look at the eShop on the Nintendo Switch 2
Apr 03, 2025 am 09:11 AM
While the Nintendo Direct about the Switch 2 was only about an hour long, the accompanying deep dives released offer even more information and peeks at the much-anticipated console, which launches on June 5, 2025.Now, as spotted in “Ask the Develop
 The best JRPGs to play in 2025
Apr 11, 2025 am 11:39 AM
The best JRPGs to play in 2025
Apr 11, 2025 am 11:39 AM
The best JRPGs (Japanese role-playing games) in 2025 use theatrical storytelling and vibrant ensemble casts to weave powerful experiences that stay with us long after we put the controller down.Contrary to the name, JRPGs aren't necessarily all from
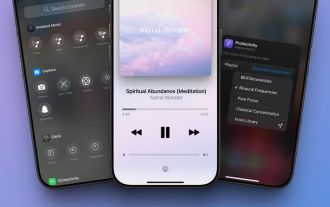 iOS 18.4: Access Hidden Ambient Music Playlists
Apr 04, 2025 pm 09:01 PM
iOS 18.4: Access Hidden Ambient Music Playlists
Apr 04, 2025 pm 09:01 PM
In Apple's iOS 18.4 software update, there's a new Ambient Music feature available in the Control Center options on iPhone. It's free to use, and does not require an Apple Music subscription. It's also more customizable than most users probably reali
 Everything New in the iOS 18.5 Beta
Apr 03, 2025 am 09:01 AM
Everything New in the iOS 18.5 Beta
Apr 03, 2025 am 09:01 AM
Apple today provided developers with the first beta of an upcoming iOS 18.5 update for testing purposes. Work on iOS 18 is starting to wind down with iOS 19 set to be introduced in a couple of months, so iOS 18.5 has just a handful of minor new featu
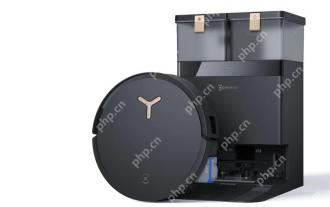 Review: Ecovacs' X8 Pro Omni Robot Now Works With HomeKit
Apr 17, 2025 am 06:01 AM
Review: Ecovacs' X8 Pro Omni Robot Now Works With HomeKit
Apr 17, 2025 am 06:01 AM
With iOS 18.4, Apple added support for robot vacuums to HomeKit. There are a few Matter-enabled robot vacuums that can be added to the Home app for use with Siri, including the Deebot X8 Pro Omni from Ecovacs. I've been testing the X8 Pro Omni for th
 Review: Dio Node Aims to Bring Cost-Effective AirPlay Speakers to Your Entire Home
Apr 15, 2025 am 06:12 AM
Review: Dio Node Aims to Bring Cost-Effective AirPlay Speakers to Your Entire Home
Apr 15, 2025 am 06:12 AM
Dio is a small company focused on delivering a single product for the Apple ecosystem: a low-cost AirPlay speaker system known as Dio Node. Initially launched as a crowdfunded Indiegogo campaign back in 2022, the Dio Node began shipping to backers la
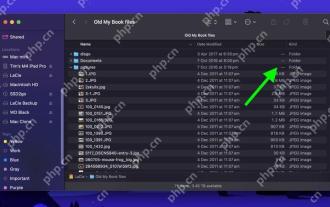 Reveal Hidden Folder Sizes in macOS Finder With These Tricks
Apr 17, 2025 am 01:11 AM
Reveal Hidden Folder Sizes in macOS Finder With These Tricks
Apr 17, 2025 am 01:11 AM
When using macOS Finder in List view, you'll see the sizes of individual files – but not folders.Instead, folders show a pair of dashes (--) in the Size column. macOS skips calculating folder sizes by default to keep List view performance fast, espec
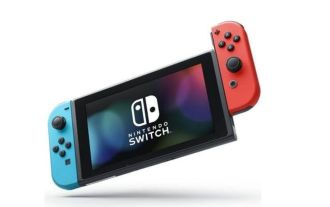 Former PlayStation boss says the Nintendo Switch 2 will determine if the OG Switch can ever claim PS2's best-selling console of all time title
Apr 01, 2025 pm 04:50 PM
Former PlayStation boss says the Nintendo Switch 2 will determine if the OG Switch can ever claim PS2's best-selling console of all time title
Apr 01, 2025 pm 04:50 PM
The PlayStation 2 is still the best-selling video game console of all time, having sold more than 160 million units to customers worldwide. But the Nintendo Switch ain't far behind. In fact, it's inching ever closer to that record every month and a f
