

Starting from Scratch: Mastering Maven to Create and Manage Java Projects

Start from the beginning: teach you how to use Maven to create and manage Java projects, specific code examples are required
As a Java developer, it is important to be proficient in project construction tools important. Among many build tools, Maven is a widely used tool that can help developers create and manage Java projects efficiently. This article will teach you how to create and manage Java projects through Maven from scratch, while providing specific code examples to help you get started faster.
1. Install Maven
First, you need to install Maven on your machine. You can find the latest Maven version and download the installation package on Maven's official website (https://maven.apache.org). After the installation is complete, enter the following command on the command line to verify whether Maven is installed successfully:
mvn -v
If you see the Maven version information, it means that Maven was installed successfully.
2. Create a Maven project
Now let us start creating a new Maven project. In the command line, execute the following command:
mvn archetype:generate -DgroupId=com.example -DartifactId=my-project -DarchetypeArtifactId=maven-archetype-quickstart -DinteractiveMode=false
The above command will create a new project using the quick start template provided by Maven. In this example, com.example is the groupId of the project, and my-project is the artifactId of the project. After execution, you will see a folder named my-project in the current directory. This is the Maven project we just created.
3. Compile and run the project
Enter the my-project project directory and execute the following command to compile the project:
mvn compile
After the compilation is successful, we You can run the unit tests of the project:
mvn test
If all tests pass, we can package the project and run:
mvn package
The above command will generate a jar in the target directory Bag. You can run the project through the following command:
java -cp target/my-project-1.0-SNAPSHOT.jar com.example.App
4. Add dependencies
A complete Java project usually depends on some third-party libraries, we can pass it in the project's pom. Add dependencies to the xml file to manage these libraries. Taking adding log4j as an example, open the pom.xml file in the project and add the following dependencies:
<dependencies>
    <dependency>
        <groupId>log4j</groupId>
        <artifactId>log4j</artifactId>
        <version>1.2.17</version>
    </dependency>
</dependencies>After saving the file, execute the following command to make the dependencies take effect:
mvn install
5. Build multi-module projects
In actual development, we may need to build multi-module projects. Maven allows us to achieve this by creating a parent project to manage multiple subprojects. The following is a simple multi-module project structure example:
parent-project
│   pom.xml
│
└─── child-module1
│     │   pom.xml
│     │
└─── child-module2
│ pom.xmlIn the parent project's pom.xml, we can introduce subprojects:
<modules>
    <module>child-module1</module>
    <module>child-module2</module>
</modules>Each subproject It has its own pom.xml file to manage the dependencies and configuration of the subproject.
Conclusion
Through the introduction of this article, I believe you have a preliminary understanding of how to use Maven to create and manage Java projects. By mastering Maven, you can develop and manage Java projects more efficiently and improve work efficiency. I hope the specific code examples provided in this article can help you get started with Maven faster. I wish you greater success in Java development!
(Number of words: less than 1500 words, if you need to add more content, please tell me)
The above is the detailed content of Starting from Scratch: Mastering Maven to Create and Manage Java Projects. For more information, please follow other related articles on the PHP Chinese website!

Hot AI Tools

Undresser.AI Undress
AI-powered app for creating realistic nude photos

AI Clothes Remover
Online AI tool for removing clothes from photos.

Undress AI Tool
Undress images for free

Clothoff.io
AI clothes remover

Video Face Swap
Swap faces in any video effortlessly with our completely free AI face swap tool!

Hot Article
Hot Tools

Notepad++7.3.1
Easy-to-use and free code editor

SublimeText3 Chinese version
Chinese version, very easy to use

Zend Studio 13.0.1
Powerful PHP integrated development environment

Dreamweaver CS6
Visual web development tools

SublimeText3 Mac version
God-level code editing software (SublimeText3)
Hot Topics


 Java Spring Interview Questions
Aug 30, 2024 pm 04:29 PM
Java Spring Interview Questions
Aug 30, 2024 pm 04:29 PM
In this article, we have kept the most asked Java Spring Interview Questions with their detailed answers. So that you can crack the interview.
 Break or return from Java 8 stream forEach?
Feb 07, 2025 pm 12:09 PM
Break or return from Java 8 stream forEach?
Feb 07, 2025 pm 12:09 PM
Java 8 introduces the Stream API, providing a powerful and expressive way to process data collections. However, a common question when using Stream is: How to break or return from a forEach operation? Traditional loops allow for early interruption or return, but Stream's forEach method does not directly support this method. This article will explain the reasons and explore alternative methods for implementing premature termination in Stream processing systems. Further reading: Java Stream API improvements Understand Stream forEach The forEach method is a terminal operation that performs one operation on each element in the Stream. Its design intention is
 TimeStamp to Date in Java
Aug 30, 2024 pm 04:28 PM
TimeStamp to Date in Java
Aug 30, 2024 pm 04:28 PM
Guide to TimeStamp to Date in Java. Here we also discuss the introduction and how to convert timestamp to date in java along with examples.
 Java Program to Find the Volume of Capsule
Feb 07, 2025 am 11:37 AM
Java Program to Find the Volume of Capsule
Feb 07, 2025 am 11:37 AM
Capsules are three-dimensional geometric figures, composed of a cylinder and a hemisphere at both ends. The volume of the capsule can be calculated by adding the volume of the cylinder and the volume of the hemisphere at both ends. This tutorial will discuss how to calculate the volume of a given capsule in Java using different methods. Capsule volume formula The formula for capsule volume is as follows: Capsule volume = Cylindrical volume Volume Two hemisphere volume in, r: The radius of the hemisphere. h: The height of the cylinder (excluding the hemisphere). Example 1 enter Radius = 5 units Height = 10 units Output Volume = 1570.8 cubic units explain Calculate volume using formula: Volume = π × r2 × h (4
 PHP vs. Python: Understanding the Differences
Apr 11, 2025 am 12:15 AM
PHP vs. Python: Understanding the Differences
Apr 11, 2025 am 12:15 AM
PHP and Python each have their own advantages, and the choice should be based on project requirements. 1.PHP is suitable for web development, with simple syntax and high execution efficiency. 2. Python is suitable for data science and machine learning, with concise syntax and rich libraries.
 PHP: A Key Language for Web Development
Apr 13, 2025 am 12:08 AM
PHP: A Key Language for Web Development
Apr 13, 2025 am 12:08 AM
PHP is a scripting language widely used on the server side, especially suitable for web development. 1.PHP can embed HTML, process HTTP requests and responses, and supports a variety of databases. 2.PHP is used to generate dynamic web content, process form data, access databases, etc., with strong community support and open source resources. 3. PHP is an interpreted language, and the execution process includes lexical analysis, grammatical analysis, compilation and execution. 4.PHP can be combined with MySQL for advanced applications such as user registration systems. 5. When debugging PHP, you can use functions such as error_reporting() and var_dump(). 6. Optimize PHP code to use caching mechanisms, optimize database queries and use built-in functions. 7
 Create the Future: Java Programming for Absolute Beginners
Oct 13, 2024 pm 01:32 PM
Create the Future: Java Programming for Absolute Beginners
Oct 13, 2024 pm 01:32 PM
Java is a popular programming language that can be learned by both beginners and experienced developers. This tutorial starts with basic concepts and progresses through advanced topics. After installing the Java Development Kit, you can practice programming by creating a simple "Hello, World!" program. After you understand the code, use the command prompt to compile and run the program, and "Hello, World!" will be output on the console. Learning Java starts your programming journey, and as your mastery deepens, you can create more complex applications.
 How to Run Your First Spring Boot Application in Spring Tool Suite?
Feb 07, 2025 pm 12:11 PM
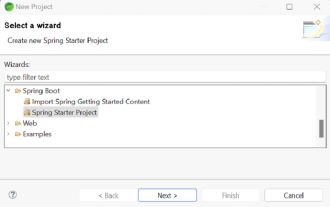
How to Run Your First Spring Boot Application in Spring Tool Suite?
Feb 07, 2025 pm 12:11 PM
Spring Boot simplifies the creation of robust, scalable, and production-ready Java applications, revolutionizing Java development. Its "convention over configuration" approach, inherent to the Spring ecosystem, minimizes manual setup, allo
