

How to securely transfer files using SCP in Linux

File transfer on the network can be completed through various different methods and protocols. The most common protocols for copying files remotely are Rsync, SCP, and SFTP. In this article, we will learn what SCP is and how to use SCP in Linux and Unix-like operating systems to securely transfer files between local and remote computers.
What is SCP?
SCP, which stands for Secure Copy, is a command-line program that copies files between local and remote systems, or between two remote systems, in a secure manner in Linux and Unix-like operating systems. and catalog.
Using the scp command, you can safely copy files or directories:
◈ From local to remote system
◈ From remote system to local
◈ Between two remote systems
When using the scp command to transfer data, files and directories are encrypted. Therefore, even if the network is breached, the perpetrators will not be able to obtain any meaningful data.
SCP is a component of the openSSH program that uses the SSH protocol to securely transfer files. Almost all modern Linux and Unix distributions come with OpenSSH pre-installed, so don’t bother installing it.
A reminder:
According to the official announcement from the openSSH developers:
“
scp protocol is outdated, it's inflexible and not easy to fix. We recommend using more modern protocols such as
sftpandrsyncinstead.Reference – https://lists.mindrot.org/pipermail/openssh-unix-dev/2019-March/037672.html
”
However, most users still prefer the SCP protocol. Because, SCP handles remote file transfers faster than its peers SFTP and Rsync.
In addition, SCP works exactly the same as the cp command, while rsync will determine whether the source directory has a trailing slash and behave differently. Take a look at the following command:
◈ rsync source destination/ – Copy the source directory to the destination folder.
◈ rsync source/ destination/ – Copy the contents of the source directory to the destination folder.
So, you have to double check whether you added slashes in the path.
I personally use Rsync🔗ostechnix.com to copy large files between two hosts and SCP to copy individual files over the network.
SCP command syntax
The general syntax of SCP is as follows:
scp [-346ABCpqrTv] [-c cipher] [-F ssh_config] [-i identity_file] [-J destination] [-l limit] [-o ssh_option] [-P port] [-S program] source ... target
The syntax will be different depending on the file transfer path. Here I have listed some examples of syntax formats.
Copy a file from local to remote system:
scp SourceFile User@RemoteHost:RemotePath
类似的,从本地系统复制一个目录到远程系统,使用 -r 参数:
scp -r SourceDirectory User@RemoteHost:RemotePath
复制多个文件到远程系统:
scp SourceFile1 SourceFile2 User@RemoteHost:RemotePath
远程系统复制文件到本地:
scp User@RemoteHost:RemoteFilePath DestinationFile
远程系统复制目录到本地:
scp -r User@RemoteHost:RemoteDirectoryPath DestinationDirectory
在本地将文件在两个远程系统之间复制:
scp User@RemoteHost1:RemoteFile1 User@RemoteHost2:RemotePath
注意,当你在两个远程系统之间复制文件时,流量不会通过本地系统。操作直接在两个远程系统之间进行。但是,你可以使用 -3 参数让流量经过你运行 scp 命令的系统。
从你的本地系统将一个远程系统的目录复制到另一个远程系统:
scp -r User@RemoteHost1:RemoteDirectory User@RemoteHost2:DestinationPath
SCP 命令参数
SCP 命令最常用的参数有:
◈ -C:启用压缩。C 代表 压缩(Compression)。使用此参数时,数据传输速度会更快,因为数据是压缩的。SCP 将自动在源系统上压缩,并在目标系统上解压缩。
◈ -c <cipher></cipher>:c 代表 加密(Cipher)。默认情况下,SCP 使用 AES-128 加密方法对数据进行加密。你可以使用 -c 参数更改加密方法。
◈ -i <identity_file></identity_file>:i 代表 身份(Identity) 文件或私钥。如你所知,SSH 中使用基于密码或密钥的身份验证。如果希望在传输文件时使用基于密钥的身份验证,可以使用 -i 参数指定身份文件或私钥。
◈ -l limit:l 代表 限制(Limit) 带宽。通过此参数,可以设置传输数据的最大带宽。它的单位是 Kbit/s。
◈ -F <ssh_config></ssh_config>:有时你可能需要使用不同的网络来连接到 Linux 系统,或你有一个代理服务器,这种情况下,你可以使用 -F 参数使用不同的 ssh_config 文件(File)。
◈ -P порт:P представляет порт. Обратите внимание, что это слово пишется с заглавной буквы P. По умолчанию SSH использует порт 22. Но из соображений безопасности вы можете изменить номер порта на целевом хосте. В этом случае следует явно указать новый номер порта с помощью параметра -P.
◈ -p: Если вы хотите сохранить время модификации, время доступа и режим исходного файла, вам необходимо использовать параметр -p. Обратите внимание, что это строчные буквы p.
◈ -r: Рекурсивно скопировать весь каталог.
◈ -B:B представляет пакетный режим. Используется для выбора пакетного режима при передаче файлов. Можно запретить запрос пароля.
◈ -S программа: Имя программы, используемое для зашифрованных соединений.
◈ -v:v представляет подробное описание. При использовании параметра -v команда будет печатать прогресс на экране терминала. Вы увидите, что именно происходит при передаче файла. Это полезно при отладке проблем с подключением, аутентификацией и конфигурацией.
SCP имеет множество параметров, другие параметры вы можете проверить на его странице руководства. Давайте посмотрим на несколько примеров полезных команд scp.
Важные вещи, которые следует запомнить, прежде чем начать
◈ scp Команда использует ssh для безопасной передачи файлов. Таким образом, для аутентификации в удаленной системе у вас должен быть ssh-ключ или пароль.
◈ Для передачи файлов у вас должно быть разрешение на чтение исходного файла и разрешение на запись в место назначения .
◈ scp Команда не проверяет целевое местоположение перед записью. Любые файлы с таким же именем в месте назначения будут перезаписаны без уведомления .
◈ Чтобы различать локальные и удаленные местоположения, используйте двоеточие (:).
◈ При передаче больших файлов рекомендуется запускать задачу в сеансе Screen🔗 ostechnix.com или Tmux🔗 ostechnix.com.
Использование SCP для передачи файлов в Linux
正如我所说,我们可以使用 scp 命令将文件或目录从本地复制到远程系统,反之亦然,或者在两台远程系统之间复制文件或目录。
\1. 使用 SCP 从本地系统复制文件到远程系统
使用 scp 命令将文件从本地复制到远程系统,运行:
$ scp File1.txt ostechnix@192.168.1.40:/home/ostechnix/
示例输出:
ostechnix@192.168.1.40's password:File1.txt 100% 104 814.0KB/s 00:00
让我们分析一下上面的命令,看看每个参数都做了什么。
◈ File1.txt – 源文件
◈ ostechnix – 远程系统的用户名
◈ 192.168.1.40 – 远程系统的 IP 地址
◈ /home/ostechnix/ – 远程系统中的目标目录。这是我们想要传输源文件的绝对路径,如 File.txt。
你还可以修改目标文件的名称。下面的命令将 File1.txt 传输到目的地,保存为 myfile.txt。
$ scp File1.txt ostechnix@192.168.1.40:/home/ostechnix/myfile.txt

将文件从本地复制到远程系统
\2. 使用 SCP 从本地系统复制多个文件到远程系统
使用 scp 命令将多个文件从本地系统传输到远程系统,运行:
$ scp File1.txt File2.txt ostechnix@192.168.1.40:/home/ostechnix/
示例输出:
ostechnix@192.168.1.40's password:File1.txt 100% 104 689.4KB/s 00:00File2.txt 100% 496 6.3MB/s 00:00
从本地复制多个文件到远程系统
这里:
◈ File1.txt 和 File2.txt – 源文件名
◈ ostechnix@192.168.1.40 – 远程系统的用户名和 IP 地址
◈ /home/ostechnix – 目标文件的路径
如果文件具有相同的扩展名,你可以使用以下替代命令来实现相同的目标。
$ scp {File1,File2}.txt ostechnix@192.168.1.40:/home/ostechnix/
或者,
$ scp *.txt ostechnix@192.168.1.40:/home/ostechnix/
\3. 使用 SCP 从本地到远程系统递归复制目录
递归地将整个目录(包括子目录及其内容)从本地复制到远程系统,使用 -r 参数。
$ scp -r Documents/ ostechnix@192.168.1.40:/home/ostechnix/
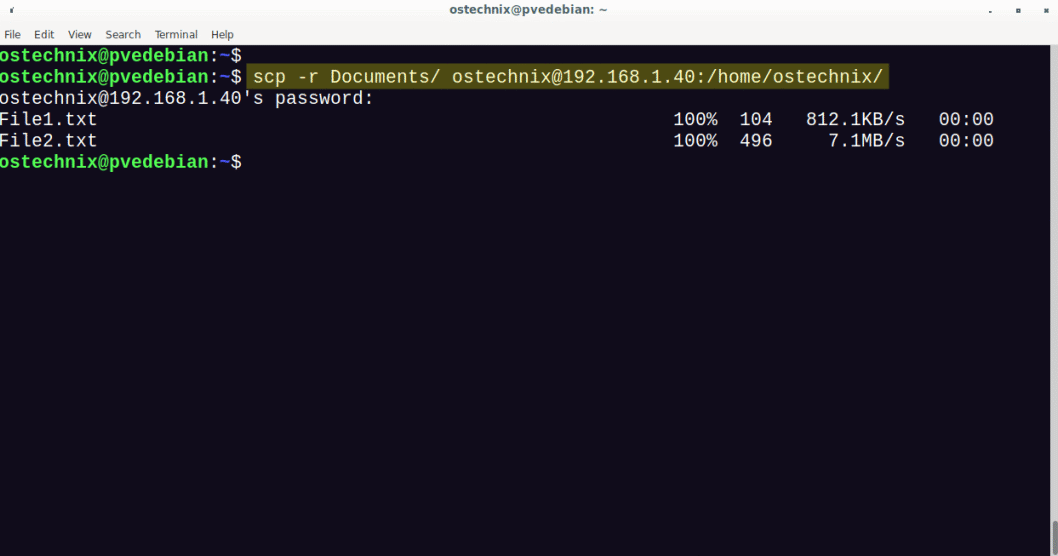
从本地复制目录到远程系统
上述命令将整个 Documents 目录包括其内容复制到目标系统。
其中,
◈ -r – 递归复制文件和目录,包括子目录及其内容
◈ Documents – 源目录名称
◈ ostechnix@192.168.1.40 – 远程系统的用户名和 IP 地址
◈ /home/ostechnix – 目标目录的路径
\4. 用 SCP 将文件从远程系统传输到本地
还记得我们从本地系统复制了 File1.txt 到远程系统,让我们把它复制回本地。
使用 scp 命令从远程系统复制文件到本地,运行:
$ scp ostechnix@192.168.1.40:/home/ostechnix/File1.txt Downloads/
其中
◈ ostechnix@192.168.1.40 – 远程系统的用户名和 IP 地址
◈ /home/ostechnix/File.txt – 远程系统文件的绝对路径
◈ Downloads – 本地保存复制文件的位置
从远程系统传输文件到本地
\5. 使用 SCP 将多个文件从远程系统传输到本地
将多个文件从远程系统复制到本地,在花括号内注明文件的绝对路径,如下所示:
$ scp ostechnix@192.168.1.40:/home/ostechnix/\{File1.txt,File2.txt\} Downloads/
将多个文件从远程系统传输到本地
上述命令将从远程系统的 /home/ostechnix/ 目录中复制 File1.txt 和 File2.txt 到本地的 Downloads 目录中。
注意,花括号内的逗号后面没有空格。
\6. 从远程系统递归复制目录到本地
使用 scp 从远程系统递归复制整个目录(包括子目录及其内容)到本地系统,使用 -r 参数。
$ scp -r ostechnix@192.168.1.40:/home/ostechnix/Documents Downloads/
上述命令将从远程系统将整个 Documents 目录复制到本地的 Downloads 目录。
\7. 使用 SCP 在两台远程计算机之间复制文件
使用 scp 命令将文件从一个远程系统直接复制到另一个远程系统,运行:
$ scp senthil@192.168.1.40:/home/senthil/File1.txt kumar@192.168.1.20:/home/kumar/
它会要求你输入两个远程系统的密码:
其中,
◈ senthil@192.168.1.40 – 文件源端远程系统的用户名和 IP 地址
◈ /home/senthil/File1.txt – 复制的文件名及其位置
◈ kumar@192.168.1.20 – 复制文件到目标端的用户名和 IP 地址
◈ /home/kumar – 在目标端上保存复制文件的位置
上述命令将从远程主机 192.168.1.40 复制 /home/senthil/File1.txt 到 192.168.1.20 上的 /home/kumar/ 目录。
在这种方法中,数据将直接从一个远程系统传输到另一个远程系统。如果你想通过本地机器路由流量,使用 -3 参数,如下所示:
$ scp -3 senthil@192.168.1.40:/home/senthil/File1.txt kumar@192.168.1.20:/home/kumar/
\8. 使用 SCP 复制文件时启用压缩
到目前为止,我们在没有压缩的情况下传输了文件。现在我们将使用 -C 参数在传输文件时启用压缩。
$ scp -C File1.txt ostechnix@192.168.1.40:/home/ostechnix/
-C 参数将在源端启用压缩,并在目标端自动解压数据。
通过启用压缩,可以显著提高文件复制或传输速度。
\9. 使用 SCP 传输文件时限制带宽
我们可以使用 -l 参数限制带宽。注意,最大带宽单位为 Kbits/s。1 Byte = 8 bit。因此,如果你想将带宽限制在 200KB/s,-l 的值将是 1600(200*8)。
$ scp -l 1600 File1.txt ostechnix@192.168.1.40:/home/ostechnix/
这在传输大文件时非常有用,可以防止 SCP 限制带宽。
\10. 使用 SCP 复制文件时使用不同端口
作为系统管理员,出于安全原因,你可能在远程服务器上 更改了 SSH 协议的默认端口🔗 ostechnix.com。这种情况下,你可以在传输文件时使用 -P 参数指定端口号。注意:大写的 P。
$ scp -P 2022 File1.txt ostechnix@192.168.1.40:/home/ostechnix/
\11. 使用 SCP 复制文件时使用不同的加密方法
默认情况下,SCP 使用 AES-128 对文件进行加密。如果你想使用不同的加密方法,使用 c 参数。
例如,如果你想使用 3des-cbc 加密方法,命令如下所示:
$ scp -c 3des-cbc File1.txt ostechnix@192.168.1.40:/home/ostechnix/
要查看支持的密码列表,执行:
$ ssh -Q cipher localhost | paste -d, -s -
示例输出:
3des-cbc,aes128-cbc,aes192-cbc,aes256-cbc,rijndael-cbc@lysator.liu.se,aes128-ctr,aes192-ctr,aes256-ctr,aes128-gcm@openssh.com,aes256-gcm@openssh.com,chacha20-poly1305@openssh.com
\12. 在详细模式下使用 SCP 复制文件
如果你想知道使用 scp 复制文件时幕后发生了什么,你可以使用 -v 参数。使用详细模式传输文件时,终端上会显示执行 scp 命令执行的每一步过程。这在故障排除时很方便。
$ scp -v File1.txt ostechnix@192.168.1.40:/home/ostechnix/
在详细模式下发送文件时,你将看到大量输出,如下所示:
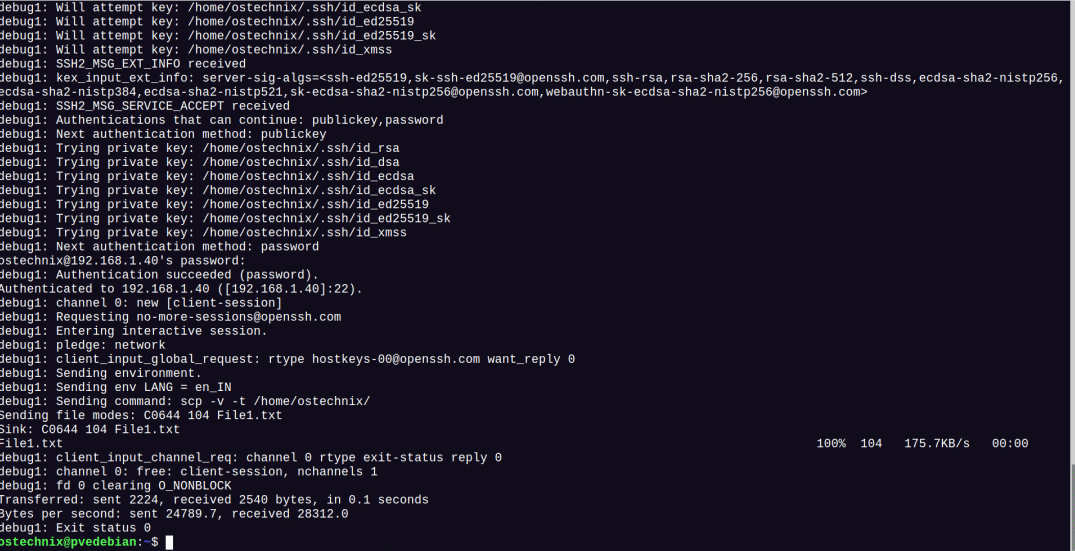
在详细模式下使用 SCP 复制文件
\13. 在安静模式下使用 SCP 传输文件
我们可以使用 -q 参数在安静模式下传输文件。在安静模式下共享文件时,不会在输出中显示进度、警告或诊断信息。
$ scp -q File1.txt ostechnix@192.168.1.40:/home/ostechnix/
\14. 使用 SCP 传输文件时保留文件属性
使用 -p 参数可以保留文件修改时间、访问时间和模式等文件属性。注意,这是小写的 p。
$ scp -p File1.txt ostechnix@192.168.1.40:/home/ostechnix/
\15. 使用 SCP 复制文件时使用身份文件
SSH 同时支持基于密码和密钥的身份验证。密钥是 Linux 环境中使用最广泛的身份验证方法。
如果你想在传输文件时使用基于密钥的身份验证,使用 -i 参数指定身份文件或私钥。
$ scp -i my_private_key.pem File1.txt ostechnix@192.168.1.40:/home/ostechnix/
\16. 使用不同的 ssh 配置文件
在某些情况下,你需要使用不同的网络来连接到 Linux 系统,或你有一个代理服务器。这在情况下,你可以配合 -F 参数使用不同的 ssh_config 文件。
$ scp -F /home/ostechnix/my_ssh_config File1.txt ostechnix@192.168.1.40:/home/ostechnix/
\17. 使用 IPv4 或 IPv6 复制文件
在复制文件时,我们可以强制 SCP 只使用 IPv4 或 IPv6 地址。IPv4 网络添加 -4 参数,IPv6 网络添加 -6 参数可以实现这一点。
$ scp -6 File1.txt ostechnix@192.168.1.40:/home/ostechnix/
常见问题
问题 1:什么是 SCP?
SCP 是一个命令行程序,旨在将文件和目录从本地系统安全地传输到远程系统,反之亦然,或者直接在两个远程系统之间传输。
问题 2: 如何使用 SCP 将文件从本地复制到远程计算机?
将文件从本地复制到远程系统,命令如下:
scp SourceFile.txt User@RemoteHost:/some/remote/directory
问题 3:如何递归复制文件和目录?
递归复制包含子目录的目录,使用 -r 参数:
scp -r /some/local/directory User@RemoteHost:/some/remote/directory
问题 4:使用 SCP 可以传输多个文件吗?
当然,只要用空格分隔源文件名即可。
从本地复制多个文件到远程:
scp file1.txt file2.txt file3.txt User@RemoteHost:/some/remote/directoryscp {file1,file2,file3}.txt User@RemoteHost:/some/remote/directoryscp *.txt User@RemoteHost:/some/remote/directory
从远程复制多个文件到本地:
scp User@RemoteHost:/some/remote/directory/\{file1.txt,file2.txt,file3.txt\} /some/local/directory
从一个远程系统复制多个文件到另一个远程系统:
$ scp User@RemoteHost1:/some/remote/directory/\{file1.txt,file2.txt,file3.txt\} User@RemoteHost2:/some/remote/directory/
问题 5:如何传输目录下的所有文件?
传输整个目录,首先进入该目录:
cd dir_name
然后,
scp *.txt User@RemoteHost:/some/remote/directory
问题 6:可以压缩文件吗?
当然。使用 -C 压缩文件。文件会在源端压缩,在目标端自动解压缩。
scp -C /some/large/file User@RemoteHost:/some/remote/directory
问题 7:可以保留文件属性吗?
保留原始文件的修改时间、访问时间和模式等文件属性,使用 -p 参数。
scp -p file.txt User@RemoteHost:/some/remote/directory
问题 8: 可以使用其他端口吗?
当然。SCP 配合 -P 参数允许你使用其他端口。
scp -P 2022 file.txt User@RemoteHost:/some/remote/directory
问题 9: 可以使用不同的加密方法吗?
当然。使用 -c 参数。
scp -c 3des-cbc User@RemoteHost:/some/remote/directory
问题 10: 如何列出 SSH 支持的加密方法?
使用以下命令查看 SSH 和 SCP 支持的加密方法列表:
ssh -Q cipher localhost | paste -d, -s -
问题 11:SCP 真的安全吗?
当然,它用起来是完全安全的。SCP 和 openSSH 使用相同的 SSH 机制。传输的数据在源端加密,目标端解密。
问题 12:可以从 Windows 系统传输文件到 Linux 吗?
当然。使用 PSCP 程序将文件从 windows 传输到 Linux 平台,你也可以使用 WinSCP。
总结
在这篇全面指南中,我们了解了什么是 SCP,以及如何在 Linux 中使用 SCP 安全地传输文件,其中包括 17 个 SCP 命令示例,另外还回答了关于 SCP 的常见问题。
无论你是 Linux 管理人员、开发人员还是普通用户,你都会面临某个时候将文件复制到远程系统或从远程系统复制文件的情况,知道如何使用 SCP 安全地复制文件将是非常有用的。
The above is the detailed content of How to securely transfer files using SCP in Linux. For more information, please follow other related articles on the PHP Chinese website!

Hot AI Tools

Undresser.AI Undress
AI-powered app for creating realistic nude photos

AI Clothes Remover
Online AI tool for removing clothes from photos.

Undress AI Tool
Undress images for free

Clothoff.io
AI clothes remover

Video Face Swap
Swap faces in any video effortlessly with our completely free AI face swap tool!

Hot Article
Hot Tools

Notepad++7.3.1
Easy-to-use and free code editor

SublimeText3 Chinese version
Chinese version, very easy to use

Zend Studio 13.0.1
Powerful PHP integrated development environment

Dreamweaver CS6
Visual web development tools

SublimeText3 Mac version
God-level code editing software (SublimeText3)
Hot Topics


 What computer configuration is required for vscode
Apr 15, 2025 pm 09:48 PM
What computer configuration is required for vscode
Apr 15, 2025 pm 09:48 PM
VS Code system requirements: Operating system: Windows 10 and above, macOS 10.12 and above, Linux distribution processor: minimum 1.6 GHz, recommended 2.0 GHz and above memory: minimum 512 MB, recommended 4 GB and above storage space: minimum 250 MB, recommended 1 GB and above other requirements: stable network connection, Xorg/Wayland (Linux)
 vscode cannot install extension
Apr 15, 2025 pm 07:18 PM
vscode cannot install extension
Apr 15, 2025 pm 07:18 PM
The reasons for the installation of VS Code extensions may be: network instability, insufficient permissions, system compatibility issues, VS Code version is too old, antivirus software or firewall interference. By checking network connections, permissions, log files, updating VS Code, disabling security software, and restarting VS Code or computers, you can gradually troubleshoot and resolve issues.
 How to run java code in notepad
Apr 16, 2025 pm 07:39 PM
How to run java code in notepad
Apr 16, 2025 pm 07:39 PM
Although Notepad cannot run Java code directly, it can be achieved by using other tools: using the command line compiler (javac) to generate a bytecode file (filename.class). Use the Java interpreter (java) to interpret bytecode, execute the code, and output the result.
 Linux Architecture: Unveiling the 5 Basic Components
Apr 20, 2025 am 12:04 AM
Linux Architecture: Unveiling the 5 Basic Components
Apr 20, 2025 am 12:04 AM
The five basic components of the Linux system are: 1. Kernel, 2. System library, 3. System utilities, 4. Graphical user interface, 5. Applications. The kernel manages hardware resources, the system library provides precompiled functions, system utilities are used for system management, the GUI provides visual interaction, and applications use these components to implement functions.
 Can vscode be used for mac
Apr 15, 2025 pm 07:36 PM
Can vscode be used for mac
Apr 15, 2025 pm 07:36 PM
VS Code is available on Mac. It has powerful extensions, Git integration, terminal and debugger, and also offers a wealth of setup options. However, for particularly large projects or highly professional development, VS Code may have performance or functional limitations.
 What is vscode What is vscode for?
Apr 15, 2025 pm 06:45 PM
What is vscode What is vscode for?
Apr 15, 2025 pm 06:45 PM
VS Code is the full name Visual Studio Code, which is a free and open source cross-platform code editor and development environment developed by Microsoft. It supports a wide range of programming languages and provides syntax highlighting, code automatic completion, code snippets and smart prompts to improve development efficiency. Through a rich extension ecosystem, users can add extensions to specific needs and languages, such as debuggers, code formatting tools, and Git integrations. VS Code also includes an intuitive debugger that helps quickly find and resolve bugs in your code.
 How to use VSCode
Apr 15, 2025 pm 11:21 PM
How to use VSCode
Apr 15, 2025 pm 11:21 PM
Visual Studio Code (VSCode) is a cross-platform, open source and free code editor developed by Microsoft. It is known for its lightweight, scalability and support for a wide range of programming languages. To install VSCode, please visit the official website to download and run the installer. When using VSCode, you can create new projects, edit code, debug code, navigate projects, expand VSCode, and manage settings. VSCode is available for Windows, macOS, and Linux, supports multiple programming languages and provides various extensions through Marketplace. Its advantages include lightweight, scalability, extensive language support, rich features and version
 How to check the warehouse address of git
Apr 17, 2025 pm 01:54 PM
How to check the warehouse address of git
Apr 17, 2025 pm 01:54 PM
To view the Git repository address, perform the following steps: 1. Open the command line and navigate to the repository directory; 2. Run the "git remote -v" command; 3. View the repository name in the output and its corresponding address.
