

Win 7 update graphics card driver


How to update the graphics card driver under Win7
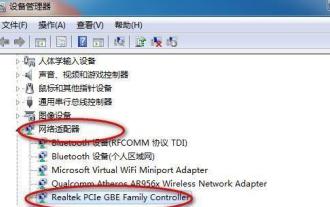
Right-click on My Computer and select "Properties". Click "Settings Manager". In Device Manager, find "Display Adapters" and expand it. Right-click the mouse on the graphics card and click "Update Driver".
Win7 graphics card driver update settings tutorial: Right-click the computer and select the Properties button under the drop-down menu. As shown in the picture: Click Properties to enter the control panel system interface, and there is a Device Manager button on the upper left.
Right-click on the computer and select Device Manager. Select the last item, Display Adapter, expand the hidden items, the display is normal, the driver update and upgrade are successful, just restart the computer.
How to solve the problem of blurry screen after using the driver wizard to update the graphics card on Win7 computer
Open my computer, uninstall or change the program, and uninstall (sound and graphics card) driver-related programs. Start running, enter INF, search oem*.inf, and delete all the searched files. Then restart the computer and use Driver Life to update the recommended driver.
Common computer screen distortion is caused by two reasons. One is a driver problem. In this case, you can download software such as Driver Wizard to update the driver. The other is a graphics card hardware problem.
Solution: Shut down the computer, unplug and insert the graphics card, clean the dust and foreign matter on the gold finger of the graphics card and the PCI-E slot. 2) The display cable is in poor contact with the display interface, resulting in a blurred screen due to a signal line problem on the monitor. Please replace it. signal line. Poor contact between the signal cable and the VGA or DVI interface may cause screen blur. Please reconnect and tighten the screws on the connector.
The graphics card driver is incompatible or damaged. Please try upgrading the graphics card driver first. The graphics card temperature is too high or the graphics card is incompatible or damaged. If the temperature is too high, the screen will be gray. If there is a problem with the fan, replace the cooling fan.
Use Driver Wizard to update the driver. The computer screen display is caused by the graphics card driver not being installed successfully. Observe after shutting down and restarting. Observe after shutting down and restarting into safe mode. If the screen is still blurry after entering safe mode, consider a hardware failure. After-sales maintenance.
Turn on the computer and press F8 until the advanced options appear. Release it, select "Last Known Good Configuration" and press Enter to repair. Press F8 on boot to enter safe mode and then exit. Select restart or shutdown before booting to enter normal mode (repair the registry).
Tips for updating NVIDIA graphics card driver in Win7 system
1. Right-click on My Computer and select "Properties". Click "Settings Manager". In Device Manager, find "Display Adapters" and expand it. Right-click the mouse on the graphics card and click "Update Driver".
2. Successfully obtain full control permissions under the folder and restart the computer to install the new driver. After the user obtains the operating permissions for the directory, the current graphics card driver can be uninstalled.
3. Click quotSupportquot and then click quotAutomatically update your drivers, and then download quotIntel Driver and Support Assistantquot. Once installed, double-clicking the icon in the lower right corner will open a browser and look for driver updates. If there are updates for Intel devices such as Intel CPU and core graphics on the computer, they will be listed.
4. One is the automatic detection tool and the other is manual search. If you know the graphics card parameters well, it is recommended to use the "manual search" method, otherwise use the "automatic driver update" tool. If the above answer does not solve the problem, you can try: It is recommended to download the graphics card driver from the official website of the computer.
5. NVIDIA graphics card, let’s Baidu the NVIDIA graphics card driver, click to enter the NVIDIA official website, or directly enter the NVIDIA official website, or. Drivers can be downloaded from both websites. When we open the page to download the driver, we usually search for the driver manually, which is more accurate.
6. The following methods are used to update the graphics card driver of Windows 7 system: through the computer software Master Lu. Via Device Manager. Method 1: Open the software Master Lu and click the driver detection button. Check the test results (an upgrade button will appear on the right side of the driver that needs to be updated. Click the upgrade button to update the driver.
How to update How to update the graphics card driver win7
1. Right on my computer Click to select "Properties". Click "Settings Manager". In the Device Manager, find "Display Adapters" and expand it. Right-click the mouse on the graphics card and click "Update Driver".
2. Win7 graphics card driver update setting tutorial: Right-click the computer and select the Properties button under the drop-down menu. As shown in the figure: Click Properties to enter the control panel system interface, and there is a Device Manager button on the upper left.
3. In fact, The steps to update the NVIDIA graphics card driver are very simple. Next, the editor will share with you the tips for updating the NVIDIA graphics card driver in Win7 system.
4. Click the Start button of the win7 system, and then select Control Panel. Enter Control Panel, select Device Manager. Find the display adapter, click to see the graphics card. Right-click on the graphics card name, click Properties in the pop-up menu, and then select the Driver tab. The driver version is the graphics card driver version.
How to update the graphics driver in win7 using Device Manager
Win7 graphics driver update setting tutorial: Method 1: The simplest method is to use Driver Life to install the update. After the download is completed, enter "Driver Management", click "Scan Now" and then find the scanned graphics card driver there, and click "Upgrade Driver".
Right-click on My Computer and select "Properties". Click "Settings Manager". In Device Manager, find "Display Adapters" and expand it. Right-click the mouse on the graphics card and click "Update Driver".
Click the Start button of win7 system, and then select Control Panel. Go to Control Panel and select Device Manager. Find the display adapter and click to see the graphics card. Right-click on the graphics card name, click Properties on the pop-up menu, and then select the Driver tab. The driver version is the graphics card driver version.
Method 1: Use your computer’s “Device Manager” to check for updates. Click on the lower left corner of the computer, then right-click on "Computer" and select "Manage".
Taking win7 system as an example, click the Start button in the lower left corner of the desktop, right-click the computer in the Start menu, and select Manage to open.
Method 1: Click the "Start" icon in the lower left corner of the computer. Right-click "Computer" in the pop-up menu bar. Then click on the "Manage" menu item. Select "Device Manager" in Computer Management.
How to turn off automatic update of graphics card driver in win7 system
1. Click Start--enter gpedit.msc in the run box and press Enter; expand Computer Configuration---Administrative Templates- --System---Device Installation---Device Installation Restrictions, find the Prohibit installation of devices not described by other policy settings option on the right, double-click it; select Enabled, click OK.
2. After booting into the system, right-click the computer and select the Properties button under the drop-down menu. Click Properties to enter the control panel system interface. There is a Device Manager button on the upper left. Click Device Manager to enter the Device Manager interface, select the display device in the list, and double-click to display the graphics card type.
3. The win7 system can automatically recognize the inserted hardware, and Windows update will install the driver. Sometimes there is no need to install it from the system. To close it, you can do it by the following method: right-click "My Computer", select Properties, and select "Advanced" System Settings". Hardware, click "Device Installation Settings".
4. Open "Computer" -> "Windows Update" -> "Change Settings" -> Select "Never check for updates". You can also remove the two check boxes below and never update. Of course, you can also choose other update methods.
The above is the detailed content of Win 7 update graphics card driver. For more information, please follow other related articles on the PHP Chinese website!

Hot AI Tools

Undresser.AI Undress
AI-powered app for creating realistic nude photos

AI Clothes Remover
Online AI tool for removing clothes from photos.

Undress AI Tool
Undress images for free

Clothoff.io
AI clothes remover

Video Face Swap
Swap faces in any video effortlessly with our completely free AI face swap tool!

Hot Article
Hot Tools

Notepad++7.3.1
Easy-to-use and free code editor

SublimeText3 Chinese version
Chinese version, very easy to use

Zend Studio 13.0.1
Powerful PHP integrated development environment

Dreamweaver CS6
Visual web development tools

SublimeText3 Mac version
God-level code editing software (SublimeText3)
Hot Topics


 What should I do if the Razer mouse driver cannot recognize the mouse?
May 06, 2024 pm 11:36 PM
What should I do if the Razer mouse driver cannot recognize the mouse?
May 06, 2024 pm 11:36 PM
Razer mouse drivers not recognized can be resolved by following these steps: check hardware connections, update drivers, reinstall drivers, check Windows settings, check for third-party software conflicts, run System File Checker (SFC) and reset Razer Snake Synapse. If the problem persists, the mouse hardware may be faulty, please contact Razer Support.
 How to install WinNTSetup into Win11 system_How to install WinNTSetup into Win11 system
May 08, 2024 am 11:19 AM
How to install WinNTSetup into Win11 system_How to install WinNTSetup into Win11 system
May 08, 2024 am 11:19 AM
First download the latest Win11 system ISO image, and then in Win10 system, you can directly right-click on the downloaded ISO image file and select [Load]; if it is under WinPE, WinXP, or Win7 system, you need to use the virtual optical drive tool to load the ISO Image; or you can directly decompress the ISO image file without using a virtual optical drive. Then run WinNTSetup. The software interface is as shown in the figure: First locate the location of the install.wim file. You can find the install.wim file in the sources directory of the Win11 ISO image loaded or decompressed by the virtual optical drive. Then set the location of the boot disk and installation disk. Generally, you are going to put W
 Solve the problem of being unable to access the Internet even though the broadband is connected (troubleshooting)
May 05, 2024 pm 06:01 PM
Solve the problem of being unable to access the Internet even though the broadband is connected (troubleshooting)
May 05, 2024 pm 06:01 PM
The Internet has become an indispensable part of people's lives in today's information age. But we can't get online, and sometimes we encounter some troubles. However, for example, the broadband is already connected. And take corresponding solution measures, we need to troubleshoot the problem step by step to restore the network connection in this case. Confirm the device connection status: Whether the mobile phone and other devices have been correctly connected to the broadband network, check the computer to ensure that the wireless network or wired network connection is normal. 2. Restart the broadband device: Reset the device and re-establish the connection, wait a few minutes and then turn it back on again. Try turning off the broadband router or modem. 3. Check the broadband account number and password: To avoid being unable to access the Internet due to incorrect account or password, make sure the broadband account number and password entered are correct. 4. Check D
 How to enter bios after assembling a computer? How to enter bios when assembling a computer?
May 07, 2024 am 09:13 AM
How to enter bios after assembling a computer? How to enter bios when assembling a computer?
May 07, 2024 am 09:13 AM
How to enter bios after assembling a computer? Before entering the BIOS, you need to make sure that the computer is completely shut down and powered off. Here are several common ways to enter the BIOS: 1. Use shortcut keys: Most computer manufacturers will display a prompt message at startup telling you which key to press to enter the BIOS settings. Usually the F2, F10, F12 or Delete key. After pressing the appropriate keys, you should be able to see a screen with information about your computer's hardware and BIOS settings. 2. Use the button on the motherboard: Some computer motherboards have a dedicated button for entering BIOS settings. This button is usually labeled "BIOS" or "UEFI". After pressing the button you should be able to see
 What to do if win11 bluetooth cannot be used_win11 bluetooth cannot be connected how to deal with it
May 08, 2024 am 10:37 AM
What to do if win11 bluetooth cannot be used_win11 bluetooth cannot be connected how to deal with it
May 08, 2024 am 10:37 AM
1. First, we click the search button in the taskbar below, search and enter [Device Manager]. 2. Then find our Bluetooth device in the device manager, right-click to select it, and click [Update Driver]. 3. If the Bluetooth device cannot be found in the device manager, then we can download Master Lu and update the driver in it. Method 2: 1. First, we enter [Settings] through the start menu. 2. Find the [devices] device in the setting interface. 3. Then click the [Bluetooth] option, and then set the switch below to [On].
 How to connect Redmi Note13RPro to the computer?
May 09, 2024 pm 06:52 PM
How to connect Redmi Note13RPro to the computer?
May 09, 2024 pm 06:52 PM
The phone Redmi Note13RPro has been very popular recently. Many consumers have purchased this phone. However, many users are using this phone for the first time, so they don’t know how to connect the Redmi Note13RPro to the computer. In this regard, the editor is here to explain to you Detailed tutorial introduction is provided. How to connect Redmi Note13RPro to the computer? 1. Use a USB data cable to connect the Redmi phone to the USB interface of the computer. 2. Open the phone settings, click Options, and turn on USB debugging. 3. Open the device manager on your computer and find the mobile device option. 4. Right-click the mobile device, select Update Driver, and then select Automatically search for updated drivers. 5. If the computer does not automatically search for the driver,
 How to upgrade Win11 system on old computers_Tutorial on upgrading Win11 system on old computers
May 07, 2024 pm 08:07 PM
How to upgrade Win11 system on old computers_Tutorial on upgrading Win11 system on old computers
May 07, 2024 pm 08:07 PM
1. First we need to download the win11 image file. 2. Put the downloaded win11 image into another disk. 3. Then we find the win11 image file among the searched image files. 4. Then when we come to this interface, we select install.wim to proceed to the next step. 5. Then select the Windows 11 system and click OK to restore the image file. 6. Then we wait for pe to download and install. Wait patiently. After the download is completed, click restart according to the prompts. 7. Then come to this interface, we select the second xiaobaiPE. After selecting, the win11 system will be automatically installed for us. After the installation is completed, click to restart the computer immediately according to the prompts. 8. Finally, the system installation is completed, and we come to
 What should I do if League of Legends does not support DX9? How to upgrade to DX11 when playing League of Legends on PC
May 06, 2024 pm 12:07 PM
What should I do if League of Legends does not support DX9? How to upgrade to DX11 when playing League of Legends on PC
May 06, 2024 pm 12:07 PM
Recently, "League of Legends" ushered in the 14.9 version update. After the update, "League of Legends" no longer supports DirectX9 in all regions around the world. In other words, if the user's computer graphics card can only support DirectX9, then the graphics card or device must be replaced. If there is no problem with the graphics card, you can update the driver. You can also update and upgrade the system, and the DirectX version will also be updated accordingly. It is understood that DirectX is a series of application development interfaces (APIs for short) developed by Microsoft. This API allows various applications to interact with your computer's hardware (including but not limited to mouse, keyboard, graphics card, etc.). Many applications use DirectX, but Direct
