

Analyze the boot process of Linux system startup

Linux system is a widely used open source operating system with powerful functions and flexible configuration. However, have you ever thought about how the Linux system gradually starts up from darkness when you press the power button? The boot process of Linux system startup is a complex and delicate process, which involves multiple levels and components such as hardware, firmware, boot loader, kernel and user space. This article will analyze in detail the boot process of Linux system startup, including BIOS, MBR, GRUB, initrd, init, etc.
The following takes CentOS5.5 version as an example to introduce the boot process of LINUX. The specific process is as follows:

The following is a detailed introduction to each step:
1) The first step is firmware self-test, which mainly performs CMOS/BIOS POST power-on self-test on the hardware to check whether the hardware is normal at the physical level. For example, check whether the hard disk is plugged in properly, etc.
2) The second step is to read the BootLoader of the MBR in the hard disk and the self-starting program. The commonly used self-starting program under Linux is GRUB. The main function of this step is to load the kernel. The kernel is stored in the /boot directory
3) The third step is the process of loading the kernel Kernel,
The main functions are: 1. Drive hardware. Kernel contains a large number of drivers. 2. Start the init process.
4) The init process mainly reads the /etc/inittab file and executes the default run level to continue booting. It should be noted that the PID of init is always 1, which is the parent process of all processes, while the background process of init process is 0, which is the kernel scheduler.
5)/etc/inittab defines initialization operations. 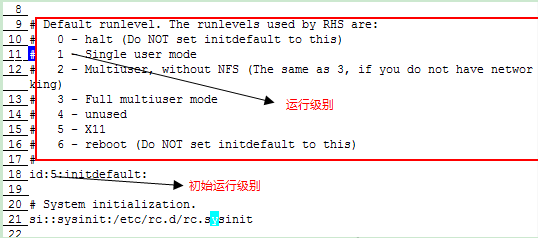
The main format of the command is: id: runlevels: action: process
Among them, as shown in the red box in the above picture
1. There are 7 run-levels, 0-6 are as follows:
0 —— halt shutdown
1 ——Single user mode Single user mode
2 - Multiuser, withoutNFS multi-user mode without network (text mode)
3——Full multiuser mode Full-featured multi-user mode (text mode)
4——unused reserved
5 ——X11 graphical multi-user mode
6——reboot
You can switch according to these 7 running levels
The commands are: view the current running level #runlevel, switch the running level #init[0 |1 |2 |3 |4 |5 |6]
2. There are also several important values in acion:
1 initdefault: Specify the default startup run level of the system, as marked in the above figure, usually used for repair. For example, if we want to enter single-user mode, we can set it to 1. The default cannot be set to 0 or 6. Otherwise it cannot be started.
2sysinit: The system starts executing the command specified in the process
It can be seen from the content of the inittab file that there is no run level set, which means that no matter which run level it is, /etc/rc.d/rc.sysinit will be executed
6) initdefault, as mentioned in the fifth step, mainly reads the information in /etc/inittab to determine what the default running level is.
7)/etc/rc.d/rc.sysinit
Run to line 21 in the inittab file to start the script. Complete the startup of the system service program, such as setting system environment variables, setting the system clock, loading fonts, checking the loaded file system, generating system startup information log files, etc. Because it is a basic service, its run-level is set to empty: that is, any level, and the action is set to sysinit. That is, the script must be started at any run level to complete the startup of the basic service
8) After the basic service is started, the script /etc/rc.d/rc will be executed
After loading the basic service, you need to start the corresponding directory according to different running levels. Its working principle is to first determine the default running level of the system, which is what is in step 6, and then execute the corresponding rcN. The service startup script in the d directory is as shown
9) Execute the service startup script in the /etc/rc.d/rcN.d directory
Look at the contents of this directory: 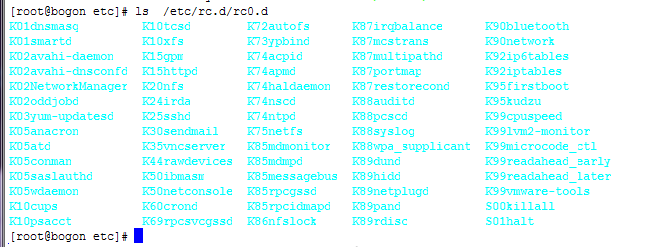
where S represents the script to be started and K represents the script to be closed
The numbers indicate the startup sequence, with smaller values given priority. Mainly for the management of some services
In this step, you need to explain the directory /etc/rc.d/init.d. The scripts placed in this directory are real scripts, while the scripts placed in rcN.d are soft links in the init.d directory. In other words, all files in rcN.d will eventually need to find the real script in init.d
Take a look at the specific details: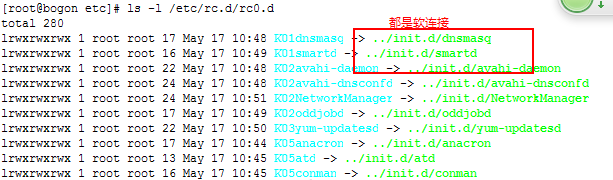

After executing this step, the interface will prompt you to enter the user name and password, which means that the system has started. The process of entering the user name and password will be discussed later. This time the boot process is over
The last thing to note is that the idea of the LINUX boot process is roughly the same, but the details are different due to version issues, in the name or location of the configuration file. This time I used the CentOS version, and the Ubuntu version There is no inittab file and grup.conf file, so if you are interested, you can follow this idea to explore.
PS: About GRUB
GNU GRUB ("GRUB" for short) is a bootloader from the GNU project. GRUB is an implementation of the multi-boot specification, which allows users to have multiple operating systems in the computer at the same time and select the operating system they want to run when the computer starts. GRUB can be used to select different kernels on an operating system partition and can also be used to pass boot parameters to these kernels.
The predecessor of GNU GRUB is Grand Unified Bootloader. It is mainly used in Unix-like systems; like most Linux distributions, GNU systems also use GNU GRUB as its launcher. Starting from version 10 1/06, Solaris also uses GNU GRUB as the launcher on x86 systems.
GRUB is dynamically configurable; it loads configuration information at startup and allows modification at startup, such as selecting a different kernel and initrd. For this purpose, GRUB provides a simple Bash-like command line interface, which allows users to write new startup sequences.
GRUB is very lightweight. It supports a variety of executable formats; in addition to being applicable to operating systems that support multi-boot, it also supports operating systems such as Windows and OS/2 that do not support multi-boot through the chain boot function. GRUB supports all Unix file systems, as well as FAT and NTFS file systems for Windows, and also supports LBA mode. GRUB allows users to view the contents of files in the file systems it supports.
GRUB has a variety of user interfaces. Most Linux distributions take advantage of GRUB's support for graphical interfaces to provide customized boot menus with background patterns, and sometimes also support mouse. By setting the GRUB text interface, remote terminal startup can be achieved through the serial port.
GRUB can download operating system images from the network, so it can support diskless systems. GRUB supports decompressing the image of the operating system before booting it.
Unlike other launchers, GRUB can interact directly with users through the GRUB prompt. Before loading the operating system, type the c key in the GRUB text mode screen to enter the GRUB command line. On systems without an operating system or with an operating system but no "menu.lst" file, you can also enter the GRUB prompt. The GRUB prompt allows users to manually boot any operating system through bash-like commands. Record the appropriate commands in the "menu.lst" file to automatically start an operating system.
GRUB has a rich set of terminal commands. Using these commands from the command line, users can view the details of hard disk partitions, modify partition settings, temporarily remap the disk order, boot from any user-defined configuration file, and view what GRUB supports. Configuration of other launchers on the file system. Therefore, it is possible to boot an operating system from an external device without knowing what is installed on a computer.
GRUB uses a scrolling screen to select the operating system you want to start. By adding relevant information to the "menu.lst" file, GRUB can control 150 or more startup options, which can be selected with the arrow keys at startup.
With chain startup, one starter can start another starter. GRUB can be started from DOS, Windows, Linux, BSD and Solaris systems with 2 to 3 lines of commands.
Although GRUB is compiled and packaged for Unix-like systems, there is also GRUB for DOS and Windows. GRUB can also be installed as an isolated system without any operating system. Using GRUB requires 1 file when booting from a CD, and 2 files when booting from a floppy disk, hard disk, and USB device. These files can be found on any Linux CD that supports GRUB, and users can easily find them.
This article analyzes in detail the boot process of Linux system startup, including BIOS, MBR, GRUB, initrd, init, etc. By understanding and mastering this knowledge, we can better understand the inner workings of the Linux system, and thus better use and optimize the Linux system. Of course, there are many details and changes in the boot process of Linux system startup, which require us to continue to learn and explore.
The above is the detailed content of Analyze the boot process of Linux system startup. For more information, please follow other related articles on the PHP Chinese website!

Hot AI Tools

Undresser.AI Undress
AI-powered app for creating realistic nude photos

AI Clothes Remover
Online AI tool for removing clothes from photos.

Undress AI Tool
Undress images for free

Clothoff.io
AI clothes remover

Video Face Swap
Swap faces in any video effortlessly with our completely free AI face swap tool!

Hot Article
Hot Tools

Notepad++7.3.1
Easy-to-use and free code editor

SublimeText3 Chinese version
Chinese version, very easy to use

Zend Studio 13.0.1
Powerful PHP integrated development environment

Dreamweaver CS6
Visual web development tools

SublimeText3 Mac version
God-level code editing software (SublimeText3)
Hot Topics


 What computer configuration is required for vscode
Apr 15, 2025 pm 09:48 PM
What computer configuration is required for vscode
Apr 15, 2025 pm 09:48 PM
VS Code system requirements: Operating system: Windows 10 and above, macOS 10.12 and above, Linux distribution processor: minimum 1.6 GHz, recommended 2.0 GHz and above memory: minimum 512 MB, recommended 4 GB and above storage space: minimum 250 MB, recommended 1 GB and above other requirements: stable network connection, Xorg/Wayland (Linux)
 How to run java code in notepad
Apr 16, 2025 pm 07:39 PM
How to run java code in notepad
Apr 16, 2025 pm 07:39 PM
Although Notepad cannot run Java code directly, it can be achieved by using other tools: using the command line compiler (javac) to generate a bytecode file (filename.class). Use the Java interpreter (java) to interpret bytecode, execute the code, and output the result.
 vscode cannot install extension
Apr 15, 2025 pm 07:18 PM
vscode cannot install extension
Apr 15, 2025 pm 07:18 PM
The reasons for the installation of VS Code extensions may be: network instability, insufficient permissions, system compatibility issues, VS Code version is too old, antivirus software or firewall interference. By checking network connections, permissions, log files, updating VS Code, disabling security software, and restarting VS Code or computers, you can gradually troubleshoot and resolve issues.
 Linux Architecture: Unveiling the 5 Basic Components
Apr 20, 2025 am 12:04 AM
Linux Architecture: Unveiling the 5 Basic Components
Apr 20, 2025 am 12:04 AM
The five basic components of the Linux system are: 1. Kernel, 2. System library, 3. System utilities, 4. Graphical user interface, 5. Applications. The kernel manages hardware resources, the system library provides precompiled functions, system utilities are used for system management, the GUI provides visual interaction, and applications use these components to implement functions.
 How to use VSCode
Apr 15, 2025 pm 11:21 PM
How to use VSCode
Apr 15, 2025 pm 11:21 PM
Visual Studio Code (VSCode) is a cross-platform, open source and free code editor developed by Microsoft. It is known for its lightweight, scalability and support for a wide range of programming languages. To install VSCode, please visit the official website to download and run the installer. When using VSCode, you can create new projects, edit code, debug code, navigate projects, expand VSCode, and manage settings. VSCode is available for Windows, macOS, and Linux, supports multiple programming languages and provides various extensions through Marketplace. Its advantages include lightweight, scalability, extensive language support, rich features and version
 Can vscode be used for mac
Apr 15, 2025 pm 07:36 PM
Can vscode be used for mac
Apr 15, 2025 pm 07:36 PM
VS Code is available on Mac. It has powerful extensions, Git integration, terminal and debugger, and also offers a wealth of setup options. However, for particularly large projects or highly professional development, VS Code may have performance or functional limitations.
 What is vscode What is vscode for?
Apr 15, 2025 pm 06:45 PM
What is vscode What is vscode for?
Apr 15, 2025 pm 06:45 PM
VS Code is the full name Visual Studio Code, which is a free and open source cross-platform code editor and development environment developed by Microsoft. It supports a wide range of programming languages and provides syntax highlighting, code automatic completion, code snippets and smart prompts to improve development efficiency. Through a rich extension ecosystem, users can add extensions to specific needs and languages, such as debuggers, code formatting tools, and Git integrations. VS Code also includes an intuitive debugger that helps quickly find and resolve bugs in your code.
 How to check the warehouse address of git
Apr 17, 2025 pm 01:54 PM
How to check the warehouse address of git
Apr 17, 2025 pm 01:54 PM
To view the Git repository address, perform the following steps: 1. Open the command line and navigate to the repository directory; 2. Run the "git remote -v" command; 3. View the repository name in the output and its corresponding address.
