
 System Tutorial
LINUX
Installing CentOS 7 under Windows: Teach you step by step how to implement dual system installation
System Tutorial
LINUX
Installing CentOS 7 under Windows: Teach you step by step how to implement dual system installation
Installing CentOS 7 under Windows: Teach you step by step how to implement dual system installation

php editor Apple brings you a detailed tutorial on installing CentOS 7 under Windows systems. Whether it is to learn the Linux system or to use dual systems, this tutorial will explain the installation process for you step by step. Through the guidance of this article, you will be able to easily implement dual-system installation of Windows and CentOS 7. It provides convenient operation steps and necessary precautions, allowing you to successfully complete the installation and enjoy the powerful functions and stability brought by CentOS 7. .
Preparation
1. Download the ISO image file of CentOS 7.
2. Prepare a USB flash drive with at least 8GB capacity for making a boot disk.
3. Make sure the USB disk creation tool, such as Rufus, is installed in the Windows system.
Making a CentOS 7 boot disk
1. Insert the USB flash drive and open the Rufus tool.
2. Select the inserted U disk in the device options.
3. Select FAT32 as the boot file system, and keep the default partition scheme and target system type.
4. Click the "Select" button and select the downloaded CentOS 7 ISO image file.
5. Click the "Start" button and wait for the production to be completed.
Installing CentOS 7
1. Restart the computer, enter the BIOS settings, and set the startup item to the USB disk you just made.
2. Save the settings and restart to enter the CentOS 7 installation interface.
3. Select "Install CentOS 7" and press Enter to start the installation.
4. Select language, keyboard layout and other settings, and click "Continue".
5. Select "Installation Destination", manually partition the hard disk, and allocate space for CentOS 7.
6. Set the root password and create a normal user.
7. Click "Start Installation" and wait for the installation to complete.
Configuring dual system boot
1. After the installation is completed, restart the computer, enter the BIOS settings, and set the startup item to the hard disk.
2. Save the settings and restart to enter the GRUB boot menu of CentOS 7.
3. Select "CentOS Linux (3.10.0-xxx.el7.x86_64) 7 (Core)" to enter the CentOS 7 system.
4. If you need to enter the Windows system, select the Windows boot item in the GRUB boot menu.
We have successfully installed CentOS 7 under Windows system, achieving dual system coexistence. During use, if you encounter problems, you can refer to official documents or search for relevant tutorials to solve them. I hope this article can help everyone It is helpful and allows everyone to better experience the charm of Linux system.
Share: In the Linux system, you can use the command line tool "top" to view the process status and resource usage of the current system. Just enter the "top" command in the terminal to view the CPU of each process in real time. Usage, memory usage and other information help us understand the operating status of the system.
The above is the detailed content of Installing CentOS 7 under Windows: Teach you step by step how to implement dual system installation. For more information, please follow other related articles on the PHP Chinese website!

Hot AI Tools

Undresser.AI Undress
AI-powered app for creating realistic nude photos

AI Clothes Remover
Online AI tool for removing clothes from photos.

Undress AI Tool
Undress images for free

Clothoff.io
AI clothes remover

Video Face Swap
Swap faces in any video effortlessly with our completely free AI face swap tool!

Hot Article
Hot Tools

Notepad++7.3.1
Easy-to-use and free code editor

SublimeText3 Chinese version
Chinese version, very easy to use

Zend Studio 13.0.1
Powerful PHP integrated development environment

Dreamweaver CS6
Visual web development tools

SublimeText3 Mac version
God-level code editing software (SublimeText3)
Hot Topics


 How to install WinNTSetup into Win11 system_How to install WinNTSetup into Win11 system
May 08, 2024 am 11:19 AM
How to install WinNTSetup into Win11 system_How to install WinNTSetup into Win11 system
May 08, 2024 am 11:19 AM
First download the latest Win11 system ISO image, and then in Win10 system, you can directly right-click on the downloaded ISO image file and select [Load]; if it is under WinPE, WinXP, or Win7 system, you need to use the virtual optical drive tool to load the ISO Image; or you can directly decompress the ISO image file without using a virtual optical drive. Then run WinNTSetup. The software interface is as shown in the figure: First locate the location of the install.wim file. You can find the install.wim file in the sources directory of the Win11 ISO image loaded or decompressed by the virtual optical drive. Then set the location of the boot disk and installation disk. Generally, you are going to put W
 MSI motherboard boot logo
May 08, 2024 pm 02:20 PM
MSI motherboard boot logo
May 08, 2024 pm 02:20 PM
How to cancel the MSI motherboard icon when booting 1. Press the DEL key when booting to enter the BIOS. Generally, in the "Advanced Features" item, you can find the words MSI motherboard LOGO screen. Select DISABLED, save and exit. There will no longer be this MSI motherboard LOGO screen when you turn on the computer in the future. MSI motherboard refers to the motherboard brand developed by MSI (MSI Technology Company). 2. The logo displayed when the computer is turned on is basically that of the motherboard manufacturer. You can set QUICKPOST to DISENABLE in the BIOS, so that the logo will generally no longer be displayed. It will display computer configuration-related information and give you more details. 3. First, teach you how to flash the BIOS in Windows environment. First: Go online
 How to upgrade Win11 system on old computers_Tutorial on upgrading Win11 system on old computers
May 07, 2024 pm 08:07 PM
How to upgrade Win11 system on old computers_Tutorial on upgrading Win11 system on old computers
May 07, 2024 pm 08:07 PM
1. First we need to download the win11 image file. 2. Put the downloaded win11 image into another disk. 3. Then we find the win11 image file among the searched image files. 4. Then when we come to this interface, we select install.wim to proceed to the next step. 5. Then select the Windows 11 system and click OK to restore the image file. 6. Then we wait for pe to download and install. Wait patiently. After the download is completed, click restart according to the prompts. 7. Then come to this interface, we select the second xiaobaiPE. After selecting, the win11 system will be automatically installed for us. After the installation is completed, click to restart the computer immediately according to the prompts. 8. Finally, the system installation is completed, and we come to
 How to enable tpm2.0 in win11_How to enable tpm2.0 in win11
May 08, 2024 pm 06:10 PM
How to enable tpm2.0 in win11_How to enable tpm2.0 in win11
May 08, 2024 pm 06:10 PM
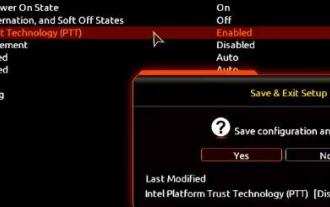
1. Gigabyte motherboard 1. First, we restart the computer and use the keyboard [DEL] to enter the BIOS settings when restarting. 2. Find and enter the [Settings] tab above. 3. Then find and enter [Miscellaneous] under settings. 4. Set [Intel Platform Trust Technology (PTT)] to [Enabled]. 5. After the settings are completed, use the keyboard [F10] to save, and then click [YES] to exit. 2. ASUS motherboard 1. First restart the computer and continuously tap [del] on the keyboard to enter the bios settings when booting. 2. Click [AdvancedMode] or press [F7] to find [A
 How to assemble an acer desktop computer?
May 08, 2024 pm 08:25 PM
How to assemble an acer desktop computer?
May 08, 2024 pm 08:25 PM
How to assemble an acer desktop computer? The assembly method of Acer desktop computer is as follows: open the case, install the power supply into the case, and tighten the screws. Install the CPU onto the motherboard, making sure the pins on the CPU are aligned with the slots on the motherboard, and tighten the screws on the CPU heat sink. Install the memory module onto the motherboard, making sure that the bumps on the memory module are aligned with the slots on the motherboard. Press down hard until you hear a "pop" sound to complete the installation. Install graphics cards, sound cards, network cards and other boards onto the motherboard, making sure the screws on the boards are tightened. Install storage devices such as hard drives and optical drives into the chassis, making sure the screws are tightened. Connect the motherboard to the chassis, including power cables, hard drive cables, optical drive cables, etc. Finally, close the chassis cover and tighten the screws to complete the assembly. exist
 How to fine-tune deepseek locally
Feb 19, 2025 pm 05:21 PM
How to fine-tune deepseek locally
Feb 19, 2025 pm 05:21 PM
Local fine-tuning of DeepSeek class models faces the challenge of insufficient computing resources and expertise. To address these challenges, the following strategies can be adopted: Model quantization: convert model parameters into low-precision integers, reducing memory footprint. Use smaller models: Select a pretrained model with smaller parameters for easier local fine-tuning. Data selection and preprocessing: Select high-quality data and perform appropriate preprocessing to avoid poor data quality affecting model effectiveness. Batch training: For large data sets, load data in batches for training to avoid memory overflow. Acceleration with GPU: Use independent graphics cards to accelerate the training process and shorten the training time.
 Does the newly assembled computer keyboard light not light up?
May 07, 2024 pm 04:40 PM
Does the newly assembled computer keyboard light not light up?
May 07, 2024 pm 04:40 PM
Does the newly assembled computer keyboard light not light up? The motherboard model should be UEFIbios. First find a keyboard with PS2 port, enter bios, turn off UEFI boot, and change to Legacy mode. If there is fast boot, turn off options like FastBoot, UEFI boot, turn on fast boot, and enter the system. USB interface detection may be turned off before, and USB devices can be used to assemble the computer after entering the system. The mouse and keyboard lights do not light up when the computer is turned on? If the keyboard light does not come on, there is a high possibility of memory failure, or it may be caused by static electricity on the motherboard or the motherboard is faulty. Use an eraser to wipe the gold finger of the memory graphics card, and remove and insert the memory several times. The problem remains. There are dual memory sticks and a single memory stick is used for testing. The problem persists. Re-plug the various cables inside and outside the chassis, and then unplug the connector on the motherboard.
 What to do if the Edge browser takes up too much memory What to do if the Edge browser takes up too much memory
May 09, 2024 am 11:10 AM
What to do if the Edge browser takes up too much memory What to do if the Edge browser takes up too much memory
May 09, 2024 am 11:10 AM
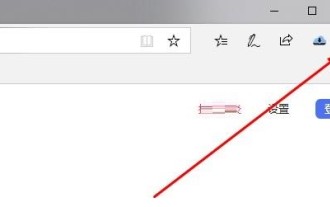
1. First, enter the Edge browser and click the three dots in the upper right corner. 2. Then, select [Extensions] in the taskbar. 3. Next, close or uninstall the plug-ins you do not need.
