

Does Apple Mac have a virtual machine?

This article will introduce to you the issue of whether Apple Mac can run virtual machines. If this is the question you are facing right now, you may wish to continue reading. At the same time, if this article is helpful to you, please remember to follow this site. Now, let's get started!
How to install a virtual machine on an Apple computer
The first solution is to use the free virtual machine VirtualBox. After starting VirtualBox, click the "New" button in the upper left corner of the window. Give the virtual machine a name, whichever you want. Keep the system type unchanged and select Windows 7 as the version in the drop-down list.
2. First, you need to download the Windows image file, and then install it through the mac virtual machine.
3. First, you need to install the virtual machine software. If your computer is a Windows system, Vmware is recommended, and Apple Mac system recommends Parallels Desktop.
Click to decompress the virtual machine installation package, and then double-click the installation package to install. After the installation is completed, the activation page will pop up. Open the crack folder and run the registration machine to generate the registration code. Manually enter the registration code and click Purchase. After a moment, it will show that the registration is successful. Now reopen the software and you can start using it.
The steps to install Win7 system on a virtual machine are as follows: Open Parallels Desktop on Mac, select "File" -> "New" to create a new virtual machine. If you have a Windows installation disk, insert it into your DVD drive. If you have the installation files for your Windows system stored on a USB memory, connect it to your Mac. After completing these steps, you can follow the Parallels Desktop prompts to install the Win7 system.

MAC dual system or virtual machine?
1. Mac users can experience it on Mac computers by installing dual systems or virtual machines. Windows. The advantage of a virtual machine is that it allows you to use the Mac system and Windows system at the same time, without having to restart every time like dual systems.
Virtual machines and dual systems each have their own advantages. A virtual machine is suitable for general applications, such as working with documents or images, because it facilitates copying files between Mac and Win. Dual systems are suitable for resource-intensive tasks such as running large games. Generally speaking, if you only need general applications, a virtual machine is more convenient; if you need to run large games and other needs, dual systems are more suitable.
It is very important to choose whether to use dual systems according to your needs. The main reason why I don't agree with the use of dual systems is that the hard disk space is inherently limited. If dual systems are installed, the space utilization will be even lower. If you feel that there is not much need for use on the Mac, then you can use all the space to install the Windows system, especially if your hard drive is only 256G. For some lightweight office needs, using a virtual machine is completely sufficient.
4. The Apple system is most suitable for use on Apple computers because the matching and optimization are quite good.
5. Dual systems, when using Windows, the fever will generally be more serious, and Windows does not support high-resolution screens very well. There are also drivers. The virtual machine has no driver problems at all, but the dual-system Windows one is more awkward. The touchpad is not as easy to use on mac os x.
6. Dual systems and virtual machines do have their own pros and cons; installation on Mac: Dual systems are more troublesome than virtual machines, but if you have everything prepared, then the installation is relatively easy. Conveniently, the virtual machine is installed very quickly.
2017 latest | Install virtual machine on Apple mac computer win7/8/10 system
Dual system: Only one system can be run when booting. Pure Windows or pure Mac are relatively independent in terms of use and are closest to the ideal environment. Sometimes some interfaces of the virtual machine cannot be recognized, so it will be better to use Win.
How to install Win7 system on a virtual machine: Open Parallels Desktop (from the application folder) and select "File" "New". If you have a Windows installation disk, insert the DVD drive. If you have a USB drive with Windows, you can connect the drive to your Mac.
Solution 1 Here we take the free virtual machine VirtualBox as an example; after starting VirtualBox, click the "New" button in the upper left corner of the window; then give the virtual a name, which you can choose at will. The system type remains unchanged and the version is selected as Windows 7 in the drop-down list.
Apple Computer Click Continue, and you will have to wait for a long time. Do not touch the computer at this time, and wait until it prompts that the copy is completed. The creation of the WIN7 installation disk is completed.
Click to start. Since there is no system installed in the new virtual machine, the screen in the virtual machine prompts the user that there is no available boot system. At this time, a window will pop up allowing the user to load the installation system CD image. Step 2: Prepare the virtual machine system image and download the WIN7 image file online.
Click to decompress the virtual machine installation package. Double-click the installation package to install. The activation page will appear shortly. Open the crack folder and run the registration machine to generate the registration code. Enter manually and click Buy. It shows that the registration is successful. Now reopen the software and you can use it.
How to handle the virtual machine that cannot be opened in mac Apple computer
Look at the network adapter in the lower right corner of the virtual machine to see if the icon has a green light flashing. If the network adapter is gray, it proves that the virtual machine The network is not turned on, but is disabled. Right-click the adapter, open [Settings], and check [Connected] and [Connect at startup].
Secondly set the virtual machine installation settings so that VMware supports macOS virtual machines. Finally, allocate memory space and configure the vmx file to solve the problem of being stuck on the white Apple interface.
The first step is to open VMWare, find "Window" - "Virtual Machine Resource Library" in the top menu bar and find the virtual machine to solve the problem in the list. I directly use Bootcamp to make the virtual machine. So select Bootcamp and right click.
Hello, method: A black screen appears on Mac when the virtual machine is installed and opened. In most cases, it is caused by mismatched configuration or software compatibility. First of all, we need to ensure that the virtual machine installation package is adapted to the current system of the Mac. We also need to choose a 32-bit installation package or a 64-bit installation package according to the number of bits of the computer system.
There are too many reasons for this. For example, your mac system has been upgraded, the version of vmware is no longer supported, and win7 has crashed. It is recommended to try reinstalling the latest version of vmware. If it doesn't work, completely uninstall and reinstall. .
save. (Copy, including quotation marks) and save, the problem will be solved. ) and finally turn on the virtual machine. Start the installation and select the language. There is no way to continue at this point. You need to partition the virtual disk. Then click Disk Utility in the upper left corner to exit Disk Utility. Select the disk you just erased and continue the installation until the reboot is complete.
How to download a windows virtual machine for Apple Mac?
You can run Windows, Linux and macOS without restarting. Simultaneously authenticate web applications in any browser on any operating system.
This macbook virtual machine installation tutorial is divided into two steps: first, we need to download a macbook virtual machine software; second, we need to create a virtual system, you can do this according to your own The preference comes. Next, we will give you a detailed demonstration operation.
Download the virtual machine software Parallels Desktop. Download the Windows image file. Install Win system. As for whether to install Win7 or Win10, it depends on your actual needs. But here’s something new to know.
The first step is to download the virtual machine software Parallels Desktop. The latest version of PD10 is used here. After installation, you need to download the official version of win10 system. It is recommended to download the 64-bit iso image.
How to install a virtual machine on mac
First we install VirtualBox on the computer and choose to create a new virtual machine.
How to install a virtual machine on macbookairM1: First download a ParallelsDesktop virtual machine. Then install it, and write down the Activecode when registering, which will be used to activate Parallels. Then you need to download the Windows 10 arm64 version, which takes up about 6GB of memory, but runs very smoothly.
First you need to download the Windows image file, and then install it through the mac virtual machine.
First you need to install the virtual machine software. If your computer is a Windows system, Vmware is recommended, and Apple Mac system recommends Parallels Desktop.
Conclusion: The above is a summary of relevant answers compiled by this site for you on whether Apple Mac has a virtual machine. I hope it will be helpful to you! If your problem is solved, please share it with more friends who care about this problem~
The above is the detailed content of Does Apple Mac have a virtual machine?. For more information, please follow other related articles on the PHP Chinese website!

Hot AI Tools

Undresser.AI Undress
AI-powered app for creating realistic nude photos

AI Clothes Remover
Online AI tool for removing clothes from photos.

Undress AI Tool
Undress images for free

Clothoff.io
AI clothes remover

Video Face Swap
Swap faces in any video effortlessly with our completely free AI face swap tool!

Hot Article
Hot Tools

Notepad++7.3.1
Easy-to-use and free code editor

SublimeText3 Chinese version
Chinese version, very easy to use

Zend Studio 13.0.1
Powerful PHP integrated development environment

Dreamweaver CS6
Visual web development tools

SublimeText3 Mac version
God-level code editing software (SublimeText3)
Hot Topics


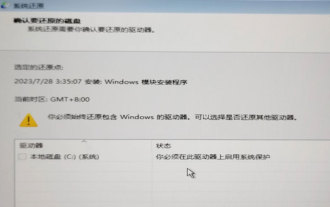 System Restore prompts that you must enable system protection on this drive
Jun 19, 2024 pm 12:23 PM
System Restore prompts that you must enable system protection on this drive
Jun 19, 2024 pm 12:23 PM
The computer has a restore point, and when the system is restored, it prompts "You must enable system protection on this drive." This usually means that the system protection function is not turned on. System protection is a feature provided by the Windows operating system that can create system restore points to back up system files and settings. That way, if something goes wrong, you can revert to a previous state. When the system fails and you cannot enter the desktop to start it, you can only try the following method: Troubleshooting-Advanced Options-Command Prompt Command 1 netstartvssrstrui.exe/offline:C:\windows=active Command 2 cd%windir%\system32 \configrenSYSTEMsy
 What should I do if win10 does not switch users? Win10 login interface does not have the option to switch users. Solution
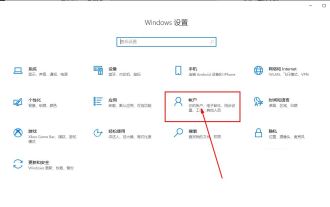
Jun 25, 2024 pm 05:21 PM
What should I do if win10 does not switch users? Win10 login interface does not have the option to switch users. Solution
Jun 25, 2024 pm 05:21 PM
A problem that Windows 10 users may encounter is that they cannot find the switch user option on the login interface. So what should I do if there is no switch user option on the win10 login interface? Let this site give users a detailed explanation of the problem of not switching user options in the win10 login interface. Detailed solution to the problem of switching user options on the Win10 login interface: Check user account settings: First, make sure you have multiple user accounts on your computer and that these accounts are enabled. You can check and enable the account by following these steps: a. Press Win+I keys to open Settings and select "Accounts". b. Select "Family & Others" or &ld in the left navigation bar
 How to permanently turn off real-time protection in win10? How to disable real-time protection function in win10 computer 0
Jun 05, 2024 pm 09:46 PM
How to permanently turn off real-time protection in win10? How to disable real-time protection function in win10 computer 0
Jun 05, 2024 pm 09:46 PM
Although the comprehensive anti-virus software that comes with Windows 10 system can continuously protect the security of your personal computer, sometimes it may also affect certain downloaded files. For some users, it may be more appropriate to temporarily turn off the real-time protection function. But many users don’t know how to permanently turn off the real-time protection feature on win10 system. 1. First, press the "Win+R" keys to open the run window, enter the "gpedit.msc" command to open the local Group Policy Editor interface; 2. Then, in the opened interface, click "Computer Configuration/Administrative Templates/ Windows Components/MicrosoftDef
 How to restore the default wallpaper in win10? One trick to quickly restore the default wallpaper in Windows 10 system
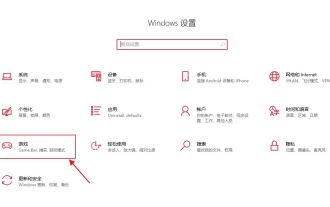
Jun 02, 2024 pm 02:07 PM
How to restore the default wallpaper in win10? One trick to quickly restore the default wallpaper in Windows 10 system
Jun 02, 2024 pm 02:07 PM
In Windows 10 system, if you want to return to the system default wallpaper, you can follow the following steps: 1. Right-click a blank space on the desktop and select Personalize in the pop-up menu. 2. This will open the Personalization window in Settings. In the left menu, click Background. 3. Under the "Background" settings, find and click the drop-down menu next to "Choosepicture", and then select Windows Default (Windows Default) or directly select a picture that looks like the default wallpaper in the picture preview below ( if there are multiple options). 4. If your system has multiple versions
 Windows cannot start the Windows Audio service Error 0x80070005
Jun 19, 2024 pm 01:08 PM
Windows cannot start the Windows Audio service Error 0x80070005
Jun 19, 2024 pm 01:08 PM
The guy's computer appears: Windows cannot start the WindowsAudio service (located on the local computer). Error 0x8007005: Access denied. This situation is usually caused by user permissions. You can try the following methods to fix it. Method 1: Modify the registry to add permissions through batch processing, create a new text document on the desktop, save it as .bat, and right-click the administrator to go far. Echo==========================EchoProcessingRegistryPermission.Pleasewait...Echo================== ========subinacl/subkey
 What should I do if Win10 takes a screenshot and crashes? How to solve the problem of Win10 flashing and then disappearing after taking a screenshot?
Jun 02, 2024 pm 12:48 PM
What should I do if Win10 takes a screenshot and crashes? How to solve the problem of Win10 flashing and then disappearing after taking a screenshot?
Jun 02, 2024 pm 12:48 PM
There are many reasons why the screenshot disappears after taking a screenshot in Win10. Users can first check the screenshot save location or adjust the screenshot settings, or check the animation effect to check it. If it really doesn't work, you can also choose to update the driver and operating system to perform the operation. Let this website carefully introduce to users the analysis of the problem of Win10 disappearing after taking a screenshot. Analysis of the problem after win10 takes a picture and it flashes and disappears 1. Check where the screenshot is saved: When you use the Win+PrtSc (PrintScreen) key combination to take a screenshot, the screenshot is usually saved in the C:\Users\YourUsername\Pictures\Screenshots folder. please
 How to turn off popular searches in Windows 10 system? List of methods to close popular searches in Windows 10 system
Jun 03, 2024 pm 08:46 PM
How to turn off popular searches in Windows 10 system? List of methods to close popular searches in Windows 10 system
Jun 03, 2024 pm 08:46 PM
In win10 system, hot search is one of the more practical methods, but sometimes it can cause certain troubles. So how to turn off hot search? Let’s take a look below! Step 1: Open the Settings app First, click on the Windows icon in the lower left corner of the screen and select the Settings app. Step 2: Enter "Personalization" settings In the "Settings" app, click the "Personalization" option. Step 3: Select the “Search” option In the “Personalization” settings, select the “Search” option. Step 4: Turn off popular searches. In the "Search" option, find the option "Show popular searches in search" and turn it off. Professional Tool Recommendation 1. Xiaozhi Soso Xiaozhi Soso—Quick Search and One-Click Positioning—Professional Computer Search Tool
 What to do if the Win10 Task Manager crashes? How to fix the Win10 Task Manager crash?
Jun 25, 2024 pm 04:31 PM
What to do if the Win10 Task Manager crashes? How to fix the Win10 Task Manager crash?
Jun 25, 2024 pm 04:31 PM
Hello everyone, have you ever encountered the situation where the Windows 10 Task Manager keeps crashing? This function helps us a lot, allowing us to quickly see all running tasks, which is very convenient to use, right? However, some friends said that they encountered this problem and didn’t know how to solve it, so let me share with you the specific solution! Solution to Win10 Task Manager crash 1. First, press and hold the "Win" + "R" keys on the keyboard to open Run, enter "regedit" and press the Enter key. 2. Expand the folders and find "HKEY_CURRENT_USERSoftwareMicros
