

How to add a hard disk and adjust the LVM size on CentOS7?

LVM is the abbreviation of LogicalVolume Manager (Logical Volume Management), which is a mechanism for managing disk partitions in the Linux environment. LVM virtualizes one or more disk partitions (PV) into a volume group (VG), which is equivalent to a large hard disk, on which we can divide some logical volumes (LV). When the space in the volume group is insufficient, new disk partitions can be added. We can also allocate some space from the remaining space of the volume group for use by logical volumes that do not have enough space.
The LVM model is as shown below:
No need to restart, refresh new hard disk files
First cat command cat /proc/scsi/scsi Tour Id:??What is the largest. Then echo "scsiadd-single-device 0 0 ? 1 0" > /proc/scsi/scsi
cat /proc/scsi/scsi >>
Attached devices:
Host: scsi0 Channel: 00 Id: 00 Lun: 00
Vendor: VMware, Model: VMware Virtual S Rev: 1.0
Type: Direct-Access ANSI SCSI revision: 02
Host: scsi2 Channel: 00 Id:00 Lun: 00
Vendor: NECVMWar Model: VMware IDECDR10 Rev: 1.00
Type: CD-ROM ANSI SCSI revision: 05
Host: scsi0 Channel: 00 Id:01 Lun: 00
Vendor: VMware, Model: VMware Virtual S Rev: 1.0
Type: Direct-Access ANSI SCSI revision: 02
2. After the addition is completed
1. Add a hard drive (8GB) to the system
Use fdisk -l to see that the new disk is /dev/vdb:
1shell# fdisk -l
2. Partition the new disk
Use the fdisk command to partition the new disk. A primary partition /dev/vdb1 is created here, with a size of 8GB. Finally, use the partprobe (or partx -u) command to re-read the partition table:
1shell# fdisk /dev/vdb
2shell# partprobe
During the partitioning process, pay attention to setting the format to 8e, which is the partition format of LVM.
3. Create a physical volume (PV)
Use the pvcreate command to create a physical volume, and pvdisplay to view the physical volume information:
1shell# pvcreate /dev/vdb1
2shell# pvdisplay
4. Add PV to the volume group (VG)
VG Create #vgcreate VG name device name
Use vgdisplay to view volume group information. The following figure shows that the volume group name is centos and the free size is 0:
1shell# vgdisplay
Use the vgextend command to add /dev/vdb1 to centos:
1shell# vgextend centos /dev/vdb1
Let’s re-check the volume group information and find that the free space is 8GB, indicating that /dev/vdb1 has been successfully added:
5. Create a logical volume (LV)
Use the lvcreate command to divide a new logical volume from the volume group. Here, a logical volume partition named newlv with a size of 4GB is created; use lvdisplay to view the logical volume information:
1shell# lvcreate -L 4G -n newlv centos (specify to add 4G capacity)
2 lvcreate -l 100%free -n newlv centos (add maximum available capacity)
shell# lvdisplay
Let’s check the volume group information again. The volume group has 4GB of space left:
6. Format the logical volume and mount it
After formatting, the new logical volume can be mounted to the system to store data. Use mkfs.xfs to format the xfs file system of CentOS7:
1shell# mkfs.xfs /dev/centos/newlv
Mount to the /mnt directory (you can mount to the directory you need). After mounting, you will see that the capacity is 4GB:
1shell# mount -t xfs /dev/centos/newlv /mnt/
2shell# df -Th
Set up automatic mounting at boot, edit the /etc/fstab file and add the last line:
1/dev/centos/newlv/mntxfs defaults1 2
7. Logical volume expansion
Use the lvextend command to expand the logical volume. I allocated all the remaining space to newlv and increased it to 8GB, as shown below:
1shell# lvextend -l 100%FREE /dev/centos/newlv
Use the xfs_growfs command to adjust the xfs format file system size online (CentOS6 uses resize2fs):
1shell# xfs_growfs /dev/centos/newlv
Finally we see that the logical volume partition has been dynamically expanded to 8GB:
The above is the detailed content of How to add a hard disk and adjust the LVM size on CentOS7?. For more information, please follow other related articles on the PHP Chinese website!

Hot AI Tools

Undresser.AI Undress
AI-powered app for creating realistic nude photos

AI Clothes Remover
Online AI tool for removing clothes from photos.

Undress AI Tool
Undress images for free

Clothoff.io
AI clothes remover

Video Face Swap
Swap faces in any video effortlessly with our completely free AI face swap tool!

Hot Article
Hot Tools

Notepad++7.3.1
Easy-to-use and free code editor

SublimeText3 Chinese version
Chinese version, very easy to use

Zend Studio 13.0.1
Powerful PHP integrated development environment

Dreamweaver CS6
Visual web development tools

SublimeText3 Mac version
God-level code editing software (SublimeText3)
Hot Topics


 How many digits is the hard drive serial number? How to query the Win11 hard drive serial number
Feb 29, 2024 pm 09:04 PM
How many digits is the hard drive serial number? How to query the Win11 hard drive serial number
Feb 29, 2024 pm 09:04 PM
The hard disk serial number can be checked through the hard disk packaging box or the hard disk casing, or in the Win11 system. However, some users do not know the method. This article is a method for querying the Win11 hard disk serial number brought to you by this site. What is the number of digits in a hard drive serial number? A computer hard drive serial number is a unique identifier that identifies a specific hard drive. It is provided by the hard drive manufacturer and cannot be modified by the user. The hard disk serial number usually contains 10 to 20 digits and letters, and of course generally consists of 12 digits. It can be used to record hard disk parameters such as hard disk capacity, loading mode, and read and write speeds. In computer systems, hard drive serial numbers are usually used to identify and distinguish different hard drives, and in some cases are used for password protection, software authorization, etc. pass
 VBOX_E_OBJECT_NOT_FOUND(0x80bb0001)VirtualBox error
Mar 24, 2024 am 09:51 AM
VBOX_E_OBJECT_NOT_FOUND(0x80bb0001)VirtualBox error
Mar 24, 2024 am 09:51 AM
When trying to open a disk image in VirtualBox, you may encounter an error indicating that the hard drive cannot be registered. This usually happens when the VM disk image file you are trying to open has the same UUID as another virtual disk image file. In this case, VirtualBox displays error code VBOX_E_OBJECT_NOT_FOUND(0x80bb0001). If you encounter this error, don’t worry, there are some solutions you can try. First, you can try using VirtualBox's command line tools to change the UUID of the disk image file, which will avoid conflicts. You can run the command `VBoxManageinternal
 How to force hard disk format under Linux system
Feb 25, 2024 am 08:39 AM
How to force hard disk format under Linux system
Feb 25, 2024 am 08:39 AM
How to force format a hard drive in Linux When using a Linux system, sometimes we need to format the hard drive in order to repartition or clear the data in the hard drive. This article will introduce how to force format a hard disk in a Linux system and provide specific code examples. 1. Check the hard disk device First, we need to check the hard disk device information to determine the hard disk device to be formatted. You can view it with the following command: #fdisk-l This command will list all hard disk devices in the system
 CentOS7 various version image download addresses and version descriptions (including Everything version)
Feb 29, 2024 am 09:20 AM
CentOS7 various version image download addresses and version descriptions (including Everything version)
Feb 29, 2024 am 09:20 AM
When loading CentOS-7.0-1406, there are many optional versions. For ordinary users, they don’t know which one to choose. Here is a brief introduction: (1) CentOS-xxxx-LiveCD.ios and CentOS-xxxx- What is the difference between bin-DVD.iso? The former only has 700M, and the latter has 3.8G. The difference is not only in size, but the more essential difference is that CentOS-xxxx-LiveCD.ios can only be loaded into the memory and run, and cannot be installed. Only CentOS-xxx-bin-DVD1.iso can be installed on the hard disk. (2) CentOS-xxx-bin-DVD1.iso, Ce
 Steps to enter CentOS 7 emergency repair mode
Jan 13, 2024 am 09:36 AM
Steps to enter CentOS 7 emergency repair mode
Jan 13, 2024 am 09:36 AM
Open the centos7 page and appear: welcome to emergency mode! afterloggingin, type "journalctl -xb" to viewsystemlogs, "systemctlreboot" toreboot, "systemctldefault" to tryagaintobootintodefaultmode. giverootpasswordformaintenance(??Control-D???): Solution: execute r
 Tutorial on adding a new hard drive in win11
Jan 05, 2024 am 09:39 AM
Tutorial on adding a new hard drive in win11
Jan 05, 2024 am 09:39 AM
When buying a computer, we may not necessarily choose a large hard drive. At this time, if we want to add a new hard drive to win11, we can first install the new hard drive we purchased, and then add partitions to the computer. Tutorial on adding a new hard drive in win11: 1. First, we disassemble the host and find the slot of the hard drive. 2. After finding it, we first connect the "data cable", which usually has a fool-proof design. If it cannot be inserted, just reverse the direction. 3. Then insert the new hard drive into the hard drive slot. 4. After inserting, connect the other end of the data cable to the computer's motherboard. 5. After the installation is completed, you can put it back into the host and turn it on. 6. After booting, we right-click "This Computer" and open "Computer Management" 7. After opening, click "Disk Management" in the lower left corner 8. Then on the right you can
 How to cancel Linux hard drive formatting
Feb 19, 2024 pm 12:18 PM
How to cancel Linux hard drive formatting
Feb 19, 2024 pm 12:18 PM
How to cancel the formatting of a Linux hard disk and code examples Introduction: When using the Linux operating system, sometimes we need to cancel the formatting operation of the hard disk. This article will tell you how to unformat a Linux hard drive and provide specific code examples. 1. What is hard disk formatting? Hard disk formatting refers to the operation of organizing and managing the data on the hard disk in a specific format. In Linux systems, we usually use file systems to format hard drives. Common file systems include ext4, NTFS, etc. two,
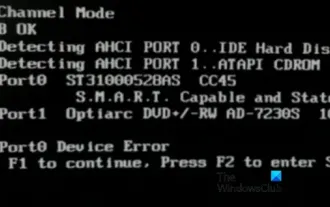 Fix AHCI Port 0 Device Error on Windows Computer
Feb 19, 2024 pm 12:45 PM
Fix AHCI Port 0 Device Error on Windows Computer
Feb 19, 2024 pm 12:45 PM
If you encounter an AHCI port 0 device error every time you start your computer, you need to follow the methods provided in this article to solve the problem. What is AHCI port 0 device error? AHCI device errors are reported by the BIOS. SMART has indicated that the hard drive on port 0 is faulty and may not be accessible. The hard drive may have problems at any time. If it is a desktop computer, it is recommended to try changing the hard drive connection port. If the problem persists, it may be a problem with the hard drive itself. You can run a disk check tool, disable the failed hard drive and check the ports to resolve this issue. Fixing AHCI Port 0 Device Errors on Windows Computers Typically, AHCI Port0 device errors do not originate from operating system issues, but rather from the hard drive failing on port 0.
