

PHP使用无限生命期Session的方法_PHP

在PHP4.0中加入了对Session的支持,方便了我们很多程序,比如购物车等等!
在很多论坛中,Session也用于处理用户的登陆,记录下用户名和密码,使得用户不必每次都输入自己的用户名和密码!但是一般的Session的生命期有限,如果用户关闭了浏览器,就不能保存Session的变量了!那么怎么样可以实现Session的永久生命期呢?
大家知道,Session储存在服务器端,根据客户端提供的SessionID来得到这个用户的文件,然后读取文件,取得变量的值,SessionID可以使用客户端的Cookie或者Http1.1协议的Query_String(就是访问的URL的“?”后面的部分)来传送给服务器,然后服务器读取Session的目录……
要实现Session的永久生命期,首先需要了解一下php.ini关于Session的相关设置(打开php.ini文件,在“[Session]”部分):
1、session.use_cookies:默认的值是“1”,代表SessionID使用Cookie来传递,反之就是使用Query_String来传递;
2、session.name:这个就是SessionID储存的变量名称,可能是Cookie,也可能是Query_String来传递,默认值是“PHPSESSID”;
3、session.cookie_lifetime:这个代表SessionID在客户端Cookie储存的时间,默认是0,代表浏览器一关闭SessionID就作废……就是因为这个所以Session不能永久使用!
4、session.gc_maxlifetime:这个是Session数据在服务器端储存的时间,如果超过这个时间,那么Session数据就自动删除!
还有很多的设置,不过和本文相关的就是这些了,下面开始讲使用永久Session的原理和步骤。
前面说过,服务器通过SessionID来读取Session的数据,但是一般浏览器传送的SessionID在浏览器关闭后就没有了,那么我们只需要人为的设置SessionID并且保存下来,不就可以……
如果你拥有服务器的操作权限,那么设置这个非常非常的简单,只是需要进行如下的步骤:
1、把“session.use_cookies”设置为1,打开Cookie储存SessionID,不过默认就是1,一般不用修改;
2、把“session.cookie_lifetime”改为正无穷(当然没有正无穷的参数,不过999999999和正无穷也没有什么区别);
3、把“session.gc_maxlifetime”设置为和“session.cookie_lifetime”一样的时间;
设置完毕后,打开编辑器,输入如下的代码:
------------------------------------------------------------------------------------
session_start();
session_register("count");
$count ;
echo $count;
?>
------------------------------------------------------------------------------------
然后保存为“session_check.php”,用浏览器打开“session_check.php”,看看显示的是不是“1”,再关闭浏览器,然后再打开浏览器访问“session_check.php”,如果显示“2”,那么恭喜了,你已经成功;如果失败的话,请检查你前面的设置。
但是如果你没有服务器的操作权限,那就比较麻烦了,你需要通过PHP程序改写SessionID来实现永久的Session数据保存。查查php.net的函数手册,可以见到有“session_id”这个函数:如果没有设置参数,那么将返回当前的SessionID,如果设置了参数,就会将当前的SessionID设置为给出的值……
只要利用永久性的Cookie加上“session_id”函数,就可以实现永久Session数据保存了!
但是为了方便,我们需要知道服务器设置的“session.name”,但是一般用户都没有权限查看服务器的php.ini设置,不过PHP提供了一个非常好的函数“phpinfo”,利用这个可以查看几乎所有的PHP信息!
------------------------------------------------------------------------------------
------------------------------------------------------------------------------------
打开编辑器,输入上面的代码,然后在浏览器中运行这个程序,会见到PHP的相关信息(如图1所示)。其中有一项“session.name”的参数(图中已经标出),这个就是我们需要的服务器“session.name”,一般是“PHPSESSID”。
记下了SessionID的名称后,我们就可以实现永久的Session数据储存了!
打开编辑器,输入下面的代码:
------------------------------------------------------------------------------------
session_start(); // 启动Session
session_register("count"); // 注册Session变量Count
if(isset($PHPSESSID)) {
session_id($PHPSESSID);
} // 如果设置了$PHPSESSID,就将SessionID赋值为$PHPSESSID,否则生成SessionID
$PHPSESSID = session_id(); // 取得当前的SessionID
$count ; // 变量count加1
setcookie("PHPSESSID", $PHPSESSID, time() 3156000); // 储存SessionID到Cookie中
echo $count; // 显示Session变量count的值
?>
------------------------------------------------------------------------------------
保存之后,利用和刚才拥有服务器权限时候的检测一样的方法,检测是否成功的保存了SessionID。
后记:
其实真正的永久储存是不可能的,因为Cookie的保存时间有限,而服务器的空间也有限……但是对于一些需要保存时间比较长的站点,以上方法就已经足够了!关于Session的其他应用,可以参见zphp.com的文章。

Hot AI Tools

Undresser.AI Undress
AI-powered app for creating realistic nude photos

AI Clothes Remover
Online AI tool for removing clothes from photos.

Undress AI Tool
Undress images for free

Clothoff.io
AI clothes remover

Video Face Swap
Swap faces in any video effortlessly with our completely free AI face swap tool!

Hot Article
Hot Tools

Notepad++7.3.1
Easy-to-use and free code editor

SublimeText3 Chinese version
Chinese version, very easy to use

Zend Studio 13.0.1
Powerful PHP integrated development environment

Dreamweaver CS6
Visual web development tools

SublimeText3 Mac version
God-level code editing software (SublimeText3)
Hot Topics


 How to write a novel in the Tomato Free Novel app. Share the tutorial on how to write a novel in Tomato Novel.
Mar 28, 2024 pm 12:50 PM
How to write a novel in the Tomato Free Novel app. Share the tutorial on how to write a novel in Tomato Novel.
Mar 28, 2024 pm 12:50 PM
Tomato Novel is a very popular novel reading software. We often have new novels and comics to read in Tomato Novel. Every novel and comic is very interesting. Many friends also want to write novels. Earn pocket money and edit the content of the novel you want to write into text. So how do we write the novel in it? My friends don’t know, so let’s go to this site together. Let’s take some time to look at an introduction to how to write a novel. Share the Tomato novel tutorial on how to write a novel. 1. First open the Tomato free novel app on your mobile phone and click on Personal Center - Writer Center. 2. Jump to the Tomato Writer Assistant page - click on Create a new book at the end of the novel.
 How to enter bios on Colorful motherboard? Teach you two methods
Mar 13, 2024 pm 06:01 PM
How to enter bios on Colorful motherboard? Teach you two methods
Mar 13, 2024 pm 06:01 PM
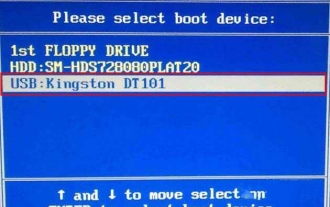
Colorful motherboards enjoy high popularity and market share in the Chinese domestic market, but some users of Colorful motherboards still don’t know how to enter the bios for settings? In response to this situation, the editor has specially brought you two methods to enter the colorful motherboard bios. Come and try it! Method 1: Use the U disk startup shortcut key to directly enter the U disk installation system. The shortcut key for the Colorful motherboard to start the U disk with one click is ESC or F11. First, use Black Shark Installation Master to create a Black Shark U disk boot disk, and then turn on the computer. When you see the startup screen, continuously press the ESC or F11 key on the keyboard to enter a window for sequential selection of startup items. Move the cursor to the place where "USB" is displayed, and then
 How to recover deleted contacts on WeChat (simple tutorial tells you how to recover deleted contacts)
May 01, 2024 pm 12:01 PM
How to recover deleted contacts on WeChat (simple tutorial tells you how to recover deleted contacts)
May 01, 2024 pm 12:01 PM
Unfortunately, people often delete certain contacts accidentally for some reasons. WeChat is a widely used social software. To help users solve this problem, this article will introduce how to retrieve deleted contacts in a simple way. 1. Understand the WeChat contact deletion mechanism. This provides us with the possibility to retrieve deleted contacts. The contact deletion mechanism in WeChat removes them from the address book, but does not delete them completely. 2. Use WeChat’s built-in “Contact Book Recovery” function. WeChat provides “Contact Book Recovery” to save time and energy. Users can quickly retrieve previously deleted contacts through this function. 3. Enter the WeChat settings page and click the lower right corner, open the WeChat application "Me" and click the settings icon in the upper right corner to enter the settings page.
 What software is crystaldiskmark? -How to use crystaldiskmark?
Mar 18, 2024 pm 02:58 PM
What software is crystaldiskmark? -How to use crystaldiskmark?
Mar 18, 2024 pm 02:58 PM
CrystalDiskMark is a small HDD benchmark tool for hard drives that quickly measures sequential and random read/write speeds. Next, let the editor introduce CrystalDiskMark to you and how to use crystaldiskmark~ 1. Introduction to CrystalDiskMark CrystalDiskMark is a widely used disk performance testing tool used to evaluate the read and write speed and performance of mechanical hard drives and solid-state drives (SSD). Random I/O performance. It is a free Windows application and provides a user-friendly interface and various test modes to evaluate different aspects of hard drive performance and is widely used in hardware reviews
 How to download foobar2000? -How to use foobar2000
Mar 18, 2024 am 10:58 AM
How to download foobar2000? -How to use foobar2000
Mar 18, 2024 am 10:58 AM
foobar2000 is a software that can listen to music resources at any time. It brings you all kinds of music with lossless sound quality. The enhanced version of the music player allows you to get a more comprehensive and comfortable music experience. Its design concept is to play the advanced audio on the computer The device is transplanted to mobile phones to provide a more convenient and efficient music playback experience. The interface design is simple, clear and easy to use. It adopts a minimalist design style without too many decorations and cumbersome operations to get started quickly. It also supports a variety of skins and Theme, personalize settings according to your own preferences, and create an exclusive music player that supports the playback of multiple audio formats. It also supports the audio gain function to adjust the volume according to your own hearing conditions to avoid hearing damage caused by excessive volume. Next, let me help you
 How to use Baidu Netdisk app
Mar 27, 2024 pm 06:46 PM
How to use Baidu Netdisk app
Mar 27, 2024 pm 06:46 PM
Cloud storage has become an indispensable part of our daily life and work nowadays. As one of the leading cloud storage services in China, Baidu Netdisk has won the favor of a large number of users with its powerful storage functions, efficient transmission speed and convenient operation experience. And whether you want to back up important files, share information, watch videos online, or listen to music, Baidu Cloud Disk can meet your needs. However, many users may not understand the specific use method of Baidu Netdisk app, so this tutorial will introduce in detail how to use Baidu Netdisk app. Users who are still confused can follow this article to learn more. ! How to use Baidu Cloud Network Disk: 1. Installation First, when downloading and installing Baidu Cloud software, please select the custom installation option.
 How to use NetEase Mailbox Master
Mar 27, 2024 pm 05:32 PM
How to use NetEase Mailbox Master
Mar 27, 2024 pm 05:32 PM
NetEase Mailbox, as an email address widely used by Chinese netizens, has always won the trust of users with its stable and efficient services. NetEase Mailbox Master is an email software specially created for mobile phone users. It greatly simplifies the process of sending and receiving emails and makes our email processing more convenient. So how to use NetEase Mailbox Master, and what specific functions it has. Below, the editor of this site will give you a detailed introduction, hoping to help you! First, you can search and download the NetEase Mailbox Master app in the mobile app store. Search for "NetEase Mailbox Master" in App Store or Baidu Mobile Assistant, and then follow the prompts to install it. After the download and installation is completed, we open the NetEase email account and log in. The login interface is as shown below
 How to set font size on mobile phone (easily adjust font size on mobile phone)
May 07, 2024 pm 03:34 PM
How to set font size on mobile phone (easily adjust font size on mobile phone)
May 07, 2024 pm 03:34 PM
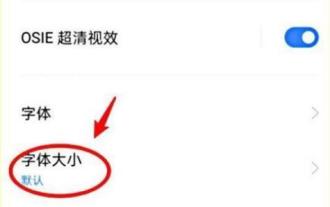
Setting font size has become an important personalization requirement as mobile phones become an important tool in people's daily lives. In order to meet the needs of different users, this article will introduce how to improve the mobile phone use experience and adjust the font size of the mobile phone through simple operations. Why do you need to adjust the font size of your mobile phone - Adjusting the font size can make the text clearer and easier to read - Suitable for the reading needs of users of different ages - Convenient for users with poor vision to use the font size setting function of the mobile phone system - How to enter the system settings interface - In Find and enter the "Display" option in the settings interface - find the "Font Size" option and adjust it. Adjust the font size with a third-party application - download and install an application that supports font size adjustment - open the application and enter the relevant settings interface - according to the individual
